When you configure an HTTPS listener, you can use a self-signed CA certificate. You can also use the CA certificate to sign a client certificate.
Generate a CA certificate by using OpenSSL
Run the following commands to create a ca folder in the
/home
directory and create four subfolders under the ca folder.
sudo mkdir ca
cd ca
sudo mkdir newcerts private conf server
The newcerts folder is used to store the digital certificate signed by the CA certificate.
The private folder is used to store the private key of the CA certificate.
The conf folder is used to store the configuration files used for simplifying parameters.
The server folder is used to store the server certificate.
Create an openssl.conf file that contains the following information in the
conf
directory:[ ca ] default_ca = foo [ foo ] dir = /home/ca database = /home/ca/index.txt new_certs_dir = /home/ca/newcerts certificate = /home/ca/private/ca.crt serial = /home/ca/serial private_key = /home/ca/private/ca.key RANDFILE = /home/ca/private/.rand default_days = 365 default_crl_days= 30 default_md = md5 unique_subject = no policy = policy_any [ policy_any ] countryName = match stateOrProvinceName = match organizationName = match organizationalUnitName = match localityName = optional commonName = supplied emailAddress = optional
Run the following commands to generate a private key.
cd /home/ca sudo openssl genrsa -out private/ca.key
The following figure shows the command output.
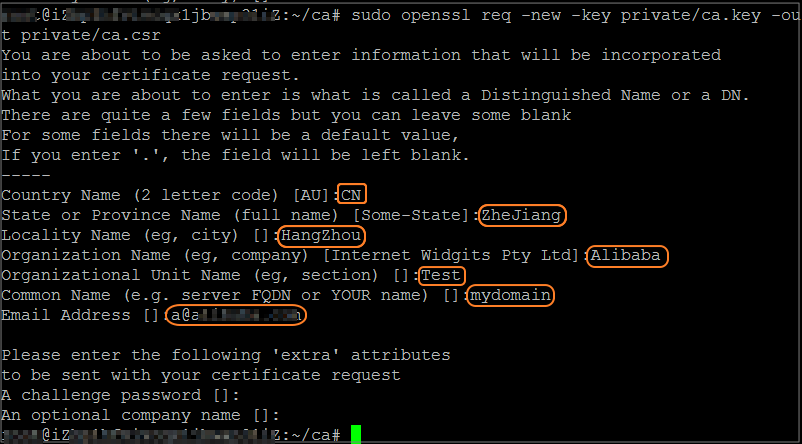
Run the following command, enter the required information as prompted, and then press the Enter key to generate a csr file.
sudo openssl req -new -key private/ca.key -out private/ca.csr
NoteCommon Name specifies the domain name of the Classic Load Balancer (CLB) instance.
Run the following command to generate a crt file:
sudo openssl x509 -req -days 365 -in private/ca.csr -signkey private/ca.key -out private/ca.crt
Run the following command to set the initial sequence number of the CA key. The initial sequence number can be any four characters. In this example, the initial sequence number of the CA key is FACE.
sudo echo FACE > serial
Run the following command to create a CA key library.
sudo touch index.txt
Run the following command to create a certificate revocation list for removing the client certificate.
sudo openssl ca -gencrl -out /home/ca/private/ca.crl -crldays 7 -config "/home/ca/conf/openssl.conf"
Output:
Using configuration from /home/ca/conf/openssl.conf
Sign the client certificate
Run the following command to create the
users
directory in theca
directory to store client keys.sudo mkdir users
Run the following command to create a client key.
sudo openssl genrsa -des3 -out /home/ca/users/client.key 1024
NoteWhen you create the key, enter a passphrase to prevent unauthorized access in case of key leaks. Enter the same passphrase twice.
Run the following command to create a csr file for the client key.
sudo openssl req -new -key /home/ca/users/client.key -out /home/ca/users/client.csr
Enter the passphrase that you entered in Step 2 and other required information as prompted.
NoteA challenge password is a client certificate password and is different from a client key.
Run the following command to use the CA key to sign the client key.
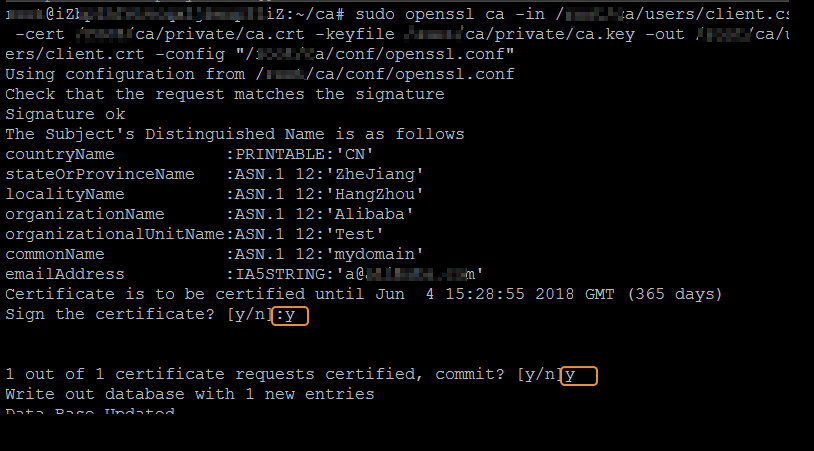
sudo openssl ca -in /home/ca/users/client.csr -cert /home/ca/private/ca.crt -keyfile /home/ca/private/ca.key -out /home/ca/users/client.crt -config "/home/ca/conf/openssl.conf"
Enter y when you are prompted to confirm the following two operations.
Run the following command to convert the certificate to a PKCS12 file.
sudo openssl pkcs12 -export -clcerts -in /home/ca/users/client.crt -inkey /home/ca/users/client.key -out /home/ca/users/client.p12
Enter the passphrase of the client key as prompted and press the Enter key. Then, enter the password that is used to export the client certificate. This password is used to protect the client certificate and is required when you install the client certificate.
Run the following commands to view the generated client certificate.
cd users ls