Configuration errors in a cloud environment can cause security vulnerabilities, performance bottlenecks, or data breaches. Cloud Security Posture Management (CSPM) uses automated check policies to regularly scan cloud service configurations to identify and fix potential configuration risks.
Configure check items
Security Center provides built-in, predefined check items for cloud service configuration risks. Before a scan, you can customize these check items to meet your business needs. This improves the accuracy and relevance of the scan results.
Custom check items: Create and manage new custom check items based on internal security standards or specific risk scenarios.
Predefined check items: For some predefined check items that support customization, such as checks for OSS Bucket hotlink protection, idle users, or password expiration, you can modify their rule parameters to better align with your business security baselines.
Custom check items
Scope
Supported editions: You must subscribe to a paid edition of CSPM. For more information, see Subscribe to a paid edition of Cloud Security Posture Management.
Supported service providers: Alibaba Cloud, Tencent Cloud, and AWS.
Detection scenarios: Compliance Risk, AISPM, and Security Risk. For more information, see Check rules.
Workflow to configure and use custom check items
The following flowchart shows the process:

Configure and publish custom check items
Go to the creation page
Go to the Security Center console - Risk Governance - CSPM page. In the upper-left corner, select the region where the assets that you want to protect are located: Chinese Mainland or Outside Chinese Mainland.
On the Cloud Service Configuration Risk tab, click Create Custom Check Item.
Set basic information
On the Basic Information Settings tab, set the following parameters and click Next.
Check Item Category Settings: Categorize the check item for easier classification and filtering in reports.
Click the Add button to assign the check item to multiple categories.
The following categorization system is supported. You can extend it with custom entries:
Use case: Defines the top-level category of the check item. You can select Compliance Risk, AISPM, or Security Risk.
Standard/Regulation/Chapter: The system provides predefined options. You can also create custom entries from the drop-down list to meet specific classification needs.
Check Item Description: Describe the check item, such as the service provider, cloud service, and a brief rule description.
Solution: Provide the recommended manual steps to remediate the risk if it is detected.
Help: Enter the URL of a help document for the check object configuration. If no help document is available, enter "None".
Risk Level: Set the risk level for the check item (High, Medium, or Low) to help users assess the impact. For more information about risk levels, see Risk level assessment.
Set check item rules
On the Check Item Rule Settings tab, set the following parameters and click Next.
Check Item Target: Select the type of cloud service to check for the specified Service Provider, such as
ECS-InstanceorOSS-Bucket.Associated Asset Settings (Optional): To configure check rules that involve other asset objects, you can click Add Associated Asset to set an asset, such as a VPC, that is associated with the Check Item Target.
NoteIf the Associable Attribute drop-down list is empty, the current Check Item Target does not support associated assets and parameters. The available parameters are subject to what is displayed on the console.
After configuration, you can set detection rules for the associated asset in the Check Item Settings section to improve detection accuracy.
Associable Attribute: A parameter in the current Check Item Target that can be used to create an association.
Associated Asset: The asset type that can be associated with the Associable Attribute.
Associated Asset Property: A parameter in the Associated Asset that is related to the Associable Attribute.
Check Item Settings: Define the core logic of the check.
Click Add Condition to expand the condition configuration area.
In the configuration area, click Add Condition or Add Group.
Condition relationships:
Within a group: You can configure multiple conditions in a single group. The relationship can be set to "AND" or "OR". Each group can contain up to 10 conditions.
Between groups: You can configure multiple groups. The relationship between groups can also be "AND" or "OR". Each check item can contain up to 5 groups.
Parameter description: You can set parameters related to the Check Item Target and the Associated Asset.
NoteClick the
 icon next to a parameter to view its data type, examples, and description.
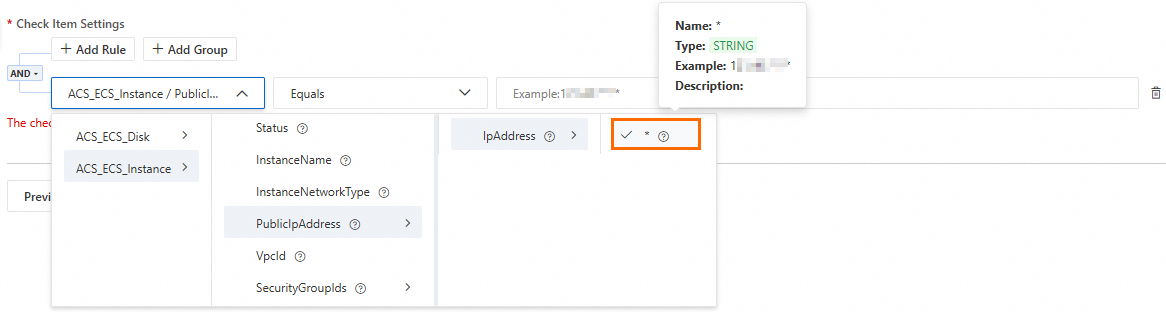
Operator description:
In/NotIn: Checks whether a value exists in a set.
Equals/NotEquals: Checks whether two values are equal.
Save and test
After you enter all the required information, click Test on the Check Item Rule Settings tab.
In the Test area, select a test instance from your account based on the configured check object, such as an OSS bucket, an ECS instance ID, or an SLS project. Then, click Test.
If the message The check item passed the check. appears, the data can be parsed correctly based on your configuration. If the test result does not meet your expectations, ensure that the check conditions are correct and test again.

After the test result meets your expectations, click Save.
NoteSaved check items that have not been published can be edited, published, or deleted.
Publish
After the test passes, you can click Publish on the Check Item Rule Settings tab, or navigate to the custom check item list and click Publish in the Actions column of the target check item.
ImportantOnly published check items are displayed and can be used in the check item list.
Published check items cannot be modified.
Manage custom check items
You can view, edit, publish, unpublish, or delete your custom check items in the Custom Check Item Management section, which is located in the upper-right corner of the CSPM Risk page.
Unpublish: When a check item is unpublished, its rules and historical scan results are cleared.
Edit: Click the name of the target check item to go to the edit page.
NoteTo modify a published check item, you must first Deactivate it.
Delete: When a check item is deleted, its historical check data and alert information are also cleared.
Predefined check items
Scope
To modify predefined rules, you must subscribe to a paid edition of CSPM. For more information, see Subscribe to a paid edition of Cloud Security Posture Management.
Procedure
Go to the Security Center console - Risk Governance - CSPM page. In the upper-left corner, select the region where the assets that you want to protect are located: Chinese Mainland or Outside Chinese Mainland.
On the Cloud Service Configuration Risk tab, search for check items for which Support Custom Parameters is set to Yes, and click the name of the target check item.
In the check item details panel, click Parameter Configuration.
NoteIf this button is not displayed, the check item configuration cannot be modified.
In the Parameter Configuration panel, click Add Modifiable Parameter in the Modifiable Parameter column and select the parameter that you want to modify from the drop-down list.
In the Edit Parameter column, modify the parameter value and click OK.
NoteThe modified rule takes effect in the next scan.
Set check policies
After you update the check items, you can configure automatic detection policies and whitelist policies to manage the scope, frequency, and exceptions for cloud service configuration risk scans.
Configure automatic detection policies: Enable and configure the Automatic CSPM Check feature to run on-demand risk checks for specified cloud services and schedule automated periodic scans to continuously detect configuration risks.
Configure whitelist policies: Exclude specific check items for specified cloud service instances to prevent unnecessary risk alerts. This policy applies to both periodic automatic checks and manual checks.
Configure automatic detection policies
In the upper-right corner of the tab, click Policy Management and then click the Cloud Service Scan Policy tab.
Turn on the Automatic CSPM Check switch and set the following parameters:
Check Cycle: Set the frequency of risk checks.
Check At: Set the specific time for the check to run.
Check Item: Select from "Predefined check items" or "Published custom check items".
After you select the check items, the Estimated Quota Consumption for a single scan is displayed above the list.
NoteThis value is for reference only. The actual number of instances may change during the scan.
After the policy is configured, Security Center automatically scans for cloud service configuration risks based on the policy.
Configure whitelist policies
Procedure
In the upper-right corner of the , click Policy Management.
On the tab, click Create Whitelist Rule.
In the panel that appears, set the following parameters and click OK.
Check Item: Select the specific items to be exempted from the check. For more information, see Check rules.
Policy Effective Scope: Select the scope in which the policy takes effect. This affects whether the policy applies to new instances.
All instances: Whitelists by Check Item. For the specified cloud product, this check is not performed on all current and future instances, and related threats are not displayed in the threat list.
Specific Instances: Whitelists by instance. Only the currently selected instances are exempted from this check. Future instances are still subject to this check.
ImportantWhitelisting all instances is a high-risk operation that may cause new security risks to be overlooked. We recommend that you use "Specific Instances" for precise whitelisting and periodically audit the necessity of your whitelist policies.
Manage whitelist policies
Manage rules: The whitelist rules that you add are displayed in the Cloud Service Check Item Whitelist list. From this list, you can edit (modify the application scope) or delete (cancel whitelisting) the rules.
Automatic synchronization: When you handle risks, the rules for check items that you manually mark as "Handled" or "Whitelisted" are automatically synchronized to this whitelist. For more information, see Handle failed check items for cloud services.
Run cloud service configuration risk checks
Security Center supports periodic automatic checks and immediate manual checks. The two check modes are described as follows:
Periodic automatic check: The system automatically runs scans based on the cycle and time that you specify in the automatic detection policy.
Immediate manual check:
On the Cloud Service Configuration Risk tab, click Scan Now in the Actions column.
Select a scan mode:
Full Scan: Performs a comprehensive scan of all supported cloud services and check items, including custom and predefined check items.
Scan By Policy: Scans only the check items that are selected in Policy Management.
After the scan is complete, you can view all failed check items in the Cloud Service Configuration Risk list and remediate them based on the provided Solution.
Fix failed check items
After the cloud service configuration risk check is complete, you can go to the Cloud Service Configuration Risk tab on the page to view all failed check items and remediate them based on the provided Solution. For more information, see View and handle failed check items.
FAQ
What do I do if I find a logic error in a published custom check item?
Go to Custom Check Item Management in the upper-right corner of the CSPM page.
Find the target check item and click Deactivate to make it editable again.
WarningNote that the Deactivate operation clears all historical scan results for the check item. This operation is irreversible.
After you modify and thoroughly test the check item, publish it again.
How do I view the custom check items that I created?
On the Cloud Service Configuration Risk tab of the page, you can view the custom check items based on the directory that you set.
