When you call API operations, we recommend that you integrate the SDK into your project. SDKs simplify the development process, quickly integrate features, and greatly reduce the O&M cost. To use Alibaba Cloud SDK, perform the following steps: install Alibaba Cloud SDK, configure an access credential, and use the SDK. This topic describes how to use Alibaba Cloud SDK.
Prerequisites
PHP 5.6 or later is installed.
Composer is installed.
The version of PHP used to install Alibaba Cloud SDK V2.0 by using Composer must be earlier than or equal to the version of PHP used to run Alibaba Cloud SDK V2.0. For example, the vendor folder generated after Alibaba Cloud SDK V2.0 is installed in PHP 7.2 can be used only in PHP 7.2 or later. If the vendor folder is copied to PHP 5.6, the dependency is incompatible with PHP 5.6. If you fail to install Composer due to network issues, you can run the following command to use the full image of Composer provided by Alibaba Cloud:
composer config -g repo.packagist composer https://mirrors.aliyun.com/composer/Import the SDK.
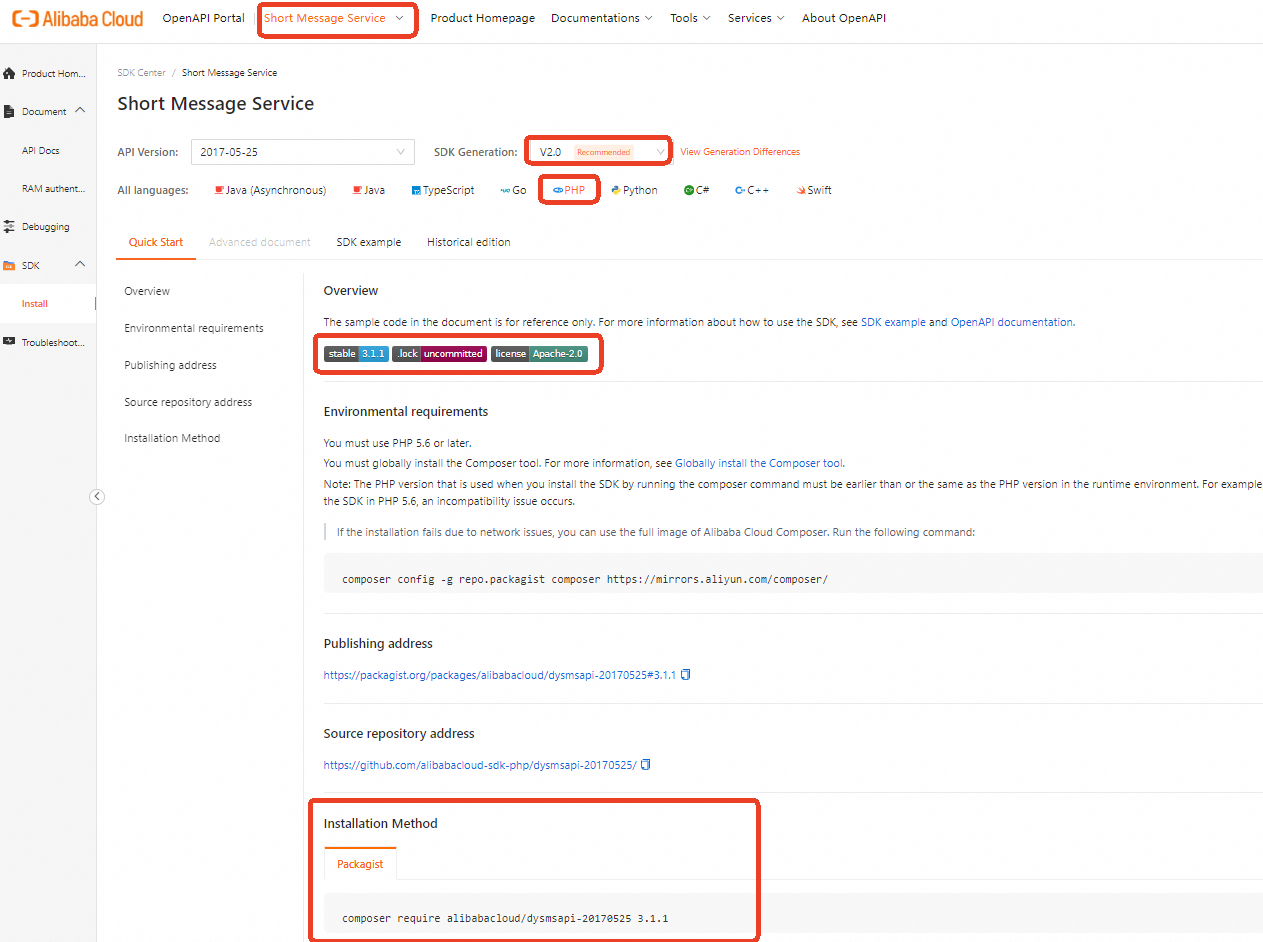
Log on to SDK Center and select the service whose SDK you want to use. In this example, Short Message Service (SMS) is selected.
On the Install page, select V2.0 from the SDK Generation drop-down list and click PHP in the All languages section. On the Quick Start tab, obtain the installation method of the Short Message Service (SMS) SDK.
Configure an access credential
To call API operations of an Alibaba Cloud service, you must configure an access credential, such as an AccessKey pair or a Security Token Service (STS) token. To prevent AccessKey pair leaks, you can record the AccessKey pair in environment variables. For more information about other security solutions, see Credential security solutions. In this example, the ALIBABA_CLOUD_ACCESS_KEY_ID and ALIBABA_CLOUD_ACCESS_KEY_SECRET environment variables are used to record AccessKey pairs.
Configure environment variables in Linux and macOS
Configure environment variables by using the export command
The temporary environment variables configured by using the export command are valid only for the current session. After you exit the session, the configured environment variables become invalid. To configure permanent environment variables, you can add the export command to the startup configuration file of the corresponding operating system.
Configure the AccessKey ID and press Enter.
# Replace <ACCESS_KEY_ID> with your AccessKey ID.
export ALIBABA_CLOUD_ACCESS_KEY_ID=yourAccessKeyID
Configure the AccessKey secret and press Enter.
# Replace <ACCESS_KEY_SECRET> with your AccessKey secret.
export ALIBABA_CLOUD_ACCESS_KEY_SECRET=yourAccessKeySecret
Check whether the configuration is successful.
Run the
echo $ALIBABA_CLOUD_ACCESS_KEY_IDcommand. If the valid AccessKey ID is returned, the environment variables are configured.
Configure environment variables in Windows
Use GUI
Procedure
If you want to use GUI to configure environment variables in Windows 10, perform the following steps:
On the Windows desktop, right-click This PC and select Properties. On the page that appears, click Advanced system settings. In the System Properties dialog box, click Environment Variables on the Advanced tab. In the Environment Variables dialog box, click New in the User variables or System variables section. Then, configure the variables described in the following table.
Variable
Example
AccessKey ID
Variable name: ALIBABA_CLOUD_ACCESS_KEY_ID
Variable value: LTAI****************
AccessKey Secret
Variable name: ALIBABA_CLOUD_ACCESS_KEY_SECRET
Variable value: yourAccessKeySecret
Check whether the configuration is successful.
On the Windows desktop, click Start or press Win + R. In the Run dialog box, enter cmd. Then, click OK or press Enter. On the page that appears, run the
echo %ALIBABA_CLOUD_ACCESS_KEY_ID%andecho %ALIBABA_CLOUD_ACCESS_KEY_SECRET%commands. If the valid AccessKey pair is returned, the configuration is successful.
Use CMD
Procedure
Open a Command Prompt window as an administrator and run the following commands to add environment variables in the operating system:
setx ALIBABA_CLOUD_ACCESS_KEY_ID yourAccessKeyID /M setx ALIBABA_CLOUD_ACCESS_KEY_SECRET yourAccessKeySecret /M/Mindicates that the environment variable is of system level. You can choose not to use this parameter when you configure a user-level environment variable.Check whether the configuration is successful.
On the Windows desktop, click Start or press Win + R. In the Run dialog box, enter cmd. Then, click OK or press Enter. On the page that appears, run the
echo %ALIBABA_CLOUD_ACCESS_KEY_ID%andecho %ALIBABA_CLOUD_ACCESS_KEY_SECRET%commands. If the valid AccessKey pair is returned, the configuration is successful.
Use Windows PowerShell
In PowerShell, configure new environment variables. The environment variables apply to all new sessions.
[System.Environment]::SetEnvironmentVariable('ALIBABA_CLOUD_ACCESS_KEY_ID', 'yourAccessKeyID', [System.EnvironmentVariableTarget]::User)
[System.Environment]::SetEnvironmentVariable('ALIBABA_CLOUD_ACCESS_KEY_SECRET', 'yourAccessKeySecret', [System.EnvironmentVariableTarget]::User)
Configure environment variables for all users. You must run the following commands as an administrator.
[System.Environment]::SetEnvironmentVariable('ALIBABA_CLOUD_ACCESS_KEY_ID', 'yourAccessKeyID', [System.EnvironmentVariableTarget]::Machine)
[System.Environment]::SetEnvironmentVariable('ALIBABA_CLOUD_ACCESS_KEY_SECRET', 'yourAccessKeySecret', [System.EnvironmentVariableTarget]::Machine)
Configure temporary environment variables. The environment variables apply only to the current session.
$env:ALIBABA_CLOUD_ACCESS_KEY_ID = "yourAccessKeyID"
$env:ALIBABA_CLOUD_ACCESS_KEY_SECRET = "yourAccessKeySecret"
In PowerShell, run the Get-ChildItem env:ALIBABA_CLOUD_ACCESS_KEY_ID and Get-ChildItem env:ALIBABA_CLOUD_ACCESS_KEY_SECRET commands. If the valid AccessKey pair is returned, the configuration is successful.
Use the SDK
In this example, the SendMessageToGlobe API operation of Short Message Service (SMS) is called. For more information about SendMessageToGlobe, see SendMessageToGlobe.
1. Initialize a request client
In the SDK, all requests to API operations are sent from a client. Before you can an API operation, you must initialize the request client. You can use multiple methods to initialize a request client. In this example, an AccessKey pair is used to initialize a request client. For more information, see Manage access credentials.
Client objects, such as Dysmsapi instances, are thread-safe, and can be used in multithreaded environments without security risks. You do not need to create an instance for each thread.
In development projects, we recommend that you do not use the new keyword to frequently create client objects. Otherwise, resource waste may increase and service perform may degrade. We recommend that you encapsulate the client in singleton mode. This ensures that only one Client instance is initialized for the same access credential and endpoint throughout the application lifecycle.
public static function createClient(){
      $config = new Config([
            // Required, please ensure that the environment variables ALIBABA_CLOUD_ACCESS_KEY_ID is set.
            "accessKeyId" => getenv("ALIBABA_CLOUD_ACCESS_KEY_ID"),
            // Required, please ensure that the environment variables ALIBABA_CLOUD_ACCESS_KEY_SECRET is set.
            "accessKeySecret" => getenv("ALIBABA_CLOUD_ACCESS_KEY_SECRET")
        ]);
        $config->endpoint = "dysmsapi.aliyuncs.com";
        return new Dysmsapi($config);
    }
2. Create a request object
When you call an API operation to pass parameters, you must use the request object provided by the SDK. Name the request object of the API operation in the following format: <API operation name>Request. For example, the request object of the SendSms API operation is SendSmsRequest. For more information about the parameters, see the API reference. For more information about the parameters of the SendMessageToGlobe operation, see SendMessageToGlobe.
If the API operation does not support request parameters, you do not need to create a request object. For example, the DescribeCdnSubList operation does not support request parameters.
// Create request object and set required input parameters
$sendMessageToGlobeRequest = new SendMessageToGlobeRequest([
            // Please replace with the actual recipient number.
            "to" => "<YOUR_VALUE>",
            // Please replace with the actual SMS content.
            "message" => "<YOUR_VALUE>"
        ]);
3. Initiate an API request
When you use a request client to call an API operation, we recommend that you name the function in the following format: <API operation name>WithOptions. Specify <API operation name> in camel case. This function contains two parameters: the request object and the runtime parameter. The request object is created in the preceding step. The runtime parameter is used to specify the request action, such as timeout and proxy configurations. For more information, see Advanced configuration.
If the API operation does not support request parameters, you do not need to specify a request object in the request. For example, you only need to specify the runtime parameter when you call the DescribeCdnSubList operation.
 // Create runtime parameters.
 $runtime = new RuntimeOptions([]);
 $client = self::createClient();
 // Send a request.
 $client->sendMessageToGlobeWithOptions($sendMessageToGlobeRequest, $runtime);
4. Handle errors
Alibaba Cloud SDK V2.0 for PHP classifies exceptions into the following types:
TeaUnretryableException: In most cases, this type of exception is caused by network issues and is reported when the maximum number of retries is reached.
InvalidArgumentException: In most cases, this type of error is trigger when a required parameter is not specified or the parameter type is invalid. You can check the error
messageto locate the error.TeaException: In most cases, this type of exception is caused by business errors.
For more information about how to handle SDK exceptions, see Exception handling.
We recommend that you take proper exception handling measures, such as reporting exceptions, logging exceptions, and performing retries, to ensure the robustness and stability of your system.
Click to view the complete sample code
Special scenario: File upload through the Advance operation
When you use Image Search or Visual Intelligence API (VIAPI) to process images on an on-premises machine or upload images, the API of the Image Search or VIAPI described in the documentation does not support direct upload. To upload images, you need to use the Advance operation, which supports transmission of file streams. The cloud service temporarily stores the uploaded file in Object Storage Service (OSS), and reads the temporary file from OSS when necessary. The default region of OSS is cn-shanghai. The following example shows how to call the DetectBodyCount operation of VIAPI:
Temporary files in OSS are regularly cleared.
Initialize a request client
Make sure that both the
regionIdparameter and theendpointof the cloud service are specified.regionIdindicates the OSS region in which the temporary files are stored. If you do not configure theregionIdparameter, the cloud service may use a different region than OSS, resulting in API timeouts.function createClient() { $config = new Config([ // getenv specifies that the access credential is obtained from environment variables. // Required. Make sure that the following environment variable is set in the code runtime environment: ALIBABA_CLOUD_ACCESS_KEY_ID. "accessKeyId" => getenv("ALIBABA_CLOUD_ACCESS_KEY_ID"), // Required. Make sure that the following environment variable is set in the code runtime environment: ALIBABA_CLOUD_ACCESS_KEY_SECRET. "accessKeySecret" => getenv("ALIBABA_CLOUD_ACCESS_KEY_SECRET") ]); // Specify the same region for the endpoint and regionId parameters. $config->endpoint = "facebody.cn-shanghai.aliyuncs.com"; $config->regionId = "cn-shanghai"; return new Facebody($config); }Create a request object
Create the
<API operation>AdvanceRequestrequest object to pass file streams. In the request object, set the parameter name toImageURLObject.// Read the file and convert it to a Stream object. $imagePath = "<FILE_PATH>"; // Replace <FILE_PATH> with the actual file path. try { $fileStream = new Stream(fopen($imagePath, "r")); } catch (\Exception $e) { die("Failed to read the file: " . $e->getMessage()); } // Create a request object and configure the request parameters. $detectBodyCountAdvanceRequest = new DetectBodyCountAdvanceRequest([ "imageURLObject" => $fileStream ]);Initiate a request
Call the
<API operation>AdvanceRequestoperation.// Configure the runtime parameters. $runtime = new RuntimeOptions([]); $client = self::createClient(); // Send the request. $client->detectBodyCountAdvance($detectBodyCountAdvanceRequest, $runtime);
FAQ
How do I handle the "You are not authorized to perform this operation" error thrown by an API operation?
Possible causes: The AccessKey pair of the Resource Access Management (RAM) user does not have the permissions to call the API operation.
Solutions: Grant the required permissions to the RAM user. For more information, see Grant permissions to a RAM user.
For example, if the "You are not authorized to perform this operation" error is thrown by the SendMessageToGlobe API operation, create the following custom policy to grant the required permissions to the RAM user:
{
  "Version": "1",
  "Statement": [
    {
      "Effect": "Allow",
      "Action": "dysms:SendMessageToGlobe",
      "Resource": "*"
    }
  ]
}
How do I handle the "PHP Fatal error: Uncaught exception 'GuzzleHttp\Exception\RequestException" endpoint error whose error message is cURL error 3?
Possible causes: The API operation does not support the endpoint that you specify when you initialize the request client.
Solutions: Specify a supported endpoint and try again. For more information, see Configure an endpoint.
How do I handle the "PHP Fatal error: Uncaught ArgumentCountError: Too few arguments to function AlibabaCloud\Credentials\AccessKeyCredential::__construct(), 1 passed and exactly 2" AccessKey error thrown by an API operation?
Possible causes: The AccessKey pair is not correctly passed to the request.
Solutions: Make sure that the AccessKey pair is correctly passed when you initialize the request client. The
XXXvalue ofgetenv("XXX")is obtained form the environment variable.How do I handle the "code: 414 URL Too Long" error thrown by Alibaba Cloud SDK?
Possible causes: This issue is not caused by the request method. When you use Alibaba Cloud SDK, request parameters are passed in URLs. If a URL contains an excessive number of parameters or overlength parameter values, the URL may exceed the maximum length and cause request failures.
Solutions: To prevent overlength URLs, we recommend that you use request syntax and signature method V3. Use self-signed signatures to pass parameters in the request body and set the body type to
Content-Type: application/x-www-form-urlencoded.
For more information about how to handle SDK errors, see FAQ about SDK for PHP.