On-premises machines, third-party servers, and containers that have Internet access can connect to SchedulerX through the Internet region. This enables you to develop and test scheduled jobs locally before deploying to Alibaba Cloud.
Prerequisites
Before you begin, make sure that you have:
Activated SchedulerX. For more information, see Activate SchedulerX
Created resources with the Internet region selected for the application. For more information, see Create resources
Access configuration parameters
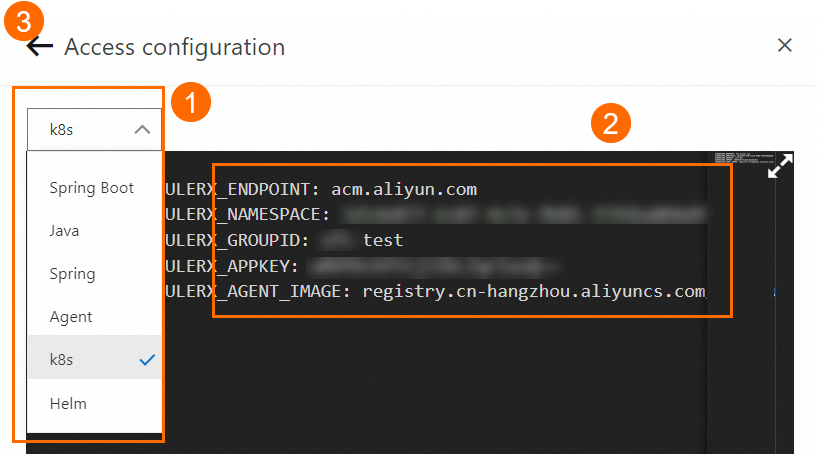
To connect to SchedulerX, each application requires four configuration values, such as the Internet region and the acm.aliyun.com endpoint.
| Parameter | Description |
|---|---|
endpoint | SchedulerX service endpoint |
namespace | Namespace that isolates environments |
groupId | Application group identifier |
appKey | Application key (required for agent version 1.2.1 or later) |
To retrieve these values:
Log on to the SchedulerX console. In the top navigation bar, select the Internet region.
In the left-side navigation pane, click Application Management. Find your application and click Access configuration in the Operation column.
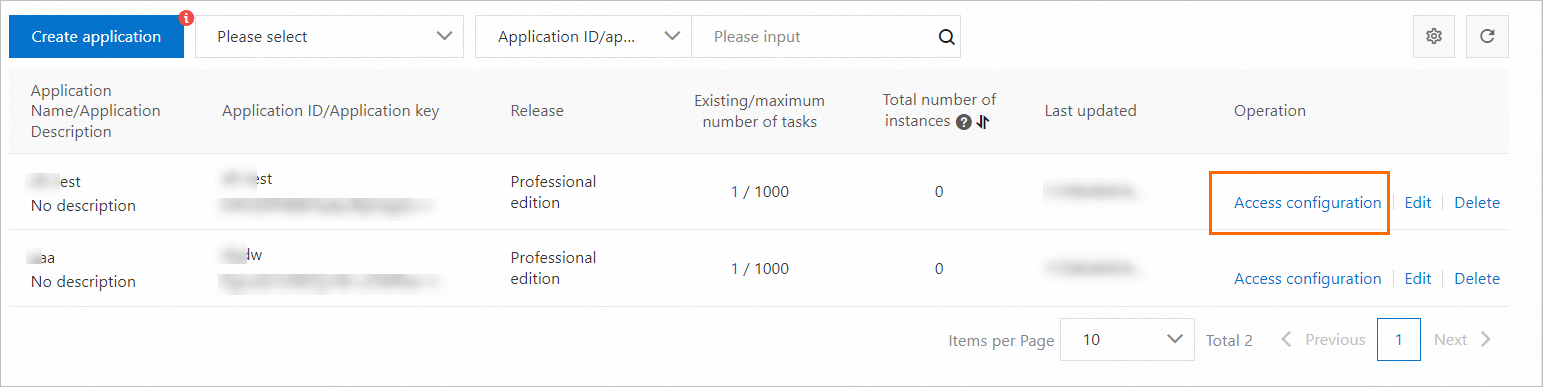
In the Access configuration panel, select an access method from the drop-down list (rectangular box 1 in the following figure). The panel displays the configuration values for the selected method.
Connect your application
The following steps walk through adding the Maven dependency, initializing SchedulerxWorker, and creating a scheduled job. Choose the instructions that match your application type.
Add the SchedulerxWorker dependency to your
pom.xmlfile.Java or Spring application
<dependency>
  <groupId>com.aliyun.schedulerx</groupId>
  <artifactId>schedulerx2-worker</artifactId>
  <version>${schedulerx2.version}</version>
  <!--If you use Logback, exclude Log4j and Log4j 2. -->
  <exclusions>
    <exclusion>
      <groupId>org.apache.logging.log4j</groupId>
      <artifactId>log4j-api</artifactId>
    </exclusion>
    <exclusion>
      <groupId>org.apache.logging.log4j</groupId>
      <artifactId>log4j-core</artifactId>
    </exclusion>
    <exclusion>
      <groupId>log4j</groupId>
      <artifactId>log4j</artifactId>
    </exclusion>
  </exclusions>
</dependency>
Spring Boot application
<dependency>
  <groupId>com.aliyun.schedulerx</groupId>
  <artifactId>schedulerx2-spring-boot-starter</artifactId>
  <version>${schedulerx2.version}</version>
  <!-- If you use Logback, exclude Log4j and Log4j 2. -->
  <exclusions>
    <exclusion>
      <groupId>org.apache.logging.log4j</groupId>
      <artifactId>log4j-api</artifactId>
    </exclusion>
    <exclusion>
      <groupId>org.apache.logging.log4j</groupId>
      <artifactId>log4j-core</artifactId>
    </exclusion>
    <exclusion>
      <groupId>log4j</groupId>
      <artifactId>log4j</artifactId>
    </exclusion>
  </exclusions>
</dependency>
Use the configuration values retrieved from the console to initialize SchedulerxWorker. In the Access configuration panel, click One click copy to copy the values, or manually replace the placeholders below.
Java application
Initialize SchedulerxWorker in your main function:
public void initSchedulerxWorker() throws Exception { SchedulerxWorker schedulerxWorker = new SchedulerxWorker(); schedulerxWorker.setEndpoint("xxxx"); // Replace with your endpoint schedulerxWorker.setNamespace("xxxx"); // Replace with your namespace schedulerxWorker.setGroupId("xxxx"); // Replace with your group ID // Required for agent version 1.2.1 or later schedulerxWorker.setAppKey("xxxx"); // Replace with your application key schedulerxWorker.init(); }NoteMultiple groups: To categorize scheduled jobs or provide multiple services, create multiple groups and append all group names to the
groupIdparameter. For example,groupId=animals.dogs,animals.cats. Instances are shared across groups automatically.Additional parameters: For a full list of initialization options, see SchedulerxWorker parameters.
Spring application
Inject the SchedulerxWorker bean into your XML configuration file:
<bean id="schedulerxWorker" class="com.alibaba.schedulerx.worker.SchedulerxWorker">
    <property name="endpoint">
      <value>${endpoint}</value>
    </property>
    <property name="namespace">
      <value>${namespace}</value>
    </property>
    <property name="groupId">
      <value>${groupId}</value>
    </property>
    <!--Required for agent version 1.2.1 or later -->
    <property name="appKey">
      <value>${appKey}</value>
    </property>
</bean>
Spring Boot application
Add the following properties to your
application.propertiesfile:spring.schedulerx2.endpoint=${endpoint} spring.schedulerx2.namespace=${namespace} spring.schedulerx2.groupId=${groupId} # Required for agent version 1.2.1 or later spring.schedulerx2.appKey=${appKey}Create a class that extends
JavaProcessorto define your job logic. The following example printshello schedulerx2.0each time the job runs:package com.aliyun.schedulerx.test.job; import com.alibaba.schedulerx.worker.domain.JobContext; import com.alibaba.schedulerx.worker.processor.JavaProcessor; import com.alibaba.schedulerx.worker.processor.ProcessResult; @Component public class MyHelloJob extends JavaProcessor { @Override public ProcessResult process(JobContext context) throws Exception { System.out.println("hello schedulerx2.0"); return new ProcessResult(true); } }Start your application in the on-premises environment.
Verify the connection
After starting the application, verify that it has connected to SchedulerX:
Publish the application to Alibaba Cloud after the application is connected to SchedulerX.
Log on to the SchedulerX console.
In the top navigation bar, select a region.
In the left-side navigation pane, click Application Management.
Check the Total number of instances column for your application.
0 instances: The application is not connected. Review the access configuration and make sure that your on-premises machine can reach the SchedulerX endpoint.
Non-zero: The application is connected. Click View instances in the Operation column to view the connected instances in the Connect to an instance panel.