If the business resources of an enterprise are deployed outside Alibaba Cloud, you can use the Secure Access Service Edge (SASE) gateway and a SASE connector to connect the on-premises network of the enterprise to the business resources outside Alibaba Cloud. This way, the users of the enterprise can access the business resources over an internal network. This topic describes how to create a connector to enable network connections, deploy a connector, configure forwarding policies for a connector, and disable network connections for a connector.
Network connection diagram

Create a connector to enable network connections
If you use a SASE connector to enable network connections, you must create and deploy the connector in the data center of your business resources. You can also create and deploy the connector on a third-party cloud server or virtual machine that hosts your business resources. Then, enable the connector.
Step 1: Create a SASE connector
Log on to the SASE console. In the left-side navigation pane, choose .
Click the Services Outside Alibaba Cloud tab and create a connector.
On the Connectors tab, click Add Connector.
In the Add Connector panel, configure the parameters based on your business requirements. Then, click OK.
Parameter
Description
Region
The region of the connector. To ensure access performance, we recommend that you select a region that is the closest to your server.
Instance Name
The name of the connector.
Instance Switch
Specifies whether to enable the connector. You can use a connector to access associated applications from the SASE client only if Instance Switch is Enabled.
You can also turn on Instance Switch on the Connectors tab or in the Details panel of the connector.
ImportantIf Instance Switch is turned off, you cannot use the connector to access your office applications from the SASE client. Proceed with caution.
After the connector is created, you can view the connector on the Connectors tab.
Step 2: Deploy the connector on the server that hosts your business resources
Find the connector and click Deploy in the Actions column. In the Deploy panel, obtain the command to deploy the connector.
Log on to the server or virtual machine as the root user and run the deployment command.
In the Deploy panel, you can also obtain the command to upgrade or uninstall the connector, and the command to export logs.
Step 3: Configure forwarding policies for the connector
On the Connectors tab, click Forwarding Policies.
On the Forwarding Policies page, click Create Policy.
In the Create Policy panel, configure the parameters based on your business requirements. Then, click OK.
Parameter
Description
Policy Name
The name of the policy.
Description
The description of the policy.
Priority
The priority of the policy. Valid values: 1 to 100. A smaller value indicates a higher priority.
Policy Details
The applicable users and associated applications.
Associated Connector
The connector to which you want to associate the policy.
Policy Status
Specifies whether to enable the policy. The policy takes effect only if Policy Status is Enabled.
View the details of a connector
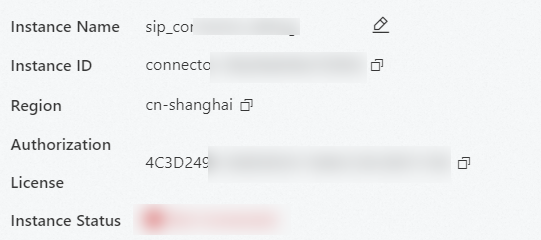
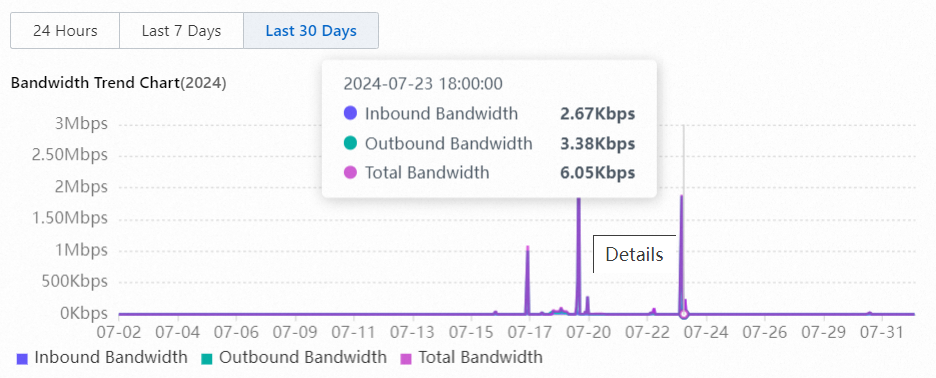
To view the details of a connector, go to the Connectors tab, find the connector, and then click Details in the Actions column. On the Instance Information tab of the panel that appears, you can view the details of the connector, including Authorization License, Instance Status, Associate Policy, and Bandwidth Trend Chart. You can use the details to estimate the bandwidth requirements of your enterprise and adjust the configuration and number of connector-deployed servers. This helps prevent business loss.
Basic information

Bandwidth Trend Chart

Forwarding policies associated with the connector
You can view and modify the forwarding policies that are associated with the connector.
View information about servers on which a connector is deployed
To view information about servers on which a connector is deployed, go to the Connectors tab, find the connector, and then click Details in the Actions column. On the Deploy Server tab of the panel that appears, you can view the information about the servers, including Status, Endpoint IP Address, Private IP Address, Bandwidth Trend Chart, CPU Utilization, Memory Usage, Packet Loss Rate, and Latency. You can use the information to evaluate whether the servers run as expected and whether the configuration of the servers meets the bandwidth requirements of your enterprise.
View the alert settings of a connector
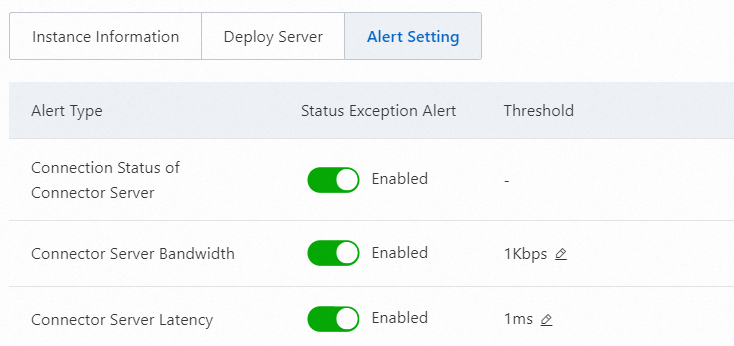
To view the alert settings of a connector, go to the Connectors tab, find the connector, and then click Details in the Actions column. On the Alert Setting tab of the panel that appears, you can view which types of alerts are enabled for the connector. The alert types are Connection Status of Connector Server, Connector Server Bandwidth, and Connector Server Latency. You can configure thresholds for Connector Server Bandwidth and Connector Server Latency based on your business requirements.

Before you configure alert settings for a connector on the Alert Setting tab, make sure that message push settings are configured for the connector. Otherwise, the alert settings do not take effect. For more information, see Configure message push.
Disable network connections for a connector
To disable network connections for a connector, go to the Connectors tab, find the connector, and then turn off the switch in the Instance Switch column. You can also click Details in the Actions column to turn off Instance Switch.
If Instance Switch is turned off, you cannot use the connector to access your office applications from the SASE client. Proceed with caution.
What to do next
After you enable network connections, you must configure applications to allow users to access the applications. For more information, see Configure office applications and Configure zero trust policies.
References
If you want to allow traffic from specific IP addresses after you configure applications, you can configure an application whitelist. For more information, see Configure an office application whitelist.
You can connect SASE to business applications that are deployed on Alibaba Cloud. For more information, see Enable network connections for services on Alibaba Cloud.
You can connect SASE to applications in global offices. For more information, see Enable network connections for applications in global office scenarios.