This topic describes how to use Cloud Development Toolkit (CDK) of Resource Orchestration Service (ROS) to upload all files from an on-premises folder to an Object Storage Service (OSS) bucket. The following programming languages are supported: TypeScript, JavaScript, Java, Python, and C#. You can refer to this topic to upload files in an efficient and convenient manner.
An OSS bucket is a storage location in which various types of data files are stored and managed in OSS. For more information, see Buckets.
Billing
You can use ROS CDK free of charge. However, the solution in this topic involves OSS and Function Compute. You are charged when you use OSS and Function Compute resources. For more information about billing of OSS, see Storage fees. For more information about billing of Function Compute, see Pay-as-you-go.
Prerequisites
The following preparations are made:
Alibaba Cloud CLI is installed and configured. ROS CDK is installed. For more information, see Install ROS CDK.
An AccessKey pair is obtained. The AccessKey pair is used for subsequent authorization. If you do not have an AccessKey pair, create one. For more information, see Create an AccessKey pair.
ImportantTo ensure the security of your Alibaba Cloud account, we recommend that you create a Resource Access Management (RAM) user that is used only to call API operations and create an AccessKey pair for the RAM user. For more information about how to create a RAM user and grant permissions to the RAM user, see Create a RAM user and Grant permissions to a RAM user.
The following requirements on programming languages are met:
If you use TypeScript, the Node.js version is 8.0 or later.
If you use JavaScript, the
jqJSON parsing toolkit is prepared.If you use Java, the Java Development Kit (JDK) version is 1.8 or later and the Maven version is 2.5 or later.
If you use Python, the Python version is 3.4 or later.
If you use C#, the .NET Core version is 2.0 or later and Visual Studio 2010 or later is prepared.
Step 1: Initialize a project
Run the following commands in sequence to create and initialize a project in the current directory:
TypeScript
mkdir demo
cd demo
ros-cdk init --language=typescript --generate-only=true
JavaScript
mkdir demo
cd demo
ros-cdk init --language=javascript --generate-only=true
Java
mkdir demo
cd demo
ros-cdk init --language=java --generate-only=true
Python
mkdir demo
cd demo
ros-cdk init --language=python --generate-only=true
Run the following command to create a virtual environment that belongs to the current project.
You must run the command because a virtual environment is required to run a Python project.
python3 -m venv .venvRun the following command to go to the virtual environment:
source .venv/bin/activateC#
mkdir demo
cd demo
ros-cdk init --language=csharp --generate-only=true
Step 2: Configure an Alibaba Cloud credential
Run the following command to configure an Alibaba Cloud credential:
ros-cdk configFollow the on-screen instructions to complete the configurations.
endpoint(optional, default:https://ros.aliyuncs.com):
defaultRegionId(optional, default:cn-hangzhou):cn-beijing

[1] AK
[2] StsToken
[3] RamRoleArn
[4] EcsRamRole
[0] CANCEL

Authenticate mode [1...4 / 0]: 1
accessKeyId:************************
accessKeySecret:******************************

  Your cdk configuration has been saved successfully!
The following table describes the parameters in the code.
Parameter
Description
defaultRegionId
The region where you want to deploy a ROS stack. Default value:
cn-hangzhou. You can call the DescribeRegions operation and check the RegionId parameter to specify the region.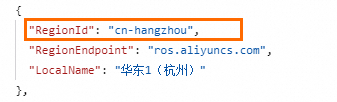
endpoint
The endpoint of ROS. Default value:
https://ros.aliyuncs.com. You can call the DescribeRegions operation to obtain the public endpoint or virtual private cloud (VPC) endpoint of ROS. When you access ROS, you must addhttps://at the beginning of the endpoint.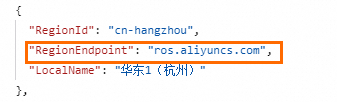
Authenticate mode
The authentication method. In this example, this parameter is set to [1] AK. You must enter the AccessKey ID and AccessKey secret that are obtained in the Prerequisites section. For more information about authentication methods, see Configure profiles.
Step 3: Install dependencies
Modify the configuration file in the project and install dependencies.
TypeScript
Replace the content of the
package.jsonfile with the following code:{ "name": "demo", "version": "0.1.0", "bin": { "demo": "bin/demo.js" }, "scripts": { "build": "tsc", "test": "jest" }, "devDependencies": { "@types/jest": "^25.2.1", "@types/node": "10.17.5", "typescript": "^3.9.7", "jest": "^25.5.0", "ts-jest": "^25.3.1", "ts-node": "^8.1.0", "babel-jest": "^26.6.3", "@babel/core": "^7.12.9", "@babel/preset-env": "7.12.7", "@babel/preset-typescript": "^7.12.7", "@alicloud/ros-cdk-assert": "^1.4.0" }, "dependencies": { "@alicloud/ros-cdk-core": "^1.4.0", "@alicloud/ros-cdk-oss": "^1.4.0", "@alicloud/ros-cdk-ossdeployment": "^1.4.0" } }Run the following command to install dependencies:
npm install
JavaScript
Replace the content of the
package.jsonfile with the following code:{ "name": "demo", "version": "0.1.0", "bin": { "demo": "bin/demo.js" }, "scripts": { "build": "echo \"The build step is not required when using JavaScript!\" && exit 0", "cdk": "cdk", "test": "jest" }, "devDependencies": { "@types/jest": "^25.2.1", "@types/node": "10.17.5", "typescript": "^3.9.7", "jest": "^25.5.0", "ts-jest": "^25.3.1", "ts-node": "^8.1.0", "babel-jest": "^26.6.3", "@babel/core": "^7.12.9", "@babel/preset-env": "7.12.7", "@babel/preset-typescript": "^7.12.7", "@alicloud/ros-cdk-assert": "^1.0.25" }, "dependencies": { "@alicloud/ros-cdk-core": "^1.4.0", "@alicloud/ros-cdk-oss": "^1.4.0", "@alicloud/ros-cdk-ossdeployment": "^1.4.0" } }Run the following command to install dependencies:
npm install
Java
Replace the content of the
pom.xmlfile with the following code:<?xml version="1.0" encoding="UTF-8"?> <project xsi:schemaLocation="http://maven.apache.org/POM/4.0.0 http://maven.apache.org/xsd/maven-4.0.0.xsd" xmlns="http://maven.apache.org/POM/4.0.0" xmlns:xsi="http://www.w3.org/2001/XMLSchema-instance"> <modelVersion>4.0.0</modelVersion> <groupId>com.myorg</groupId> <artifactId>demo</artifactId> <version>0.1</version> <properties> <project.build.sourceEncoding>UTF-8</project.build.sourceEncoding> <cdk.version>1.0.25</cdk.version> </properties> <build> <plugins> <plugin> <groupId>org.apache.maven.plugins</groupId> <artifactId>maven-compiler-plugin</artifactId> <version>3.8.1</version> <configuration> <source>1.8</source> <target>1.8</target> </configuration> </plugin> <plugin> <groupId>org.codehaus.mojo</groupId> <artifactId>exec-maven-plugin</artifactId> <version>1.6.0</version> <configuration> <mainClass>com.myorg.DemoApp</mainClass> </configuration> </plugin> </plugins> </build> <dependencies> <!-- AliCloud ROS Cloud Development Kit (ROS CDK) --> <dependency> <groupId>com.aliyun</groupId> <artifactId>ros-cdk-core</artifactId> <version>1.4.0</version> </dependency> <dependency> <groupId>com.aliyun</groupId> <artifactId>ros-cdk-oss</artifactId> <version>1.4.0</version> </dependency> <dependency> <groupId>com.aliyun</groupId> <artifactId>ros-cdk-ossdeployment</artifactId> <version>1.4.0</version> </dependency> <!-- https://mvnrepository.com/artifact/junit/junit --> <dependency> <groupId>junit</groupId> <artifactId>junit</artifactId> <version>4.12</version> <scope>test</scope> </dependency> </dependencies> </project>Run the following command to install dependencies:
mvn compile
Python
Replace the content of the
requirements.txtfile with the following code:ros-cdk-core==1.4.0 ros-cdk-oss==1.4.0 ros-cdk-ossdeployment==1.4.0Run the following command to install dependencies:
pip install -r requirements.txt
C#
Replace the content of the src/Demo/Demo.csproj file with the following code:
<Project Sdk="Microsoft.NET.Sdk">

  <PropertyGroup>
    <OutputType>Exe</OutputType>
    <TargetFramework>netcoreapp3.1</TargetFramework>
    <!-- Roll forward to future major versions of the netcoreapp as needed -->
    <RollForward>Major</RollForward>
  </PropertyGroup>

  <ItemGroup>
    <!-- CDK Construct Library dependencies -->
    <PackageReference Include="AlibabaCloud.SDK.ROS.CDK.Core" Version="1.4.0" />
    <PackageReference Include="AlibabaCloud.SDK.ROS.CDK.Oss" Version="1.4.0" />
    <PackageReference Include="AlibabaCloud.SDK.ROS.CDK.Ossdeployment" Version="1.4.0" />

    <!-- jsii Roslyn analyzers (un-comment to obtain compile-time checks for missing required props
    <PackageReference Include="Amazon.Jsii.Analyzers" Version="*" PrivateAssets="all" />
    -->

  </ItemGroup>

</Project>
Step 4: Add resources
Add resources to the project. In this example, the following resources are involved:
Use an existing OSS bucket and add resources
TypeScript
If you want to use an existing OSS bucket to store on-premises files, replace the content of the lib/demo-stack.ts file in the directory of the project created in Step 1 with the following code:
Specify the absolute path of your on-premises folder as the value of the folderPath variable, and the name of the OSS bucket in which you want to store your project files as the value of the ossBucketName variable. Make sure that the OSS bucket exists.
import * as ros from '@alicloud/ros-cdk-core';
import * as oss_deployment from '@alicloud/ros-cdk-ossdeployment';
import * as oss from '@alicloud/ros-cdk-oss';
import * as fs from "fs";
import * as path from "path";


/**
 * Recursively reads all files in a directory including subdirectories.
 * @param dirPath The directory path to read.
 * @returns An array containing paths of all files.
 */
function getAllFiles(dirPath: string): oss_deployment.ISource[] {
  dirPath = dirPath.endsWith('/') ?  dirPath : dirPath + '/';
  const result: oss_deployment.ISource[] = [];
  const files = fs.readdirSync(dirPath);
  for (const file of files) {
    const curPath = path.join(dirPath, file);
    if (fs.lstatSync(curPath).isDirectory()) {
      result.push(...getAllFiles(curPath));
    } else {
      const objectPrefix = path.dirname(curPath).substring(
          path.dirname(curPath).indexOf('/out') + '/out'.length) + '/';
      result.push(oss_deployment.Source.asset(curPath, {}, objectPrefix.substring(1)));
    }
  }
  return result;
}


export class DemoStack extends ros.Stack {
  constructor(scope: ros.Construct, id: string, props?: ros.StackProps) {
    super(scope, id, props);

    const folderPath = "my-folder";  //The absolute path of the on-premises folder.
    const ossBucketName = "my-blog";  //The name of the OSS bucket.

    const filePaths = getAllFiles(folderPath);
    new ros.RosInfo(this, ros.RosInfo.description, "Deploy the folder to OSS.");

    new oss_deployment.BucketDeployment(this, 'SampleFileDeployment', {
      sources: filePaths,
      destinationBucket: ossBucketName,
      timeout: 300,
      logMonitoring: true,  //Specifies whether to enable log monitoring. If you set this parameter to false, log monitoring is disabled.
    });
  }
}
JavaScript
If you want to use an existing OSS bucket to store on-premises files, replace the content of the lib/demo-stack.js file in the directory of the project created in Step 1 with the following code:
Specify the absolute path of your on-premises folder as the value of the folderPath variable, and the name of the OSS bucket in which you want to store your project files as the value of the ossBucketName variable. Make sure that the OSS bucket exists.
const ros = require('@alicloud/ros-cdk-core');
const oss_deployment = require('@alicloud/ros-cdk-ossdeployment');
const oss = require('@alicloud/ros-cdk-oss');
const fs = require("fs");
const path = require("path");

/**
 * Recursively reads all files in a directory including subdirectories.
 * @param dirPath The directory path to read.
 * @returns An array containing paths of all files.
 */
function getAllFiles(dirPath) {
  dirPath = dirPath.endsWith('/') ?  dirPath : dirPath + '/';
  const result = [];
  const files = fs.readdirSync(dirPath);
  for (const file of files) {
    const curPath = path.join(dirPath, file);
    if (fs.lstatSync(curPath).isDirectory()) {
      result.push(...getAllFiles(curPath));
    } else {
      const objectPrefix = path.dirname(curPath).substring(
          path.dirname(curPath).indexOf('/out') + '/out'.length) + '/';
      result.push(oss_deployment.Source.asset(curPath, {}, objectPrefix.substring(1)));
    }
  }
  return result;
}

class DemoStack extends ros.Stack {
  constructor(scope, id, props) {
    super(scope, id, props);
    const folderPath = "my-folder";  //The absolute path of the on-premises folder.
    const ossBucketName = "my-blog";  //The name of the OSS bucket.
    const filePaths = getAllFiles(folderPath);
    new ros.RosInfo(this, ros.RosInfo.description, "Deploy the folder to OSS.");
    new oss_deployment.BucketDeployment(this, 'SampleFileDeployment', {
      sources: filePaths,
      destinationBucket: ossBucketName,
      timeout: 300,
      logMonitoring: true,  //Specifies whether to enable log monitoring. If you set this parameter to false, log monitoring is disabled.
    });
  }
}

module.exports = { DemoStack };
Java
If you want to use an existing OSS bucket to store on-premises files, replace the content of the
src/main/java/com/myorg/DemoStack.javafile in the directory of the project created in Step 1 with the following code:ImportantSpecify the absolute path of your on-premises folder as the value of the
folderPathvariable, and the name of the OSS bucket in which you want to store your project files as the value of theossBucketNamevariable. Make sure that the OSS bucket exists.package com.myorg; import com.aliyun.ros.cdk.core.Construct; import com.aliyun.ros.cdk.core.RosInfo; import com.aliyun.ros.cdk.core.Stack; import com.aliyun.ros.cdk.core.StackProps; import com.aliyun.ros.cdk.oss.Bucket; import com.aliyun.ros.cdk.ossdeployment.BucketDeployment; import com.aliyun.ros.cdk.ossdeployment.ISource; import com.aliyun.ros.cdk.ossdeployment.Source; import java.io.File; import java.util.ArrayList; import java.util.List; import java.util.stream.Collectors; public class DemoStack extends Stack { public DemoStack(final Construct scope, final String id) { this(scope, id, null); } public DemoStack(final Construct scope, final String id, final StackProps props) { super(scope, id, props); final String folderPath = "my-folder"; //The absolute path of the on-premises folder. final String ossBucketName = "my-blog"; //The name of the OSS bucket. List<ISource> filePaths = getAllFiles(folderPath); RosInfo.setDescription("Deploy the folder to OSS."); BucketDeployment.Builder.create(this, "SampleFileDeployment") .sources(filePaths) .destinationBucket(ossBucketName) .timeout(300) .logMonitoring(true) //Specifies whether to enable log monitoring. If you set this parameter to false, log monitoring is disabled. .build(); } public static List<ISource> getAllFiles(String dirPath) { if (!dirPath.endsWith("/")) { dirPath += "/"; } List<File> files = listFilesRecursively(new File(dirPath)); return files.stream() .filter(file -> !file.isDirectory()) .map(file -> { String curPath = file.getPath(); String parentPath = file.getParent(); String objectPrefix = parentPath.substring(parentPath.indexOf("/out") + "/out".length()) + "/"; return Source.asset(curPath, null, objectPrefix.substring(1)); }) .collect(Collectors.toList()); } private static List<File> listFilesRecursively(File dir) { List<File> result = new ArrayList<>(); File[] files = dir.listFiles(); if (files != null) { for (File file : files) { result.add(file); if (file.isDirectory()) { result.addAll(listFilesRecursively(file)); } } } return result; } }Run the
mvn compilecommand to compile the CDK project.
Python
If you want to use an existing OSS bucket to store on-premises files, replace the content of the demo/demo_stack.py file in the directory of the project created in Step 1 with the following code:
Specify the absolute path of your on-premises folder as the value of the folderPath variable, and the name of the OSS bucket in which you want to store your project files as the value of the ossBucketName variable. Make sure that the OSS bucket exists.
import os
import ros_cdk_core as core
import ros_cdk_ossdeployment as oss_deployment
import ros_cdk_oss as oss


def get_all_files(dir_path: str):
    """
    Recursively reads all files in a directory including subdirectories.
    :param dir_path: The directory path to read.
    :returns: An array containing paths of all files.
    """
    if not dir_path.endswith('/'):
        dir_path += '/'
    result = []
    files = os.listdir(dir_path)
    for file in files:
        cur_path = os.path.join(dir_path, file)
        if os.path.isdir(cur_path):
            result.extend(get_all_files(cur_path))
        else:
            object_prefix = os.path.dirname(cur_path)[os.path.dirname(cur_path).index('/out') + len('/out'):] + '/'
            print(object_prefix[1:], cur_path)
            result.append(oss_deployment.Source.asset(cur_path, {}, object_prefix[1:]))
    return result


class DemoStack(core.Stack):
    def __init__(self, scope: core.Construct, construct_id: str, **kwargs):
        super().__init__(scope, construct_id, **kwargs)

        folder_path = "my-folder"  #The absolute path of the on-premises folder.
        oss_bucket_name = "my-blog"  #The name of the OSS bucket.
        file_paths = get_all_files(folder_path)

        core.RosInfo(self, core.RosInfo.description, "Deploy the folder to OSS.")

        oss_deployment.BucketDeployment(self, 'SampleFileDeployment',
                                        oss_deployment.BucketDeploymentProps(
                                            sources=file_paths,
                                            destination_bucket=oss_bucket_name,
                                            timeout=300,
                                            log_monitoring=True  #Specifies whether to enable log monitoring. If you set this parameter to false, log monitoring is disabled.
                                        ))
C#
If you want to use an existing OSS bucket to store on-premises files, replace the content of the src/Demo/DemoStack.cs file in the directory of the project created in Step 1 with the following code:
Specify the absolute path of your on-premises folder as the value of the folderPath variable, and the name of the OSS bucket in which you want to store your project files as the value of the ossBucketName variable. Make sure that the OSS bucket exists.
using System;
using System.Collections.Generic;
using System.IO;
using AlibabaCloud.SDK.ROS.CDK.Core;
using AlibabaCloud.SDK.ROS.CDK.Ossdeployment;
using AlibabaCloud.SDK.ROS.CDK.Oss;

namespace Demo
{
    public class DemoStack : Stack
    {
        /**
         * Recursively reads all files in a directory including subdirectories.
         * @param dirPath The directory path to read.
         * @returns A list containing paths of all files.
         */
        public static List<ISource> GetAllFiles(string dirPath)
        {
            if (!dirPath.EndsWith("/"))
            {
                dirPath += "/";
            }

            var result = new List<ISource>();
            var files = System.IO.Directory.GetFiles(dirPath, "*", SearchOption.AllDirectories);

            // Loop through each file and directory
            foreach (var file in files)
            {
                var curPath = Path.Combine(dirPath, file);
                if (System.IO.Directory.Exists(curPath))
                {
                    result.AddRange(GetAllFiles(curPath));
                }
                else
                {
                    var objectPrefix = Path.GetDirectoryName(curPath)
                                        .Substring(Path.GetDirectoryName(curPath).IndexOf("/out") + "/out".Length)
                                        + "/";
                    result.Add(Source.Asset(curPath, null, objectPrefix.Substring(1)));
                }
            }

            return result;
        }

        public DemoStack(Construct scope, string id, IStackProps props = null) : base(scope, id, props)
        {
            // The code that defines your stack goes here
            const string folderPath = "my-folder";  //The absolute path of the on-premises folder.
            const string ossBucketName = "my-blog";  //The name of the OSS bucket.
            var filePaths = GetAllFiles(folderPath);

            new RosInfo(this, RosInfo.Description, "Deploy the folder to OSS.");

            new BucketDeployment(this, "SampleFileDeployment", new BucketDeploymentProps
            {
                Sources = filePaths.ToArray(),
                DestinationBucket = ossBucketName,
                Timeout = 300,
                LogMonitoring = true  //Specifies whether to enable log monitoring. If you set this parameter to false, log monitoring is disabled.
            });
        }
    }
}
Create an OSS bucket and add resources
TypeScript
If you do not have an existing OSS bucket, run the following code to create an OSS bucket to store your on-premises files. Replace the content of the lib/demo-stack.ts file in the directory of the project created in Step 1 with the following code:
Specify the absolute path of your on-premises folder as the value of the folderPath variable, and the name of the OSS bucket that you want to create as the value of the ossBucketName variable. Make sure that the name of the OSS bucket is globally unique.
import * as ros from '@alicloud/ros-cdk-core';
import * as oss_deployment from '@alicloud/ros-cdk-ossdeployment';
import * as oss from '@alicloud/ros-cdk-oss';
import * as fs from "fs";
import * as path from "path";


/**
 * Recursively reads all files in a directory including subdirectories.
 * @param dirPath The directory path to read.
 * @returns An array containing paths of all files.
 */
function getAllFiles(dirPath: string): oss_deployment.ISource[] {
  dirPath = dirPath.endsWith('/') ?  dirPath : dirPath + '/';
  const result: oss_deployment.ISource[] = [];
  const files = fs.readdirSync(dirPath);
  for (const file of files) {
    const curPath = path.join(dirPath, file);
    if (fs.lstatSync(curPath).isDirectory()) {
      result.push(...getAllFiles(curPath));
    } else {
      const objectPrefix = path.dirname(curPath).substring(
          path.dirname(curPath).indexOf('/out') + '/out'.length) + '/';
      result.push(oss_deployment.Source.asset(curPath, {}, objectPrefix.substring(1)));
    }
  }
  return result;
}


export class DemoStack extends ros.Stack {
  constructor(scope: ros.Construct, id: string, props?: ros.StackProps) {
    super(scope, id, props);

    const folderPath = "my-folder";  //The absolute path of the on-premises folder.
    const ossBucketName = "my-blog";  //The name of the OSS bucket.

    const filePaths = getAllFiles(folderPath);
    new ros.RosInfo(this, ros.RosInfo.description, "Deploy the folder to OSS.");

    const destBucket = new oss.Bucket(this, 'SampleDestBucket', {
      bucketName: ossBucketName
    });

    new oss_deployment.BucketDeployment(this, 'SampleFileDeployment', {
      sources: filePaths,
      destinationBucket: destBucket,
      timeout: 300,
      logMonitoring: true,  //Specifies whether to enable log monitoring. If you set this parameter to false, log monitoring is disabled.
    });
  }
}
JavaScript
If you do not have an existing OSS bucket, run the following code to create an OSS bucket to store your on-premises files. Replace the content of the lib/demo-stack.js file in the directory of the project created in Step 1 with the following code:
Specify the absolute path of your on-premises folder as the value of the folderPath variable, and the name of the OSS bucket that you want to create as the value of the ossBucketName variable. Make sure that the name of the OSS bucket is globally unique.
const ros = require('@alicloud/ros-cdk-core');
const oss_deployment = require('@alicloud/ros-cdk-ossdeployment');
const oss = require('@alicloud/ros-cdk-oss');
const fs = require("fs");
const path = require("path");

/**
 * Recursively reads all files in a directory including subdirectories.
 * @param dirPath The directory path to read.
 * @returns An array containing paths of all files.
 */
function getAllFiles(dirPath) {
  dirPath = dirPath.endsWith('/') ?  dirPath : dirPath + '/';
  const result = [];
  const files = fs.readdirSync(dirPath);
  for (const file of files) {
    const curPath = path.join(dirPath, file);
    if (fs.lstatSync(curPath).isDirectory()) {
      result.push(...getAllFiles(curPath));
    } else {
      const objectPrefix = path.dirname(curPath).substring(
          path.dirname(curPath).indexOf('/out') + '/out'.length) + '/';
      result.push(oss_deployment.Source.asset(curPath, {}, objectPrefix.substring(1)));
    }
  }
  return result;
}

class DemoStack extends ros.Stack {
  constructor(scope, id, props) {
    super(scope, id, props);
    const folderPath = "my-folder";  //The absolute path of the on-premises folder.
    const ossBucketName = "my-blog";  //The name of the OSS bucket.
    const filePaths = getAllFiles(folderPath);
    new ros.RosInfo(this, ros.RosInfo.description, "Deploy the folder to OSS.");
    const destBucket = new oss.Bucket(this, 'SampleDestBucket', {
      bucketName: ossBucketName
    });
    new oss_deployment.BucketDeployment(this, 'SampleFileDeployment', {
      sources: filePaths,
      destinationBucket: destBucket,
      timeout: 300,
      logMonitoring: true,  //Specifies whether to enable log monitoring. If you set this parameter to false, log monitoring is disabled.
    });
  }
}

module.exports = { DemoStack };
Java
If you do not have an existing OSS bucket, run the following code to create an OSS bucket to store your on-premises files. Replace the content of the
src/main/java/com/myorg/DemoStack.javafile in the directory of the project created in Step 1 with the following code:ImportantSpecify the absolute path of your on-premises folder as the value of the
folderPathvariable, and the name of the OSS bucket that you want to create as the value of theossBucketNamevariable. Make sure that the name of the OSS bucket is globally unique.package com.myorg; import com.aliyun.ros.cdk.core.Construct; import com.aliyun.ros.cdk.core.RosInfo; import com.aliyun.ros.cdk.core.Stack; import com.aliyun.ros.cdk.core.StackProps; import com.aliyun.ros.cdk.oss.Bucket; import com.aliyun.ros.cdk.ossdeployment.BucketDeployment; import com.aliyun.ros.cdk.ossdeployment.ISource; import com.aliyun.ros.cdk.ossdeployment.Source; import java.io.File; import java.util.ArrayList; import java.util.List; import java.util.stream.Collectors; public class DemoStack extends Stack { public DemoStack(final Construct scope, final String id) { this(scope, id, null); } public DemoStack(final Construct scope, final String id, final StackProps props) { super(scope, id, props); final String folderPath = "my-folder"; //The absolute path of the on-premises folder. final String ossBucketName = "my-blog"; //The name of the OSS bucket. List<ISource> filePaths = getAllFiles(folderPath); RosInfo.setDescription("Deploy the folder to OSS."); Bucket destBucket = Bucket.Builder.create(this, "SampleDestBucket") .bucketName(ossBucketName) .build(); BucketDeployment.Builder.create(this, "SampleFileDeployment") .sources(filePaths) .destinationBucket(destBucket) .timeout(300) .logMonitoring(true) //Specifies whether to enable log monitoring. If you set this parameter to false, log monitoring is disabled. .build(); } public static List<ISource> getAllFiles(String dirPath) { if (!dirPath.endsWith("/")) { dirPath += "/"; } List<File> files = listFilesRecursively(new File(dirPath)); return files.stream() .filter(file -> !file.isDirectory()) .map(file -> { String curPath = file.getPath(); String parentPath = file.getParent(); String objectPrefix = parentPath.substring(parentPath.indexOf("/out") + "/out".length()) + "/"; return Source.asset(curPath, null, objectPrefix.substring(1)); }) .collect(Collectors.toList()); } private static List<File> listFilesRecursively(File dir) { List<File> result = new ArrayList<>(); File[] files = dir.listFiles(); if (files != null) { for (File file : files) { result.add(file); if (file.isDirectory()) { result.addAll(listFilesRecursively(file)); } } } return result; } }Run the
mvn compilecommand to compile the CDK project.
Python
If you do not have an existing OSS bucket, run the following code to create an OSS bucket to store your on-premises files. Replace the content of the demo/demo_stack.py file in the directory of the project created in Step 1 with the following code:
Specify the absolute path of your on-premises folder as the value of the folderPath variable, and the name of the OSS bucket that you want to create as the value of the ossBucketName variable. Make sure that the name of the OSS bucket is globally unique.
import os
import ros_cdk_core as core
import ros_cdk_ossdeployment as oss_deployment
import ros_cdk_oss as oss


def get_all_files(dir_path: str):
    """
    Recursively reads all files in a directory including subdirectories.
    :param dir_path: The directory path to read.
    :returns: An array containing paths of all files.
    """
    if not dir_path.endswith('/'):
        dir_path += '/'
    result = []
    files = os.listdir(dir_path)
    for file in files:
        cur_path = os.path.join(dir_path, file)
        if os.path.isdir(cur_path):
            result.extend(get_all_files(cur_path))
        else:
            object_prefix = os.path.dirname(cur_path)[os.path.dirname(cur_path).index('/out') + len('/out'):] + '/'
            print(object_prefix[1:], cur_path)
            result.append(oss_deployment.Source.asset(cur_path, {}, object_prefix[1:]))
    return result


class DemoStack(core.Stack):
    def __init__(self, scope: core.Construct, construct_id: str, **kwargs):
        super().__init__(scope, construct_id, **kwargs)

        folder_path = "my-folder"  #The absolute path of the on-premises folder.
        oss_bucket_name = "my-blog"  #The name of the OSS bucket.
        file_paths = get_all_files(folder_path)

        core.RosInfo(self, core.RosInfo.description, "Deploy the folder to OSS.")

        dest_bucket = oss.Bucket(self, 'SampleDestBucket',
                                 oss.BucketProps(bucket_name=oss_bucket_name))

        oss_deployment.BucketDeployment(self, 'SampleFileDeployment',
                                        oss_deployment.BucketDeploymentProps(
                                            sources=file_paths,
                                            destination_bucket=dest_bucket,
                                            timeout=300,
                                            log_monitoring=True  #Specifies whether to enable log monitoring. If you set this parameter to false, log monitoring is disabled.
                                        ))
C#
If you do not have an existing OSS bucket, run the following code to create an OSS bucket to store your on-premises files. Replace the content of the src/Demo/DemoStack.cs file in the directory of the project created in Step 1 with the following code:
Specify the absolute path of your on-premises folder as the value of the folderPath variable, and the name of the OSS bucket that you want to create as the value of the ossBucketName variable. Make sure that the name of the OSS bucket is globally unique.
using System;
using System.Collections.Generic;
using System.IO;
using AlibabaCloud.SDK.ROS.CDK.Core;
using AlibabaCloud.SDK.ROS.CDK.Ossdeployment;
using AlibabaCloud.SDK.ROS.CDK.Oss;

namespace Demo
{
    public class DemoStack : Stack
    {
        /**
         * Recursively reads all files in a directory including subdirectories.
         * @param dirPath The directory path to read.
         * @returns A list containing paths of all files.
         */
        public static List<ISource> GetAllFiles(string dirPath)
        {
            if (!dirPath.EndsWith("/"))
            {
                dirPath += "/";
            }

            var result = new List<ISource>();
            var files = System.IO.Directory.GetFiles(dirPath, "*", SearchOption.AllDirectories);

            // Loop through each file and directory
            foreach (var file in files)
            {
                var curPath = Path.Combine(dirPath, file);
                if (System.IO.Directory.Exists(curPath))
                {
                    result.AddRange(GetAllFiles(curPath));
                }
                else
                {
                    var objectPrefix = Path.GetDirectoryName(curPath)
                                        .Substring(Path.GetDirectoryName(curPath).IndexOf("/out") + "/out".Length)
                                        + "/";
                    result.Add(Source.Asset(curPath, null, objectPrefix.Substring(1)));
                }
            }

            return result;
        }

        public DemoStack(Construct scope, string id, IStackProps props = null) : base(scope, id, props)
        {
            // The code that defines your stack goes here
            const string folderPath = "my-folder";  //The absolute path of the on-premises folder.
            const string ossBucketName = "my-blog";  //The name of the OSS bucket.
            var filePaths = GetAllFiles(folderPath);

            new RosInfo(this, RosInfo.Description, "Deploy the folder to OSS.");

            var destBucket = new Bucket(this, "SampleDestBucket", new BucketProps
            {
                BucketName = ossBucketName
            });

            new BucketDeployment(this, "SampleFileDeployment", new BucketDeploymentProps
            {
                Sources = filePaths.ToArray(),
                DestinationBucket = destBucket,
                Timeout = 300,
                LogMonitoring = true  //Specifies whether to enable log monitoring. If you set this parameter to false, log monitoring is disabled.
            });
        }
    }
}
Step 5: Create a stack
When a stack is created, all files in your file directory are uploaded to the OSS bucket.
Run the following command to create a stack:
ros-cdk deploy --sync=trueIf
The deployment(sync create stack) has completed!is displayed in the command output, the stack is created. The following sample code shows the complete command output:DemoStack: deploying... |DemoStack |2024-06-20T03:46:09 | CREATE_COMPLETE | ALIYUN::SLS::Logstore | ros-cdk-oss-deploy...gxxxx/funct ion-log | SLSLogStoregxxxx |DemoStack |2024-06-20T03:46:09 | CREATE_COMPLETE | ALIYUN::SLS::Project | ros-cdk-oss-deployment-gxxxx | S LSProjectgxxxx |DemoStack |2024-06-20T03:46:09 | CREATE_COMPLETE | ALIYUN::RAM::Role | ros-cdk-oss-deployment-gxxxx | F CRolegxxxx |DemoStack |2024-06-20T03:46:09 | CREATE_COMPLETE | ALIYUN::OSS::Bucket | yingzhao-blog-0001 | SampleDestB ucket |DemoStack |2024-06-20T03:46:09 | CREATE_COMPLETE | ALIYUN::FC::Service | 6ba8771f-a499-433d-a7ac-5e7axxxx eb4b | FCServicegxxxx |DemoStack |2024-06-20T03:46:09 | CREATE_COMPLETE | ALIYUN::FC::Function | 436f5ba6-7ce2-4627-be63-c67dxxxx 907a | FCFunctiongxxxx |DemoStack |2024-06-20T03:46:09 | CREATE_COMPLETE | ALIYUN::SLS::Index | ros-cdk-oss-deploy...function-lo g/index | SLSIndexgxxxx |DemoStack |2024-06-20T03:46:09 | CREATE_COMPLETE | ALIYUN::ROS::CustomResource | - | SampleFileDeployment The deployment(sync create stack) has completed! Status: CREATE_COMPLETE StatusReason: Stack CREATE completed successfully StackId: 070932bb-d6d3-4f08-8e6a-2a0740bxxxxCheck whether files are uploaded to the OSS bucket.
Log on to the OSS console.
In the left-side navigation pane, click Buckets. On the Buckets page, click the name of the desired OSS bucket.
In the left-side navigation tree, choose Object Management > Objects.
On the Objects page, check whether the files exist.
Related operations
Update a stack
If new files are added to your on-premises folder, or the content of an existing file in your on-premises folder is updated, you can update the corresponding stack.
Run the following command to update the stack and upload the updates to the OSS bucket. The command used to create a stack is the same as the command used to update a stack.
ros-cdk deploy --sync=trueCheck whether the stack is updated. If the following command output is displayed, the stack is updated:
 The deployment(sync update stack) has completed!
Status: UPDATE_COMPLETE
StatusReason: Stack successfully updated
StackId: 070932bb-d6d3-4f08-8e6a-2a0740bxxxx
Delete a stack
Deleted objects cannot be recovered. Proceed with caution.
When your project is complete, the environment is cleared, or you want to control your costs, you may no longer require a stack. In this case, you can use ROS CDK to delete the stack.
ROS CDK cannot automatically delete the objects in an OSS bucket. Before you use ROS CDK to delete your stack, log on to the OSS console and select and delete all the desired objects in your OSS bucket.
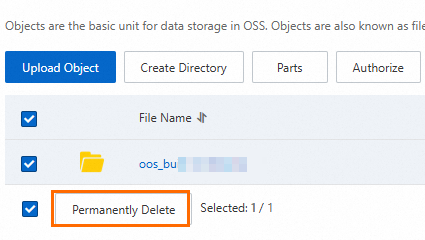
Delete all objects in an OSS bucket. In this example, all operations are performed in the console. If you want to use Alibaba Cloud SDK or a command line tool such as ossutil to delete objects, see Delete objects.
Log on to the OSS console.
In the left-side navigation pane, click Buckets. On the Buckets page, click the name of the desired OSS bucket.
In the left-side navigation tree, choose Object Management > Objects.
Select all objects and click Permanently Delete.
Use ROS CDK to delete a stack.
Run the following command to delete the stack:
ros-cdk destroy --sync=trueROS CDK prompts you to confirm the stack that you want to delete. Sample code:
The following stack(s) will be destroyed(Only deployed stacks will be displayed).

DemoStack

Please confirm.(Y/N)
Enter
yand press the Enter key. Check whether the stack is deleted. If the stack is deleted, the following command output is displayed:The task(sync destroy stack) has finished! status: DELETE_COMPLETE StatusReason: Stack DELETE completed successfully StackId: 070932bb-d6d3-4f08-8e6a-2a0740bxxxx
References
API reference page: The CDK construct library provides a collection of API operations for you to build your CDK applications. For more information about how to use the API operations and the features of the API operations, see Ros Cdk References.
CDK command: For more information about how to use CDK commands and the usage examples, see ROS CDK commands.
CDK feature: For more information about how to use CDK features such as outputs and pseudo parameters and the usage examples, see ROS CDK features.
GitHub repository: For more information about the official GitHub repository of ROS CDK, visit Resource-Orchestration-Service-Cloud-Development-Kit. On the website, you can submit issues and view the service license and release notes.