Dify is an open-source platform for large language model (LLM) application development. It integrates Backend as a Service (BaaS) with LLMOps, enabling rapid development of production-ready Generative AI applications. This tutorial walks through creating an AI Q&A application that uses ApsaraDB RDS for PostgreSQL as both the relational database and the vector store, with Dify as the application platform.
Prerequisites
Before you begin, prepare the following:
An Alibaba Cloud account with access to ApsaraDB RDS and Elastic Compute Service (ECS)
A corpus file for the knowledge base. Supported formats: TXT, MARKDOWN, MDX, PDF, HTML, XLSX, XLS, DOCX, CSV, MD, and HTM. Maximum file size: 15 MB per file
(Optional) An API key from Alibaba Cloud Bailian if you plan to use Tongyi Qianwen as the LLM
Step 1: Set up the ApsaraDB RDS for PostgreSQL instance
Create an account and a database for the RDS instance. For more information, see Create a database and an account.
Set Account Type to Privileged Account.
Set Authorized Account to the privileged account you created.
Apply for a public endpoint for the RDS instance. For more information, see Enable or disable a public endpoint.
Add the public IP address of your ECS instance to the whitelist of the RDS instance. For more information, see Set a whitelist.
Enable the vector plug-in (pgvector) for the target database. For more information, see Manage plug-ins.
Step 2: Deploy Dify on ECS
Create an ECS instance
Create an ECS instance. For more information, see Custom purchase of ECS instances.
| ECS type | Supported AI models |
|---|---|
| CPU-based | Online AI large models only |
| GPU-based | Both online and local AI large models |
This tutorial uses Alibaba Cloud Linux 3 as an example.
If you purchase a GPU-based ECS instance, install the corresponding GPU driver when configuring the image. A GPU-based instance lets you deploy large models on ECS through Ollama.
Install Docker
Install Docker on the ECS instance. For more information, see Install Docker.
Get the Dify source code
Clone the Dify repository:
git clone https://github.com/langgenius/dify.gitTo install a specific version, use the --branch parameter. For example, to install version v1.0.0:
git clone https://github.com/langgenius/dify.git --branch 1.0.0For available versions, see Dify tags.
If Git is not installed, run sudo yum install git -y to install it.
Configure ApsaraDB RDS for PostgreSQL as the database and vector store
Set ApsaraDB RDS for PostgreSQL as both the default database and the default vector store for Dify. Choose one of the following configuration methods.
Option 1: Use environment variables
Set ApsaraDB RDS for PostgreSQL as the default database:
export DB_USERNAME=testdbuser
export DB_PASSWORD=dbPassword
export DB_HOST=pgm-****.pg.rds.aliyuncs.com
export DB_PORT=5432
export DB_DATABASE=testdb01
Replace the placeholder values with your actual RDS instance information.
| Parameter | Description |
|---|---|
DB_USERNAME | The privileged account of the ApsaraDB RDS for PostgreSQL instance. |
DB_PASSWORD | The password of the privileged account. |
DB_HOST | The public endpoint of the ApsaraDB RDS for PostgreSQL instance. |
DB_PORT | The public port of the ApsaraDB RDS for PostgreSQL instance. Default: 5432. |
DB_DATABASE | The database name in the ApsaraDB RDS for PostgreSQL instance. |
Set ApsaraDB RDS for PostgreSQL as the default vector store:
export VECTOR_STORE=pgvector
export PGVECTOR_HOST=pgm-****.pg.rds.aliyuncs.com
export PGVECTOR_PORT=5432
export PGVECTOR_USER=testdbuser
export PGVECTOR_PASSWORD=dbPassword
export PGVECTOR_DATABASE=testdb01
Replace the placeholder values with your actual RDS instance information.
| Parameter | Description |
|---|---|
VECTOR_STORE | The vector store type. Set to pgvector. |
PGVECTOR_USER | The privileged account of the ApsaraDB RDS for PostgreSQL instance. |
PGVECTOR_PASSWORD | The password of the privileged account. |
PGVECTOR_HOST | The public endpoint of the ApsaraDB RDS for PostgreSQL instance. |
PGVECTOR_PORT | The public port of the ApsaraDB RDS for PostgreSQL instance. Default: 5432. |
PGVECTOR_DATABASE | The database name in the ApsaraDB RDS for PostgreSQL instance. |
(Optional) Disable the default database and Weaviate containers
To avoid running the default PostgreSQL database and Weaviate containers on ECS, which saves traffic and storage space, edit the .env and docker-compose.yaml files.
Start Dify
Start Dify:
cd /root/dify/docker
docker compose -f docker-compose.yaml up -d
Step 3: Access the Dify service
Open
http://<ECS public IP address>/installin your browser.NoteIf the page fails to load, refresh it several times. Dify is initializing the storage table structure and related data.
Follow the on-screen prompts to Set Administrator Account by entering an email address, username, and password. This registers you on the Dify platform.
Step 4: Add and configure AI models
This section uses Tongyi Qianwen as an example.
Add Tongyi Qianwen through an API key
Log on to the Dify platform.
In the upper-right corner, click User Name > Settings.
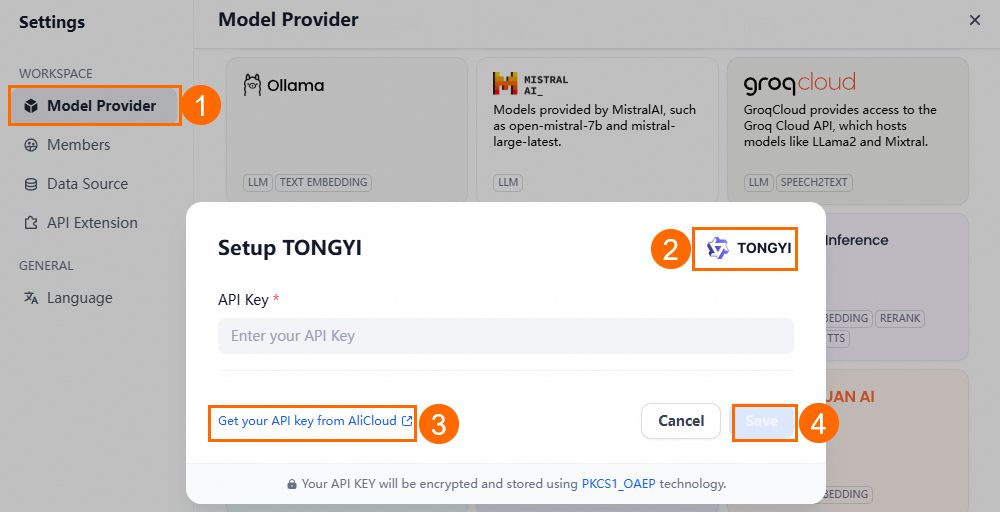
On the Settings page, go to Model Provider > Tongyi Qianwen > (settings).
On the Tongyi Qianwen Settings page, click the link to retrieve the API key from Alibaba Cloud Bailian.
Enter the API key and click Save.
Step 5: Create a knowledge base
A dedicated knowledge base enables the AI Q&A application to answer questions with greater accuracy and relevance.
Upload documents
Go to Knowledge Base > Create Knowledge Base > Import Existing Text > Select File > Next to upload your prepared file.
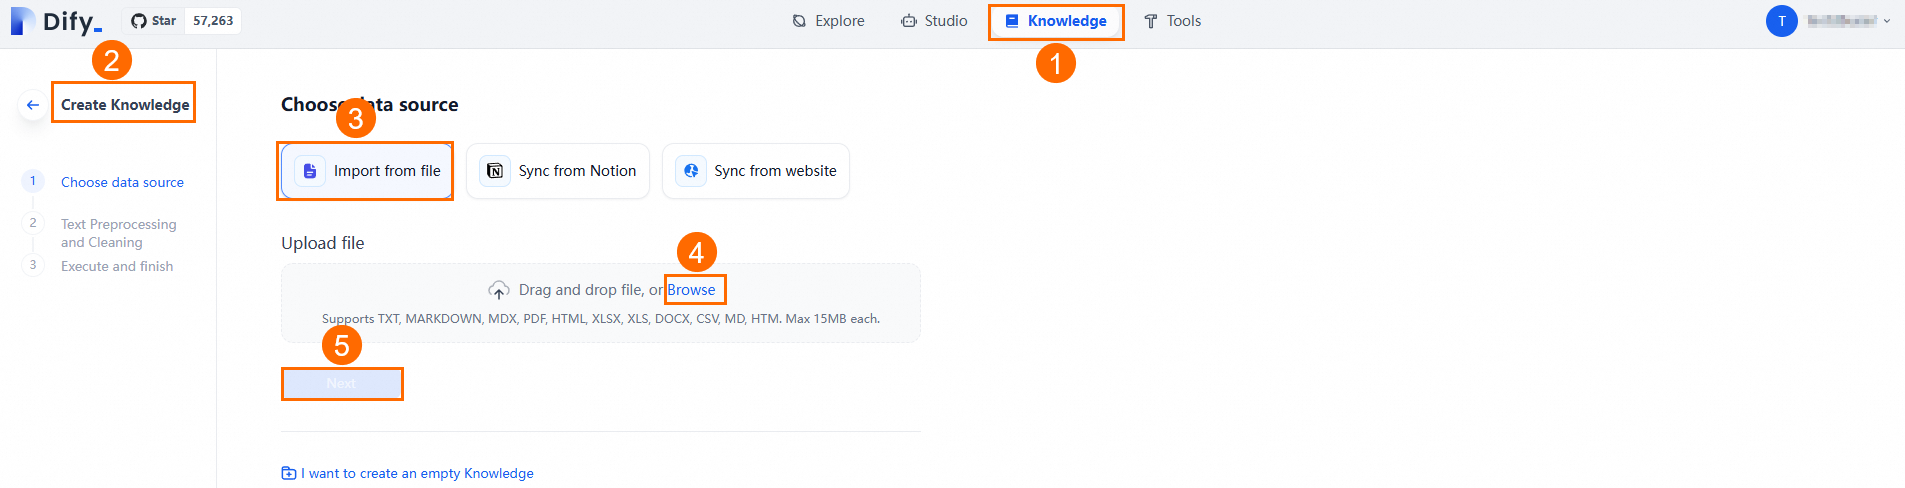
Click Next and follow the on-screen guide to perform Text Segmentation And Traffic Scrubbing. You can use the default settings. Dify automatically scrubs, segments, and indexes the uploaded documents, improving the Q&A application's retrieval accuracy.
Verify the knowledge base in ApsaraDB RDS for PostgreSQL
After setting up the knowledge base, verify its content in the ApsaraDB RDS for PostgreSQL database and confirm the index for each knowledge base table.
Connect to the ApsaraDB RDS for PostgreSQL database used by Dify. For connection instructions, see Connect to an ApsaraDB RDS for PostgreSQL instance.
Query the knowledge base IDs:
SELECT * FROM datasets;Construct the table name from the knowledge base ID: replace
-with_in the ID, add the prefixembedding_vector_index_, and append the suffix_nod. For example:SELECT * FROM embedding_vector_index_6b169753_****_****_be66_9bddc44a4848_nod;Confirm the knowledge base index. By default, Dify creates an HNSW index for each knowledge base table to speed up vector similarity queries through the pgvector plug-in. The system uses the following SQL statement for vector similarity queries: To check whether the index exists and its parameters meet your recall rate requirements, run: For details on how the HNSW index parameters
mandef_constructionaffect recall rate, see pgvector performance testing (based on HNSW index).SELECT meta, text, embedding <=> $1 AS distance FROM embedding_vector_index_6b169753_****_****_be66_9bddc44a4848_nod ORDER BY distance LIMIT $2;SELECT * FROM pg_indexes WHERE tablename = 'embedding_vector_index_6b169753_****_****_be66_9bddc44a4848_nod';(Optional) If the index was not created automatically or the default parameters do not meet your recall rate requirements, create the index manually.
Delete the existing index (if needed):
DROP INDEX IF EXISTS embedding_vector_index_6b169753_****_****_be66_9bddc44a4848_nod;Create a new HNSW index:
CREATE INDEX ON embedding_vector_index_6b169753_****_****_be66_9bddc44a4848_nod
USING hnsw (embedding vector_cosine_ops)
WITH (m = 16, ef_construction = 100);
NoteReplace
embedding_vector_index_6b169753_****_****_be66_9bddc44a4848_nodwith your actual table name.
Step 6: Create an AI Q&A application
This section uses the Question Classifier + Knowledge + Chatbot template as an example.
Go to Studio > Create From Application Template.

Find the Question Classifier + Knowledge + Chatbot template and click Use This Template.
Set the application name and icon, then click Create.
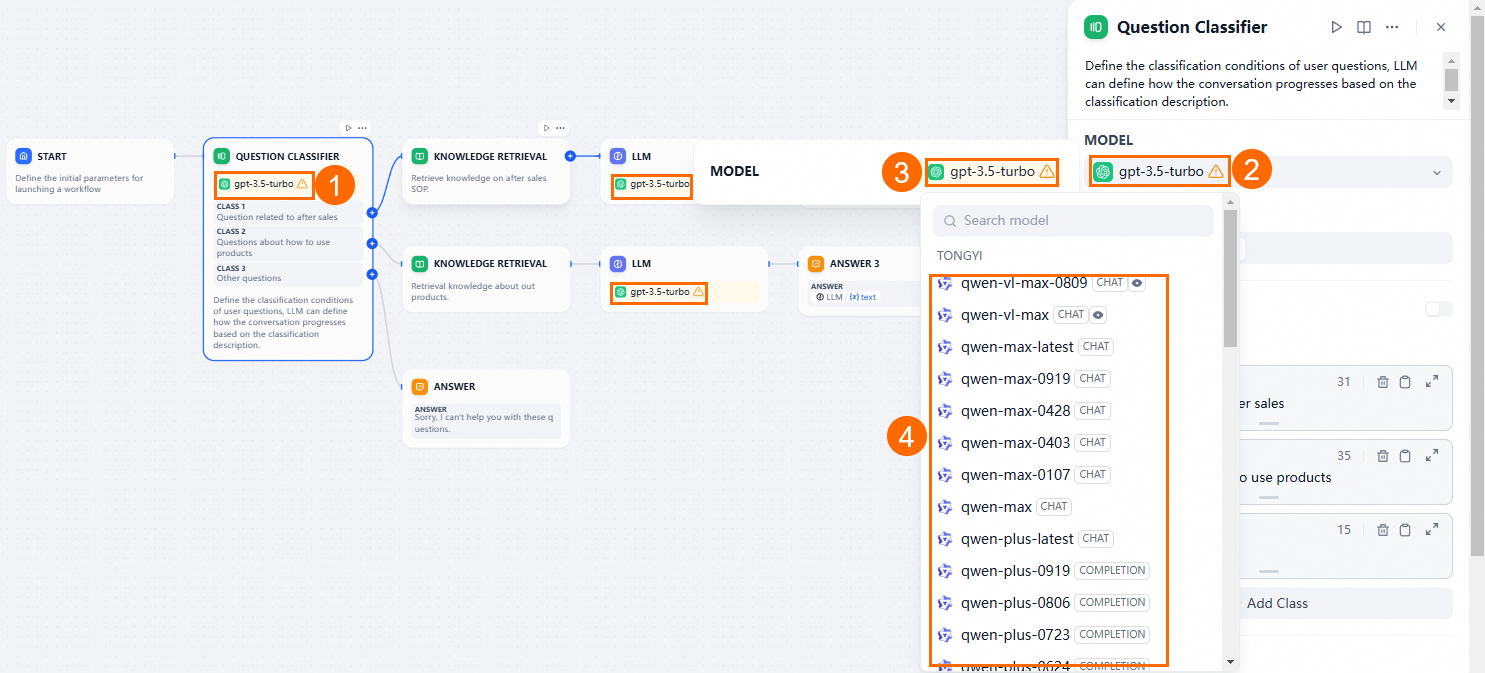
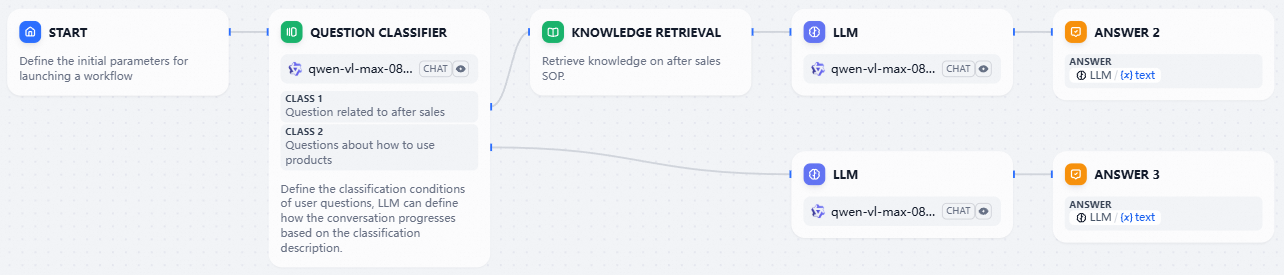
On the Studio page, select the newly created application card to open the workflow editor.
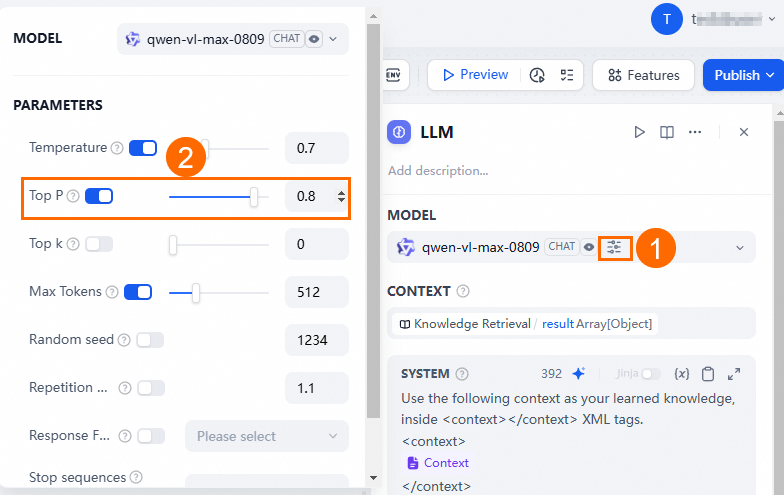
Configure the workflow: remove the Answer module, keep a Knowledge Retrieval module, and set the AI models for the Question Classifier and LLM modules to Tongyi Qianwen.
When configuring Tongyi Qianwen, set the Top P value to less than 1.
Customize the Question Classifier module. For example, if your knowledge base contains PostgreSQL information:
For PostgreSQL-related questions, combine the knowledge base with the Tongyi Qianwen LLM for analysis and summarization.
For non-PostgreSQL questions, use the Tongyi Qianwen LLM directly.
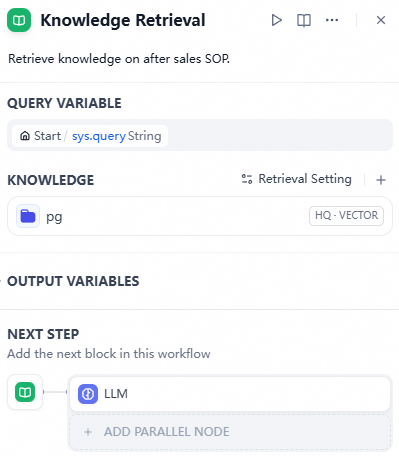
Update the Knowledge Retrieval module by adding the PostgreSQL knowledge base you created earlier.
Click Preview in the upper-right corner to test the Q&A application. Once it works correctly, click Publish to release it.