If your database system receives a large number of read requests but a small number of write requests, your primary ApsaraDB RDS for MySQL instance may need to process more read requests as your business grows. As a result, the performance of the primary RDS instance is affected. In this case, you can create read-only RDS instances and enable database proxies to automatically forward read requests to the read-only RDS instances. This helps reduce the loads on the primary RDS instance and achieve read/write splitting.
Billing rules
You are charged for the instance types and storage resources that you select for your primary and read-only RDS instances. For more information, see Billable items.
You are charged for the instance type and Elastic Block Storage (EBS) resources that your select for your Elastic Compute Service (ECS) instance. For more information, see Billing overview.
If you enable the SQL Explorer and Audit feature for your primary and read-only RDS instances, you are charged for log traffic and log indexing. For more information, see Billing details.
Preparations
In this topic, an ECS instance and an RDS instance are required to simulate the sending and processing of read and write requests.
Create and configure an RDS instance
Log on to the ApsaraDB RDS console and click Create Instance to go to the ApsaraDB RDS buy page.
Create an RDS instance. In this topic, a standard RDS instance that runs MySQL 8.0 on RDS High-availability Edition, uses a PL1 ESSD or Premium ESSD, and provides a storage capacity of 20 GB is created. You can use the lowest configurations for other specifications to reduce costs.
Create a database. In this topic, a database named
dbtestis created and supports the UTF-8 character set.Create a privileged account. In this topic, a privileged account named
dbuseris created, and a custom password is specified.
Create and configure an ECS instance
In this topic, an ECS instance is created to simulate the sending of read and write requests, and a MySQL database is created on the ECS instance. For more information, see Getting started with ECS.
Create an ECS instance: Go to the ECS buy page. Select the Pay-as-you-go billing method, the China (Hangzhou) region, and the Alibaba Cloud Linux 3.2104 LTS 64-bit image. Set the Logon Username parameter to root and specify a password. You can use the lowest configurations for other specifications to reduce costs.
ImportantThe ECS instance and the RDS instance must reside in the same region and the same virtual private cloud (VPC) to enable communication over an internal network. Otherwise, you may fail to connect the ECS instance to the RDS instance.
Log on to the ECS instance: On the Instances page of the ECS console, find the ECS instance and click Connect in the Actions column. Then, log on to the ECS instance as the root user.
Run the following commands in the CLI of the ECS instance to install and enable the MySQL service:
yum install -y mysql-server
systemctl start mysqld
systemctl enable mysqld
After the installation process is complete, run the
mysqlcommand. If the information in the following figure is displayed, the MySQL service is installed and enabled. Then, you can run theexitcommand to exit the CLI.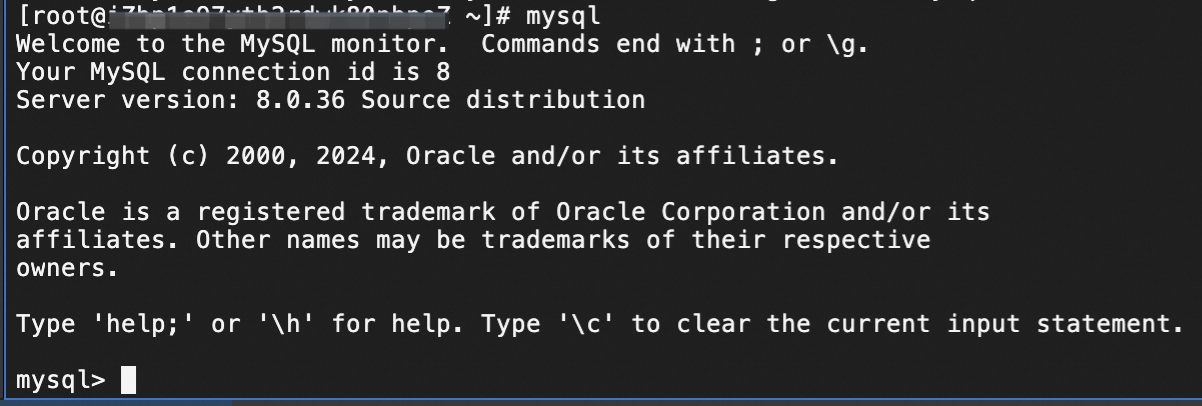
1. Configure the primary and read-only RDS instances
If the RDS instance runs RDS High-availability Edition, the secondary RDS instance is inaccessible. In this case, you must create a read-only RDS instance and use the database proxy to forward read requests to the read-only RDS instance to implement read/write splitting. For more information about read-only RDS instances, see Overview of read-only ApsaraDB RDS for MySQL instances.
1.1 Configure the primary RDS instance
Log on to the ApsaraDB RDS console. Click the ID of the RDS instance that you created.
Enable the database proxy feature for the primary RDS instance.
NoteIn this topic, general-purpose database proxies are enabled. The general-purpose database proxies are provided free of charge and forward write requests to the primary RDS instance and read requests to the read-only RDS instance. For more information, see What are database proxies?
In the left-side navigation pane of the page that appears, click Database Proxy. In the General-purpose card, click Enable Now.
In the dialog box that appears, click OK. Wait approximately 1 to 2 minutes for the general-purpose database proxy to be enabled.
1.2 Configure the read-only RDS instance
On the Instances page, click the ID of the primary RDS instance to go to the instance details page.
In the Instance Distribution section of the page, click Add to the right of Read-only Instance to go to the ApsaraDB RDS buy page.
Create a read-only RDS instance: Select the Pay-as-you-go billing method, the High-availability Edition, and the Standard product type. Specify a storage capacity that is greater than or equal to the storage capacity of the primary RDS instance. You can use the lowest configurations for other specifications to reduce the costs. In this topic, a storage capacity of 20 GB is selected.
Click Next: Instance Configuration. Then, click Next: Confirm Order. On the page that appears, set the Quantity parameter to 1 and complete the payment.
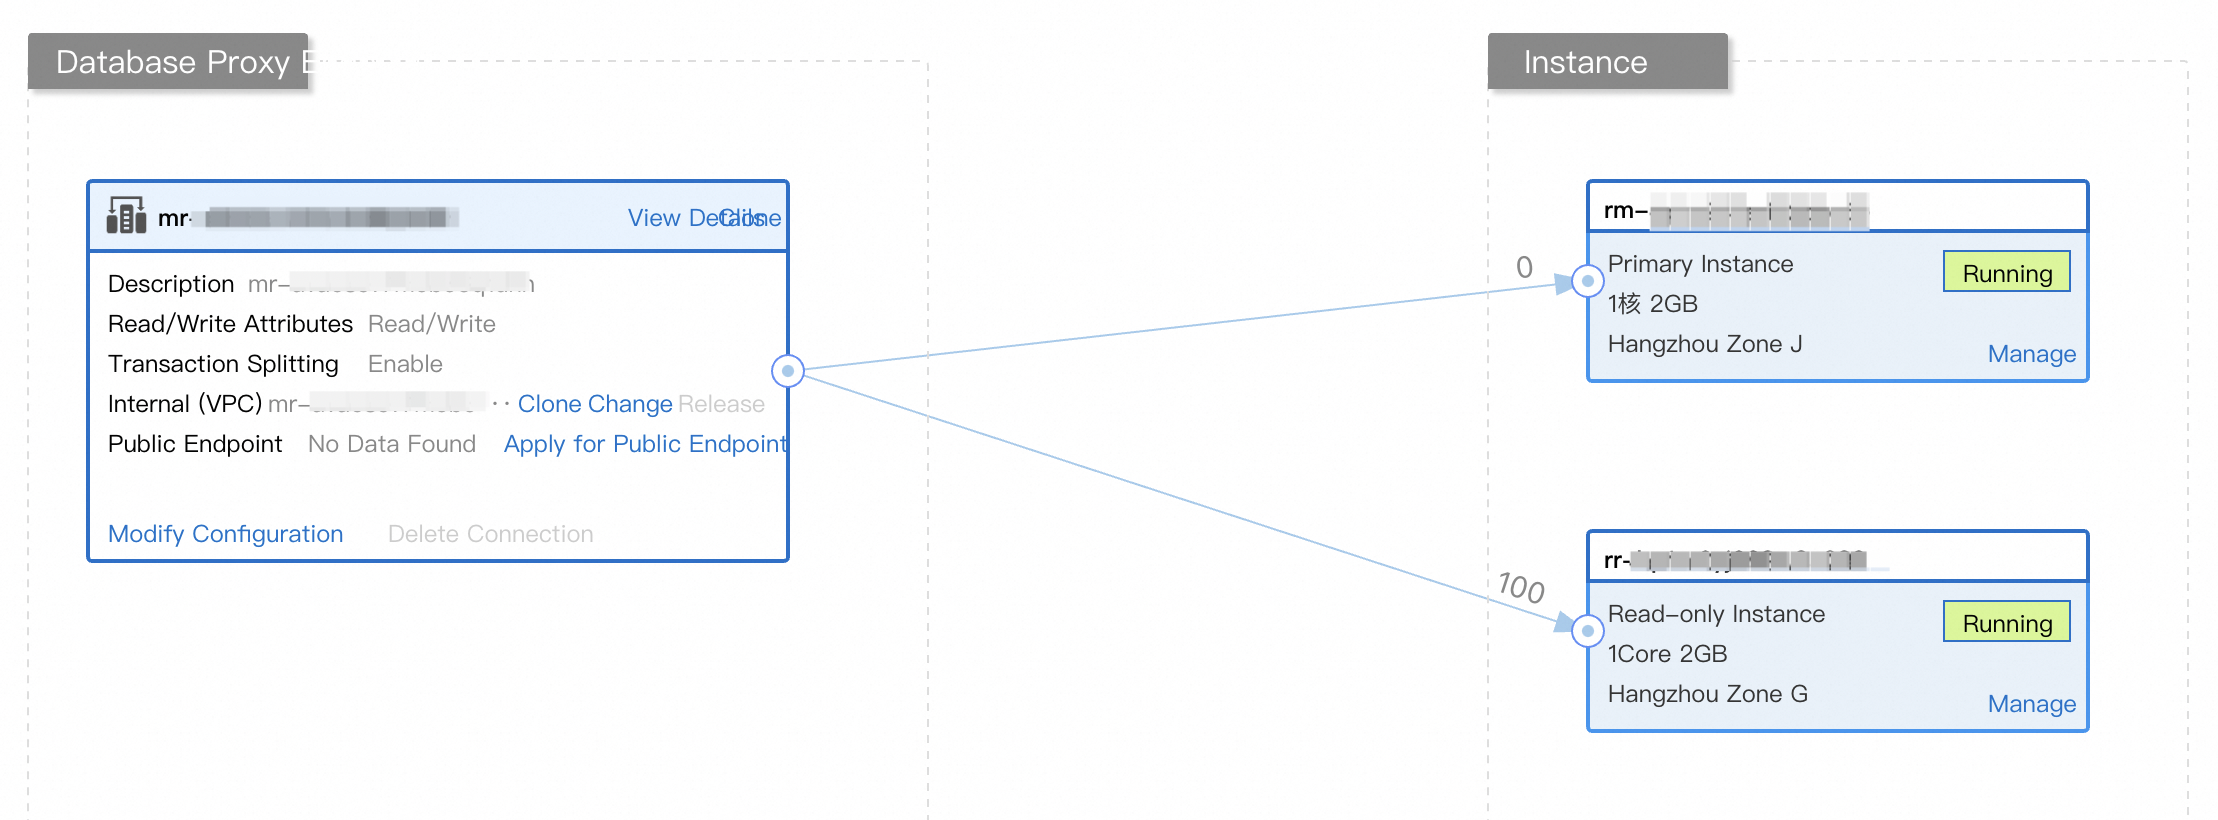
Go to the Database Proxy page of the primary or read-only RDS instance to view the connection topology of the instance. After the read-only RDS instance is created, the database proxy of the primary RDS instance automatically connects to the read-only RDS instance and assigns read weights. By default, the primary RDS instance processes only write requests, and the read-only RDS instance processes only read requests.
The database proxy feature is used to distribute read and write requests. If you want to verify the effectiveness of read/write splitting, you must enable the SQL Explorer and Audit feature for the primary and read-only RDS instances before read and write requests are sent. For more information, see Use the SQL Explorer and Audit feature.
If you enable the SQL Explorer and Audit feature, you are charged for log traffic and log indexing. In this topic, the feature is used to verify the distribution of read and write requests on the primary and read-only RDS instances. If you want to continue using the RDS instance but no longer require the feature after read/write splitting is verified, we recommend that you disable the feature to prevent unexpected fees. For more information, see Use the SQL Explorer and Audit feature.
2. Simulate read and write requests
2.1 Connect to the database
Log on to the ECS instance. In the CLI of the ECS instance, run the following command to connect to the database:
# mysql connection command template
mysql -hInternal endpoint of the database proxy -PPort number -uUsername -p

# Sample mysql connection command
mysql -hmr-bm**************.rwlb.rds.aliyuncs.com -P3306 -udbuser -p
Use the default port
3306.Use
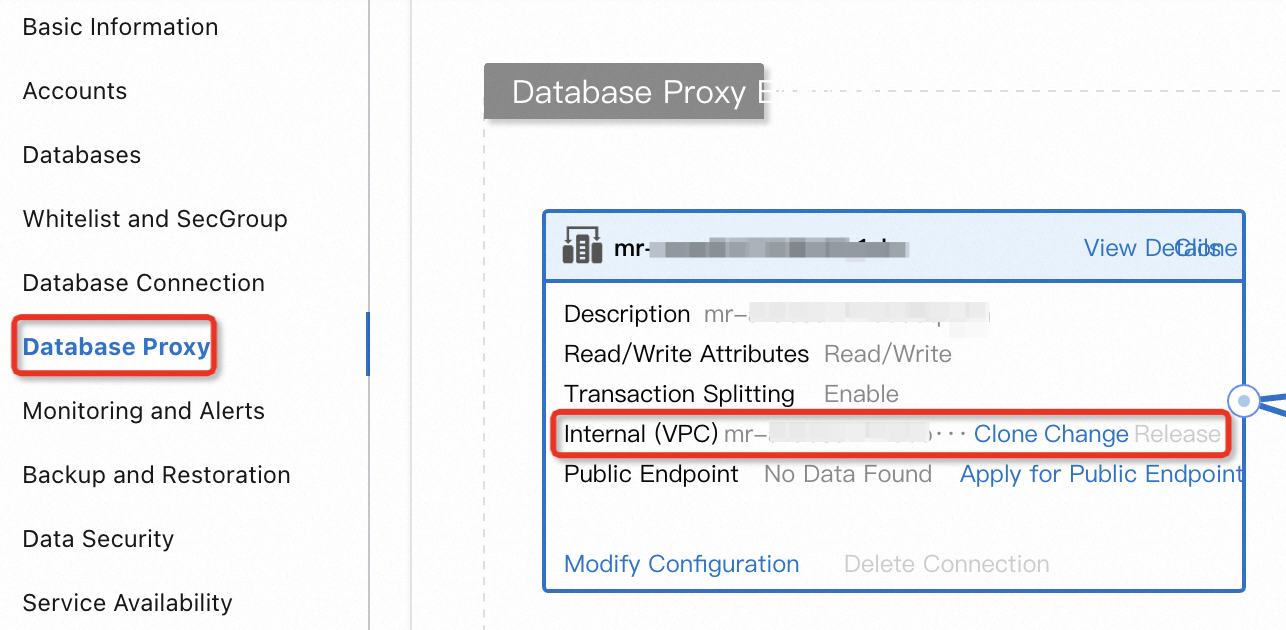
dbuseras the username and the custom password as the password. The dbuser is the privileged account that you created in Preparations.Use the internal endpoint of the database proxy. If you use the endpoint of the primary RDS instance, read/write splitting cannot be implemented. You can go to the Database Proxy page to obtain the internal endpoint of the database proxy from the connection topology.
2.2 Simulate write requests
After you connect to the database, you can run the following command to switch to the
dbtestdatabase that you created in Preparations.-- Use the dbtest database. USE dbtest;Execute the following statements to create a table named
table_testin thedbtestdatabase and insert four data records into the table:-- Create the table_test table. CREATE TABLE table_test ( id INT PRIMARY KEY, name VARCHAR(50), age INT ); -- Insert four data records into the table. INSERT INTO table_test (id, name, age) VALUES (1, 'user1', 25); INSERT INTO table_test (id, name, age) VALUES (2, 'user2', 30); INSERT INTO table_test (id, name, age) VALUES (3, 'user3', 28); INSERT INTO table_test (id, name, age) VALUES (4, 'user4', 18);
2.3 Simulate read requests
Execute the following SELECT statements to query data from the database. Then, simulate the sending of read requests.
SELECT * FROM table_test;
SELECT * FROM table_test WHERE id = 1;
SELECT * FROM table_test WHERE id = 2;
SELECT * FROM table_test WHERE id = 3;
SELECT * FROM table_test WHERE id = 4;
3. (Optional) Verify read/write splitting
If you want to verify the effectiveness of read/write splitting, you must enable the SQL Explorer and Audit feature for the primary and read-only RDS instances before read and write requests are sent.
After read and write requests are sent from the ECS instance, you can use the SQL Explorer and Audit feature to view the distribution and processing of the read and write requests on the primary instance and read-only RDS instances. The primary RDS instance processes only write requests and the read-only RDS instance processes only read requests based on the default read weights assigned by the database proxy. The read requests refer to the CREATE TABLE and INSERT statements. The write requests refer to the SELECT statement.
Verify the requests on the primary RDS instance
On the Instances page, click the ID of the primary RDS instance. In the left-side navigation pane of the page that appears, click SQL Explorer and Audit. On the page that appears, click the Audit tab.
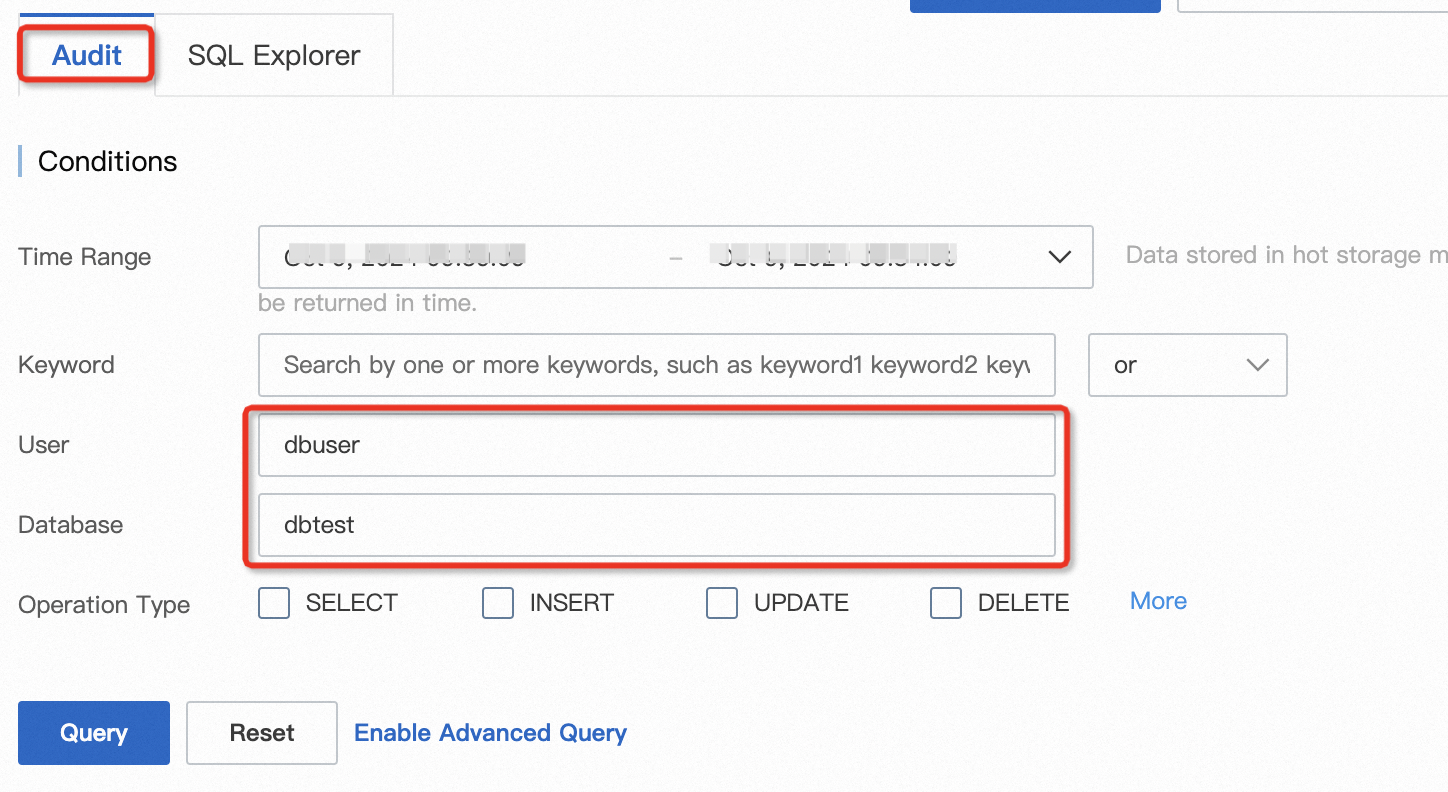
Specify search conditions: Specify a time range, set the User parameter to
dbuserand the Database parameter todbtest, and then click Query. You can view the execution of SQL statements on the primary RDS instance in the Logs section.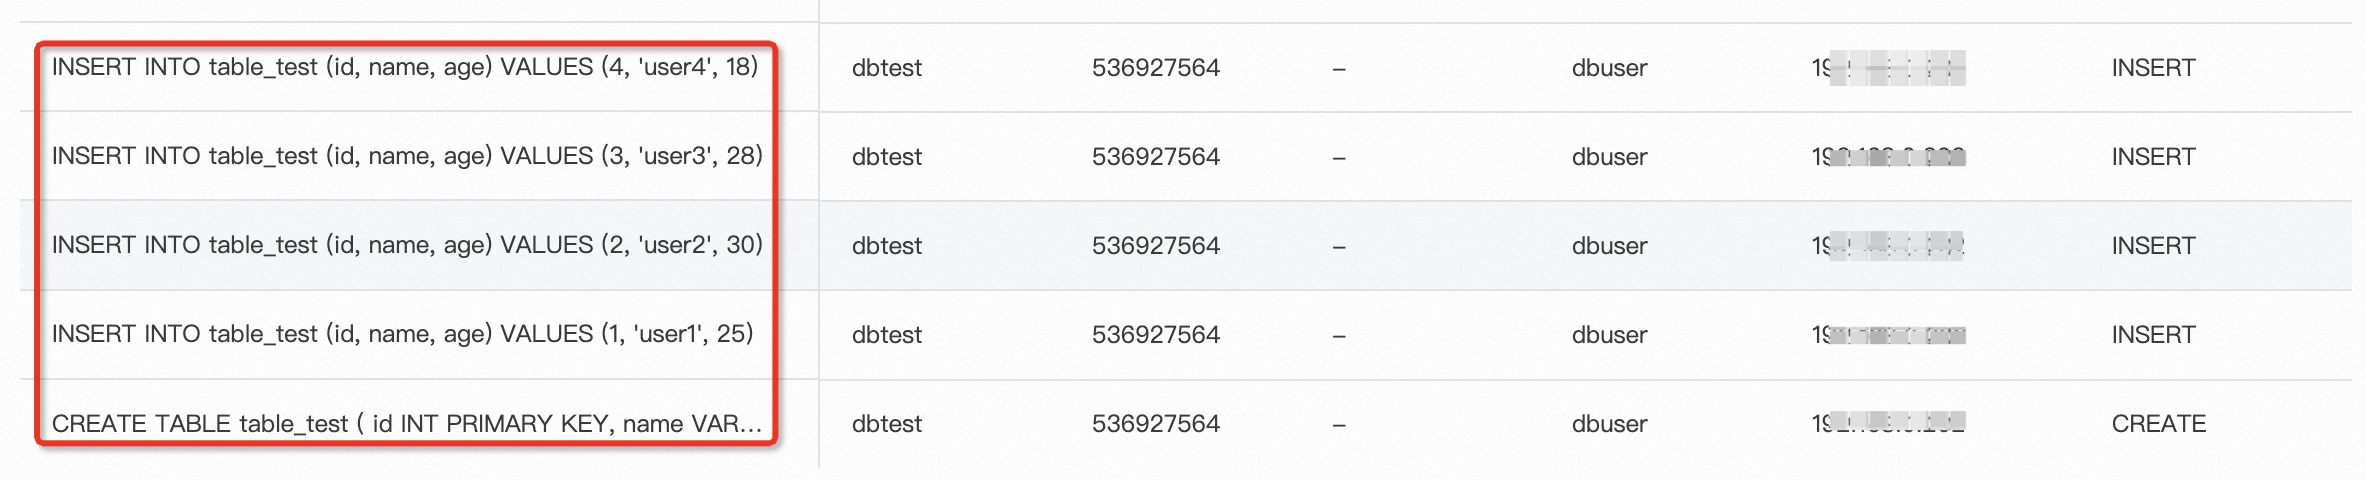 The preceding figure shows that one
 CREATE TABLEstatement and fourINSERTstatements are executed and noSELECTstatements are executed on the primary RDS instance. This indicates that only write requests are sent to the primary RDS instance.
Verify the requests on the read-only RDS instance
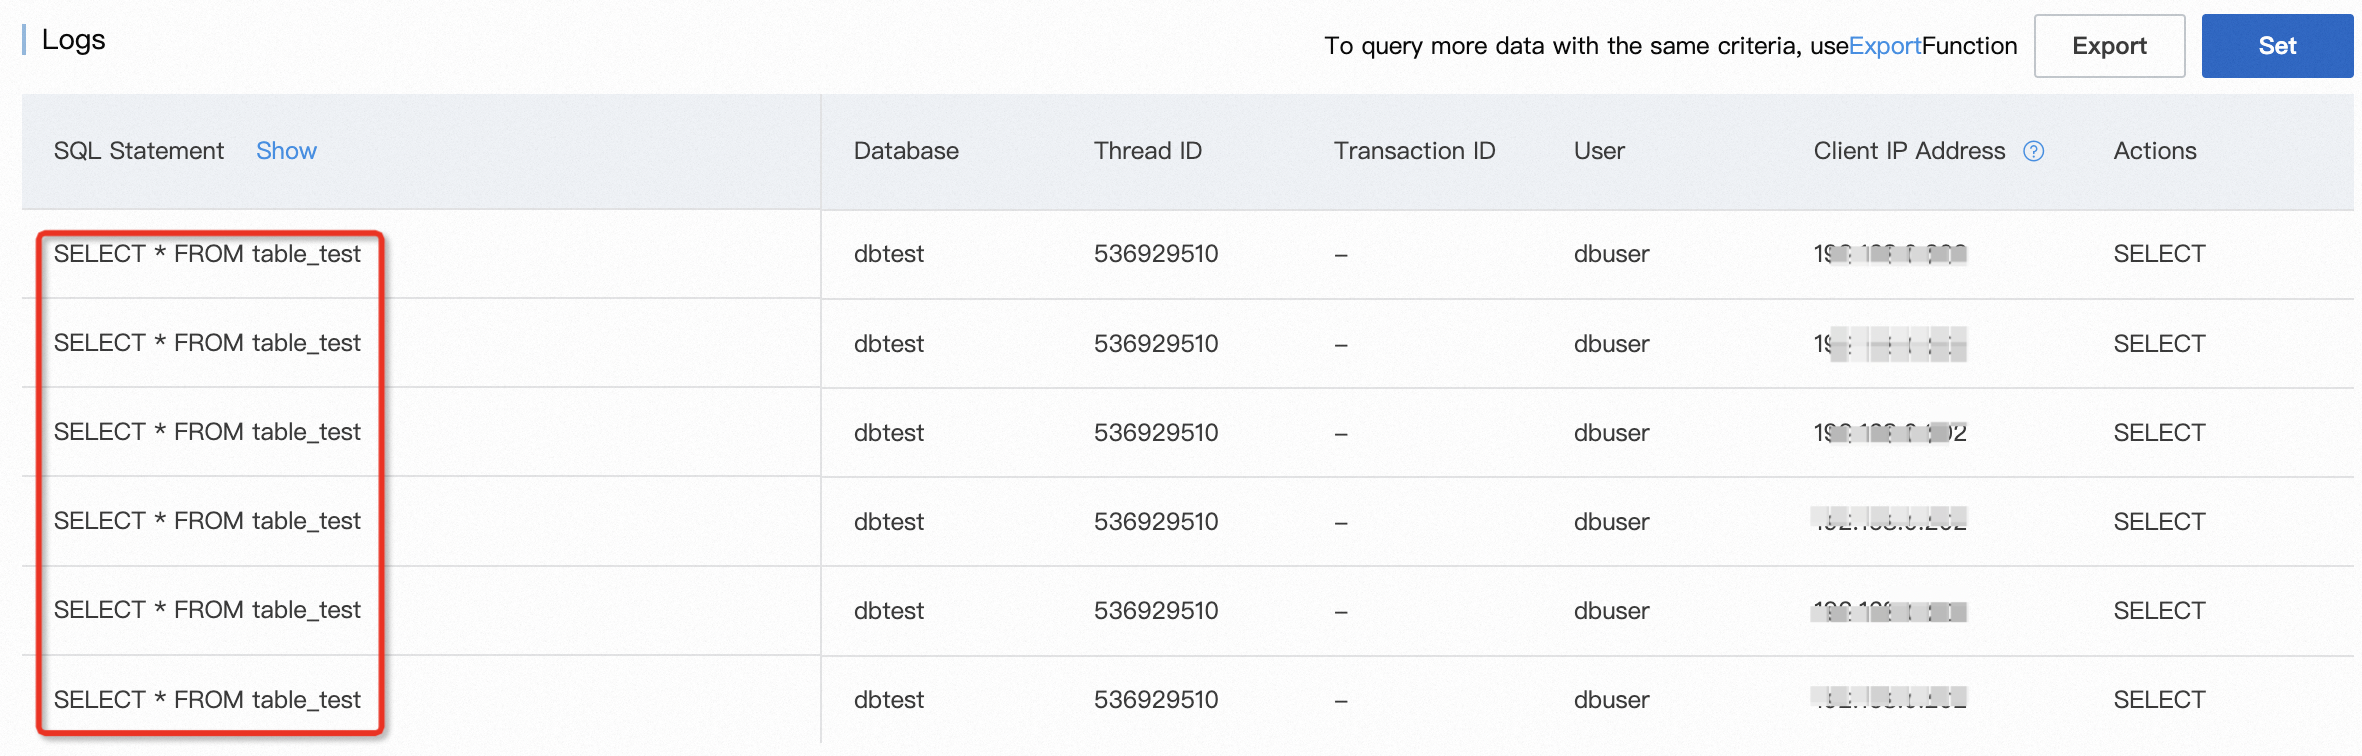
On the Instances page, click the ID of the read-only RDS instance. In the left-side navigation pane of the page that appears, click SQL Explorer and Audit. On the page that appears, click the Audit tab.
Specify search conditions: Specify a time range, set the User parameter to
dbuserand the Database parameter todbtest, and then click Query. You can view the execution of SQL statements on the read-only RDS instance in the Logs section.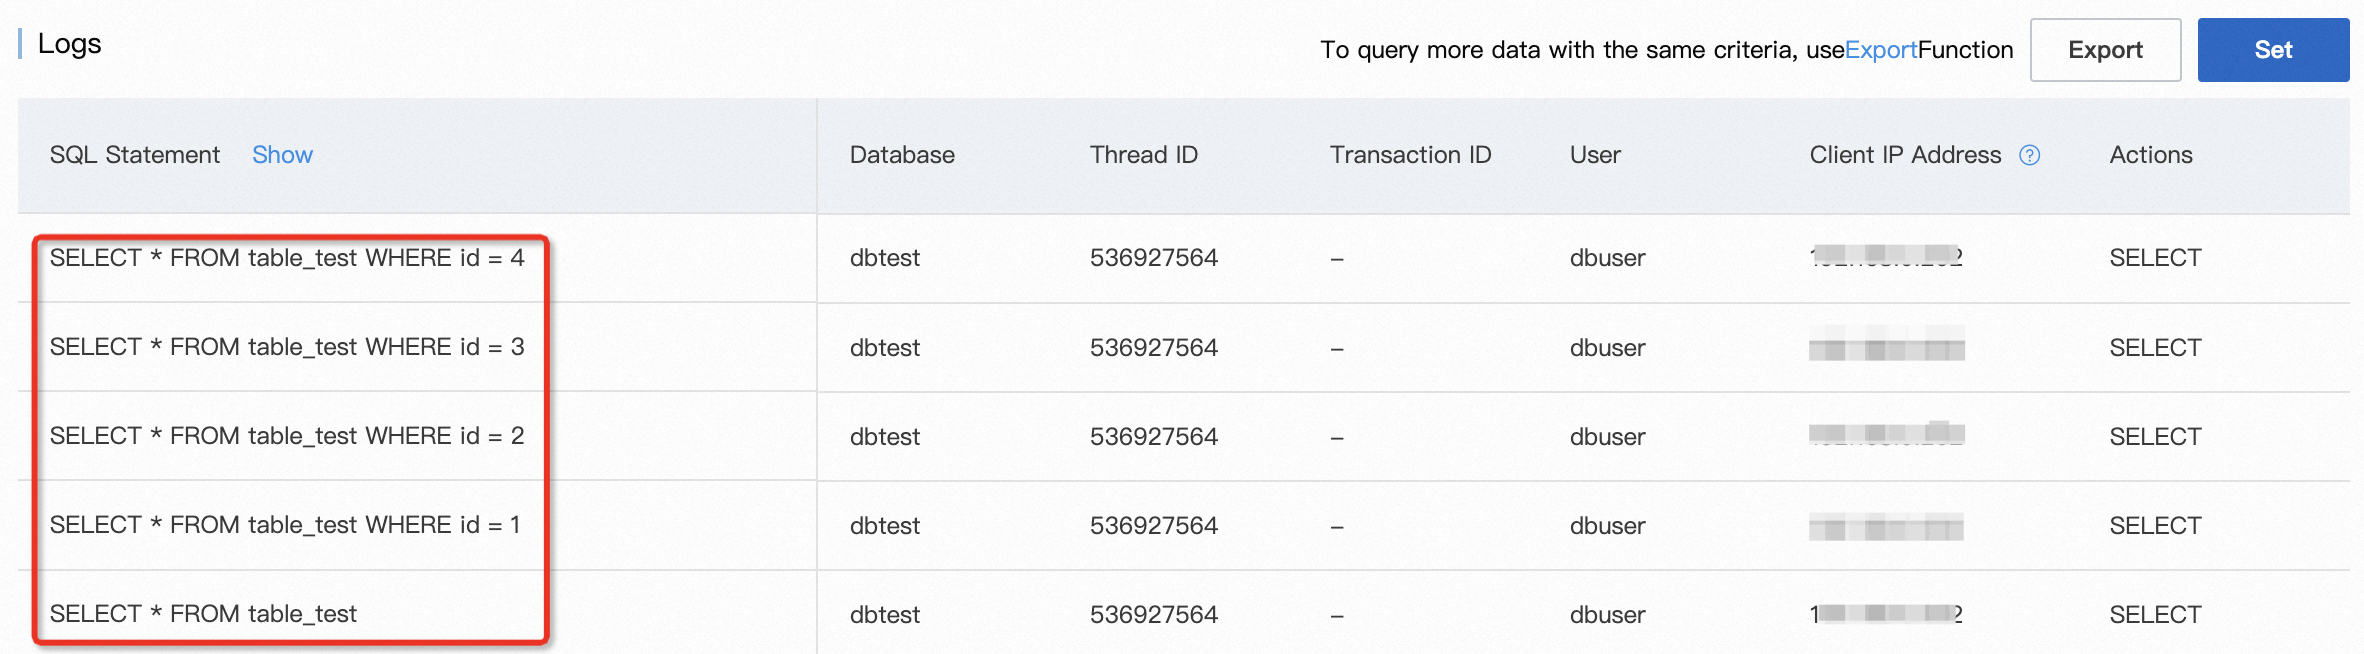 The preceding figure shows that only five
 SELECTstatements are executed on the read-only RDS instance. This indicates that only read requests are sent to the read-only RDS instance.
4. Configure weights for multiple read-only RDS instances
If you attach only one read-only RDS instance, the read-only RDS instance may encounter performance bottlenecks. As the number of read requests increases, the processing capacity of the read-only RDS instance may be exhausted. If the read-only RDS instance fails, the stability of your database system is affected. You can attach multiple read-only RDS instances to a primary RDS instance and adjust the read weights of the RDS instances to achieve high-performance and more stable read/write splitting.
4.1 Specify read weights for read-only RDS instances
Create another read-only RDS instance for the primary RDS instance. Then, enable the SQL Explorer and Audit feature for the read-only RDS instance. For more information, see Use the SQL Explorer and Audit feature.
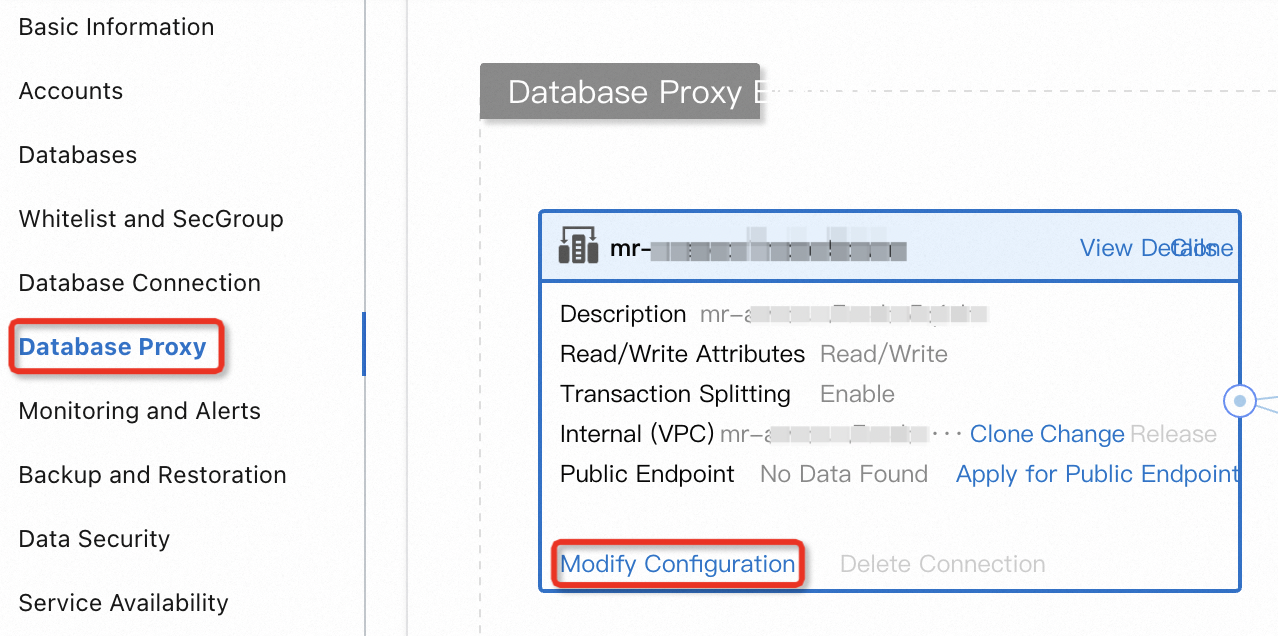
On the Instances page, click the ID of the primary RDS instance. In the left-side navigation pane of the page that appears, click Database Proxy. On the page that appears, find the connection topology and click Modify Configuration.
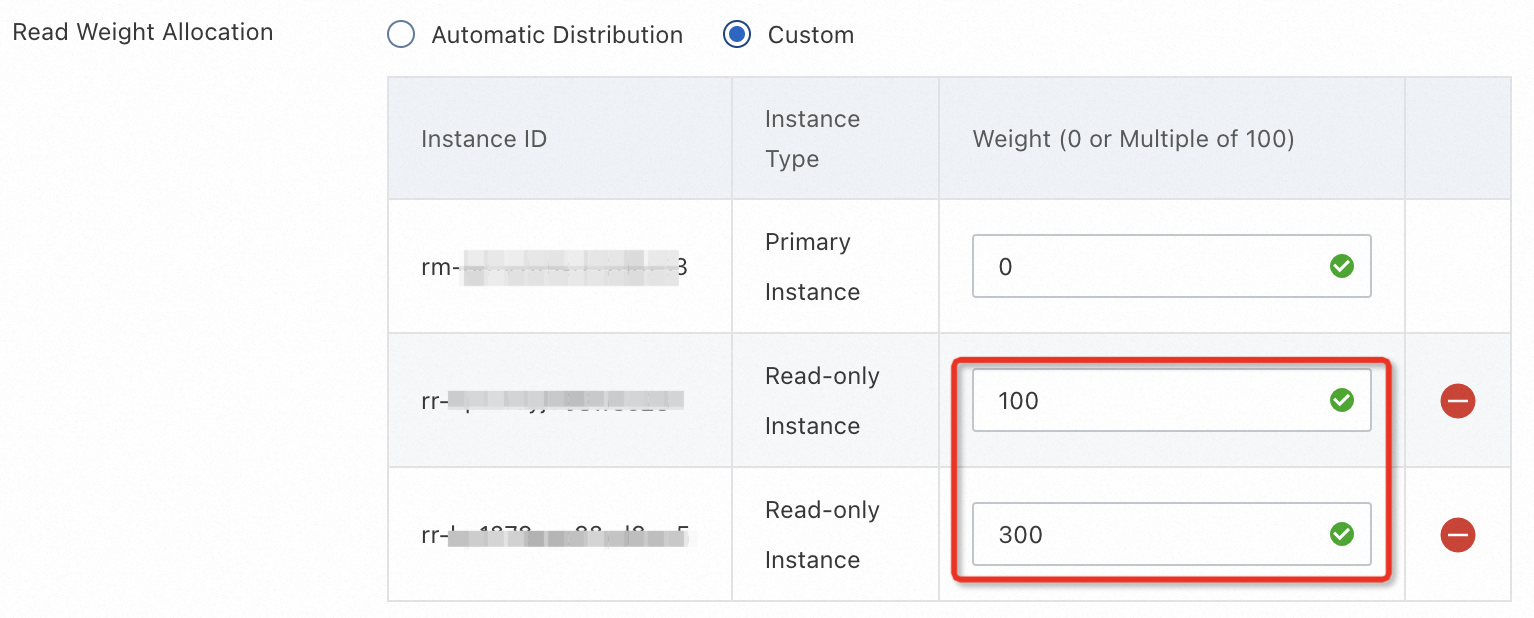
In the dialog box that appears, set the Read Weight Allocation parameter to Custom. Set the weight for the new read-only RDS instance to 300 and retain the default weight of 100 for the original read-only RDS instance. Then, click OK.
NoteThe read weight ranges from 1 to 10,000. A higher read weight indicates that more read requests need to be processed.
Read requests are allocated among read-only RDS instances based on the weights of the instances. In this topic, the allocation ratio of read requests to the read-only RDS instances is 1:3. For more information, see Configure the read and write attributes and the read weight.
4.2 (Optional) Verify the read weight allocation
In the CLI of the ECS instance, repeatedly enter and execute the following SELECT statement eight times. The read-only RDS instance whose read weight is 100 needs to process two read requests and the read-only RDS instance whose read weight is 300 needs to process six read requests.
SELECT * FROM table_test;On the Instances page, click the ID of the read-only RDS instance whose read weight is 100. On the SQL Explorer and Audit page, view the execution of SQL statements. For more information, see 3. (Optional) Verify read/write splitting. The following figure shows that two read requests are distributed to the read-only RDS instance.

On the Instances page, click the ID of the read-only RDS instance whose read weight is 300. On the SQL Explorer and Audit page, view the execution of SQL statements. The following figure shows that six read requests are distributed to the read-only RDS instance. The allocation of read requests on the read-only RDS instances meets the allocation ratio of 1:3.
5. Release resources
Release the ECS instance: Log on to the ECS console and find the ECS instance that you want to release. Then, click the More icon and select Release in the Actions column to release the ECS instance.
Release the RDS instance: Log on to the ApsaraDB RDS console and find the primary RDS instance that you want to release. Then, click More and select Release Instance in the Actions column. After the primary RDS instance is released, the read-only RDS instances are also released, and the features that are enabled for the RDS instances become unavailable.
ImportantIf you want to continue using the RDS instance but no longer require the SQL Explorer and Audit feature after read/write splitting is verified, we recommend that you disable the feature to prevent unexpected fees. For more information, see Use the SQL Explorer and Audit feature.