If your organization has many members, you can use tag-based authorization to grant permissions to all users at once. This avoids granting permissions to individual users or user groups, reducing costs and complexity while simplifying future management. This topic describes how to perform tag-based authorization.
Scenarios
User tag management authorization is suitable for organizations with many users who have diverse permission requirements. This authorization uses user-level access control policies to deliver personalized permission management for each user. For example, users responsible for different regions can view only data from their respective areas.
Prerequisites
You have created a dataset. For more information, see Create a dataset.
Notes
This topic applies only to users who purchased or started a free trial of Quick BI on or after June 3, 2021. If you do not meet this requirement, upgrade from the earlier version of row-level permissions to the latest version before performing the operations described in this topic. For more information, see Upgrade row-level permissions.
Limits
Only the Premium Edition and Professional Edition support setting row-level permissions.
Only dataset owners and workspace administrators can set row-level permissions.
NoteWorkspace developers can set row-level permissions only for datasets that they create. Workspace administrators can set row-level permissions for all datasets.
Procedure
Log on to the Quick BI console. You can set row-level permissions for a dataset on the workbench or the dataset edit page.
Feature entry
Entry 1
Set row-level permissions for a dataset on the workbench.
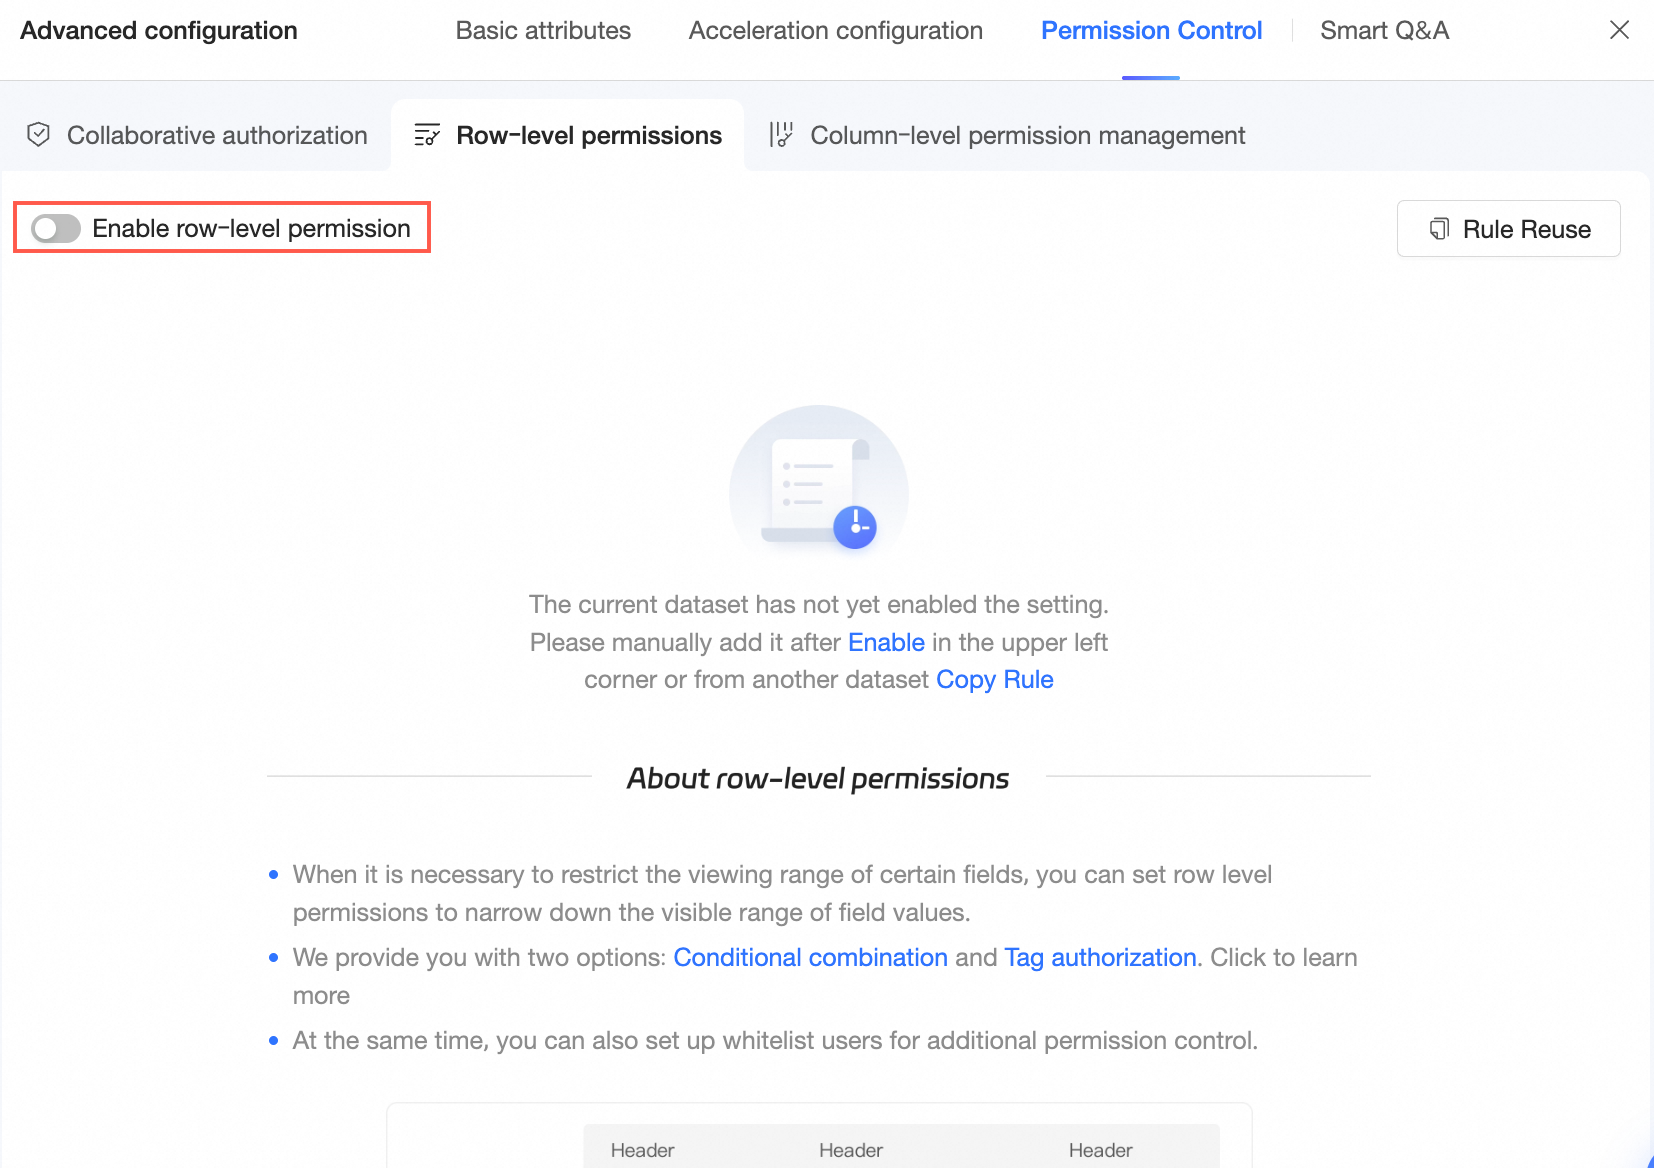
Follow the steps in the figure to go to the Row-level Permissions settings page.
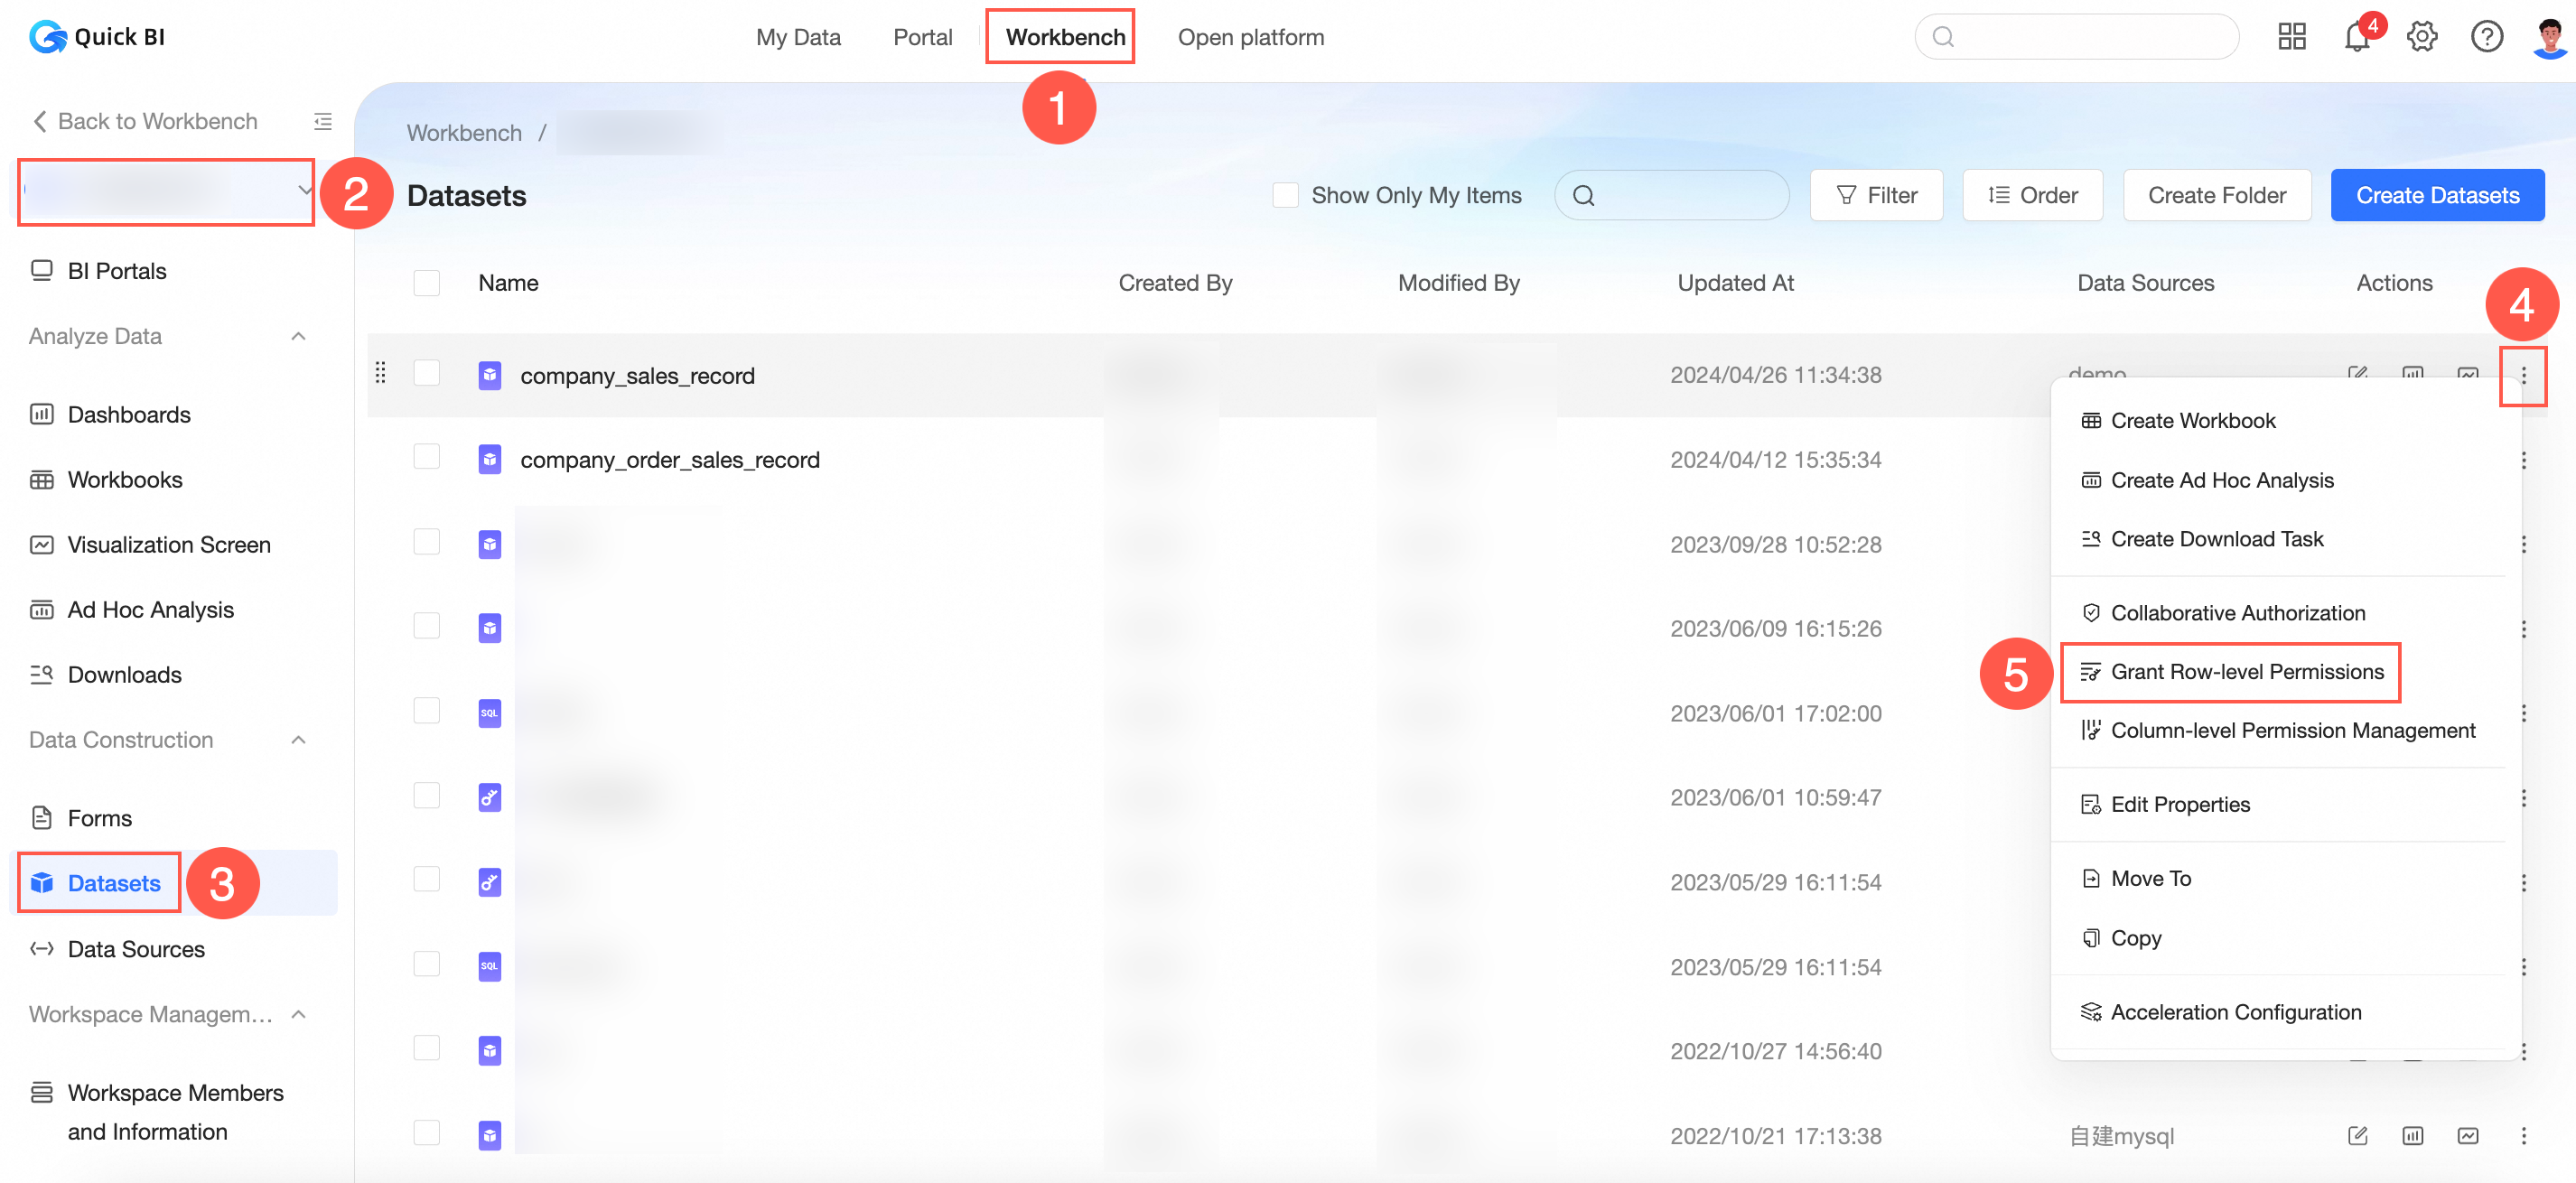
Turn on Enable Row-level Permissions.
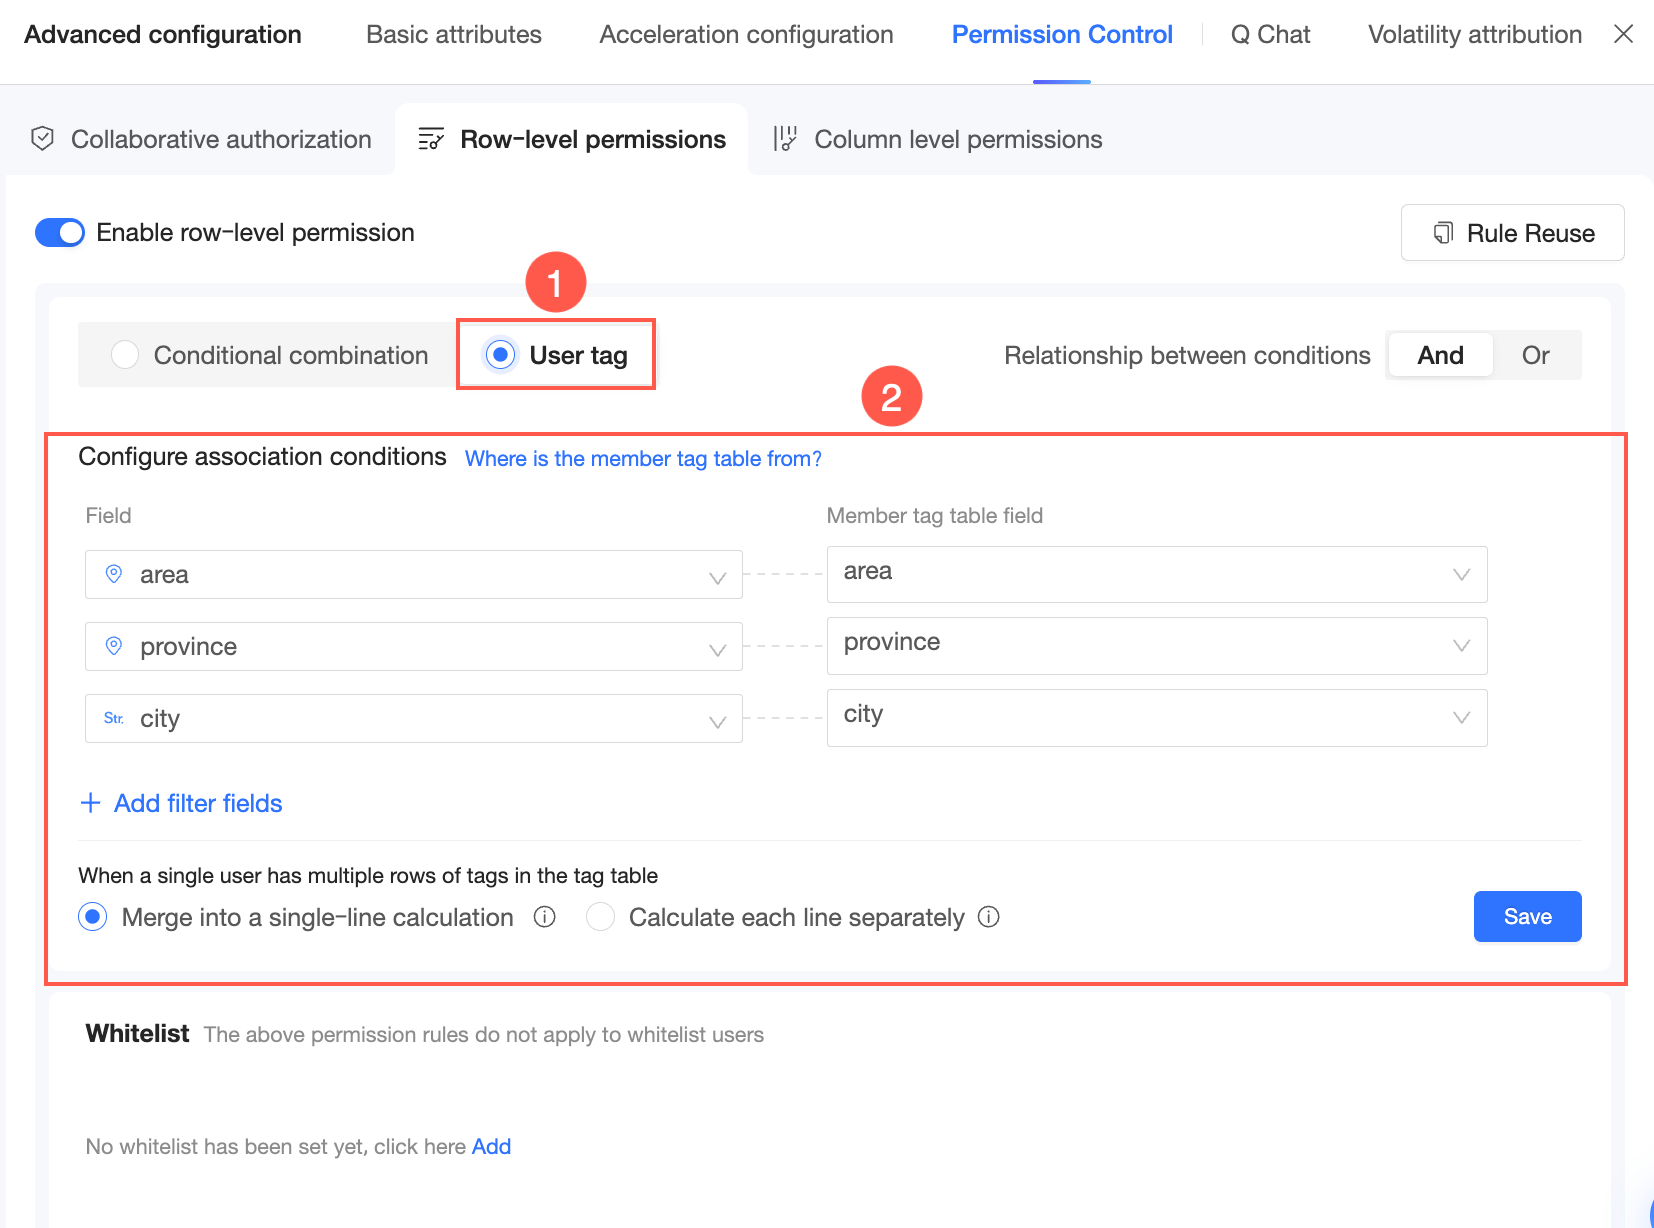
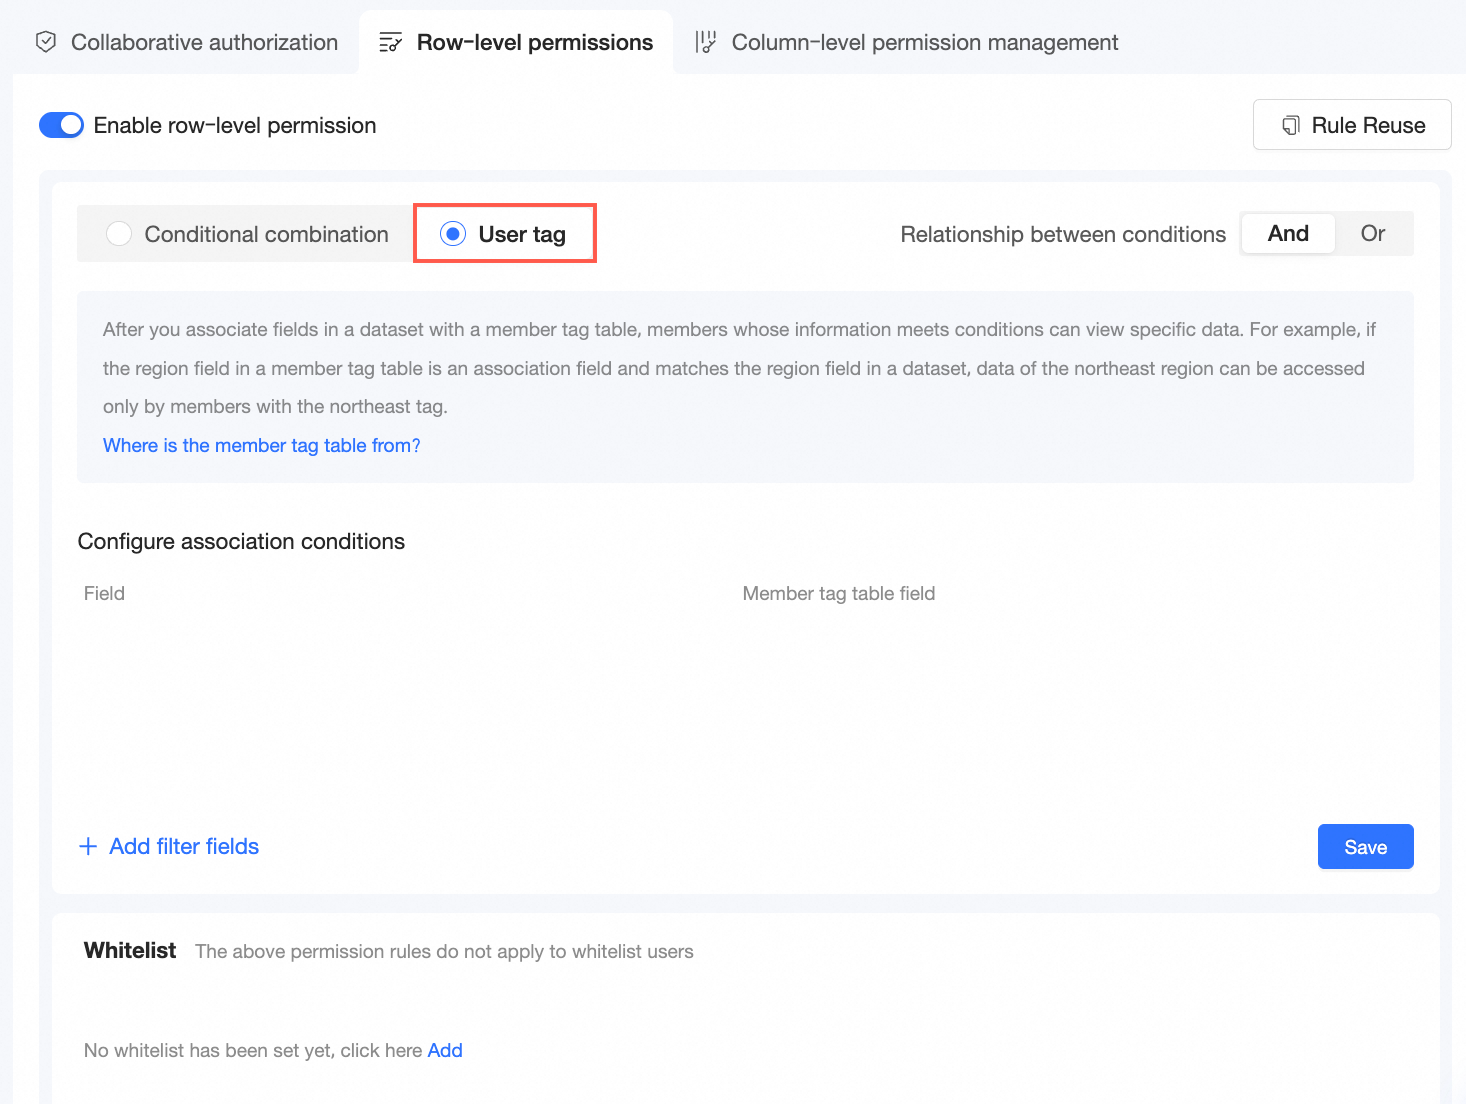
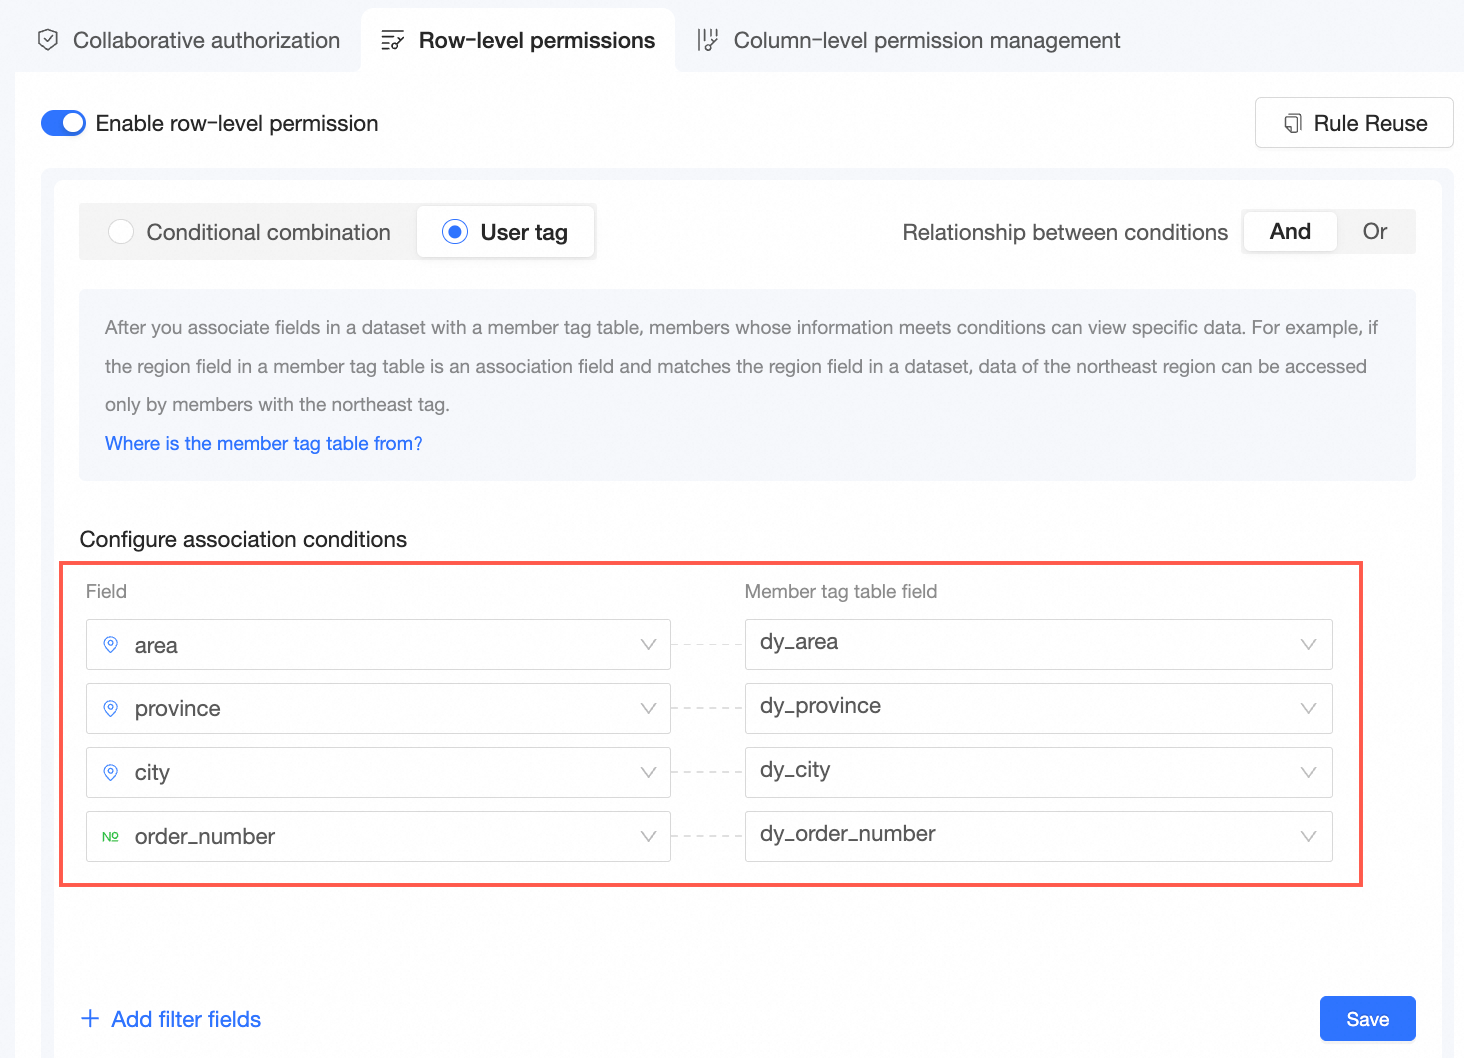
On the Row-level Permissions configuration page, select User Tag Management Authorization and set association conditions.
Click Save.
Entry 2
Set row-level permissions for a dataset on the dataset edit page.
In the top toolbar, click Advanced Configuration and select Permission Control → Row-level Permissions.
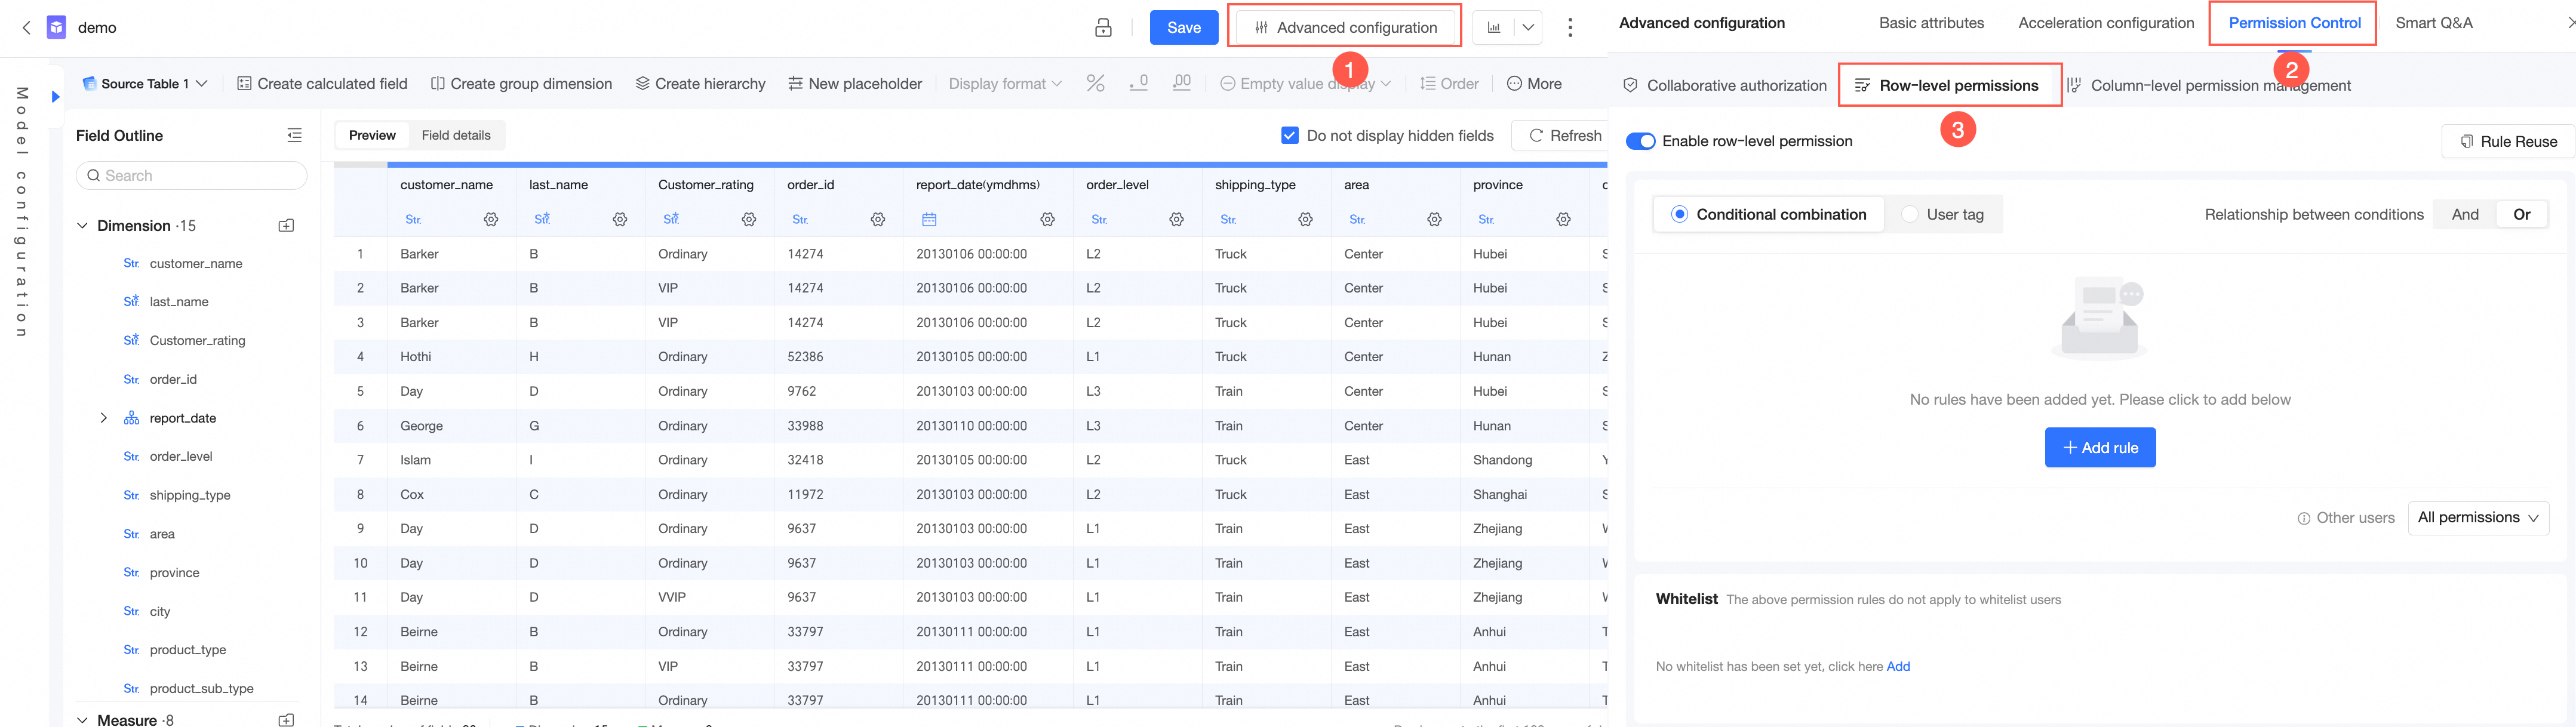
Turn on Enable Row-level Permissions.
On the Row-level Permissions configuration page, select User Tag Management Authorization and set association conditions.
Click Save.
Entry 3
Set row-level permissions when you create a dataset.
On the dataset preview page, click the
 icon to go to the Row-level Permissions configuration page.
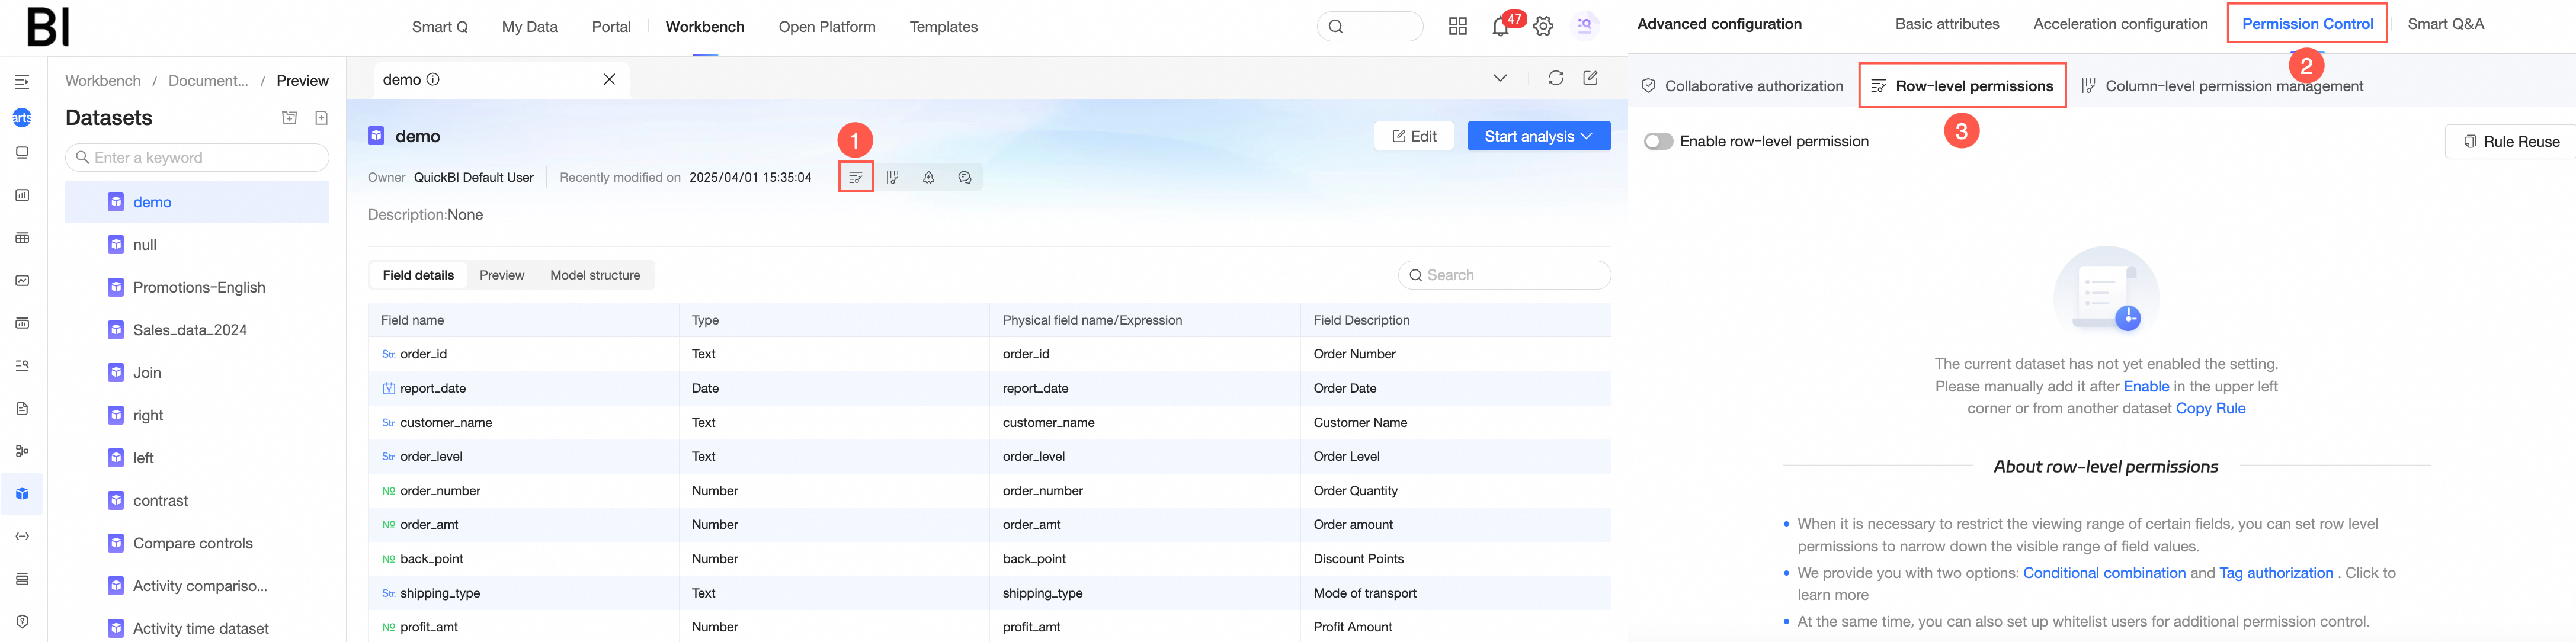
Turn on Enable Row-level Permissions.
On the Row-level Permissions configuration page, select User Tag Management Authorization and set association conditions.
Click Save.
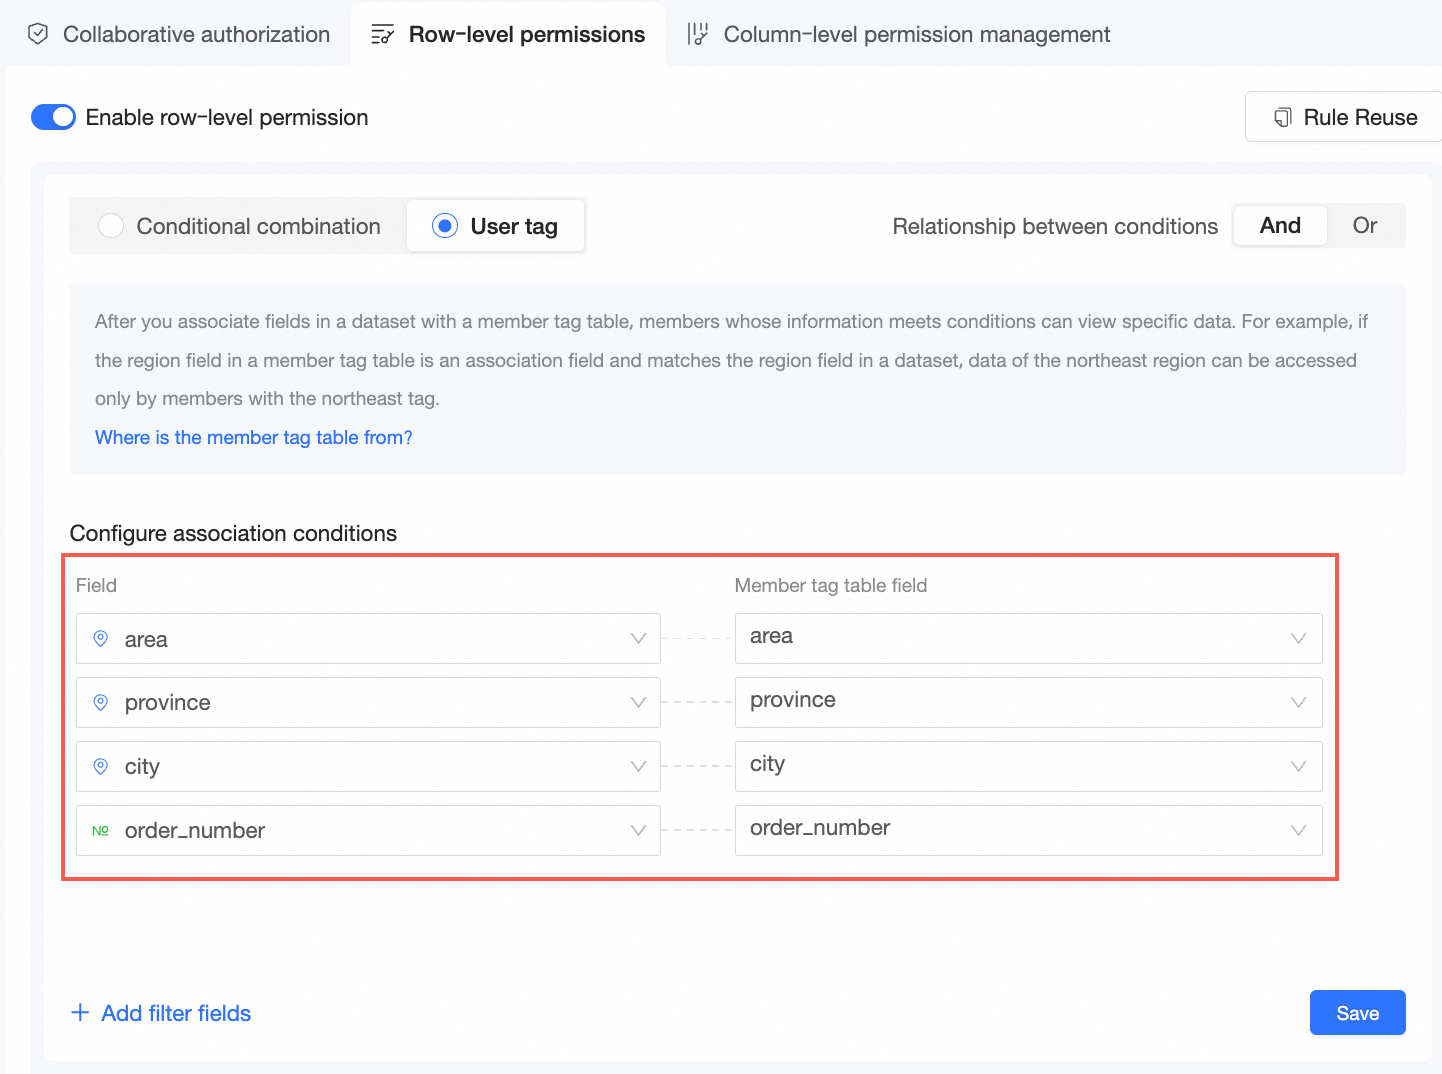
Set association conditions

Click Add Controlled Field.
Select a Controlled Field and a User Tag Table Field.
When you add multiple association conditions, you can choose between AND and OR logic. If you select AND, all rules must be met for the permission to take effect. If you select OR, the permission takes effect if any rule is met.
If the tag table contains multiple rows of tags for the same user, select Merge into a single row for calculation or Calculate each row separately.
Merge into a single row for calculation: The union of multiple rows is taken for each tag. The tags are then merged into one column for permission verification.
For example, the user tag table is as follows:
User
Area
Province
City
user1
Northeast
ALL_VALUES
ALL_VALUES
user1
Southeast
Zhejiang
Hangzhou
The logic for single-row calculation is:
where Area in {'Northeast', 'Southeast'}
and 'BI' = 'BI'
and 'BI' = 'BI'
The permission effect is the same as the following:
User
Area
Province
City
user1
Northeast,Southeast
ALL_VALUES
ALL_VALUES
Calculate each row separately: Each row of tag values represents a set of permissions. The OR logic is used between multiple rows. You can use the Calculate each row separately mode only when all User Tag Table Fields are from the same user tag table. For example:
If the relationship between conditions is AND, and the user tag table is as follows:
User
Area
Province
City
user1
Northeast
$ALL_VALUES$
$ALL_VALUES$
user1
North China,Southwest
$ALL_MEMBERS$
$ALL_MEMBERS$
user1
Southeast
Zhejiang
Hangzhou
The logic for calculating each row separately is:
where (Area = 'Northeast' and 'BI' = 'BI' and 'BI' = 'BI')
or (Area in {'North China', 'Southwest'})
or (Area = 'Southeast' and Province = 'Zhejiang' and City = 'Hangzhou')
If the relationship between conditions is OR, and the user tag table is as follows:
User
Area
Product Type
user1
Northeast
$ALL_VALUES$
user1
North China,Southwest
$ALL_MEMBERS$
user1
Southeast
Furniture
The logic for calculating each row separately is:
where (Area = 'Northeast' or 'BI' = 'BI')
or (Area in {'North China', 'Southwest'})
or (Area = 'Southeast' or Product_Type = 'Furniture')
The permission effect is the same as the following:
User
Area
Product Type
user1
Northeast,North China,Southwest,Southeast
$ALL_VALUES$
Click Save.
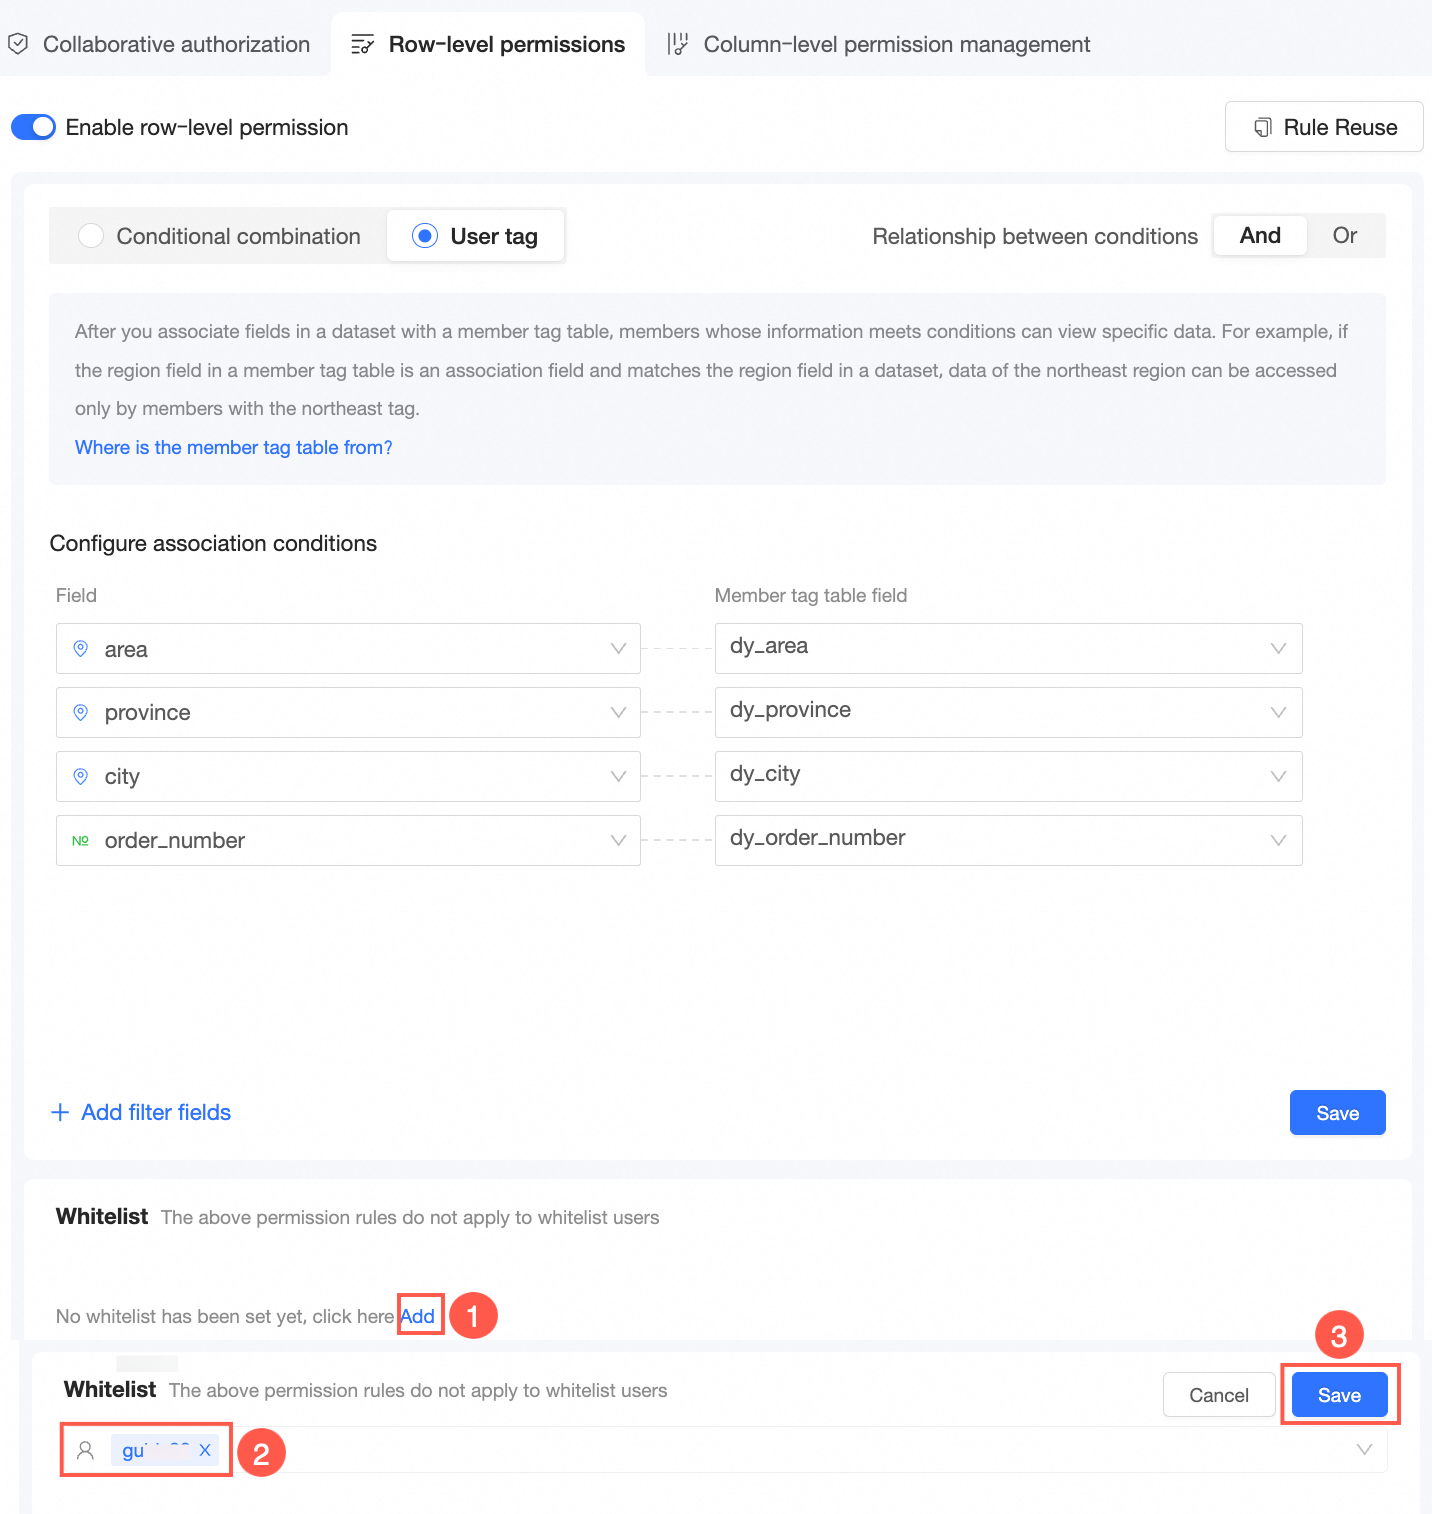
Set a whitelist
If you do not want these rules to apply to certain users, add those users to the whitelist.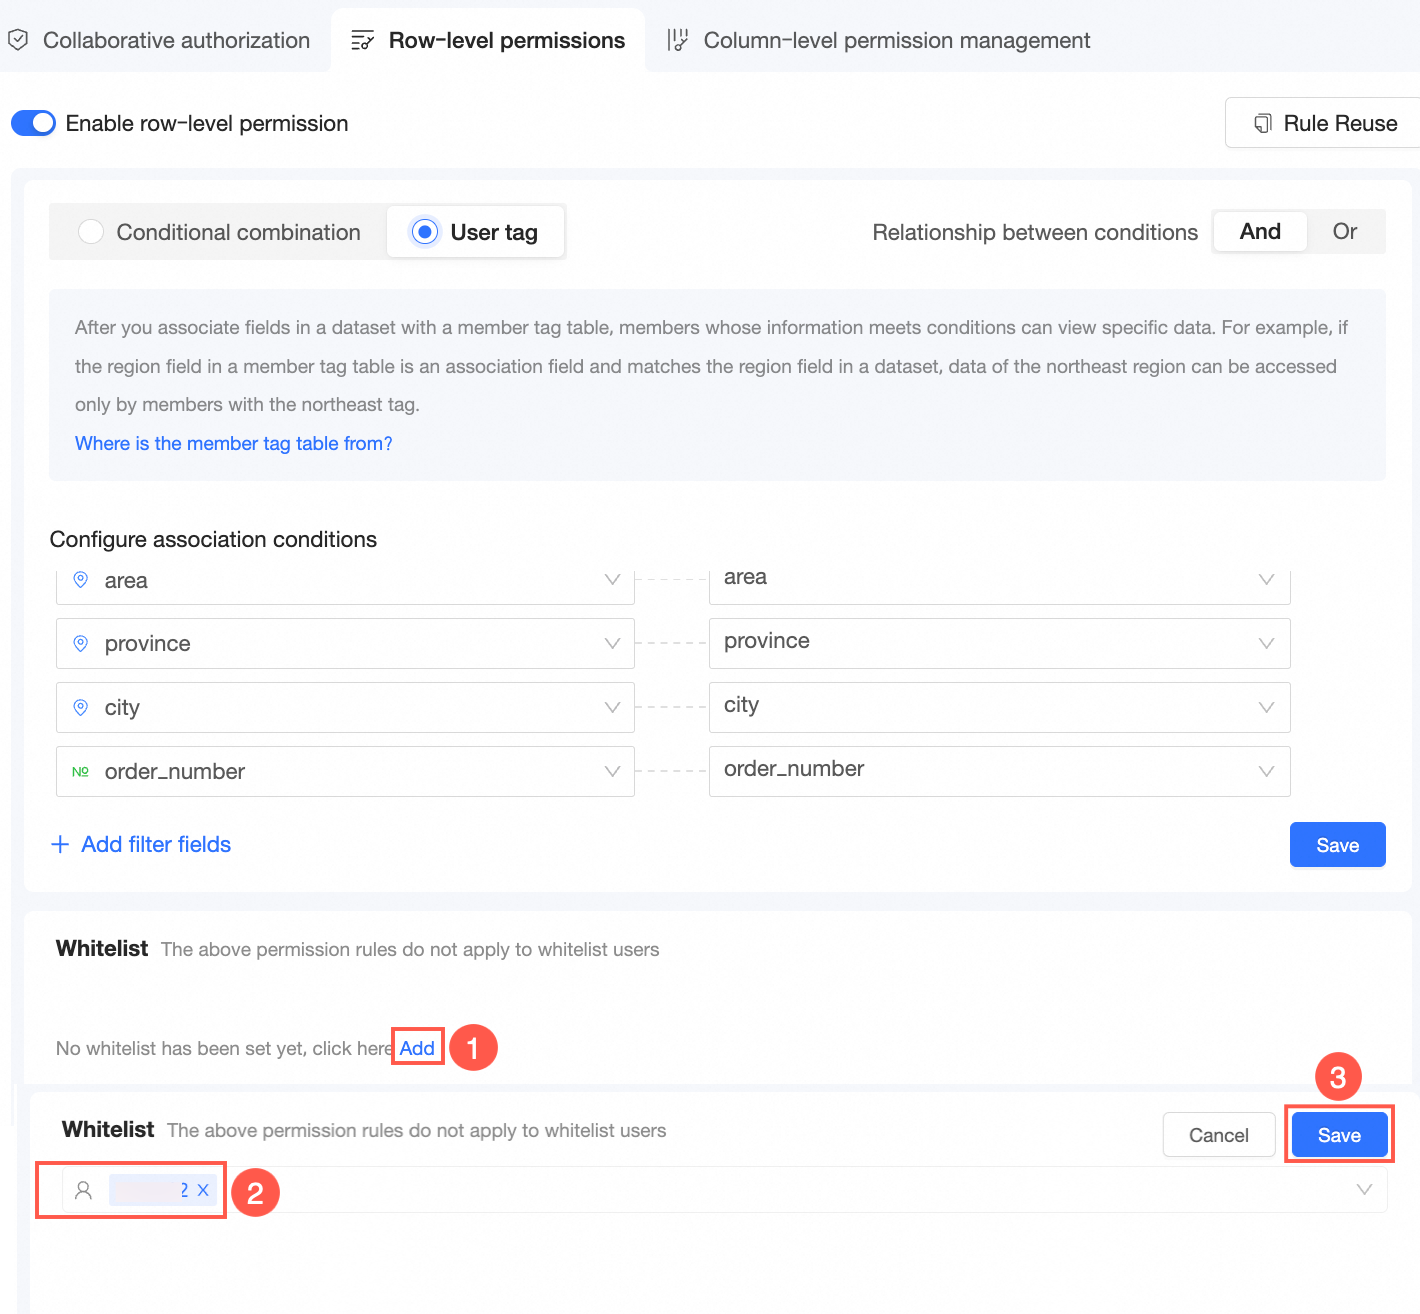
Copy row-level permissions
You can copy row-level permissions from other datasets. For more information, see Copy row-level permissions.
Scenarios
A tag table can originate from either a user-managed tag table (user tag table) or tags configured directly in Quick BI (manually managed tag table). The following sections describe these two scenarios.
Scenario | Implementation steps |
Scenario 1: Perform access control by attaching a user tag table |
|
Scenario 2: Perform access control by manually managing a tag table |
|
Scenario 1: Perform access control by attaching a user tag table
Customize a user tag table.
After you attach a user tag table stored in a data source, Quick BI reads the latest member tag information in real time. No manual maintenance is required.
When you customize a tag table, make sure that the user tag table meets the following requirements:
It contains at least one of the following fields: Alibaba Cloud account ID (account_id), Alibaba Cloud account name (account_name), or nickname in the Quick BI organization (nick_name).
NoteIf you use an Alibaba Cloud account ID or Alibaba Cloud account name, make sure the user already exists in the Quick BI organization.
It contains at least one tag field, such as area.
If there are multiple tags, you can separate them with a comma (,) or present them in multiple rows.
$ALL_MEMBERS$indicates that all permissions are granted.
Attach the user tag table.
After you attach the table, use the Alibaba Cloud account ID (account_id), Alibaba Cloud account name (account_name), or nickname (nick_name) field in the user tag table as the primary key to associate with members in the Quick BI organization.
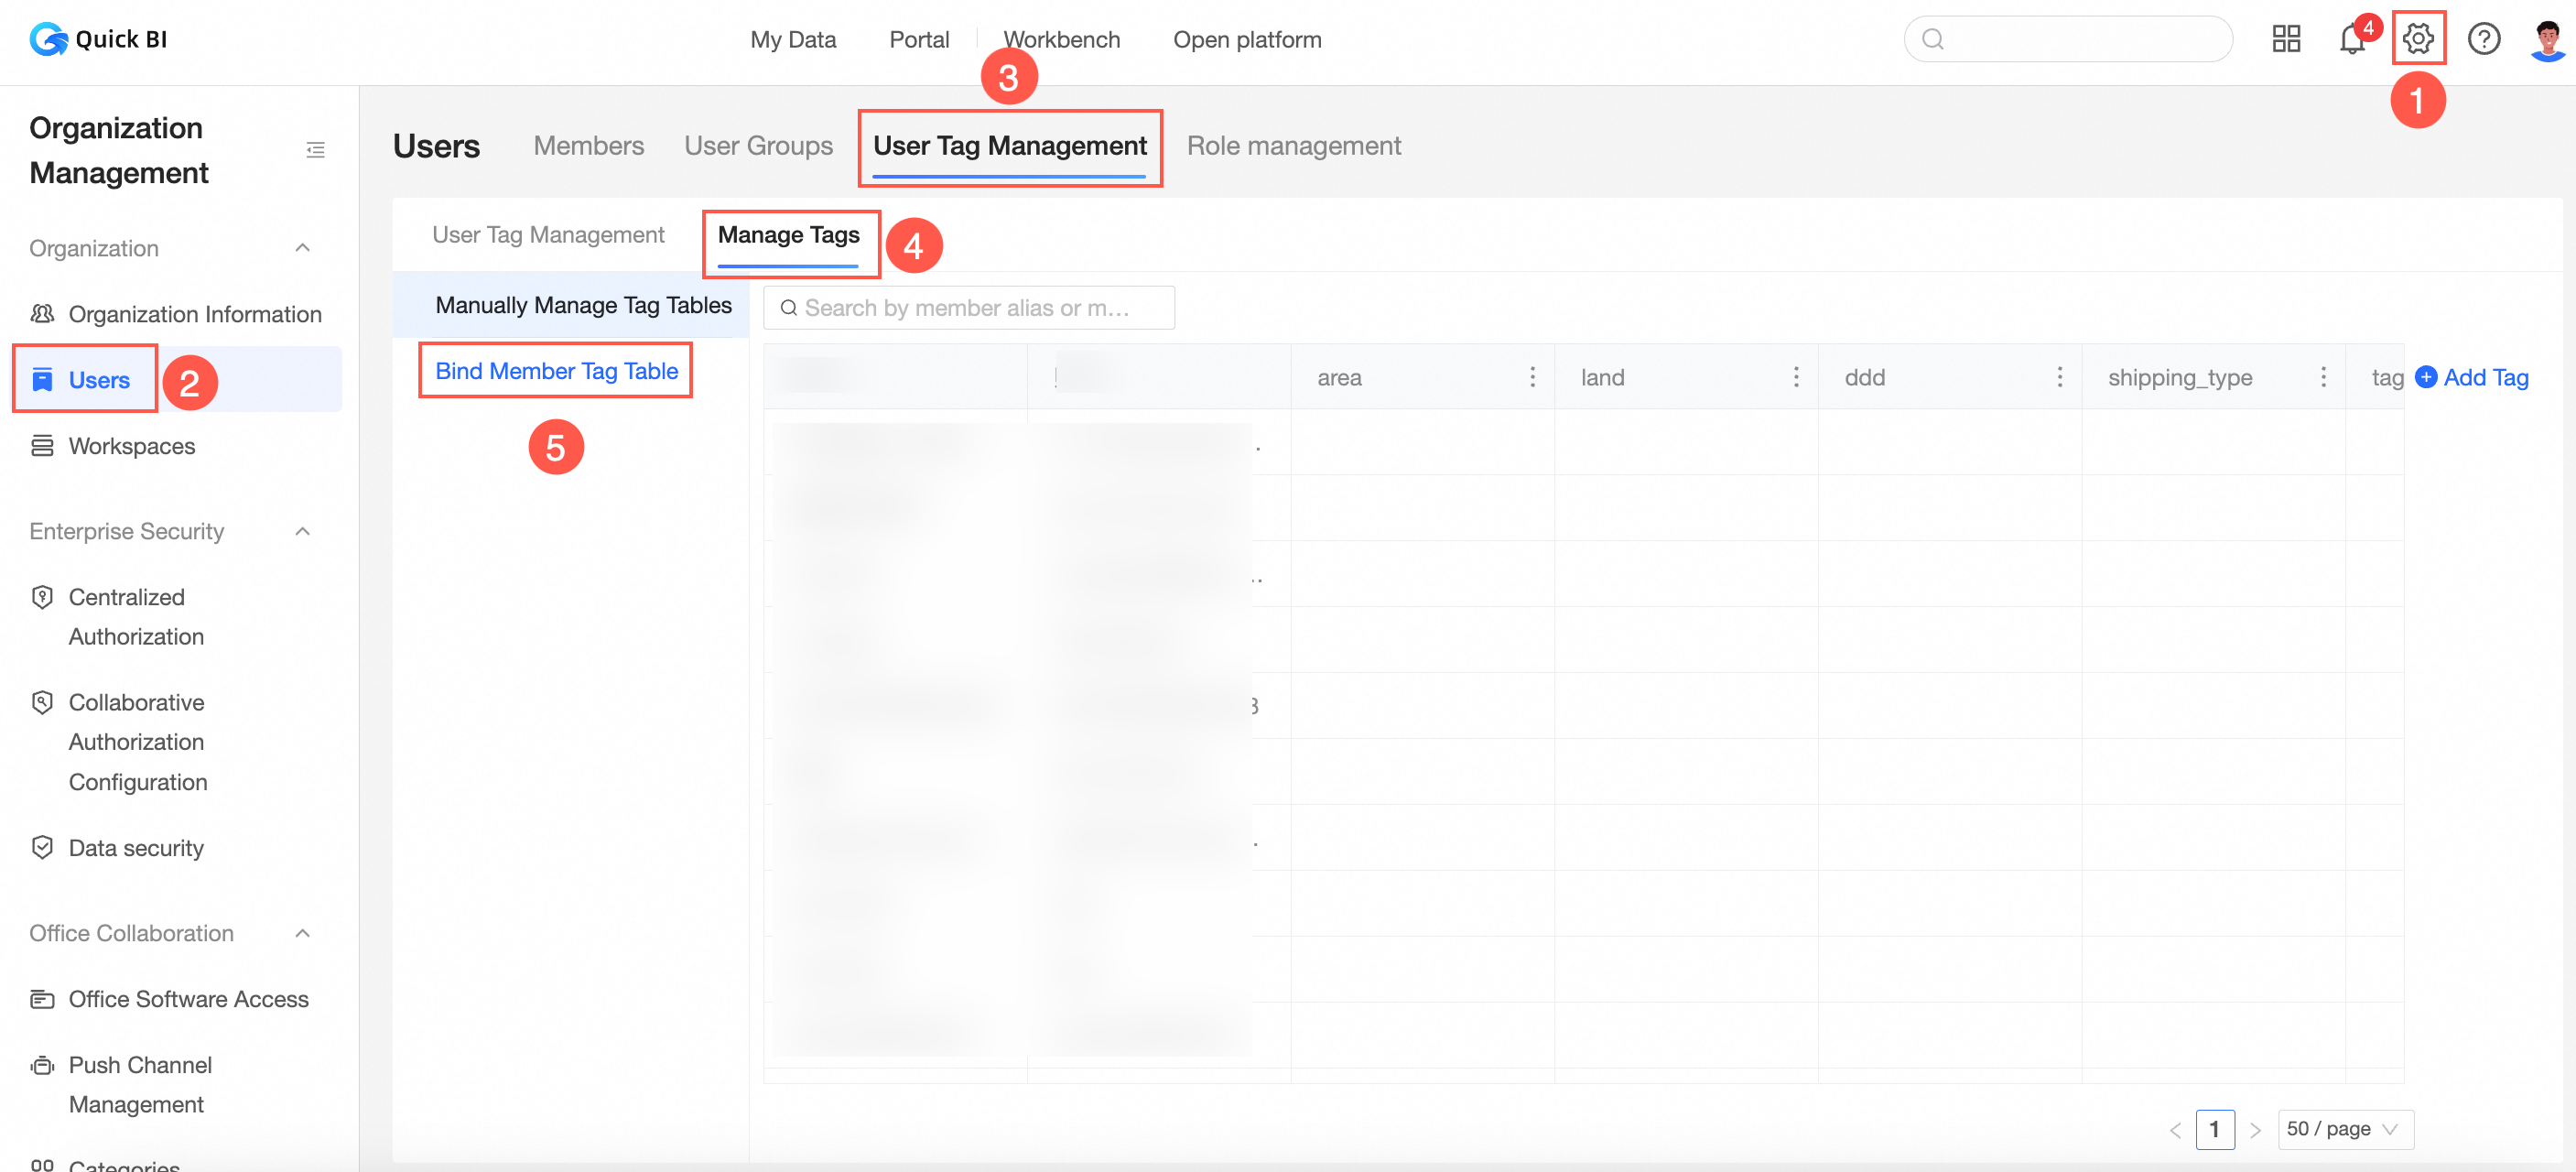
Log on to the Quick BI console.
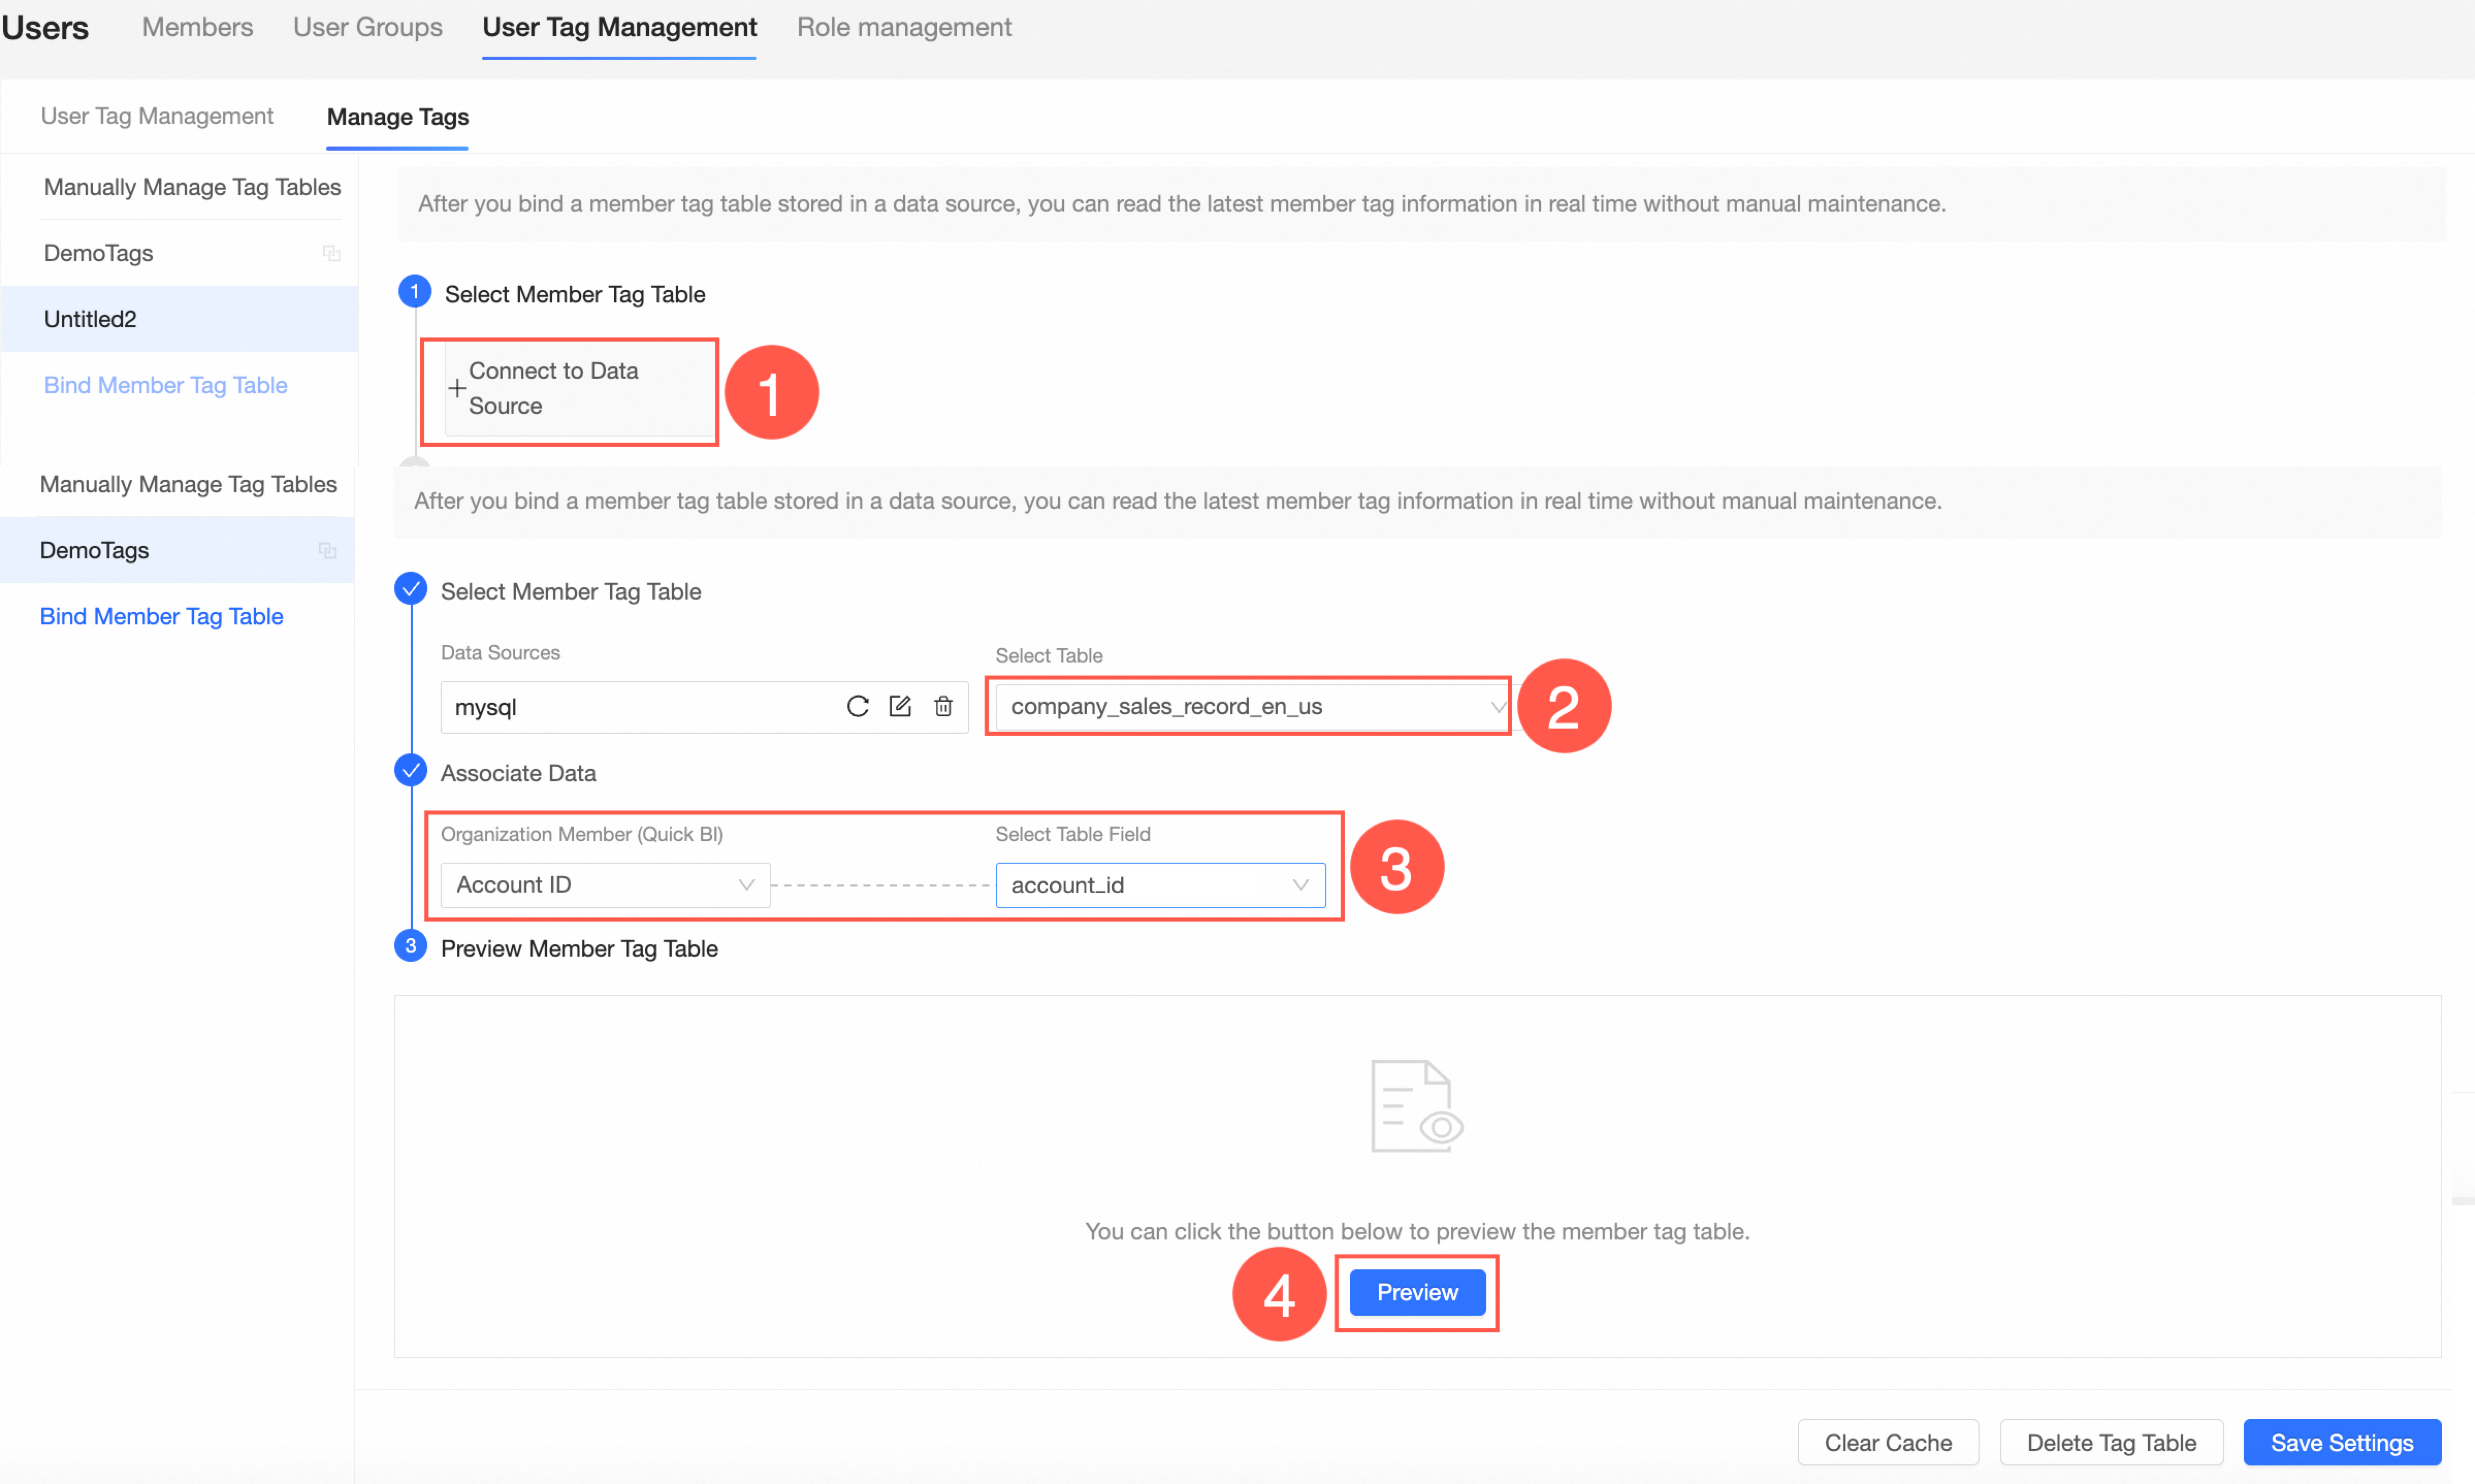
On the Quick BI home page, follow the steps in the figure to go to the tag table attachment page.
Customize a name for the user tag table to attach.
In this example, the name of the user tag table is Demo Tag Table.
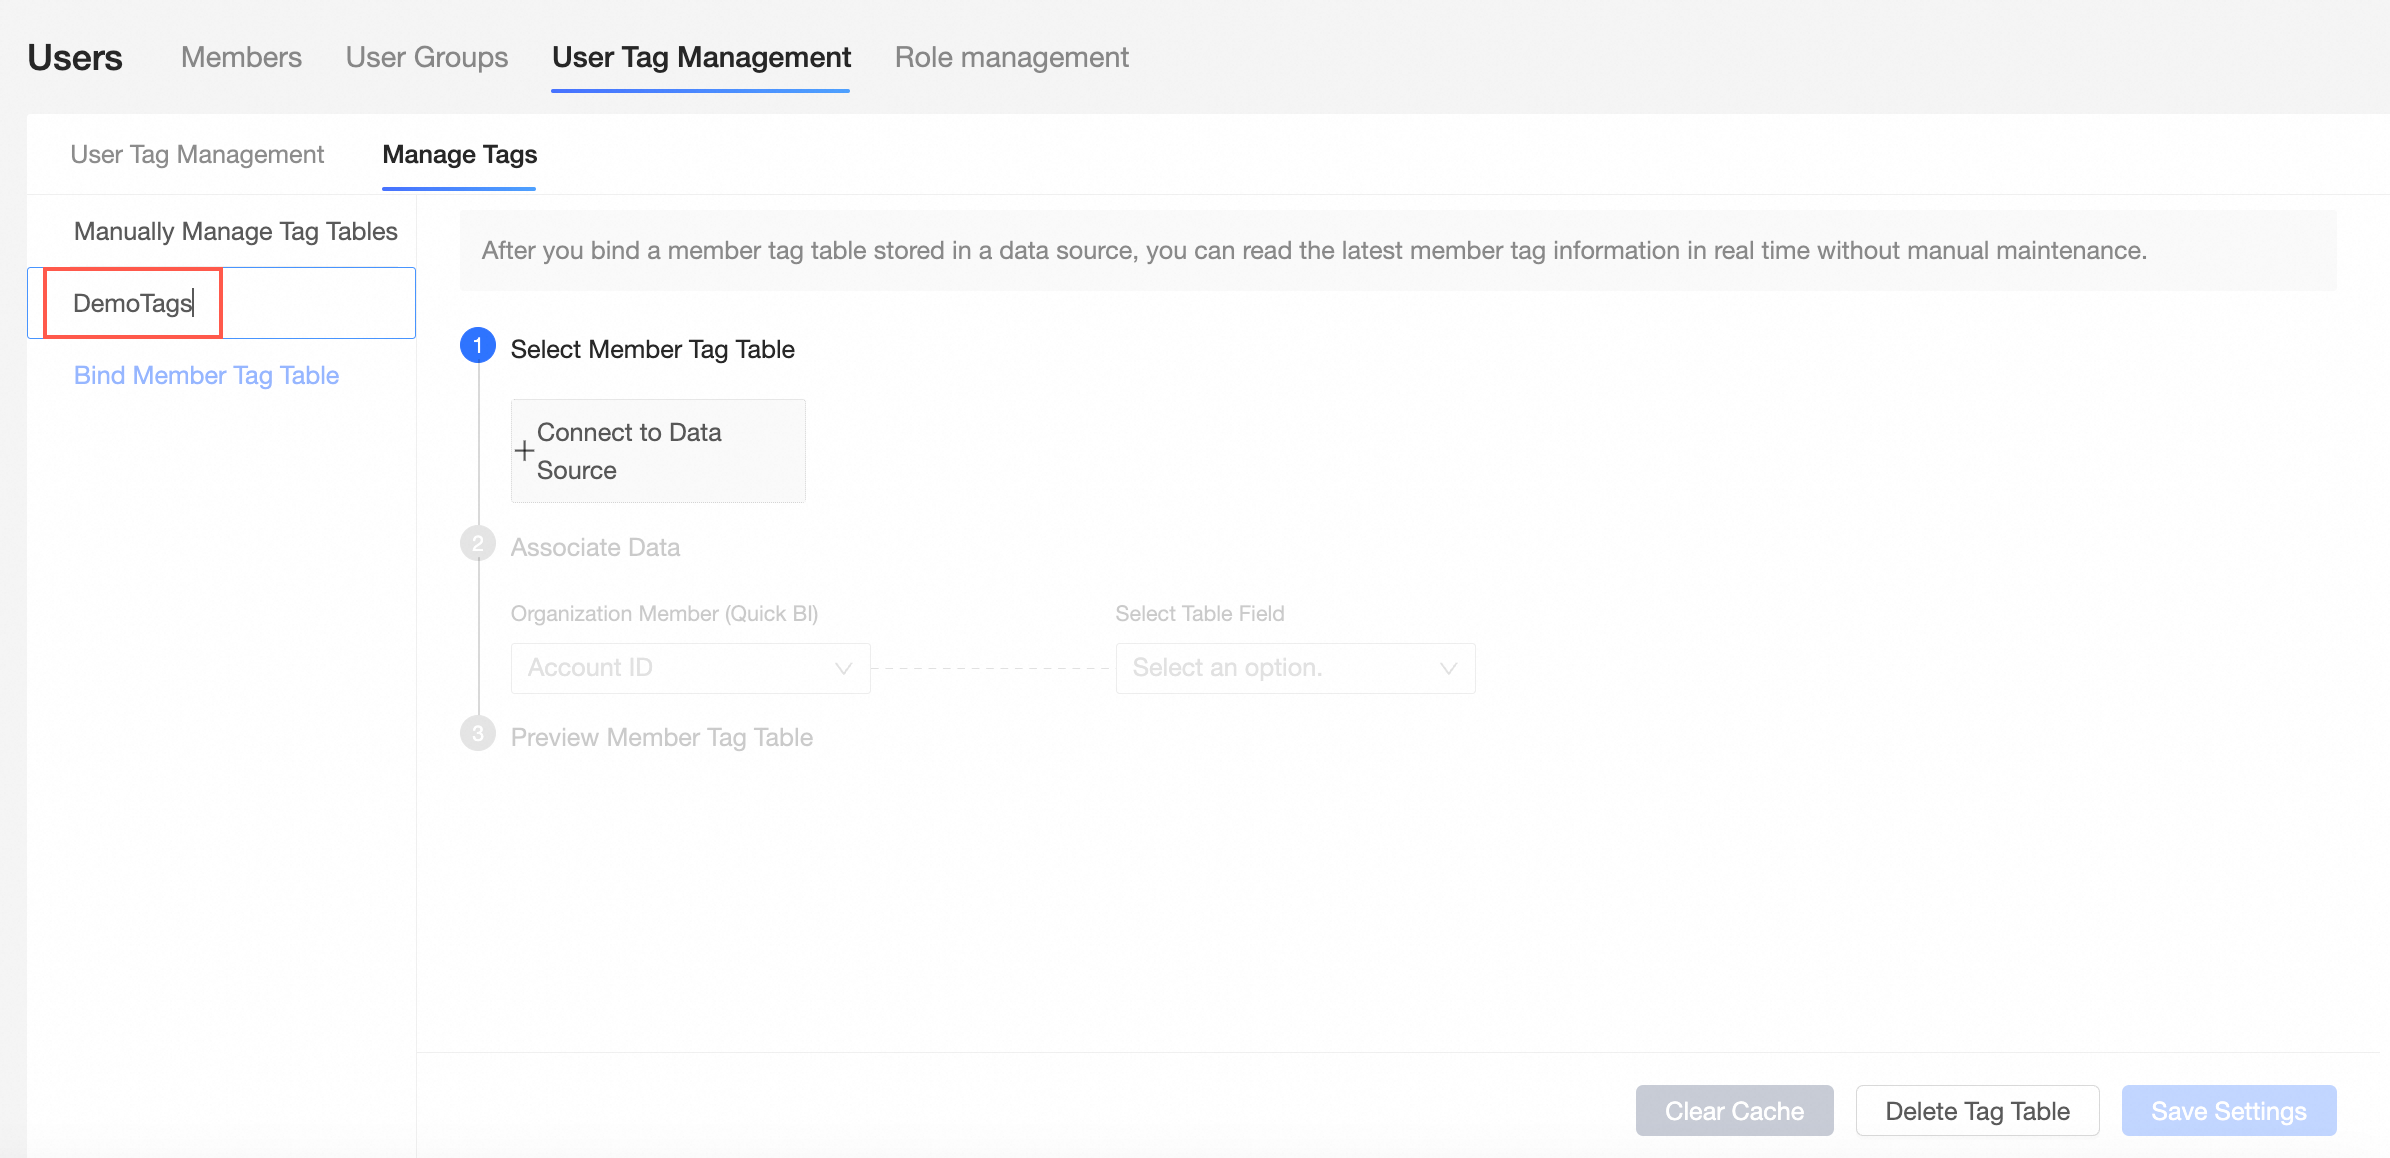
Follow the steps in the figure to configure the user tag table to attach.
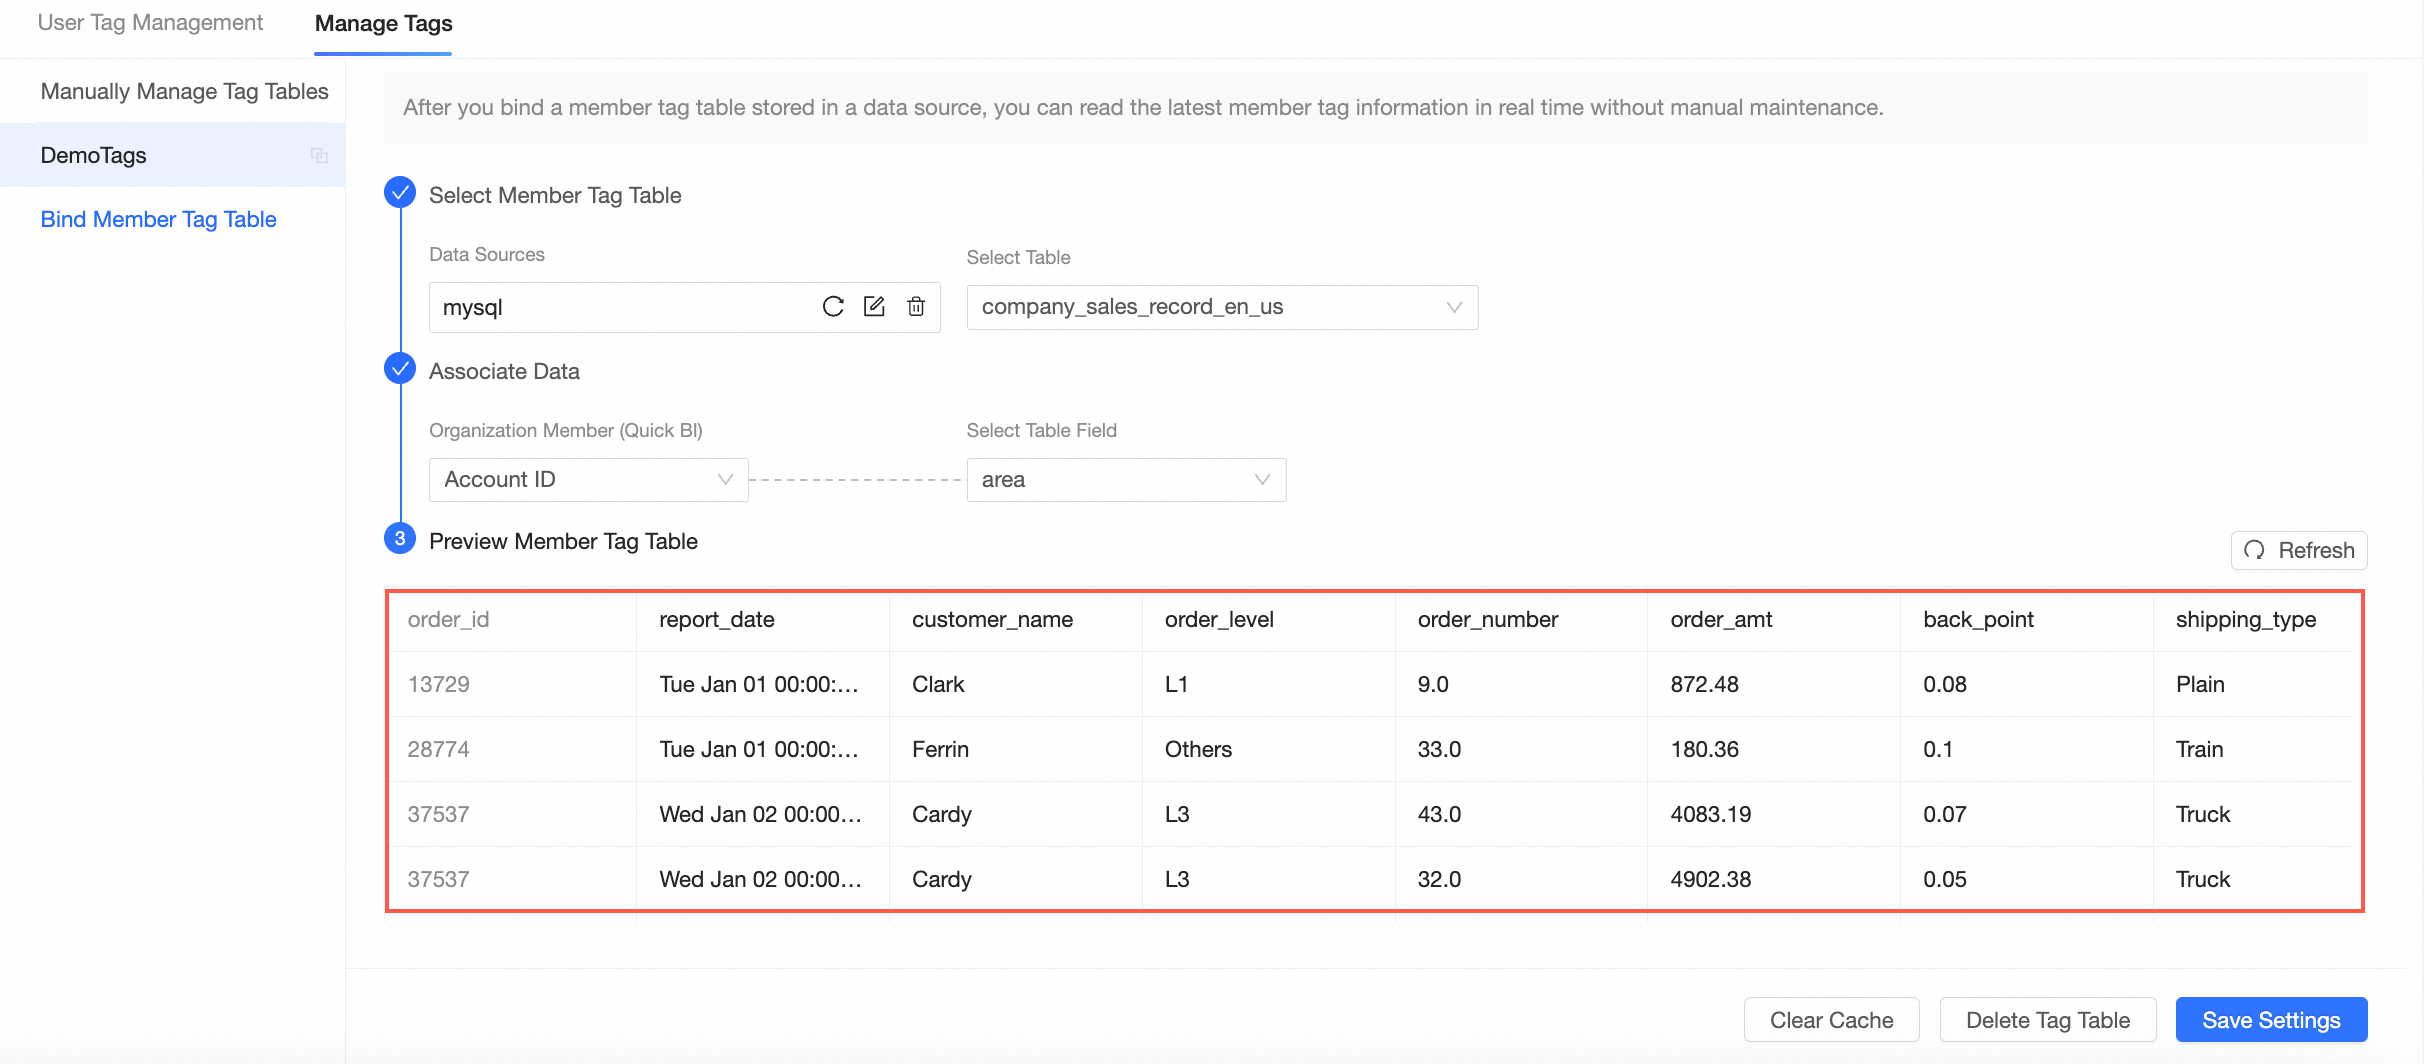
The preview of the user tag table is shown in the following figure.
Add a user tag.
Add a user tag to associate with a field in the user tag table, such as area, province, city, or order_number. After the association, the tag value in the user tag table is passed to the Quick BI user tag.
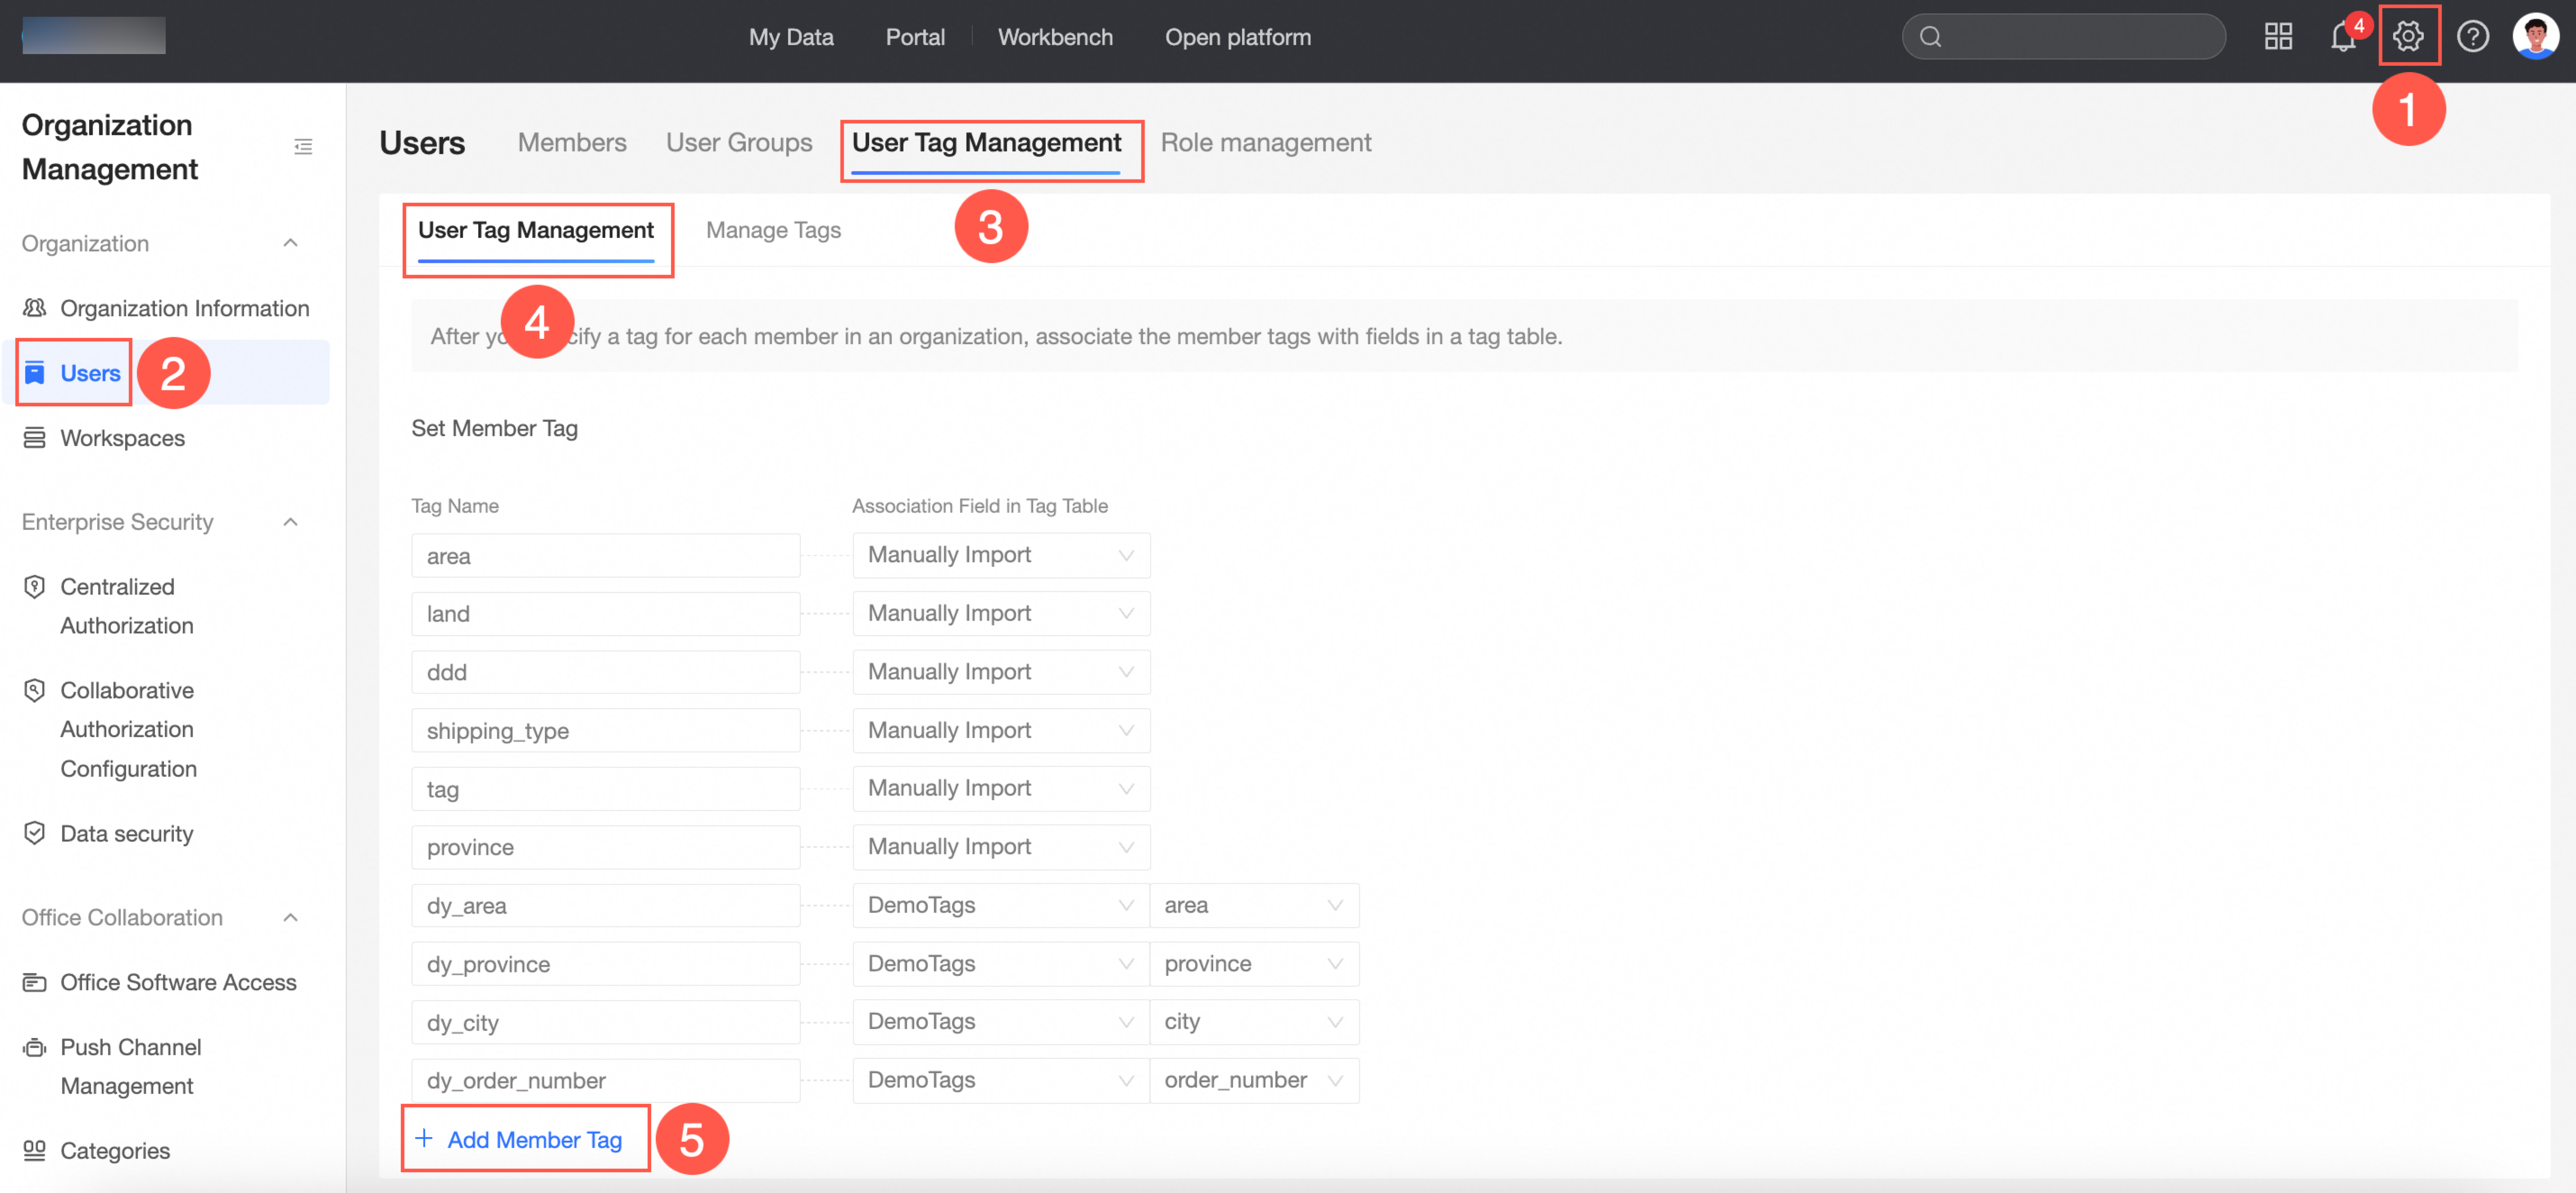
Click the User Tag Management tab, and click Add User Tag.
Enter a Tag Name and an Associated Tag Table Field, and then save the configuration.
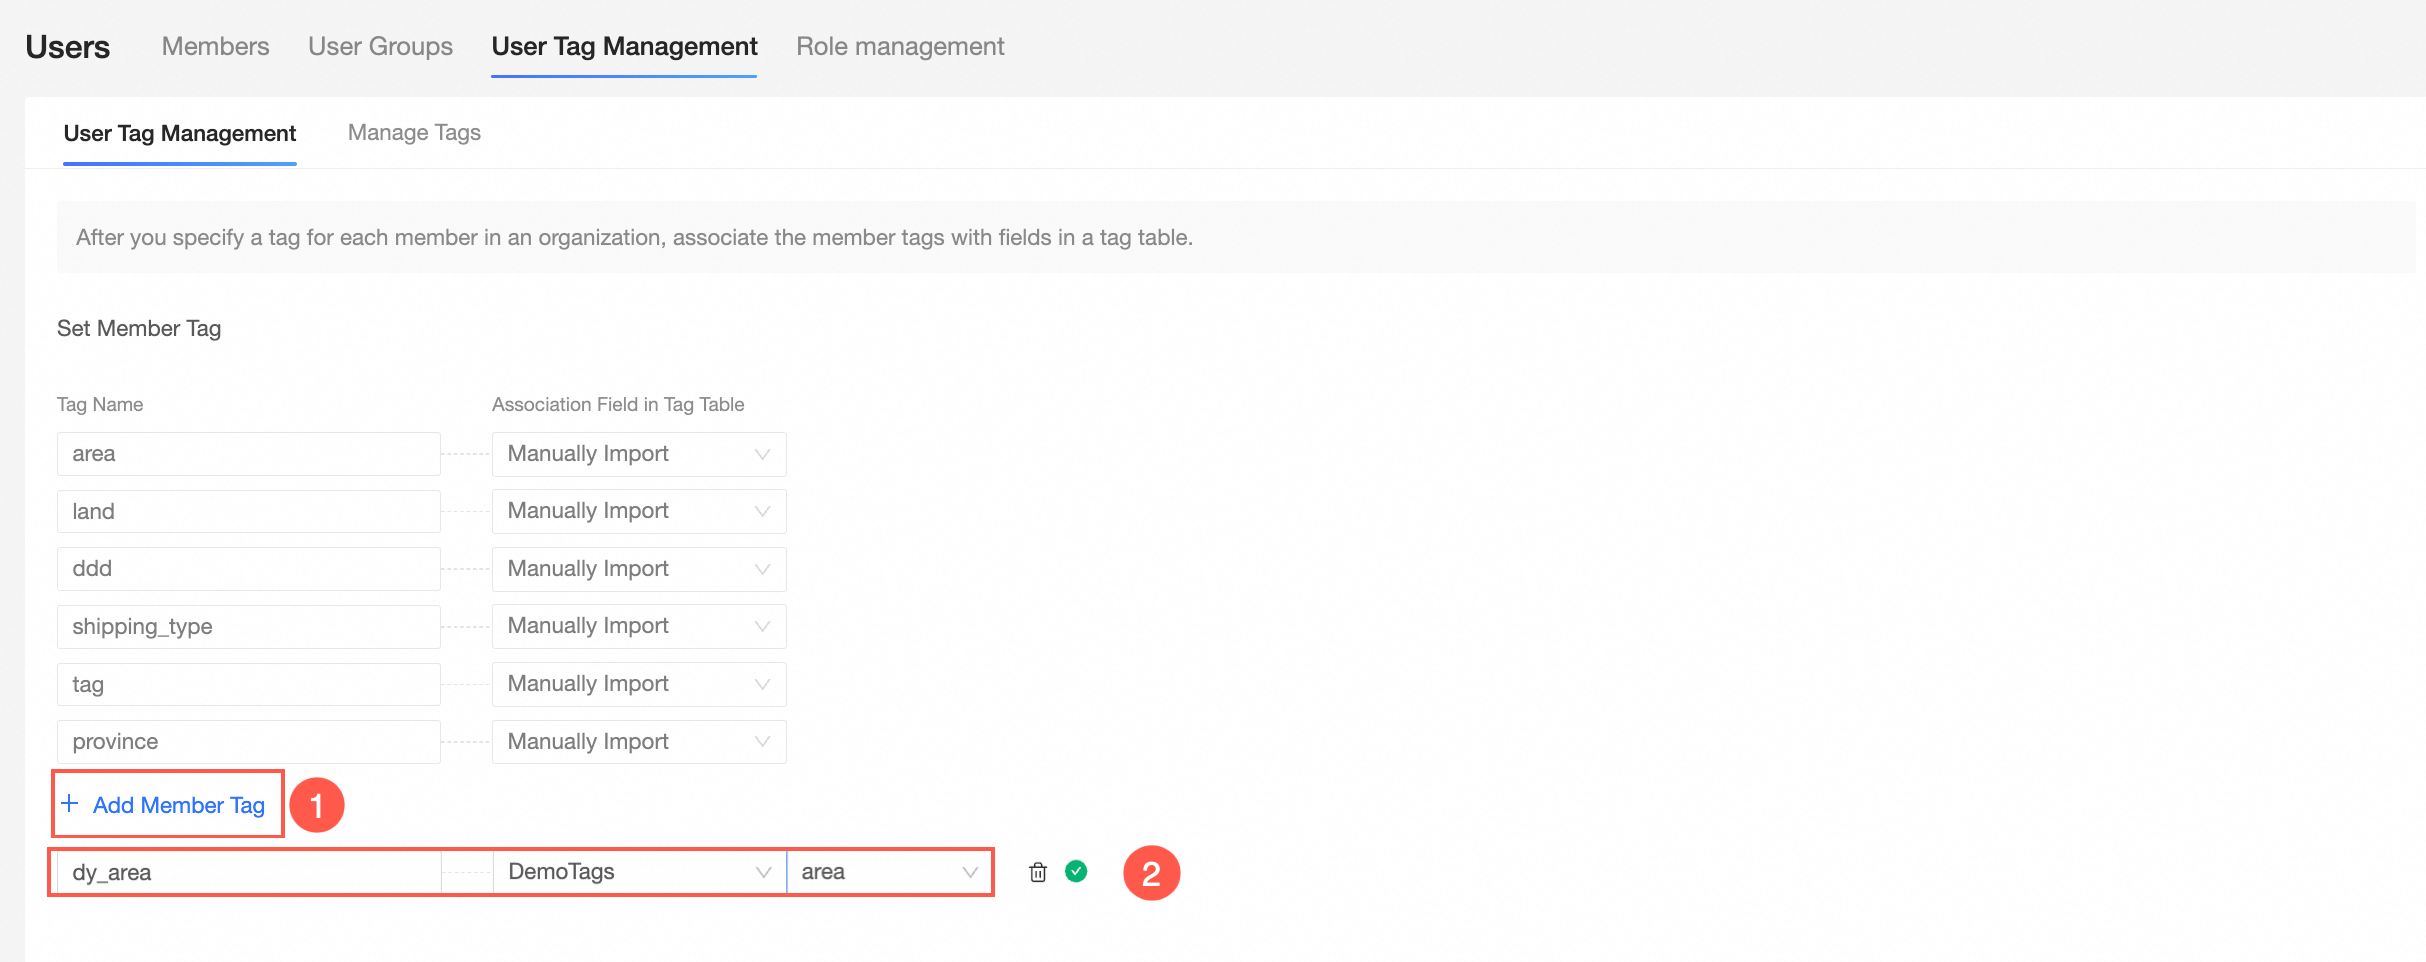
Set the associated tag table to Demo Tag Table. Customize the tag names as dy_area, dy_province, dy_city, and dy_order_number, and attach them to the area, province, city, and order_number fields in the Demo Tag Table.
Use tag-based authorization.
After authorization, the tag values in the user tag table apply to all datasets. Authorized users can view only the data within their permission scope.
On the Quick BI home page, follow the steps in the figure to go to the row-level permissions settings page.
Turn on the Enable Row-level Permissions switch, and set Authorization Method to User Tag Association Authorization.
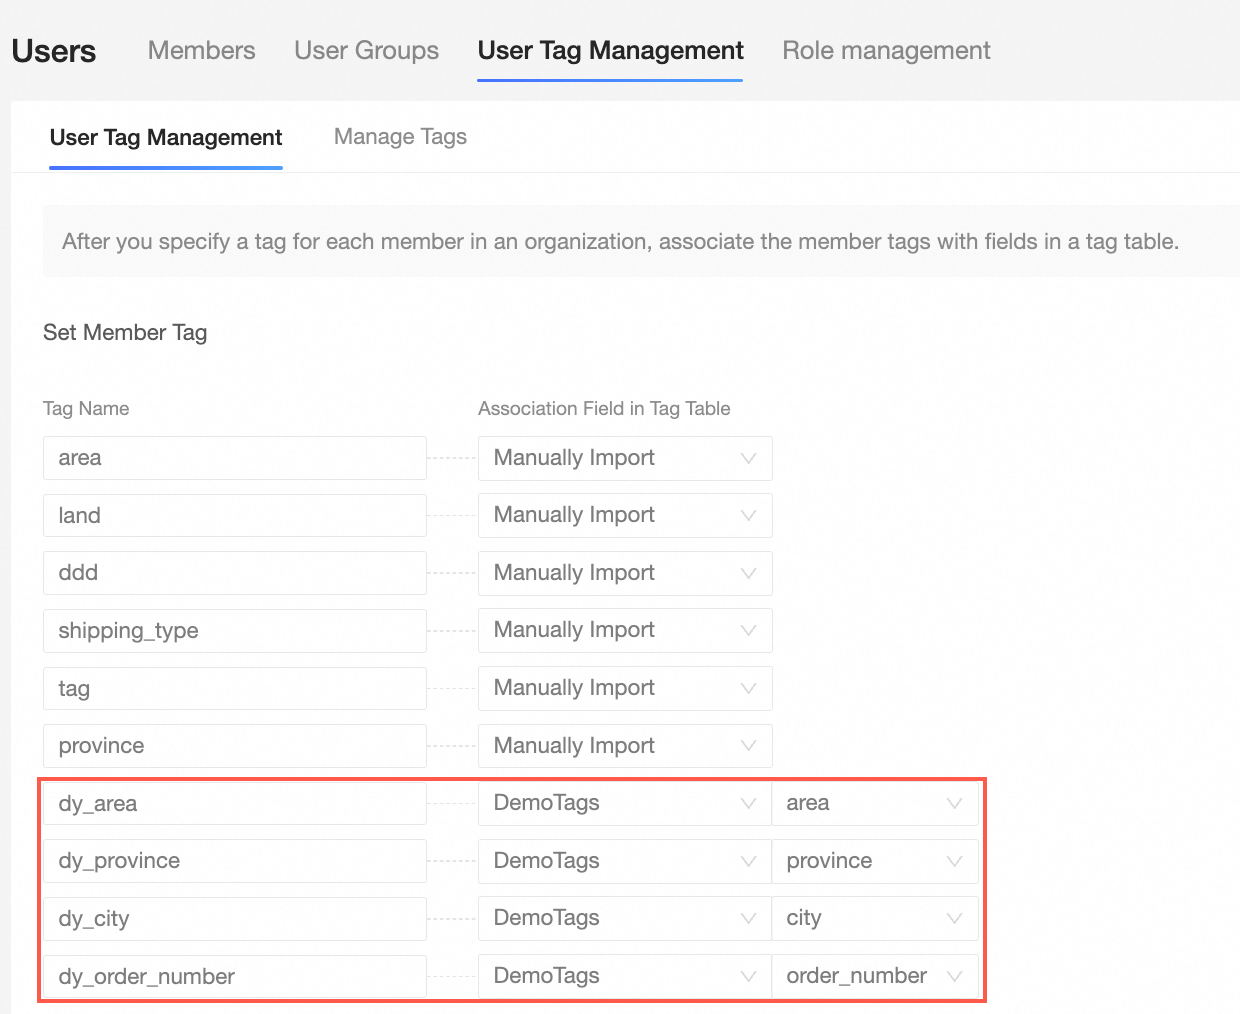
In the Set association conditions area, click Add Controlled Field.
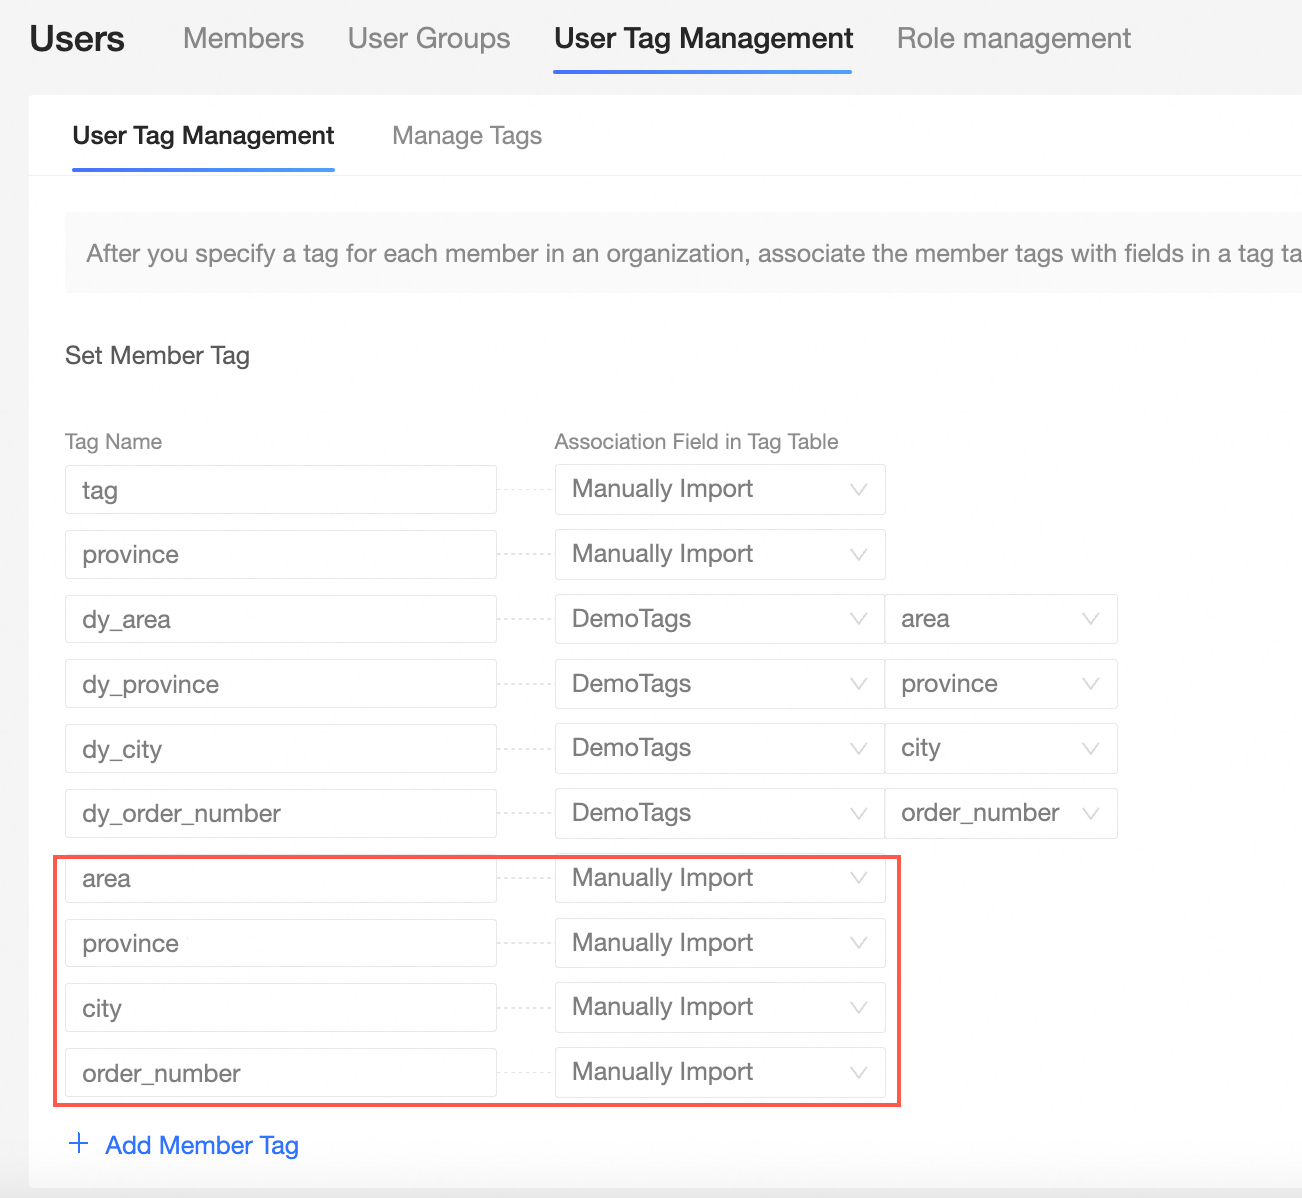
Select a Controlled Field and attach a User Tag Table Field.
The selected controlled fields and user tag table fields are shown in the following figure.
Click Save.
Whitelisted users
If you do not want these rules to apply to certain users, add those users to the whitelist.
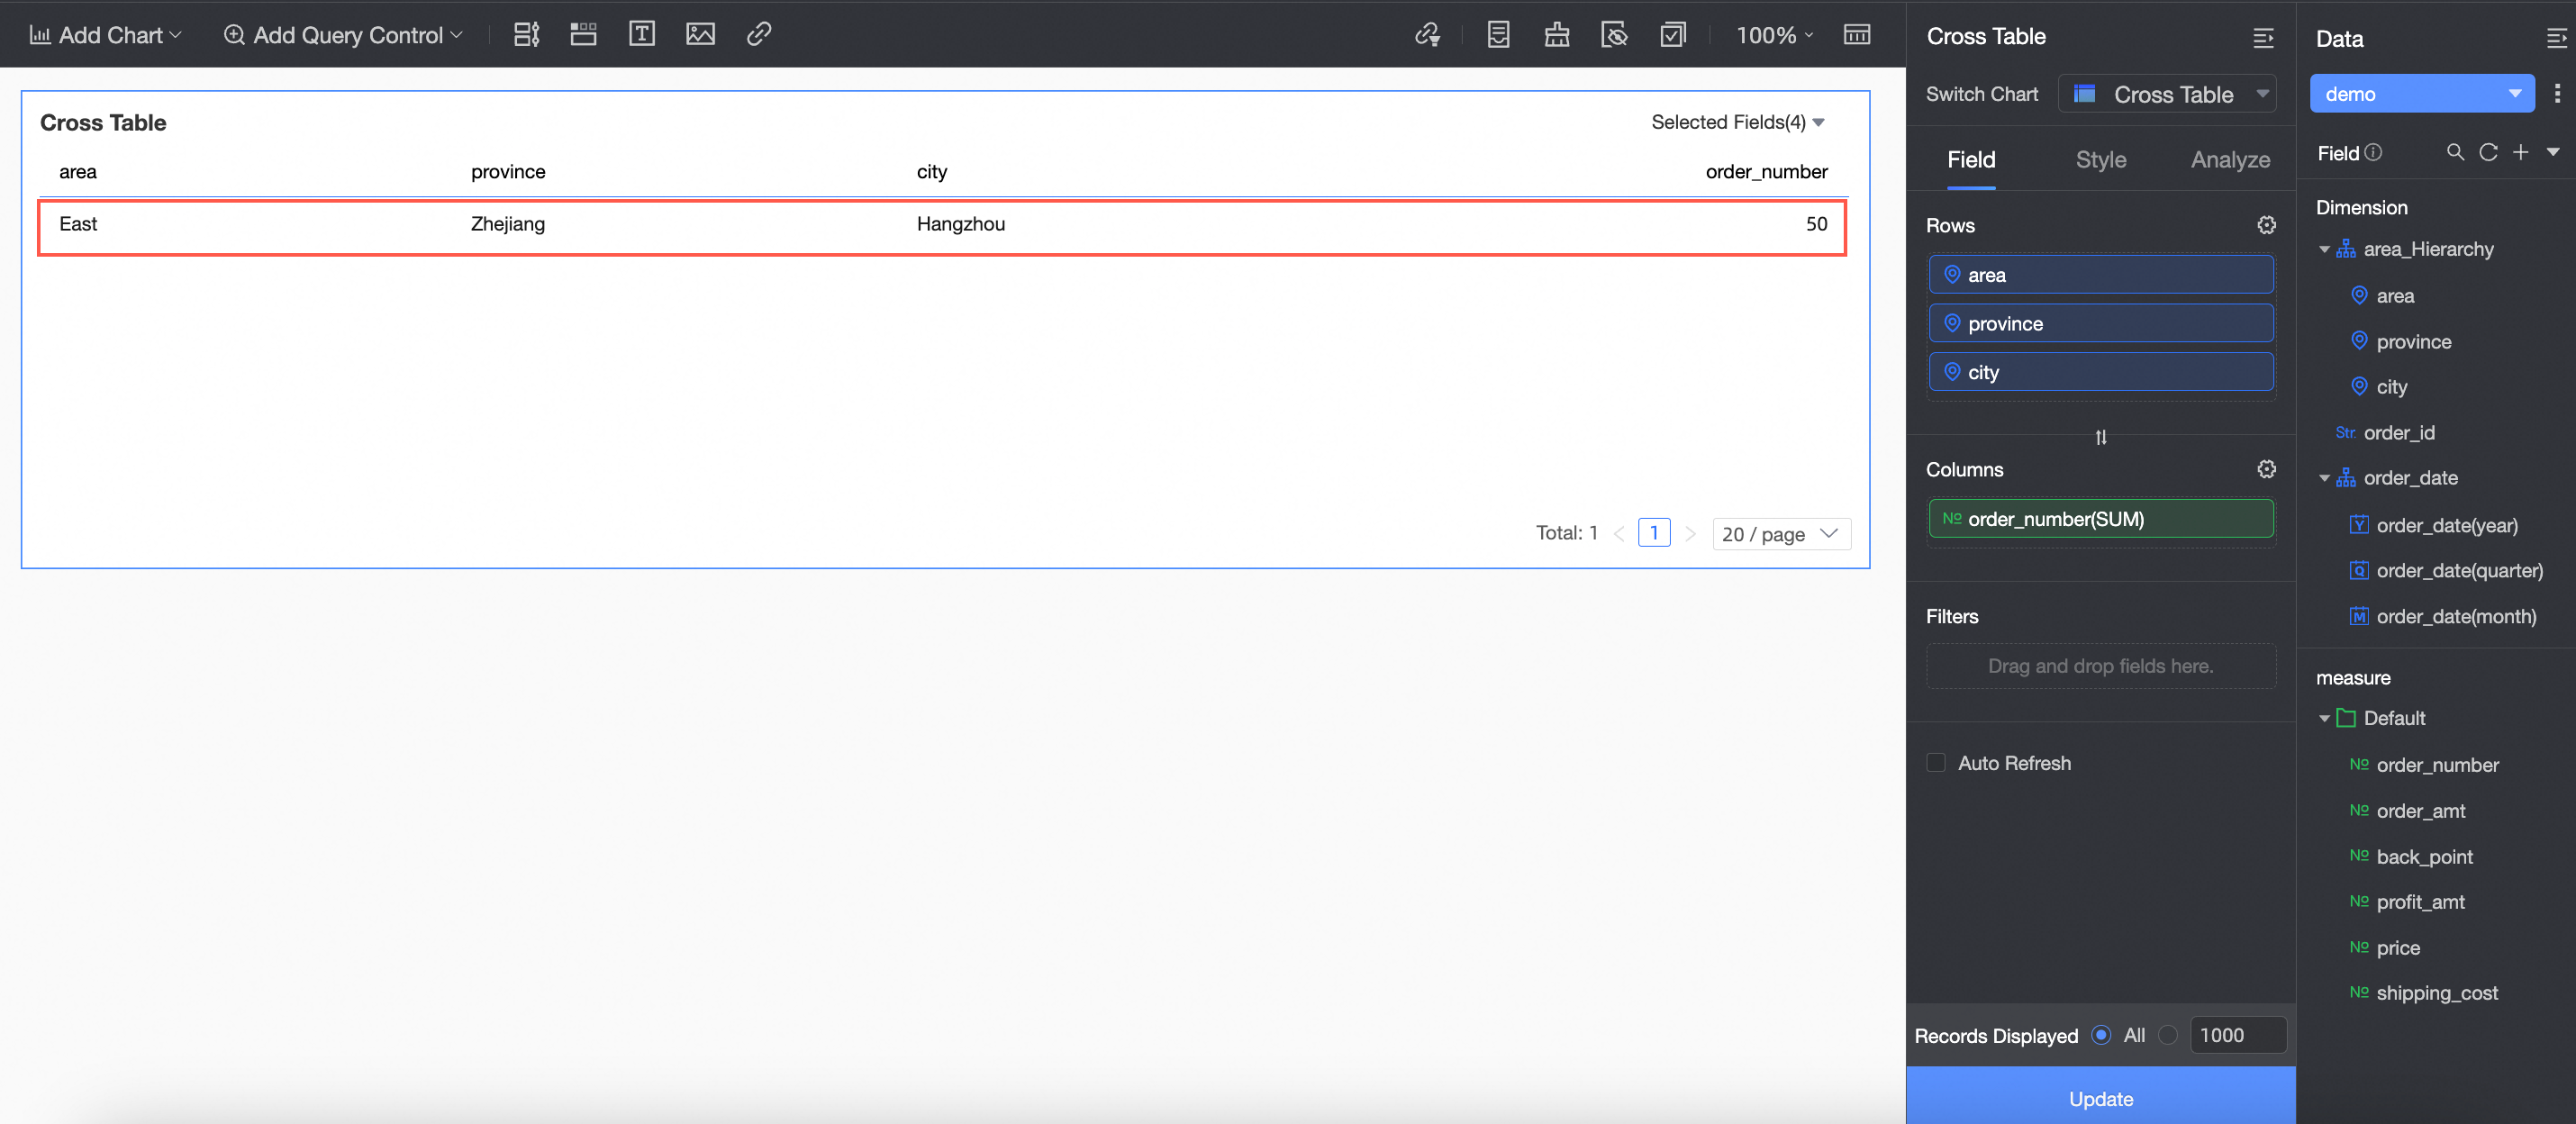
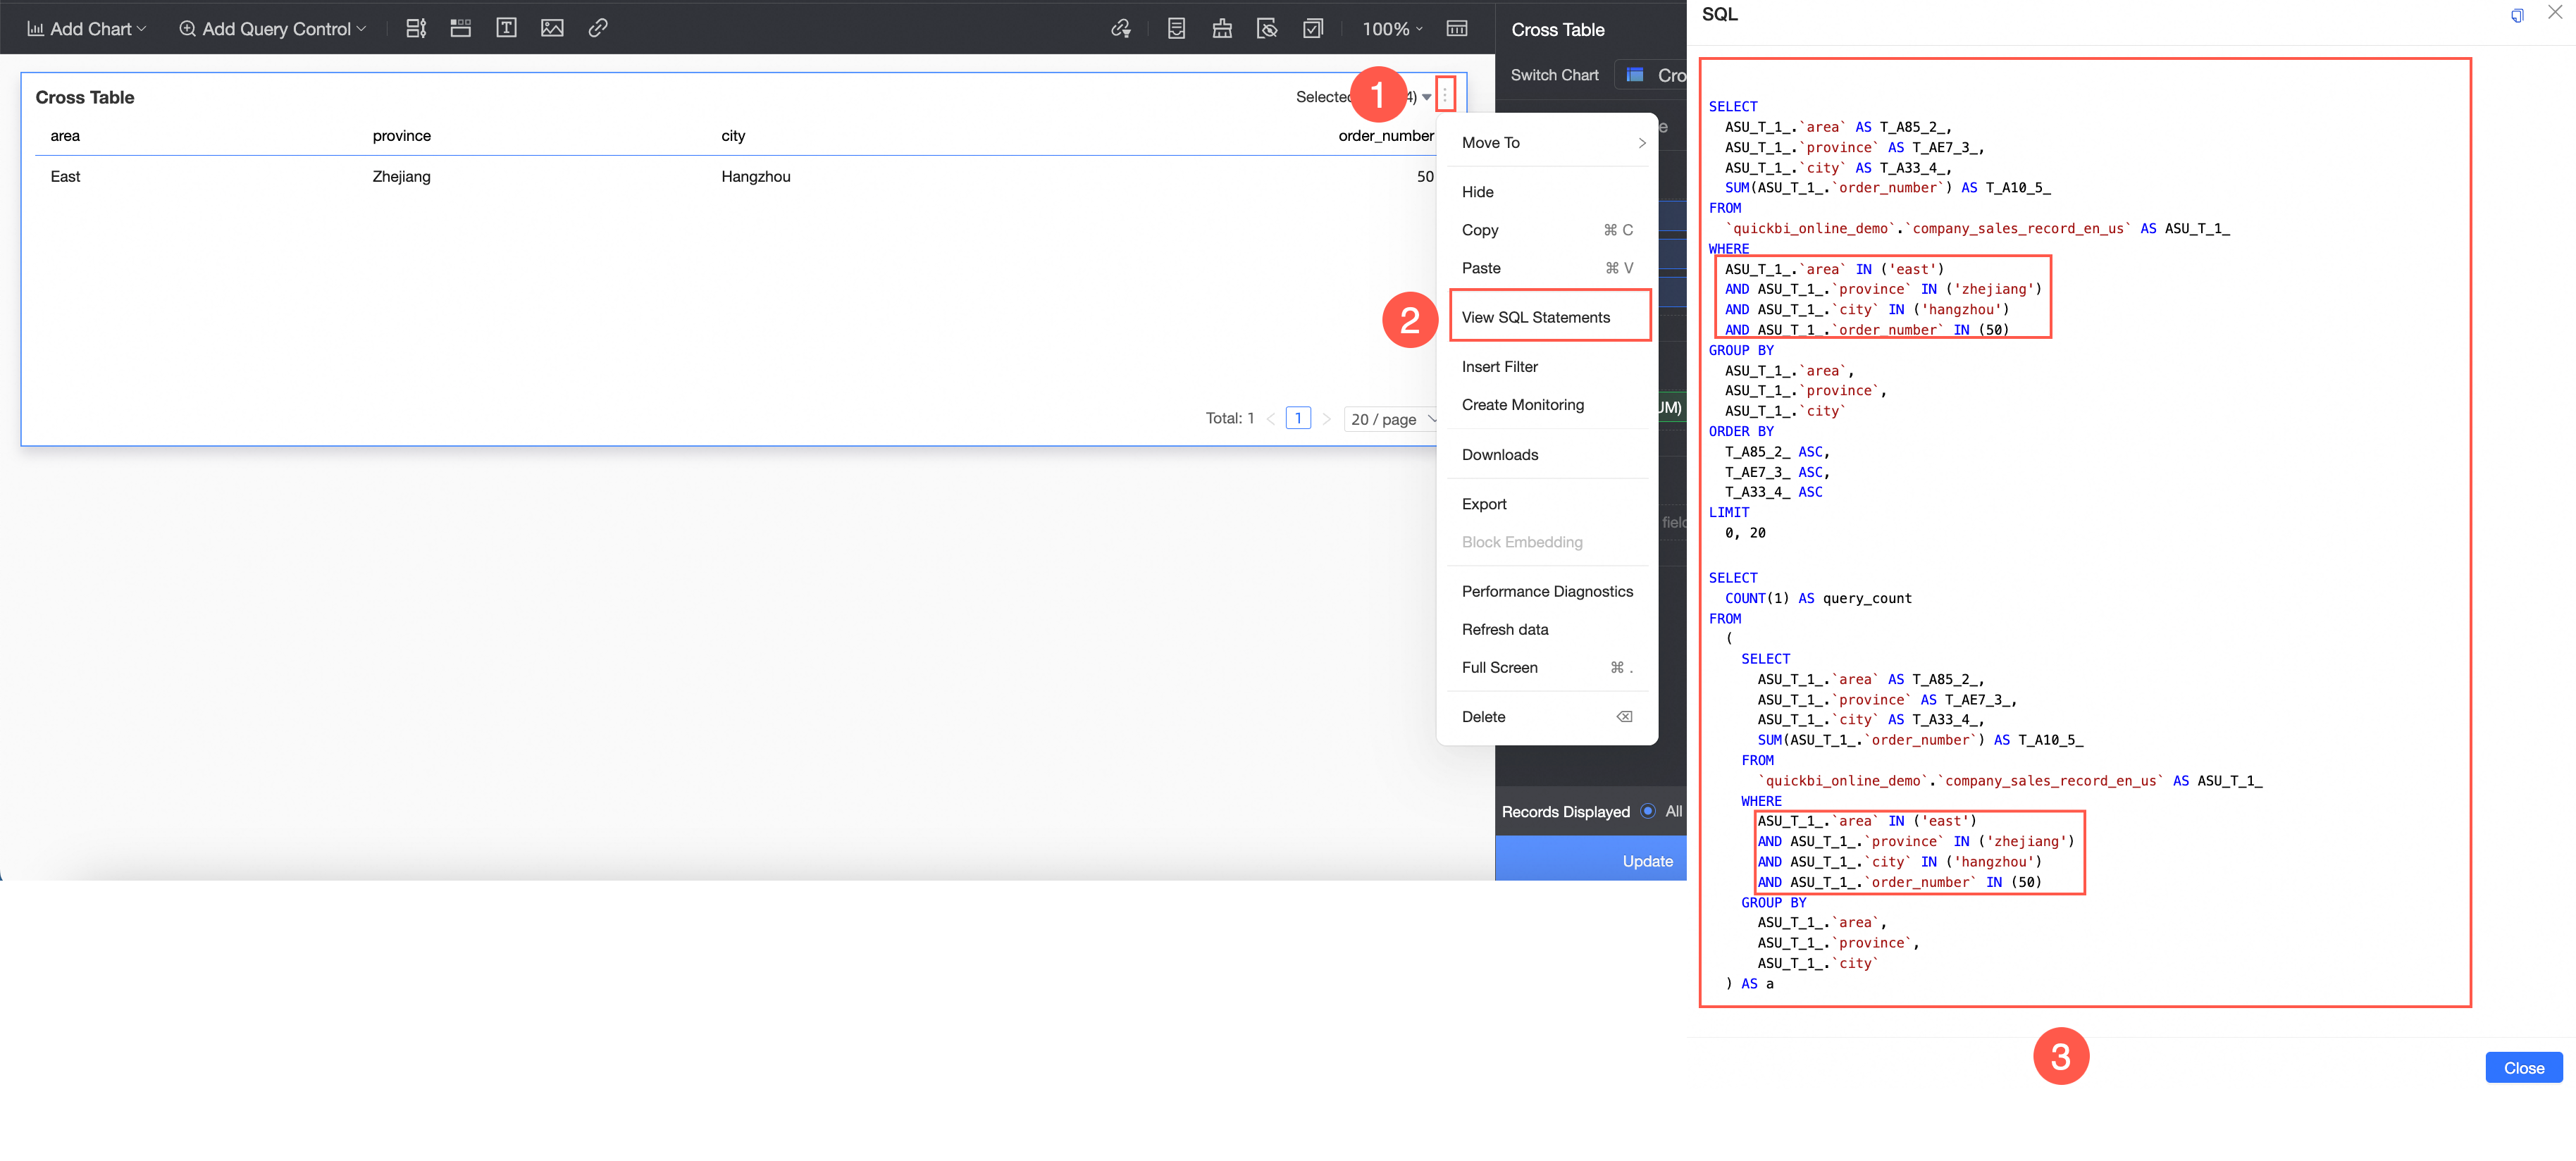
View the authorization result in a dashboard.
On the dashboard edit page, create a chart and view the authorization result.
For example, create a cross table. You can see the data for Hangzhou where the order quantity is 50.
View the data retrieval logic of the SQL statement.
Scenario 2: Perform access control by manually managing a tag table
Log on to the Quick BI console.
Set user tags.
The added user tags are used to control the scope of data that can be viewed after the tags are attached when you set row-level permissions.
Follow the steps in the following figure to add a user tag.
Enter a Tag Name and an Associated Tag Table Field, and then save the configuration.
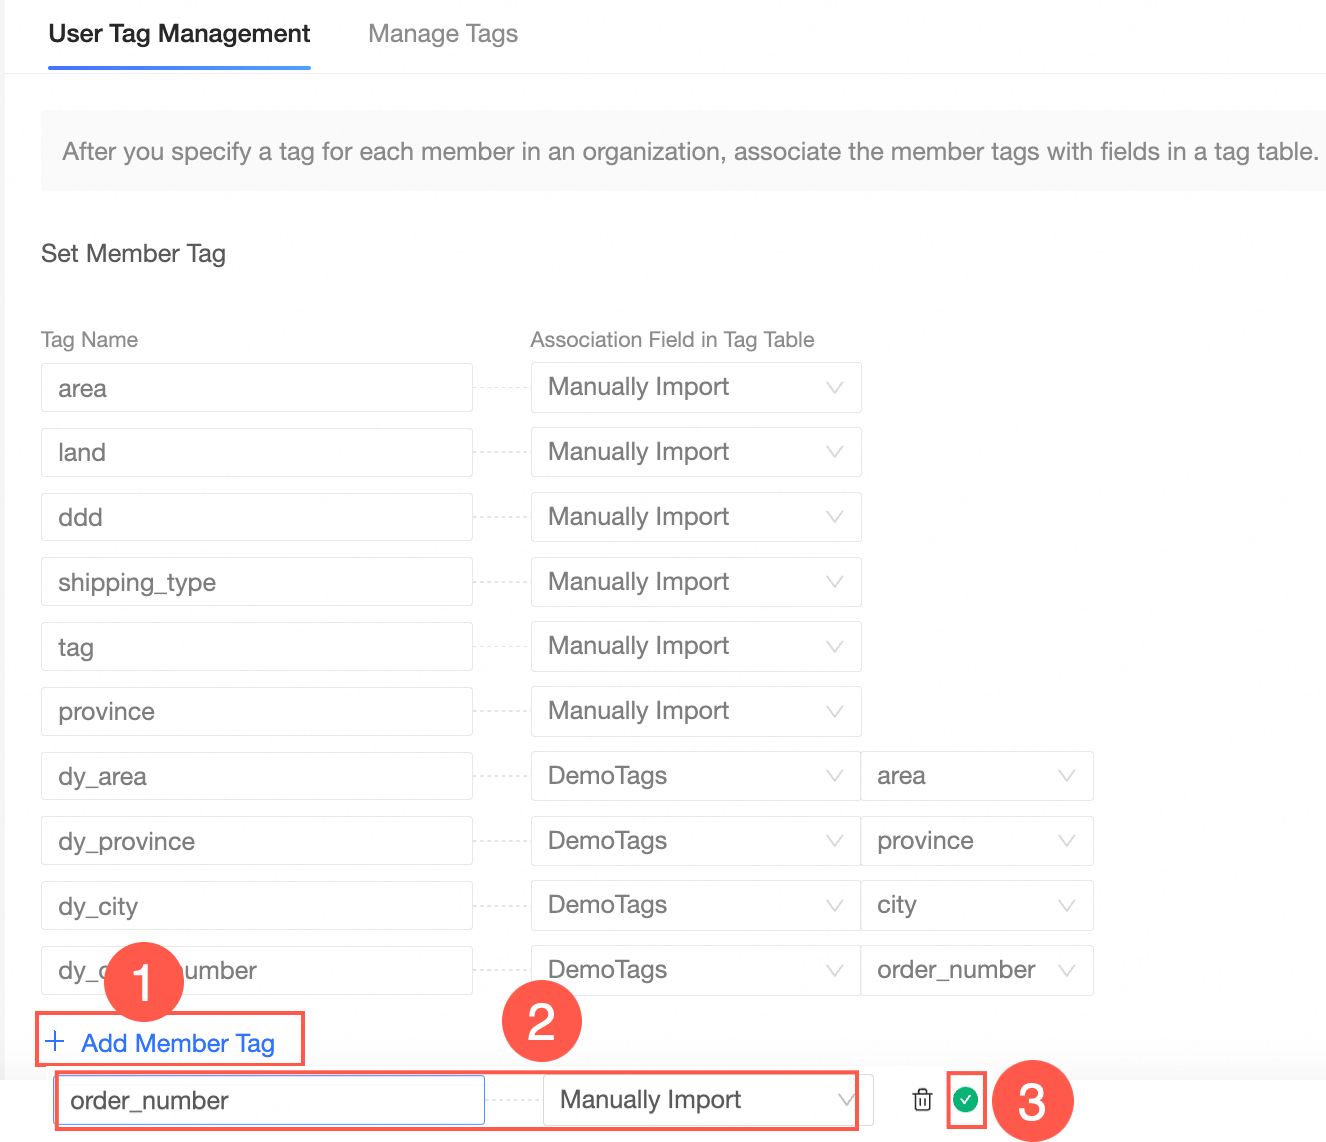
Customize the tag names as area, province, city, and order_number, and set Associated Tag Table Field to Manual Entry for all of them.
Manually manage the user tag table.
In the manually managed tag table, select one or more users and assign values to the added user tags.
On the Tag Management page, click Manual Management in the navigation pane on the left.
Search for the target user and assign tag values.
The tag assignment in this example is shown in the following figure.

Use tag-based authorization.
After authorization, the tag values in the user tag table apply to all datasets. Authorized users can view only the data within their permission scope.
On the Quick BI home page, follow the steps in the figure to go to the row-level permissions settings page.
Turn on the Enable Row-level Permissions switch, and set Authorization Method to User Tag Association Authorization.
In the Set association conditions area, click Add Controlled Field.
Select a Controlled Field and attach a User Tag Table Field.
The selected controlled fields and user tag table fields are shown in the following figure.
Click Save.
Whitelisted users.
If you do not want these rules to apply to certain users, add those users to the whitelist.
View the authorization result in a dashboard.
On the dashboard edit page, create a chart and view the authorization result.
For example, create a cross table. You can see the data for Hangzhou where the order quantity is 50.
View the data retrieval logic of the SQL statement.
What to do next
After you set up the dataset, you can perform data analytics. For more information, see Create a Dashboard and Create a Chart.