This topic describes how to configure an Active Directory (AD) domain controller on an Elastic Compute Service (ECS) instance. This topic also describes how to connect a PolarDB for MySQL cluster to an AD domain based on Kerberos authentication.
Background information
AD is a directory service provided by Microsoft. A directory is a hierarchical structure that stores information about the objects on the same LAN. An enterprise can store data, such as computer accounts, user accounts, and groups, in a directory. This way, the enterprise can improve the security of the data and manage the data in a more convenient manner.
PolarDB for MySQL offers integration with AD. You can configure AD domain settings to connect your PolarDB for MySQL cluster to an AD domain and enable Kerberos authentication.
Version requirements
Your PolarDB for MySQL cluster must meet the following requirements:
Database engine version: MySQL 8.0.1.
Minor version: V8.0.1.1.44.2 or later. For more information about how to update the minor version, see Minor version update.
Edition: Enterprise Edition.
Series: Cluster Edition.
Usage notes
The feature is in canary release. You can apply for a trial.
Prerequisites
If you already have an AD domain and a client environment configured to access the PolarDB for MySQL cluster, you can directly use your existing AD domain configuration without the need to create ECS instances. For more information, see the Step 3: Configure an AD domain server for the PolarDB for MySQL cluster section of this topic.
An ECS instance that hosts the AD domain controller is created. For more information, see Create and manage an ECS instance in the console (express version). A PolarDB for MySQL cluster must be connected to a self-managed AD domain over a private network. Therefore, the ECS instance must meet the following conditions:
The system image version is Windows Server 2016 or later, and the language is English.
An ECS instance that hosts the client for accessing the PolarDB for MySQL cluster is created. For more information, see Create and manage an ECS instance in the console (express version). The ECS instance that hosts the client for accessing the PolarDB for MySQL cluster must meet the following conditions:
The ECS instance that hosts the client for accessing the PolarDB for MySQL cluster resides in the same virtual private cloud (VPC) as the PolarDB for MySQL cluster.
The ECS instance that hosts the client for accessing the PolarDB for MySQL cluster resides in the same VPC as the ECS instance that hosts the AD domain controller.
Your Alibaba Cloud account is used to log on to the PolarDB for MySQL console.
Procedure
Step 1: (Optional) Configure an AD domain controller on an ECS instance
Remotely log on to an ECS instance that runs Windows Server 2022.
NoteThe AD domain controller must be installed on an ECS instance that runs Windows Server. We recommend that you use Windows Server 2016 or later. In this example, Windows Server 2022 is used.
Search for and open Server Manager.
Click Add roles and features and configure the parameters that are described in the following table.
Page name
Setting
Installation Type
Keep the default settings.
Server Selection
Keep the default settings.
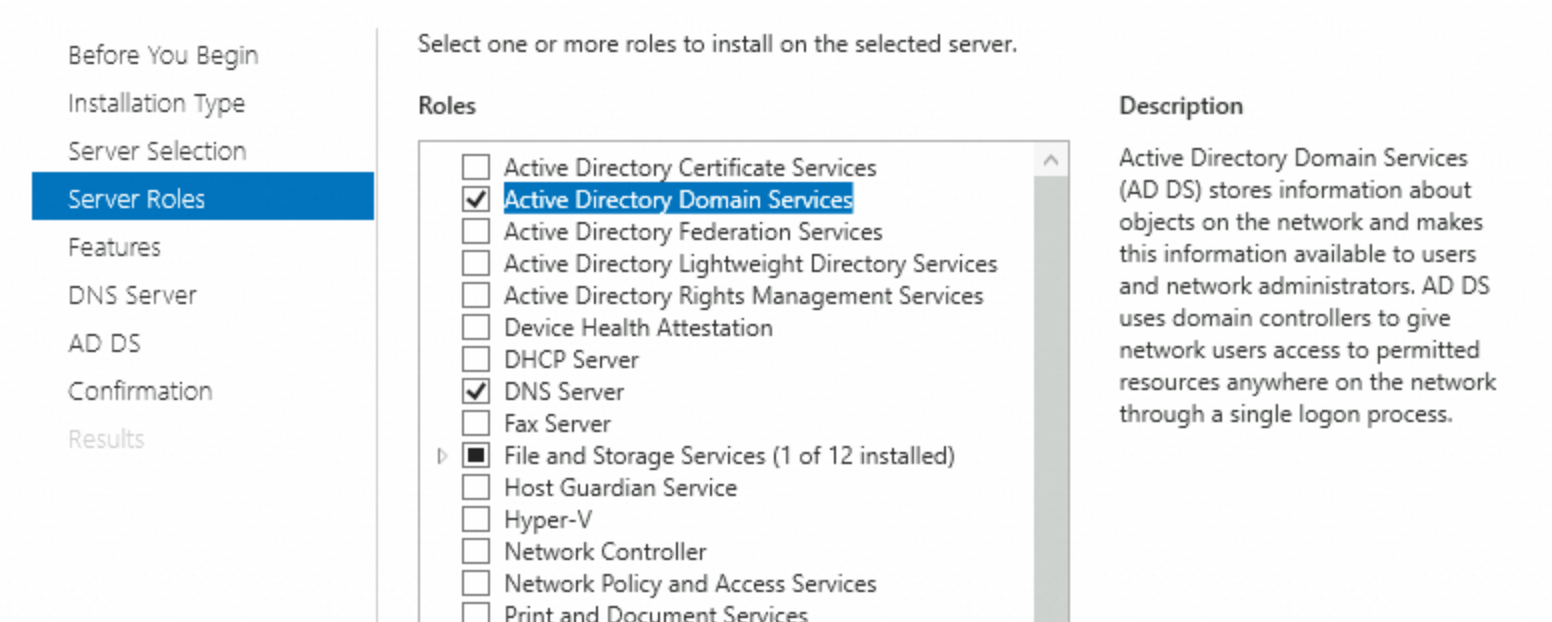
Server Roles
Select Active Directory Domain Services. In the dialog box that appears, click Add Features.
Select DNS Server. In the dialog box that appears, click Add Features. Make sure that your computer uses a fixed IP address. If the IP address dynamically changes, the DNS server becomes unavailable.
Features
Keep the default settings.
AD DS
Keep the default settings.
DNS Server
Keep the default settings.
Confirmation
Click Install.
After the installation is complete, click Close.
In the left-side navigation pane, click AD DS. In the upper-right corner of the page, click More.

Click Promote this server to a domain in the Action column. Configure the parameters that are described in the following table.

Page name
Setting
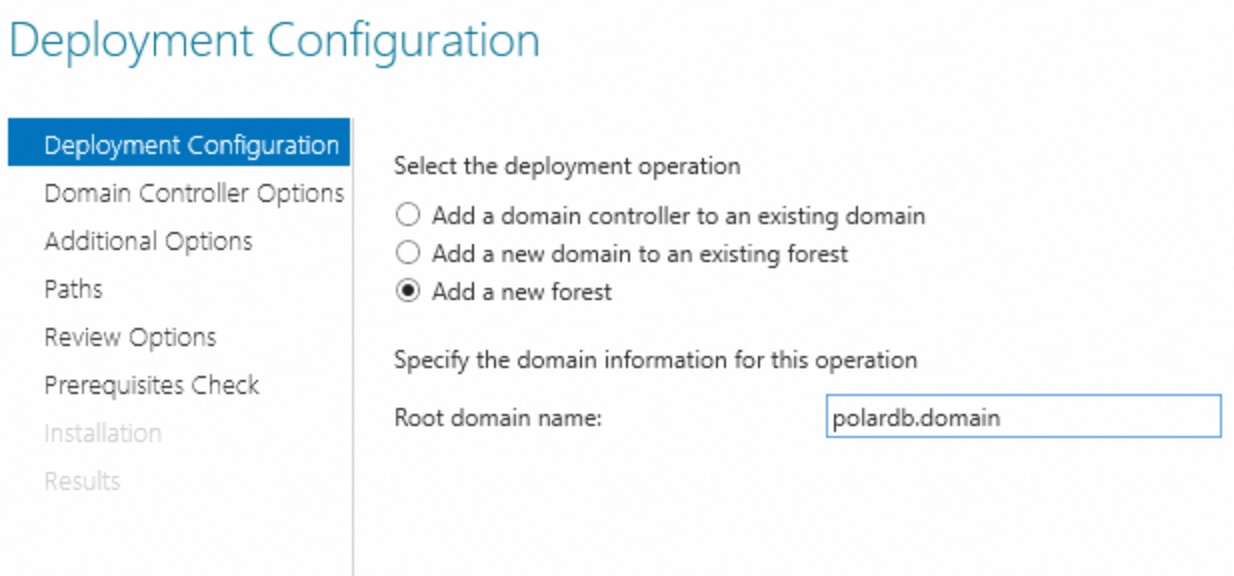
Deployment Configuration
Select Add a new forest and specify the domain name.
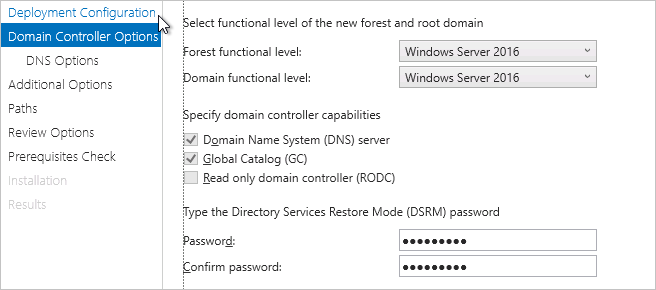
Domain Controller Options
Specify and confirm the password for use in Directory Services Restore Mode (DSRM).
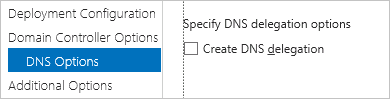
DNS Options
Clear Create DNS delegation.
Additional Options
Keep the default settings.
Paths
Keep the default settings.
Review Options
Keep the default settings.
Prerequisites Check
Click Install.
NoteAfter the installation is complete, the system restarts.
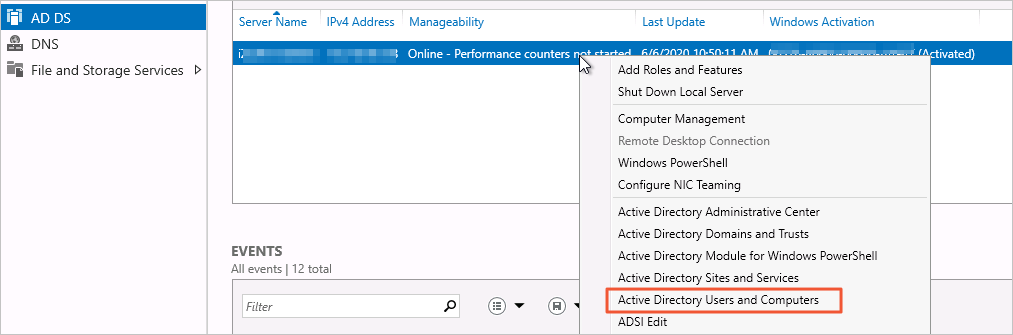
After the system restarts, search for and open Server Manager again.
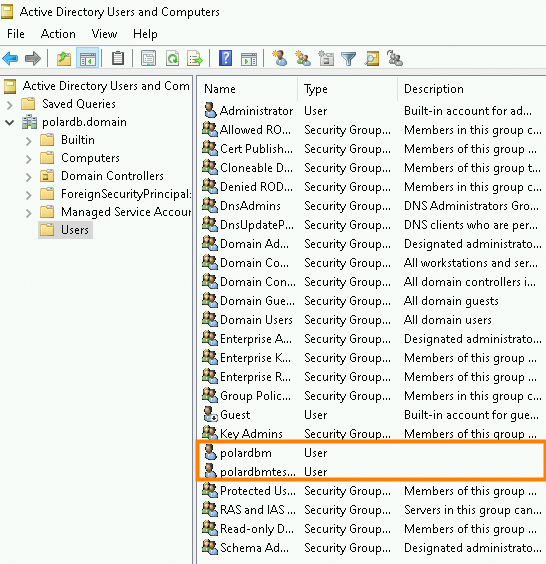
In the left-side navigation pane, click AD DS. In the server list, right-click the domain controller server that you want to manage and select Active Directory Users and Computers to go to the AD user management module.
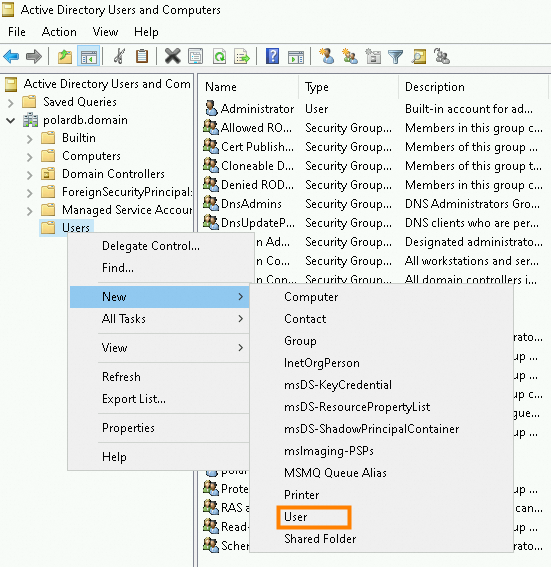
In the left-side navigation pane, choose polardb.domain > Users. Right-click Users and select New > User.
Specify the logon username, such as polardbmtestuser, and click Next.
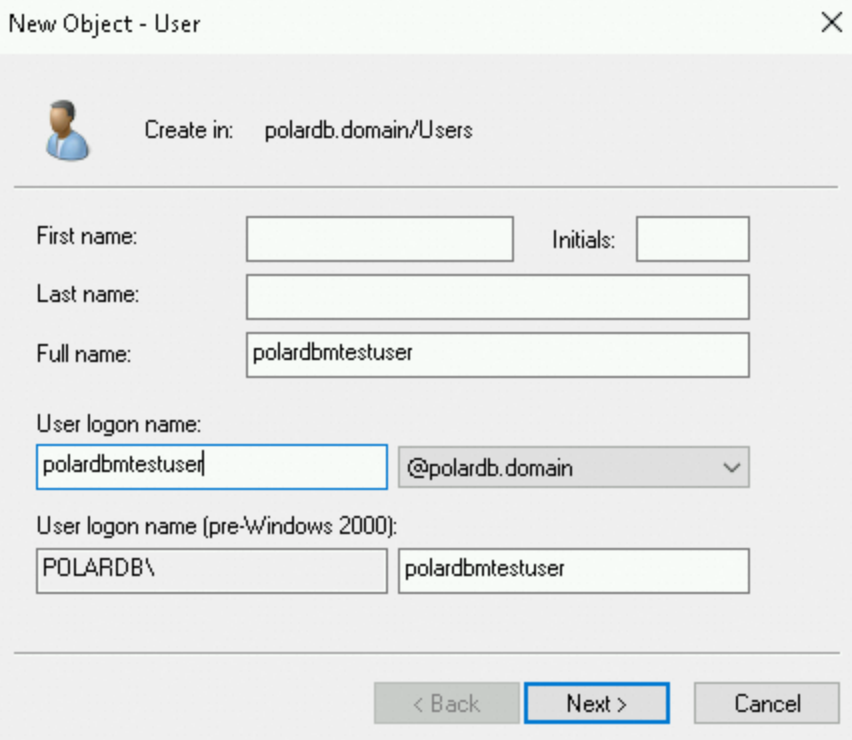
Specify the logon password and select Password never expires. Click Next and Finish. A user named polardbmtestuser is created.

Double-click the user that you created. In the
Account optionssection, select the options that enableKerberos AESencryption support.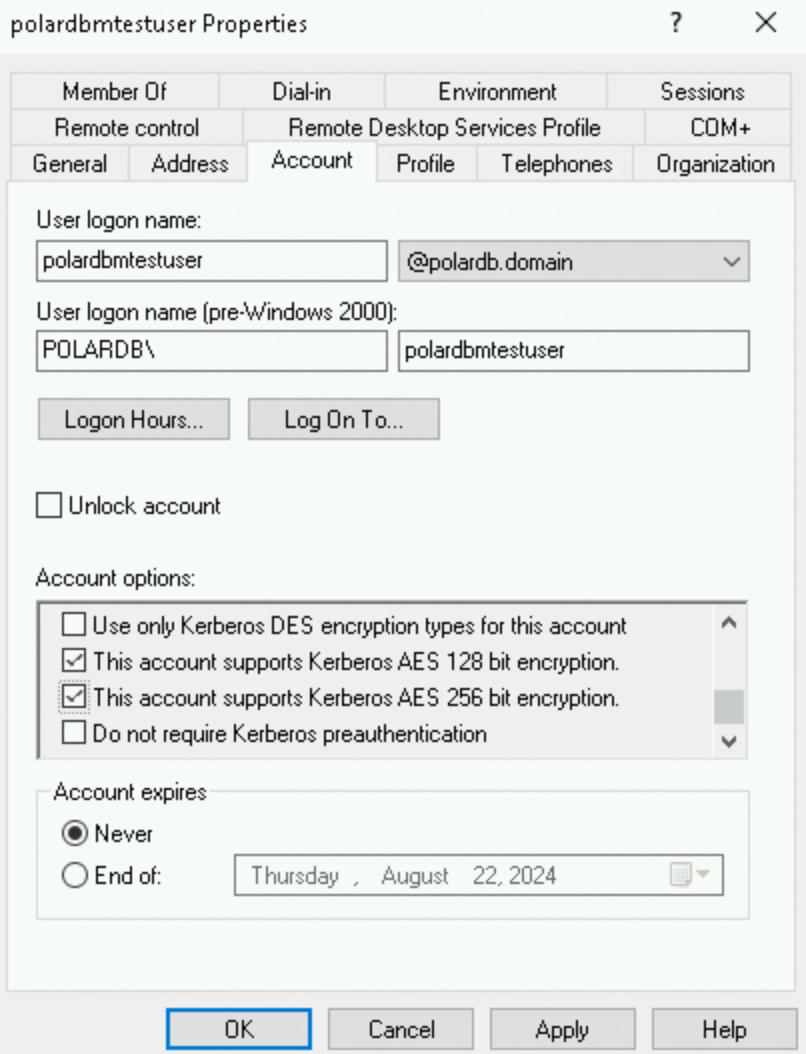
Create another user named polardbm by repeating the previous steps. In this example, polardbmtestuser is used for client access, and polardbm is used for server-side authentication in the PolarDB for MySQL cluster.
Step 2: (Optional) Configure security group rules on an ECS instance
Log on to the ECS console.
In the left-side navigation pane, choose Instances & Images > Instances.
In the top navigation bar, select the region in which the ECS instance that you want to manage resides.
On the Instance page, click the ID of the ECS instance to go to the instance details page.
Click the Security Groups tab. Find the security group that you want to manage and click Manage Rules in the Operation column.
NoteA number of ports need to be enabled for the AD domain controller. We recommend that you configure a separate security group for the AD domain controller rather than configuring the AD domain controller in the same security group as other ECS instances.
On the Inbound tab, click Quick Add to allow access to the ECS instance over the following ports.
Protocol type
Port or port range
Description
TCP
88
The port for the Kerberos authentication protocol.
TCP
135
The port for the Remote Procedure Call (RPC) protocol.
TCP/UDP
389
The port for the Lightweight Directory Access Protocol (LDAP).
TCP
445
The port for the Common Internet File System (CIFS) protocol.
TCP
3268
The port for Global Catalog.
TCP/UDP
53
The port for the DNS service.
TCP
49152 to 65535
The default dynamic port range for connections. Example: 49152/65535.
Step 3: Configure an AD domain server for the PolarDB for MySQL cluster
Go to the Clusters page in the PolarDB for MySQL console. In the top navigation bar, select the region in which the cluster that you want to manage resides. Then, click the cluster ID to go to the cluster details page.
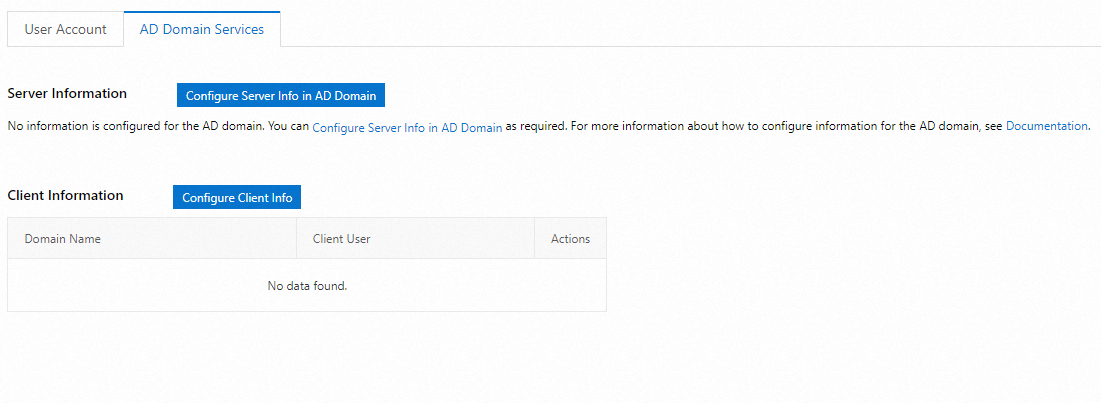
In the left-side navigation pane, choose Settings and Management > Accounts. On the page that appears, click the AD Domain Services tab. On the AD Domain Services tab, you can configure the information about an AD domain server and a client for accessing the PolarDB for MySQL cluster.
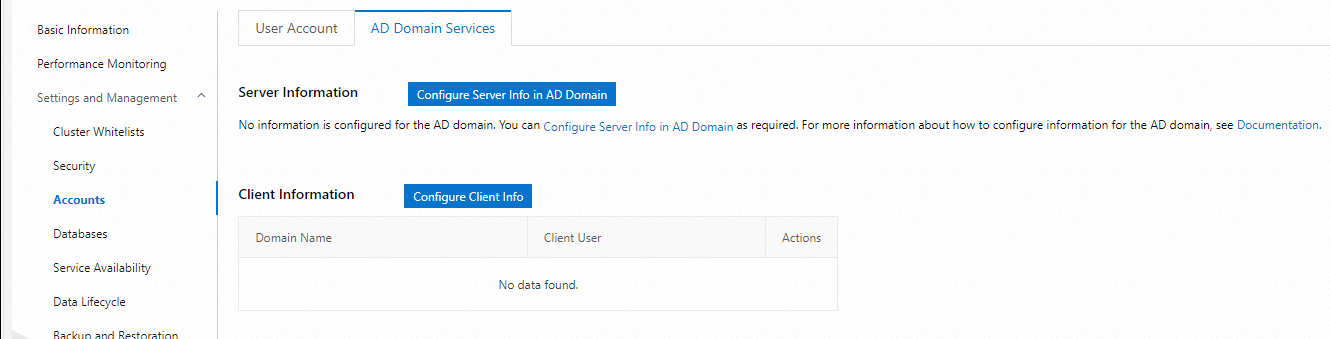
Click Configure Server Info in AD Domain and configure the following parameters.
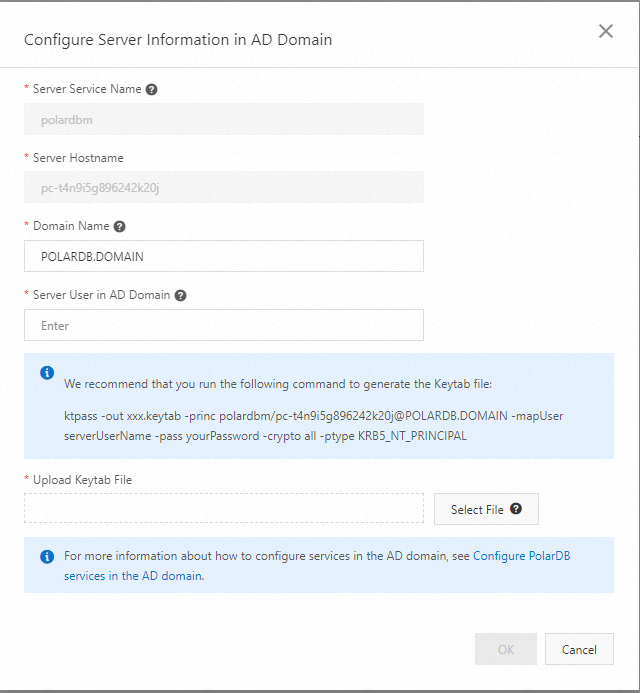
Server Service Name: the type of the service to be requested, which is PolarDB for MySQL in this example. The default value is
polardbmand cannot be modified.Server Hostname: the hostname of the service. The default value is the cluster ID and cannot be modified.
Domain Name: the root domain name of the self-managed AD domain on the ECS instance. You can also use your own self-managed AD domain. In this example, POLARDB.DOMAIN is used.
NoteIf you use the self-managed AD domain of your enterprise, such as
Azure Active Directory(now known as Microsoft Enter ID), enter the domain name of the AD domain.The values of the Server Service Name, Server Hostname, and Domain Name parameters together form a Kerberos Service Principal Name (SPN). A
Kerberos SPNis a core concept in theKerberosauthentication protocol and is used to uniquely identify a service instance on the network. SPNs are crucial for ensuring that clients can securely communicate with the intended services. Generally, SPNs are in the ServiceType/HostName@REALM format.
Server User in AD Domain: the user account created in the AD domain, which is used for server-side service authentication. After you specify the Server Hostname and Domain Name parameters, a suggested command for generating a
keytabfile is displayed. Note
NoteA Kerberos Keytab (
keytabfor short) file is a binary file that stores mappings between SPNs and their corresponding encryption keys in the Kerberos security realm. This file is crucial to the Kerberos authentication process. If you use an AD domain as your Kerberos key distribution center (KDC), we recommend that you run thektpasscommand to generate akeytabfile. When you run the ktpass command, replace-out xxx.keytabwith the desired name for the keytab file, and replace-pass yourPasswordwith the password that you specified when you created the polardbm user in the AD domain.Generate a
keytabfile.Generate a
keytabfile in the self-managed AD domain on the ECS instance. To do so, openWindows PowerShell.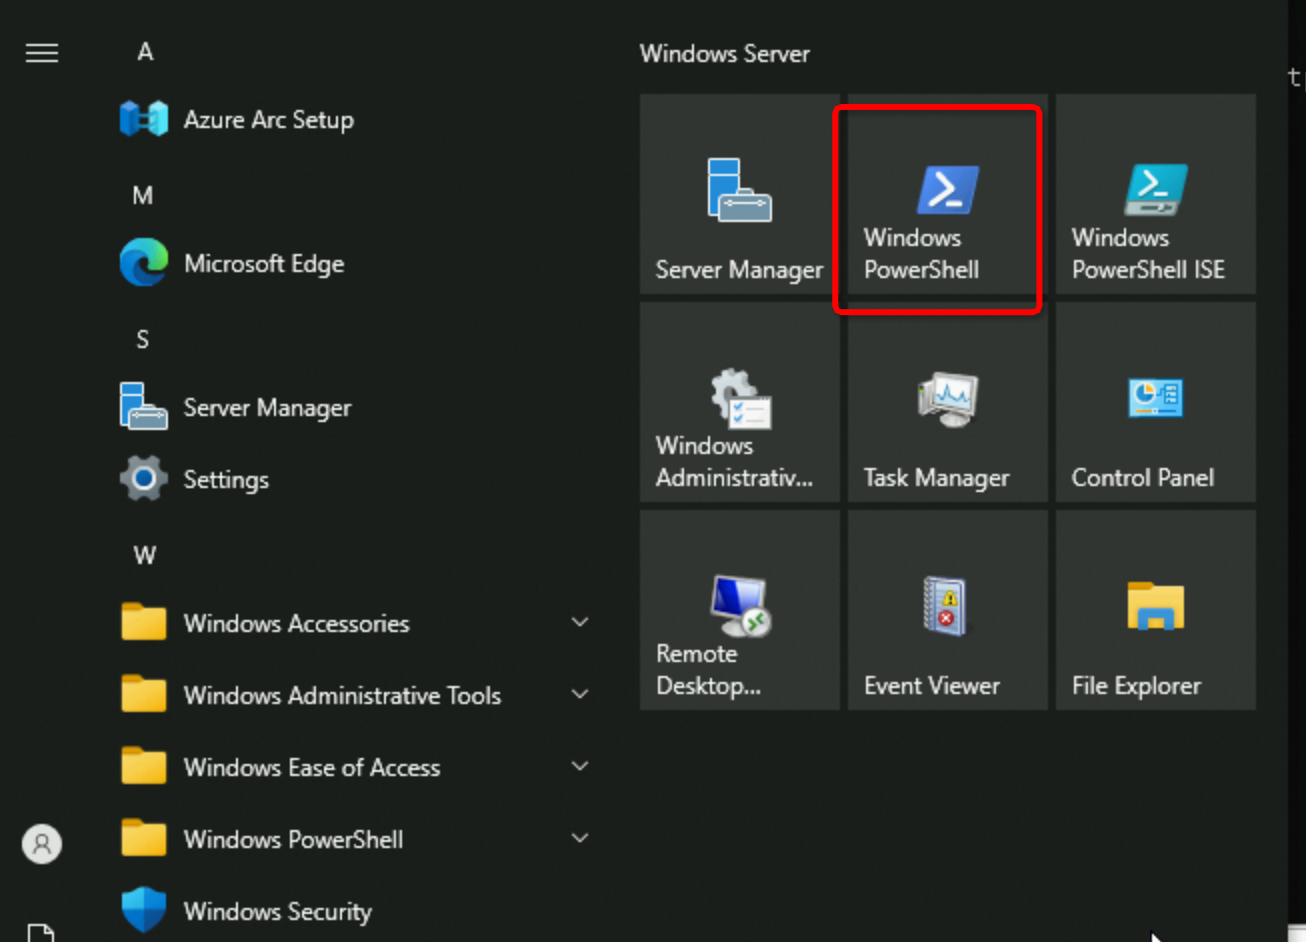
Run the ktpass command to generate a
keytabfile.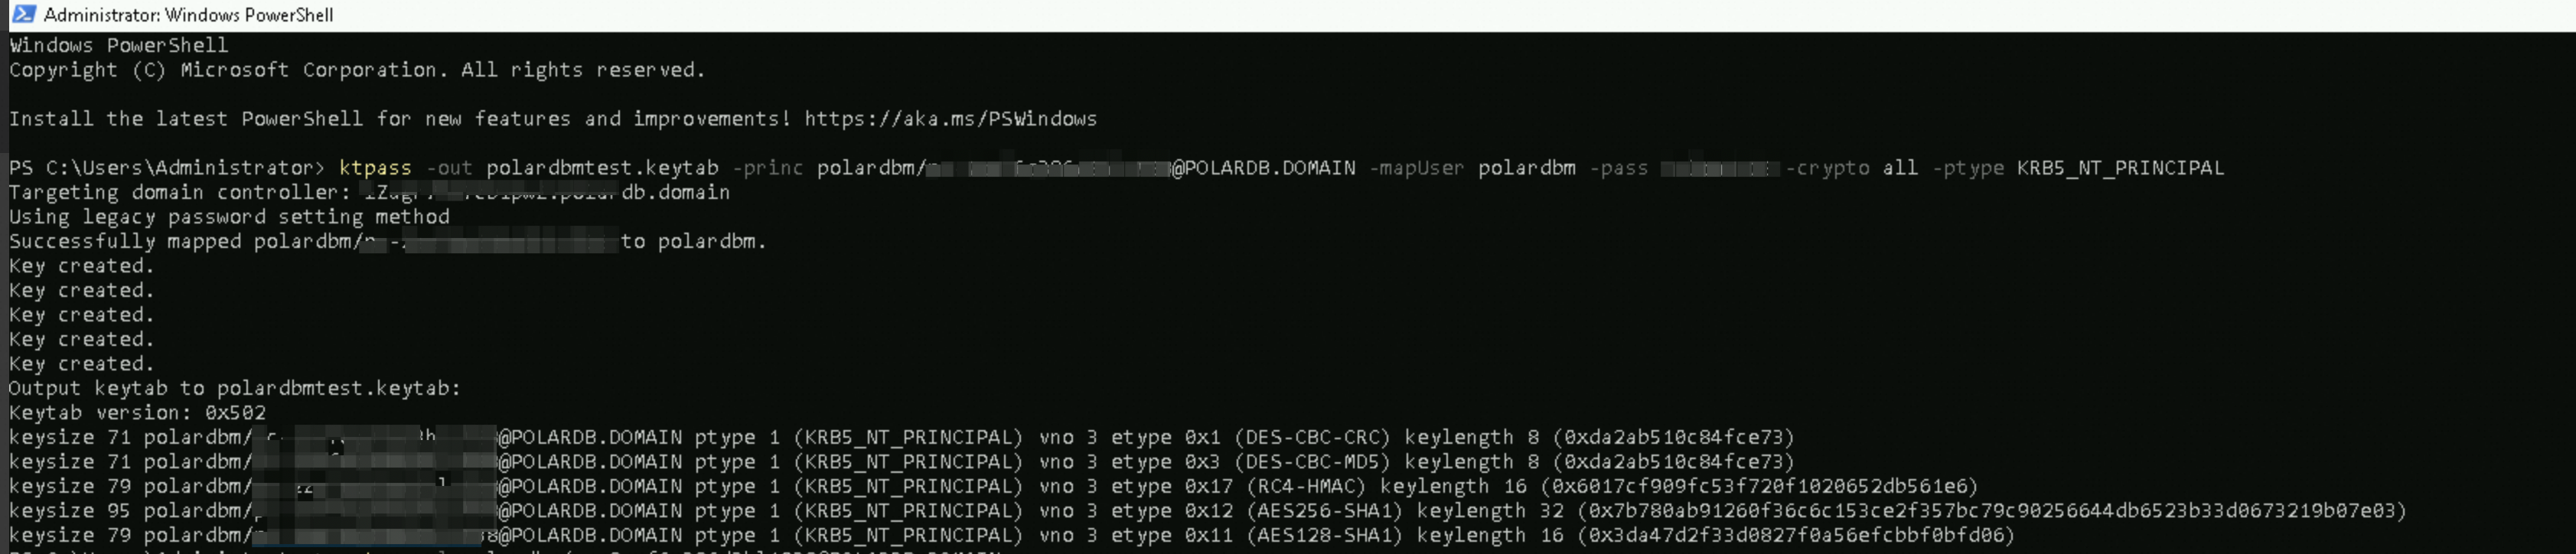
Make sure that no error occurs in the command output. Then, run the
setspncommand to check the SPN mapping forpolardbm.Click Select File to upload the
keytabfile and complete the configuration of the AD domain server.You need to first store the generated
keytabfile to your computer before you click Select File to upload thekeytabfile.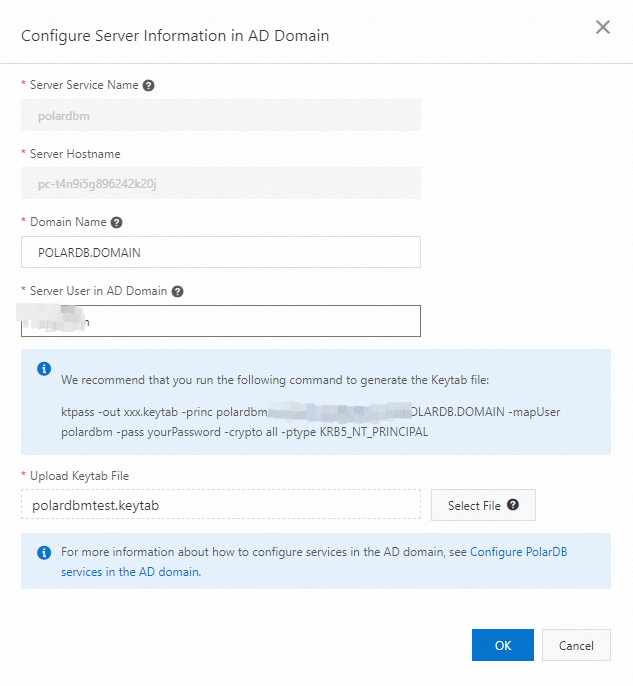
Click OK.
NoteAfter the configuration is submitted, the system enters the Maintaining Instance state.
Step 4: Configure a client for accessing the PolarDB for MySQL cluster
In the left-side navigation pane, choose Settings and Management > Accounts. On the page that appears, click the AD Domain Services tab. On the AD Domain Services tab, click Configure Client Info.
In the Create Client User in AD Domain dialog box, configure the Client User and Domain Name parameters.
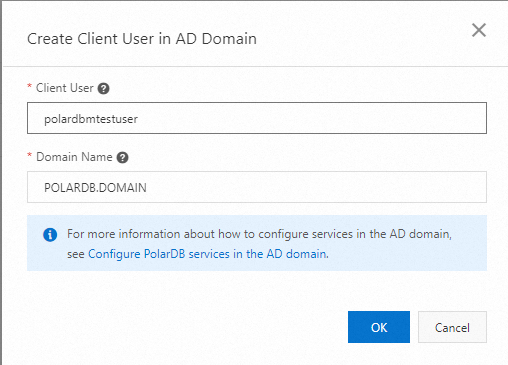
Client User: the name of the
Kerberos-authenticated user to be created in the PolarDB for MySQL cluster. This user corresponds to the client user that you created in the self-managed AD domain on the ECS instance. In this example, polardbmtestuser is used.Domain Name: the root domain name of the self-managed AD domain on the ECS instance. In this example, POLARDB.DOMAIN is used.
Click OK.
NoteAfter the configuration is submitted, the system enters the Maintaining Instance state.
In the left-side navigation pane, choose Settings and Management > Accounts. On the page that appears, click the User Account tab.
The user that you created in the previous step is displayed. You can modify the permissions of the user. However, you cannot change the password of the user or delete the user.
If you want to delete the user, you must specify the user in the client information on the AD Domain Services tab.
Step 5: (Optional) Enable client identity authentication
You must use Kerberos to authenticate the identity of the client. After the authentication is passed, you can access the PolarDB for MySQL cluster from the client. You must perform the following operations on the ECS instance that hosts the client for accessing the PolarDB for MySQL cluster.
Configure the /etc/krb5.conf file used to access the self-managed AD domain on the ECS instance.
# To opt out of the system crypto-policies configuration of krb5, remove the
# symlink at /etc/krb5.conf.d/crypto-policies which will not be recreated.
includedir /etc/krb5.conf.d/

[logging]
    default = FILE:/var/log/krb5libs.log
    kdc = FILE:/var/log/krb5kdc.log
    admin_server = FILE:/var/log/kadmind.log

# libdefaults configuration
# Set the default_realm parameter in the [libdefaults] section to the root domain name of the self-managed AD domain on the ECS instance. In this example, PolarDB.Domain is used.
[libdefaults]
    dns_lookup_realm = false
    ticket_lifetime = 24h
    renew_lifetime = 7d
    forwardable = true
    rdns = false
    pkinit_anchors = FILE:/etc/pki/tls/certs/ca-bundle.crt
    spake_preauth_groups = edwards25519
    default_realm = POLARDB.DOMAIN
    default_ccache_name = KEYRING:persistent:%{uid}

# realms configuration
# Set the kdc and admin_server parameters in the [realms] section to the domain controller service of the self-managed AD domain on the ECS instance.
[realms]
POLARDB.DOMAIN = {
# Add ad.polardb.domain to the /etc/hosts file, and bind ad.polardb.domain to the IP address of the self-managed AD domain on the ECS instance. The default port is port 88.
     kdc = ad.polardb.domain:88
     admin_server = ad.polardb.domain:88
}
# domain_realm configuration
# Set parameters in the [domain_realm] section to the root domain name of the self-managed AD domain on the ECS instance.
[domain_realm]
.polardb.domain = POLARDB.DOMAIN
polardb.domain = POLARDB.DOMAIN
kinit usernameReplace
usernamewith the client user that you created in the AD domain. In this example,polardbmtestuseris used. Enter the password of the user that you specified in the AD domain as prompted.Run the following MySQL command to log on to the PolarDB for MySQL cluster that is connected to the AD domain. Use the primary address.
NoteOnly MySQL official clients of version 8.0.26 or later support the
authentication_kerberos_clientplug-in. --plugin-dirspecifies the directory of theauthentication_kerberos_client.soplug-in and its dependent plug-inauthentication_oci_client.so../mysql -h [Primary address] -P 3306 --default-auth=authentication_kerberos_client --plugin-dir=/root/mysql-client/plugin --user=polardbmtestuser