If you can predict peak and off-peak business hours, you can use Scheduled Scaling to automatically adjust the number of replicas based on a predefined schedule. It scales out before traffic peaks to ensure service performance and scales in during off-peak periods to save costs. This topic explains how to configure this feature and how it works with Horizontal Auto Scaling.
Method 1: Configure scheduled scaling in the console
Enable scheduled auto scaling
-
Log on to the PAI console. Select a region on the top of the page. Then, select the desired workspace and click Elastic Algorithm Service (EAS).
In the service list, click the target service to open its Overview page.
On the Auto Scaling tab, in the Scheduled Scaling section, click Enable Scheduled Scaling.
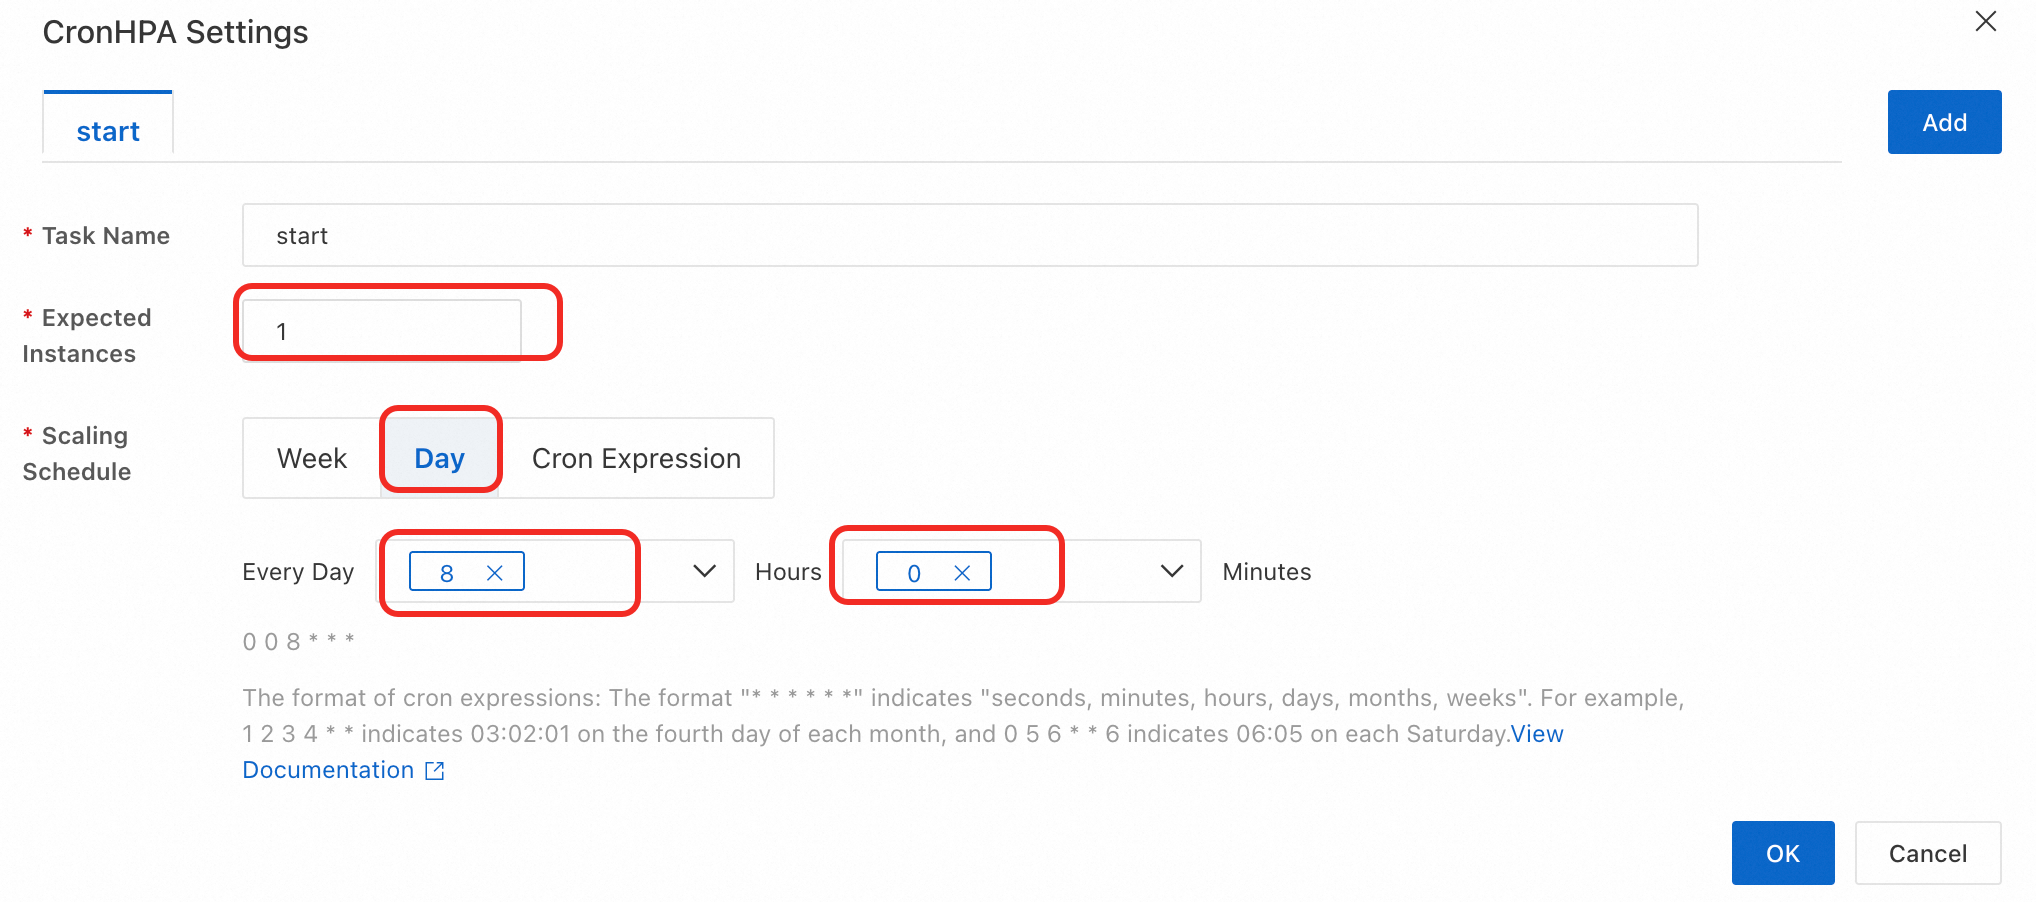
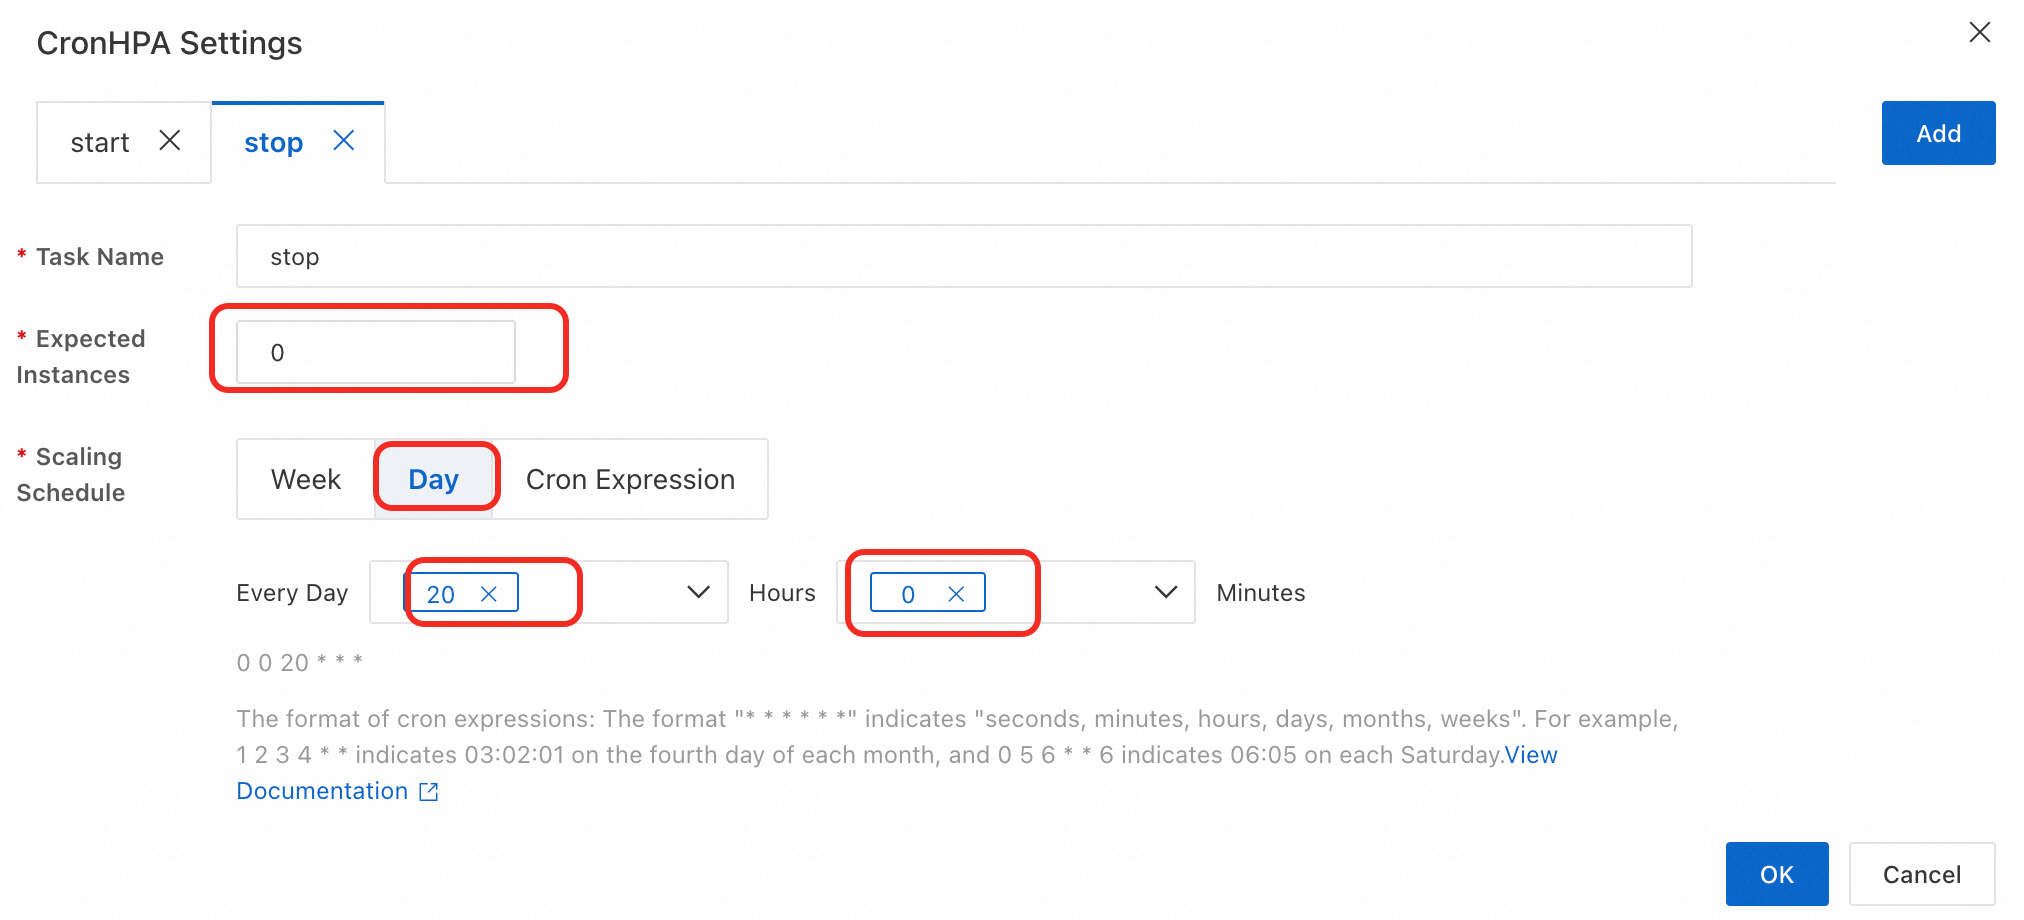
In the CronHPA Settings dialog box, configure the following parameters. You can also click Add to configure multiple tasks. When you are finished, click OK.
Parameter
Description
Task Name
The name of the scheduled scaling task.
Target Replicas
The expected number of replicas.
Scaling Schedule
The time to execute the task. You can set the time in one of the following ways:
Week: A recurring weekly schedule.
Day: A recurring daily schedule.
Cron Expression: Set the schedule using a cron expression.
Update the scheduled scaling configuration
On the Auto Scaling tab, in the CronHPA section, you can click Manage CronHPA.
In the CronHPA Settings dialog box, you can modify the configurations for Task Name, Target Replicas, or Scaling Schedule.
Click Update.
Disable scheduled auto scaling
On the Auto Scaling tab, in the CronHPA section, click Disable Scheduled Scaling.
In the Confirm Disable dialog box, click Confirm.
Method 2: Configure using the local client
Enable or update scheduled auto scaling
After you create a service, Scheduled Scaling is disabled by default. You can log on to the eascmd client and use the cronscale subcommand to enable or update the feature. For more information about how to log on to the eascmd local client, see Download and authenticate the client.
Command format (The Windows 64-bit version is used as an example)
eascmdwin64.exe cronscale [region]/[service_name] -s cronscale.jsonBefore running the command, configure the cronscale.json file according to the parameter descriptions. The following code is a sample cronscale.json configuration.
{
  "ExcludeDates": ["* * * * * 6,0"],
  "ScaleJobs": [
    {
      "Schedule": "0 15,45 * * * *",
      "TargetSize": 6
    },
    {
      "Schedule": "0 0,30 * * * *",
      "TargetSize": 1
    },
    {
      "Schedule": "0 7,22,37,52 * * * *",
      "TargetSize": 3
    }
  ]
}
Parameter name | Description | Example |
ExcludeDates | Times to exclude from the schedule, specified as a Cron expression. For more information, see Appendix: Cron expressions. Note If a Cron expression in | ["* * * * * 0,6"] The scheduled scaling task is not executed on Saturdays or Sundays. |
ScaleJobs | The scheduled scaling tasks to be executed. The tasks include the Schedule, TargetSize, and Name parameters:
| [ { "Schedule": "0 0 18 * * *", "TargetSize": 10, "Name": "scale-up" }, { "Schedule": "0 0 22 * * *", "TargetSize": 3, "Name": "scale-down" }] The service is scaled out to 10 replicas at 18:00 every day and scaled in to 3 replicas at 22:00 every day. |
View the scheduled auto scaling configurations
Command format (The Windows 64-bit version is used as an example)
eascmdwin64.exe cronscale show [region]/[service_name]
[RequestId]: F4C38D2D-4B38-5CB7-B706-9A1C41D4617E
+--------------+----------------------------+---------+------------+----------------------+
|     NAME     |          SCHEDULE          |  STATE  | TARGETSIZE |    LASTPROBETIME     |
+--------------+----------------------------+---------+------------+----------------------+
| scale-jobs-1 | 0 5,15,25,35,45,55 * * * * | Succeed |          1 | 2022-03-03T13:45:00Z |
| scale-jobs-0 | 0 0,10,20,30,40,50 * * * * | Succeed |          4 | 2022-03-03T13:50:00Z |
+--------------+----------------------------+---------+------------+----------------------+
Disable scheduled auto scaling
Command format (The Windows 64-bit version is used as an example)
eascmdwin64.exe cronscale rm [region]/[service_name]Compatibility between scheduled and horizontal auto scaling
Scheduled Scaling (Cronscaler) can be enabled at the same time as Horizontal Auto Scaling (Autoscaler). When both are enabled, Cronscaler modifies the min or max values of Autoscaler.
Although Cronscaler permanently modifies the Autoscaler configuration, the original Autoscaler configuration remains in effect until the next scheduled scaling event. Each time the service is updated or upgraded, the Autoscaler configuration reverts to its original settings.
When Cronscaler and Autoscaler are enabled simultaneously, the min and max values are determined by the rules in the following table.
Horizontal auto scaling min/max | Scheduled auto scaling | Current number of replicas | Final result | Description |
1/10 | 5 | 5 |
| If the target matches the current replica count, no change occurs. |
1/10 | 4 | 5 |
| If the target is lower than the current replica count, the count is retained. |
1/10 | 6 | 5 |
|
|
5/10 | 4 | 5 |
|
|
5/10 | 11 | 5 |
|
|
Appendix: Cron expressions
Scheduled Scaling uses Cron expressions to define its schedules.
Cron expression
Special character
Asterisk (*)
An asterisk (*) represents any value. For example,
0 0 0 1 * *represents 00:00 on the first day of each month.Hyphen (-)
A hyphen (-) represents a continuous range of values. For example,
0 0 12-14 * * *represents 12:00, 13:00, and 14:00 every day.Comma (,)
A comma (,) represents multiple discrete values. For example,
0 0 12,14 * * *represents 12:00 and 14:00 every day.Slash (/)
A slash (/) represents an incremental interval. For example,
0 */15 * * * *triggers an event at 0, 15, 30, and 45 minutes past each hour. You can use a slash (/) with a hyphen (-). For example,0 5-40/15 * * * *triggers an event every 15 minutes, starting from minute 5 to minute 40 of each hour. The valid time points are 5, 20, and 35 minutes past the hour.
Time parameter descriptions
Name
Available value
Available special character
Second
0-59
* / , -
Minute
0-59
* / , -
Hour
0-23
* / , -
Day
1-31
* / , -
Month
1-12 or JAN-DEC
* / , -
Week
0-6 or SUN-SAT
* / , -
FAQ
How do I use scheduled scaling to automatically start and stop a service?
Yes, you can. You can effectively "start" and "stop" a service by scaling its replica count up from zero and back down to zero.
To do this, configure two separate scheduled tasks:
Scale-up (Start): Create a task to scale the
Expected Instancesto1at your desired start time (e.g., 8:00 AM).Scale-down (Stop): Create a second task to scale the
Expected Instancesto0at your desired stop time (e.g., 8:00 PM).
This ensures the service only runs and incurs costs during its active hours.
References
To automatically scale replicas based on defined metrics, enable horizontal auto scaling. For more information, see Horizontal auto scaling.
To ensure that your service scaling is not limited by the machine resources in your dedicated resource group, you can use the EAS elastic resource pool. For more information, see Elastic resource pool.