This topic describes how to use Deep Learning Containers (DLC) of Platform for AI (PAI), Data Science Workshop (DSW), and File Storage NAS (NAS) to perform PyTorch-based offline migration training.
Prerequisites
A general-purpose NAS file system is created in a region. For more information, see Create a General-purpose NAS file system in the console.
Limits
The operations described in this topic are applicable only for clusters that use general computing resources and are deployed in the public resource group.
Step 1: Create datasets
Go to the Datasets page.
Log on to the PAI console.
In the left-side navigation pane, click Workspaces. On the Workspaces page, click the name of the workspace that you want to manage.
In the left-side navigation pane, choose .
On the Dataset page, click Create Dataset. On the Create Dataset page, set the Storage Type parameter to General-purpose NAS file system. For more information about how to create a basic dataset, see Create a basic dataset.
Step 2: Create a DSW instance
To create a DSW instance, configure the parameters described in the following table. For information about other parameters, see Create a DSW instance.
Parameter | Description | |
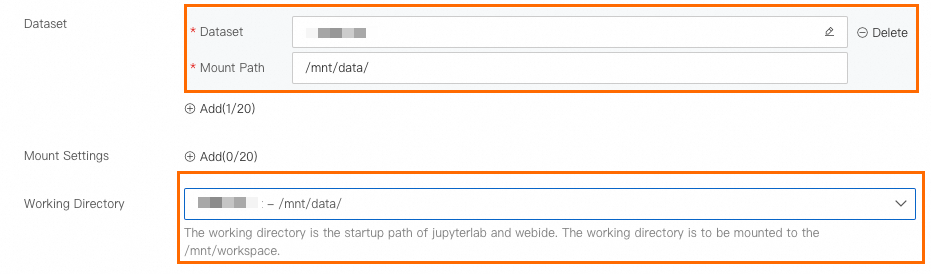
Environment Information | Dataset Mounting | Click Custom Dataset, select the NAS dataset that you created in Step 1, and then set the Mount Path parameter to |
Working Directory | Select | |
Network Information | VPC | You do not need to configure this parameter. |
Step 3: Prepare data
The data used in this topic is available for public access. You can click here to download the data and then decompress and use the data.
Go to the development environment of a DSW instance.
Log on to the PAI console.
In the left-side navigation pane, click Workspaces. On the Workspaces page, click the name of the workspace that you want to manage.
In the upper-left corner of the page, select the region where you want to use PAI.
In the left-side navigation pane, choose .
Optional: On the Data Science Workshop (DSW) page, enter the name of a DSW instance or a keyword in the search box to search for the DSW instance.
Click Open in the Actions column of the instance.
In the DSW development environment, click the Notebook tab in the top navigation bar.
Download data.
Click the
 icon in the upper-left toolbar to create a folder. In this example, pytorch_transfer_learning is used as the folder name.
 In the DSW development environment, click the Terminal tab in the top navigation bar.
On the Terminal tab, run the commands as shown in the following figure. You can use the
cdcommand to go to the folder that you create, and thewgetcommand to download the dataset.cd /mnt/workspace/pytorch_transfer_learning/ wget https://pai-public-data.oss-cn-beijing.aliyuncs.com/hol-pytorch-transfer-cv/data.tar.gzhttps://pai-public-data.oss-cn-beijing.aliyuncs.com/hol-pytorch-transfer-cv/data.tar.gzis the URL for downloading the dataset file.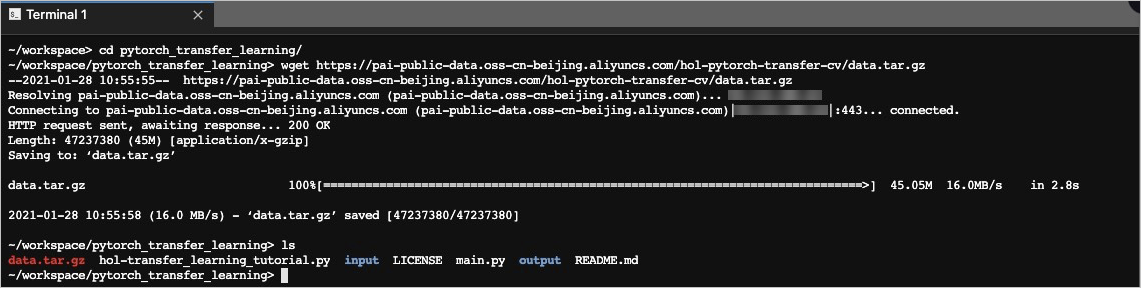
Run the
tar -xf ./data.tar.gzcommand to decompress the dataset.Click the Notebook tab. Go to the pytorch_transfer_learning directory, right-click the extracted hymenoptera_data folder, and then click Rename to rename the file as input.
Step 4: Prepare the training code and the model storage folder
On the Terminal tab of the DSW instance, run the
wgetcommand to download the training code to thepytorch_transfer_learningfolder.cd /mnt/workspace/pytorch_transfer_learning/ wget https://pai-public-data.oss-cn-beijing.aliyuncs.com/hol-pytorch-transfer-cv/main.pyhttps://pai-public-data.oss-cn-beijing.aliyuncs.com/hol-pytorch-transfer-cv/main.pyis the URL for downloading the training code.In the pytorch_transfer_learning folder, create a folder named output to store the trained model.
mkdir outputView the content contained in the pytorch_transfer_learning folder.
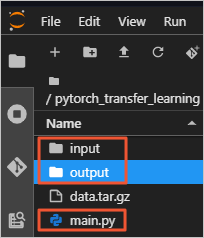
The folder contains the following content:
input: the folder that stores the training data.
main.py: the training code file.
output: the folder that stores the trained model.
Step 5: Create a scheduled job
Go to the Create Job page.
Log on to the PAI console. In the top navigation bar, select a desired region. On the page on the right, select a desired workspace and click Enter Deep Learning Containers (DLC).
On the Deep Learning Containers (DLC) page, click Create Job.
On the Create Job page, configure the parameters. The following table describes the parameters.
Section
Parameter
Description
Basic Information
Job Name
Specify the name of the job.
Environment Information
Node Image
Select Alibaba Cloud Image and then select a PyTorch image from the drop-down list. In this example, the
pytorch-training:1.12-gpu-py39-cu113-ubuntu20.04image is used.Datasets
Click Custom Dataset and select the NAS dataset that you created in Step 1.
Startup Command
Set this parameter to
python /mnt/data/pytorch_transfer_learning/main.py -i /mnt/data/pytorch_transfer_learning/input -o /mnt/data/pytorch_transfer_learning/output.Third-party Libraries
Click Select from List and then enter the following content in the text box:
numpy==1.16.4
absl-py==0.11.0
Code Builds
You do not need to configure this parameter.
Resource Information
Source
Select Public Resources.
Framework
Select PyTorch.
Job Resource
Select an instance type and specify the number of instances. Example: select ecs.g6.xlarge on the CPU tab of the Resource Type page. Set the Nodes parameter to 1.
Click OK.
Step 6: View the job details and logs
On the Deep Learning Containers (DLC) page, click the name of the job that you want to view.
On the Overview tab of the job details page, view the Basic Information and Resource Information of the job.
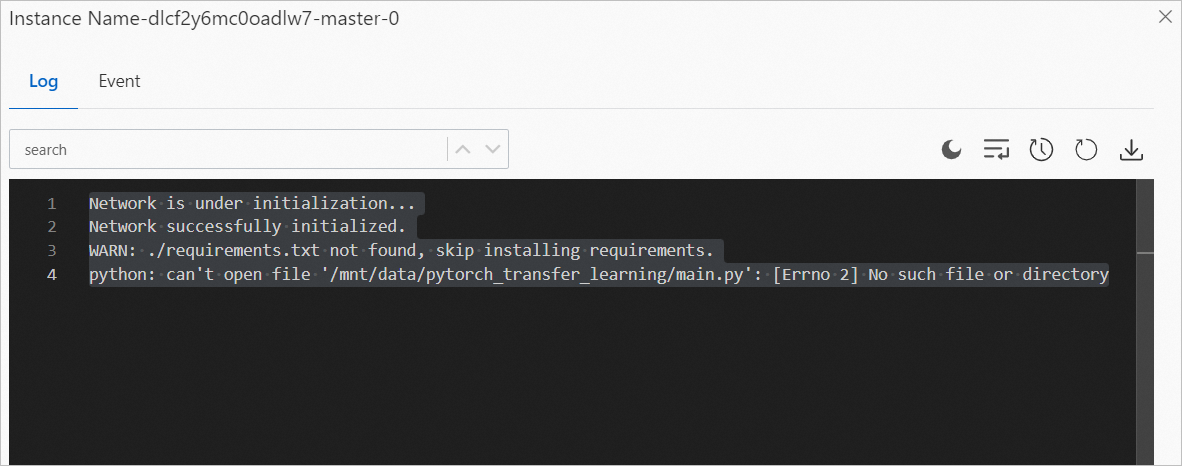
In the Instance section on the Overview tab of the job details page, find the instance that you want to manage and click Log in the Actions column to view the logs.
The following figure shows an example of the logs.