This topic describes how to set up a direct data transfer service for a mobile application in less than 30 minutes by using Security Token Service (STS). This service allows you to directly connect the mobile application to Object Storage Service (OSS) and you can upload data from the mobile application to OSS or download data from OSS to the mobile application. You only need to manage credentials obtained from STS by using the application server. This ensures the efficiency and security of data transmission.
Benefits
In the mobile Internet era, large amounts of data are uploaded by using mobile applications. OSS-based direct data transfer for mobile applications provides the following benefits: OSS-based direct data transfer for mobile applications provides the following benefits:
Data security: OSS allows mobile applications to upload and download data based on flexible permission management mechanism. This helps improve data security.
Cost-effectiveness: A small number of application servers are required. This helps reduce costs. The mobile application is connected to OSS for data uploads and downloads, and only the control flow is sent to the application server.
High concurrency: OSS supports concurrent access requests that are sent from a large number of users to guarantee user experience.
Elastic scalability: OSS provides unlimited and scalable storage capacity to meet the requirements of growing business.
Data processing: OSS supports image processing (IMG) and audio and video transcoding to allow users to process data in a flexible manner.
Prerequisites
OSS is activated. For more information, see Activate OSS.
A bucket is created. For more information, see Create a bucket.
Process
The following figure shows the development process of the direct data transfer service for mobile applications.

Steps:
The Android or iOS application requests temporary access credentials from the application server.
NoteAccessKey pairs cannot be stored in Android and iOS applications due to security concerns. In this case, the application may request a security token by using STS from the application server. The security token is valid for a specific period of time. If the application server specifies a validity period of 30 minutes, the Android or iOS application can use the security token to upload data to or download data from OSS within 30 minutes after the security token is issued. After 30 minutes, the application must request a new security token to upload or download data.
The application server uses STS SDKs to call the AssumeRole operation to obtain the security token.
STS generates and returns the security token to the application server.
The application server returns the security token to the client.
The Android or iOS application uses OSS SDKs to upload an object to OSS by using the security token.
OSS returns a success response to the client.
Procedure
Step 1: Activate STS and configure an application server
1. Create a RAM user in the RAM console
Create a RAM user and obtain the AccessKey pair of the RAM user. The AccessKey pair is long-term access credentials that are required to access and manage the application server.
Log on to the RAM console by using an Alibaba Cloud account or as an account administrator.
In the left-side navigation pane, choose Identities > Users.
On the Users page, click Create User.
Configure the Logon Name and Display Name parameters.
In the Access Mode section, select Using permanent AccessKey to access and click OK.
ImportantYou can obtain the AccessKey secret of a RAM user only when you create the RAM user. You must keep the AccessKey secret secure to prevent credential leaks.
Click Copy in the Actions column of the page that appears to copy and paste the AccessKey pair to a securely stored file.
2. Grant the RAM user the permissions to call the AssumeRole operation in the RAM console
Grant the RAM user the permissions to call the AssumeRole operation. This way, the RAM user can obtain temporary access credentials by assuming a RAM role.
In the left-side navigation pane, choose Identities > Users.
On the Users page, find the RAM user and click Add Permissions in the Actions column.
In the Policy section of the Grant Permission panel, select the AliyunSTSAssumeRoleAccess system policy.
NoteThe AliyunSTSAssumeRoleAccess policy allows a RAM user to call the AssumeRole operation. The permissions of the policy are independent of the permissions required to allow the RAM user to obtain temporary access credentials from STS and initiate requests to OSS.
Click Grant permissions.
3. Create a RAM role in the RAM console
Create a RAM role for the Alibaba Cloud account and obtain the Alibaba Cloud Resource Name (ARN) of the RAM role. The RAM role is assumed by the RAM user later.
In the left-side navigation pane, choose Identities > Roles.
Click Create Role. In the Create Role wizard, set Select Trusted Entity to Alibaba Cloud Account and click Next.
In the Configure Role step, enter a name in the RAM Role Name field and set Select Trusted Alibaba Cloud Account to Current Alibaba Cloud Account.
Click OK. After you create the role, click Close.
On the Roles page, enter the role name in the search box. Example:
oss-web-upload. Click the name of the role.In the Basic Information section, click Copy next to the ARN field to record the ARN of the RAM role.
4. Create a policy for uploading in the RAM console
Create a custom policy based on the principle of least privilege. The custom policy grants the RAM role the permissions to upload data only to a specific bucket.
In the left-side navigation pane, choose Permissions > Policies.
On the Policies page, click Create Policy.
On the Create Policy page, click JSON. Copy the following sample script and paste it into the code editor. Replace
<BucketName>withweb-direct-upload, the name of the bucket that you created.{ "Version": "1", "Statement": [ { "Effect": "Allow", "Action": "oss:PutObject", "Resource": "acs:oss:*:*:<BucketName>/*" } ] }After you configure the policy, click Next to edit policy information.
In the Basic Information section, specify the policy name and click OK.
5. Attach the custom policies to the RAM role in the RAM console
Attach the custom policy to the RAM role. This way, the RAM role can provide the required permissions when the RAM role is assumed.
In the left-side navigation pane, choose Identities > Roles.
On the Roles page, find the RAM role and click Grant Permission in the Actions column.
In the Policy section of the Grant Permission panel, select Custom Policy from the drop-down list, and then select the custom policy.
Click OK.
6. Create an ECS instance as the application server
Create an ECS instance to obtain temporary access credentials from STS.
In an actual deployment scenario, you can integrate STS API operations into your application server without the need to create an ECS instance.
Parameter | Example |
Billing Method | Pay-as-you-go |
Region | China (Hangzhou) |
Public IP Address | Assign Public IPv4 Address |
Security Group | HTTP-TCP:80-open |
For more information, see Create an ECS instance.
7. Obtain temporary access credentials from the application server
Integrate STS SDK into the application server to obtain the /get_sts_token operation to obtain temporary access credentials from STS. When the /get_sts_token operation is called by using the HTTP GET method, the temporary access credentials are created and returned to the requester.
On the ECS instance, build a web application by using the Flask framework and implement the operation to obtain temporary access credentials from STS:
Connect to an ECS instance.
For more information, see Connect to an instance.
Install Python 3.
Create a project directory and switch to the project directory. Sample commands:
mkdir my_web_sample
cd my_web_sample
Run the following command to install dependencies:
pip3 install Flask
pip3 install attr
pip3 install yarl
pip3 install async_timeout
pip3 install idna_ssl
pip3 install attrs
pip3 install aiosignal
pip3 install charset_normalizer
pip3 install alibabacloud_tea_openapi
pip3 install alibabacloud_sts20150401
pip3 install alibabacloud_credentials
Write application backend code.
Create a
main.pyfile.Write the following Python code to the file:
import json
from flask import Flask, render_template
from alibabacloud_tea_openapi.models import Config
from alibabacloud_sts20150401.client import Client as Sts20150401Client
from alibabacloud_sts20150401 import models as sts_20150401_models
from alibabacloud_credentials.client import Client as CredentialClient

app = Flask(__name__)

# Replace <YOUR_ROLE_ARN> with the ARN of the RAM role.
role_arn_for_oss_upload = '<YOUR_ROLE_ARN>'
# Specify the region of STS. Example: cn-hangzhou
region_id = 'cn-hangzhou'

@app.route("/")
def hello_world():
    return render_template('index.html')

@app.route('/get_sts_token', methods=['GET'])
def get_sts_token():
    # If you do not specify parameters when you initialize CredentialClient, the default credential chain is used.
    # If you run the program on your local computer, you can obtain the AccessKey pair from the ALIBABA_CLOUD_ACCESS_KEY_ID and ALIBABA_CLOUD_ACCESS_KEY_SECRET environment variables.
    # If you run the program on ECS or Elastic Container Instance, you can specify the role of the bound instance by configuring the ALIBABA_CLOUD_ECS_METADATA environment variable. The SDK automatically obtains the temporary access credentials from STS.
    config = Config(region_id=region_id, credential=CredentialClient())
    sts_client = Sts20150401Client(config=config)
    assume_role_request = sts_20150401_models.AssumeRoleRequest(
        role_arn=role_arn_for_oss_upload,
        # Replace <YOUR_ROLE_SESSION_NAME> with the name of the custom session.
        role_session_name='<YOUR_ROLE_SESSION_NAME>'
    )
    response = sts_client.assume_role(assume_role_request)
    token = json.dumps(response.body.credentials.to_map())
    return token
app.run(host="127.0.0.1", port=8000)  # To listen on other addresses, such as 0.0.0.0, you need to implement an authentication mechanism on the server side.
Replace
<YOUR_ROLE_ARN>in the sample code with the ARN of the RAM role that you created in Step 3.Replace
<YOUR_ROLE_SESSION_NAME>in the sample code with the name of the custom session.
Start the application by using the AccessKey pair that you obtained in Step 1.
ALIBABA_CLOUD_ACCESS_KEY_ID=<YOUR_AK_ID> ALIBABA_CLOUD_ACCESS_KEY_SECRET=<YOUR_AK_SECRET> python3 main.pyIn the address bar of your browser, enter
http://<ECS-public-IP-address>/get_sts_token.Sample success response:

Press
Ctrl+Cto stop the application.
Step 2: Download and install a mobile application
Android
Download the source code package of the mobile application.
You can use the mobile application on Android or iOS devices to upload images to OSS. Simple upload and resumable upload are supported. If the network quality is poor, we recommend that you use resumable upload. You can also use IMG to resize an image to obtain a thumbnail and add watermarks to the image.
Open the mobile application and configure the application parameters.
STS authentication server: the address of the application server in the output information in Step 1.
Destination bucket: the bucket to which data is uploaded from a mobile application.
Region: the region in which the destination bucket is located.
Click Configure.
iOS
Download the source code package of the mobile application.
You can use the mobile application on Android or iOS devices to upload images to OSS. Simple upload and resumable upload are supported. If the network quality is poor, we recommend that you use resumable upload. You can also use IMG to resize an image to obtain a thumbnail and add watermarks to the image.
Open the mobile application and configure the application parameters.
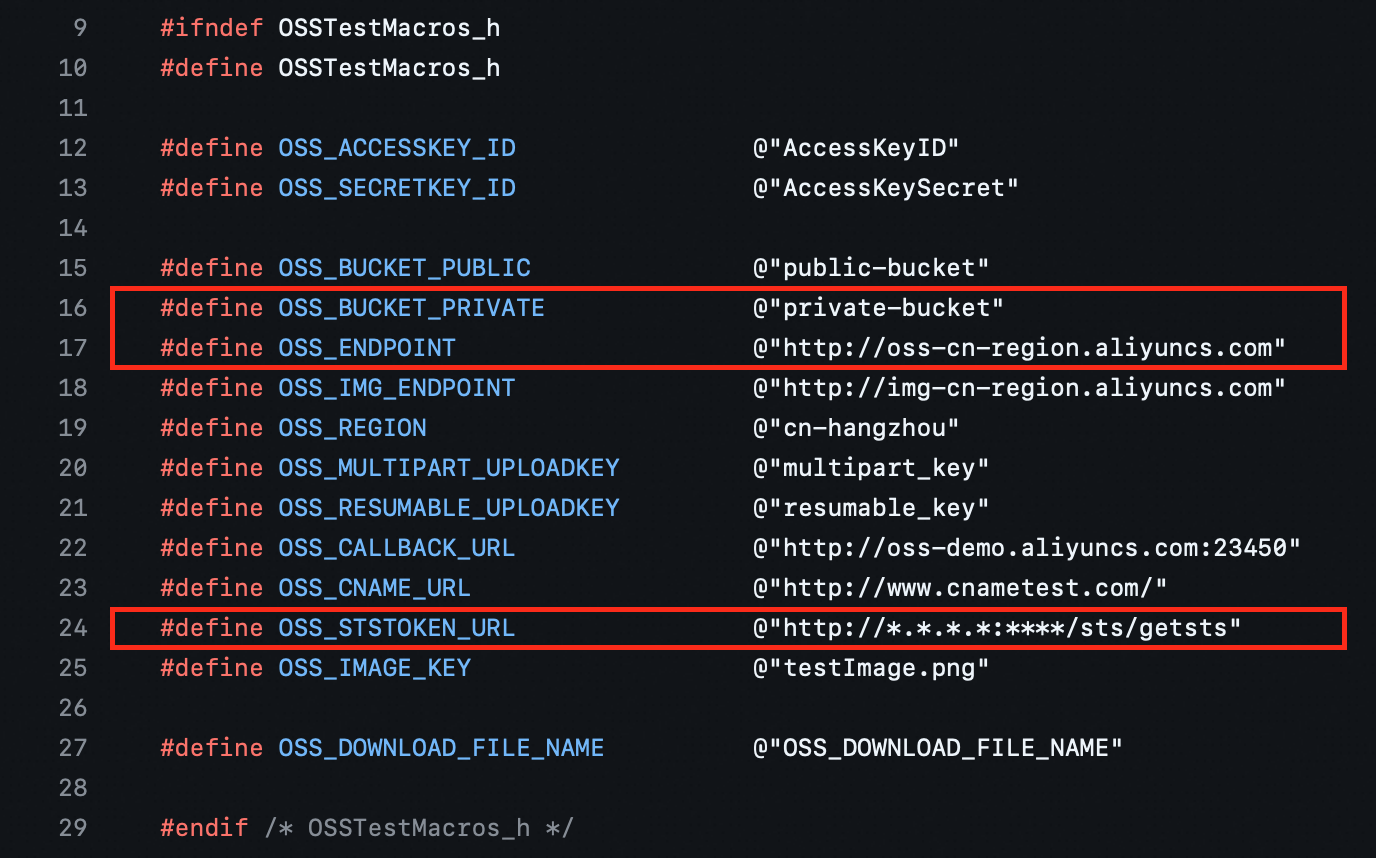
Before you run AliyunOSSSDK, you must configure the required parameters in the OSSTestMacros.h file. The required parameters include OSS_BUCKET_PRIVATE, OSS_ENDPOINT, and OSS_STSTOKEN_URL. Set OSS_STSTOKEN_URL to the address of the application server that is deployed in Step 1.
Run the instance.
Step 3: Configure direct data transfer for the mobile application
Specify the name of the OSS object. Click Upload and select the image that you want to upload.
After the image is uploaded, check the upload result in the OSS console.