Object Storage Service (OSS) supports custom logging by adding the user_defined_log_fields field to its access logs. You can configure custom log fields to monitor specific request information. This topic describes how to log the x-forwarded-for request header and use recorded information for intermediary analysis.
Prerequisites
The real-time log query feature is enabled for the bucket. For more information, see Real-time log query.
The requests sent to the bucket contain the request headers or query parameters that you want to record in access logs. For more information, see x-oss-additional-headers.
Step 1: Specify the request header
Log on to the OSS console.
In the left-side navigation pane, click Buckets. On the Buckets page, find and click the desired bucket.
In the left-side navigation tree, choose .
On the Real-time Log Query tab, click Add next to Request Headers or Query Parameters in Logs.
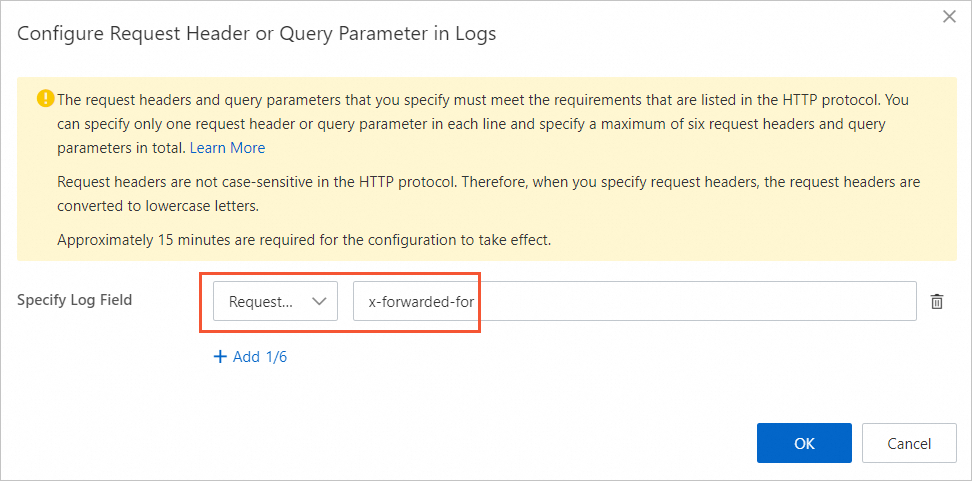
In the Configure Request Header or Query Parameter in Logs dialog box, click Add next to Specify Log Field.
Select Request Header, enter
x-forwarded-for, and click OK.
Step 2: Initiate a request
Proxies such as Alibaba Cloud CDN proxies may be used to access OSS.
The following sample code provides an example on how to send a request to OSS from a proxy by using OSS SDK for Python:
# -*- coding: utf-8 -*-
import oss2
from oss2.credentials import EnvironmentVariableCredentialsProvider

# Prepare resources.
bucketName = "examplebucket"
endpoint = "oss-cn-hangzhou.aliyuncs.com"
# Obtain access credentials from environment variables. Before you run the sample code, make sure that the OSS_ACCESS_KEY_ID and OSS_ACCESS_KEY_SECRET environment variables are configured.
auth = oss2.ProviderAuth(EnvironmentVariableCredentialsProvider())
# Initialize the bucket instance.
bucket = oss2.Bucket(auth, endpoint, bucketName)
# Simulate a request by using a proxy.
headers = dict()
headers["x-forwarded-for"] = "10.0.0.1"
result = bucket.put_object('exampleobject.txt', 'Hello OSS', headers)
# Show the HTTP status code.
print('http status: {0}'.format(result.status))
# Show the request ID. A request ID uniquely identifies the request. We recommend that you add this parameter to the logs.
print('request_id: {0}'.format(result.request_id))
Step 3: Filter logs
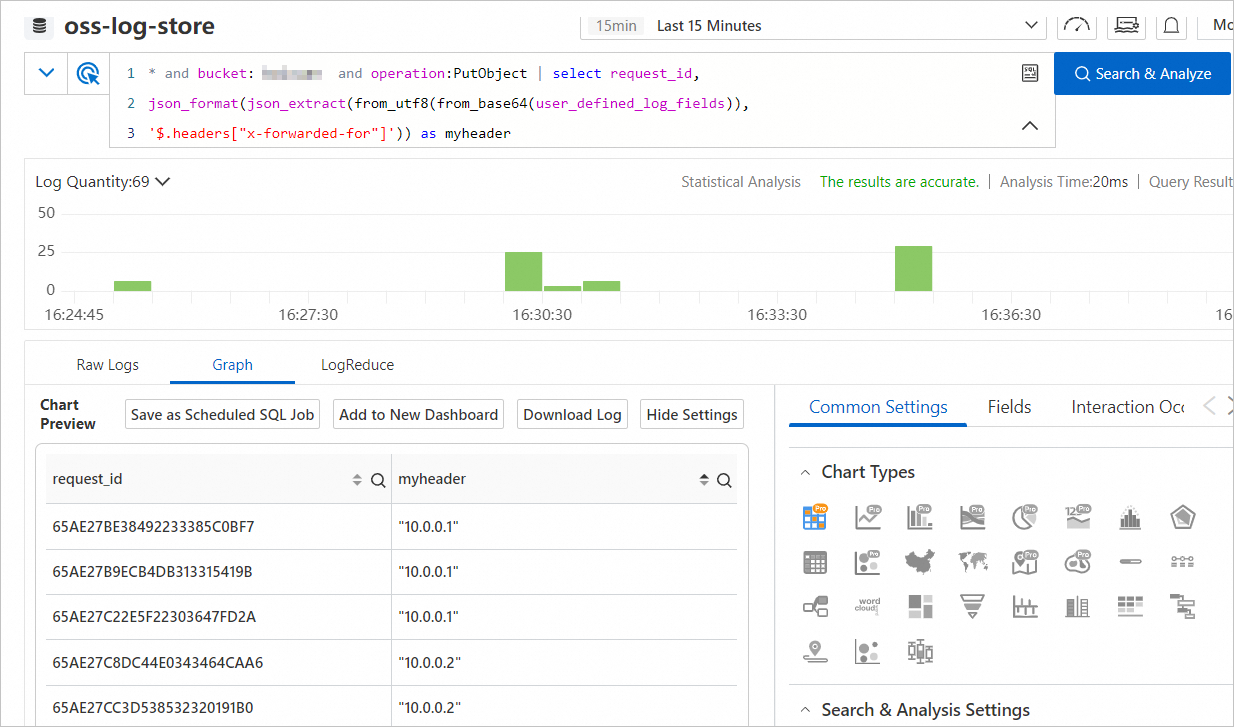
On the Real-time Log Query tab, enter the following query statement and click Search & Analyze.
* and bucket: examplebucket and operation:PutObject | select request_id,
json_format(json_extract(from_utf8(from_base64(user_defined_log_fields)),
'$.headers["x-forwarded-for"]')) as myheader
Filter requests from the 10.0.0.2 proxy IP address.
Enter the following query statement and click Search & Analyze.
* and bucket: examplebucket and operation:PutObject | select request_id,
json_format(json_extract(from_utf8(from_base64(user_defined_log_fields)),
'$.headers["x-forwarded-for"]')) as myheader having myheader like '%10.0.0.2%'
FAQ
Why is user_defined_log_fields not an indexed field?
The user_defined_log_fields field is added after the real-time log query feature is added. To make the field indexed, you need to manually refresh field indexing. For more information, see Reset the field index. If you do not want the field to be an indexed field, you do not need to perform the operation.
What do I do if Simple Log Service returns a Base64 decoding error that says at least two bytes are required for decoding?
The start time of log analysis must be earlier than the effective time of the custom logging settings. Before the custom logging settings are effective, the value of the user_defined_log_fields field is -, which is not Base64-encoded. For example, the value of this field is also - for a request with HTTP status code 499. In this case, we recommend that you filter out logs in which the value of the user_defined_log_fields field is - before you analyze log data.