This topic describes how to use Object Storage Service (OSS) SDK for iOS to perform common operations, such as object upload and download.
Prerequisites
Ensure that you have installed the iOS SDK. For more information, see Installation (iOS SDK).
Demo projects
You can view the following demo projects to learn how to create a bucket, upload a local file, and download an object:
You can use the following methods to try a demo project:
Clone a project: run the git clone command to obtain the demo projects.
Configure the parameters.
Before you run the AliyunOSSSwift instance, you must configure the required parameters in the OSSSwiftGlobalDefines.swift file.
Before you run AliyunOSSSDK, you must configure the required parameters in the OSSTestMacros.h file.
Start Security Token Service (STS).
Start the local STS authentication server by running the local authentication script in the sts_local_server directory of the project and configure the AccessKeyId, AccessKeySecret, and RoleArn parameters.
Start the local HTTP service httpserver.py using Python. In this case, you can run the client code to access the local HTTP service to obtain the values of the StsToken.AccessKeyId, StsToken.SecretKey, and StsToken.SecurityToken parameters.
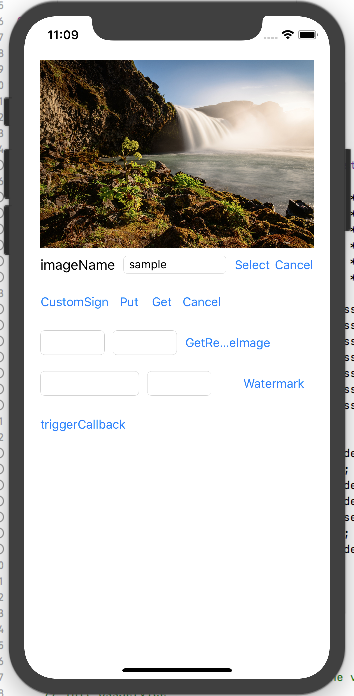
Run the AliyunOSSSDK-iOS-Example demo project. The following result is returned as shown in the following figure. 
Sample code
The following sample code provides an example on how to upload and download objects on the iOS and macOS platforms:
Import the OSS software package.
Before you use OSS, import the required header files.
#import <AliyunOSSiOS/OSSService.h>
Initialize an OSSClient instance.
Authorize access
Three authentication modes are supported by OSS: plaintext setting, self-signed, and STS authentication. We recommend that you use the STS authentication mode for mobile devices. For more information, see STS authentication mode.
Obtain temporary access credentials
Plaintext setting mode: use the AccessKey ID and AccessKeySecret for authentication.
Self-signed mode: generate a signature string for authentication. For more information, see Self-signed mode.
STS authentication mode: use temporary access credentials provided by STS for authentication. For more information about how to call the AssumeRole operation of STS or use STS SDKs for different programming languages to obtain temporary access credentials, see Access OSS using an STS token.
Use temporary access credentials to initialize OSS SDK for iOS
The following sample code provides an example on how to initialize an OSSClient instance in a complete application lifecycle:
@interface AppDelegate () @property (nonatomic, strong) OSSClient *client; @end /** * Obtain the URL of STS and configure the URL on the user-built server. */ #define OSS_STS_URL @"oss_sts_url" /** * The endpoint of the region in which the bucket is located. */ #define OSS_ENDPOINT @"your bucket's endpoint" /** * The region in which the bucket is located. */ #define OSS_REGION @"your bucket's region" @implementation AppDelegate - (BOOL)application:(UIApplication *)application didFinishLaunchingWithOptions:(NSDictionary *)launchOptions { // Override point for customization after application launch. // Initialize the OSSClient instance. [self setupOSSClient]; return YES; } - (void)setupOSSClient { // Initialize the credentialProvider that automatic refreshes. id<OSSCredentialProvider> credentialProvider = [[OSSAuthCredentialProvider alloc] initWithAuthServerUrl:OSS_STS_URL]; // Configure the client, such as the timeout period and DNS resolution. OSSClientConfiguration *cfg = [[OSSClientConfiguration alloc] init]; cfg.signVersion = OSSSignVersionV4; client = [[OSSClient alloc] initWithEndpoint:OSS_ENDPOINT credentialProvider:credentialProvider clientConfiguration:cfg]; client.region = OSS_REGION; }NoteIf your application uses only one bucket in a region, we recommend that you set the lifecycle of the OSSClient instance to be the same as that of the application.Regions and endpoints
Create a bucket
The following sample code provides an example on how to create a bucket named examplebucket:
// Construct a request to create a bucket. OSSCreateBucketRequest * create = [OSSCreateBucketRequest new]; // Set the name of the bucket to examplebucket. create.bucketName = @"examplebucket"; // Set the access control list (ACL) of the bucket to private. create.xOssACL = @"private"; // Set the storage class of the bucket to Infrequent Access (IA). create.storageClass = OSSBucketStorageClassIA; OSSTask * createTask = [client createBucket:create]; [createTask continueWithBlock:^id(OSSTask *task) { if (!task.error) { NSLog(@"create bucket success!"); } else { NSLog(@"create bucket failed, error: %@", task.error); } return nil; }]; // Wait for the task to complete. // [createTask waitUntilFinished];NoteAll SDK operations return an
OSSTask. You can set a continuation action for theOSSTaskto process the result asynchronously. You can also callwaitUntilFinishedto block the current thread until the task is complete.Upload a local file
The following sample code provides an example on how to upload a local file to OSS:
OSSPutObjectRequest * put = [OSSPutObjectRequest new];
// Specify the name of the bucket. Example: examplebucket.
put.bucketName = @"examplebucket";
// Specify the full path of the object. Do not include the bucket name in the full path. Example: exampledir/testdir/exampleobject.txt.
put.objectKey = @"exampledir/testdir/exampleobject.txt";
put.uploadingFileURL = [NSURL fileURLWithPath:@"<filePath>"];
// put.uploadingData = <NSData *>; // Directly upload NSData.
// Directly upload NSData.
put.uploadProgress = ^(int64_t bytesSent, int64_t totalByteSent, int64_t totalBytesExpectedToSend) {
    NSLog(@"%lld, %lld, %lld", bytesSent, totalByteSent, totalBytesExpectedToSend);
};
OSSTask * putTask = [client putObject:put];
[putTask continueWithBlock:^id(OSSTask *task) {
    if (!task.error) {
        NSLog(@"upload object success!");
    } else {
        NSLog(@"upload object failed, error: %@" , task.error);
    }
    return nil;
}];
// Wait for the task to complete.
// [putTask waitUntilFinished];
Download an object
The following sample code provides an example on how to download a specific object to a local computer:
OSSGetObjectRequest * request = [OSSGetObjectRequest new];
// Specify the name of the bucket. Example: examplebucket.
request.bucketName = @"examplebucket";
// Specify the full path of the object. Do not include the bucket name in the full path. Example: exampledir/testdir/exampleobject.txt.
request.objectKey = @"exampledir/testdir/exampleobject.txt";
request.downloadProgress = ^(int64_t bytesWritten, int64_t totalBytesWritten, int64_t totalBytesExpectedToWrite) {
    NSLog(@"%lld, %lld, %lld", bytesWritten, totalBytesWritten, totalBytesExpectedToWrite);
};
OSSTask * getTask = [client getObject:request];
[getTask continueWithBlock:^id(OSSTask *task) {
    if (!task.error) {
        NSLog(@"download object success!");
        OSSGetObjectResult * getResult = task.result;
        NSLog(@"download result: %@", getResult.downloadedData);
    } else {
        NSLog(@"download object failed, error: %@" ,task.error);
    }
    return nil;
}];
// Wait for the task to complete.
// [task waitUntilFinished];