Overview
Each document contains multiple fields, and each field contains a set of words. An index is used to speed up data retrieval. Indexes can be divided into different types based on mappings. The following section describes some concepts about indexes:
Field: The name and the type of a field can be used to define an index table.
Inverted index: The index stores a mapping from words to locations in documents. Example: Word A: (Doc1,Doc2,...,DocN). An inverted index is used for data retrieval and can help you locate the document that contains the keyword you search for.
Forward index: The index stores a mapping from documents to fields. Example: DocID (term1,term2,...termn). Forward indexes can be divided into single-value indexes and multi-value indexes. A single-value index contains data values that belong only to a single-value attribute. The data values are fixed-length, excluding the values of the String type. This makes data queries efficient. You can also update the index data. A multi-value attribute indicates that a field contains multiple pieces of data whose quantity is not fixed. This negatively affects query performance. You cannot update the index data.
A forward index is used to obtain the attribute of data based on document IDs. The attribute can be used for statistics, sorting, and filtering. OpenSearch Vector Search Edition supports the following data types of fields in forward indexes:
INT8 (8-bit signed integer type) and UINT8 (8-bit unsigned integer type)
INT16 (16-bit signed integer type)
UINT16 (16-bit unsigned integer type)
INTEGER (32-bit signed integer type)
UINT32 (32-bit unsigned integer type) and INT64 (64-bit signed integer type)
UINT64 (64-bit unsigned integer type)
FLOAT (32-bit floating-point number)
DOUBLE (64-bit floating-point number)
STRING (string type)
Summary index: The index stores data in a similar way to forward indexes. However, a summary index stores a mapping from fields to a document. A summary index can help you quickly locate the content based on the document ID. A summary index is used to display search results. A summary index contains a large amount of data. For each query, you do not need to retrieve an excessive amount of data in summary indexes. Instead, you need to only obtain the search results from a document based on the summary index. OpenSearch Vector Search Edition provides a compression mechanism for summary indexes. If you enable compression for a summary index in the schema, OpenSearch Vector Search Edition uses zlib to compress the summary index and then stores the compressed summary index. When OpenSearch Vector Search Edition reads data from the summary index, the search engine decompresses the compressed summary index and then returns the retrieved results to the user.
For more information about how to configure an index table, see Configure an index table.
Sample index schema:
{
  "summarys": {
    "summary_fields": [
      "pk",
      "embedding",
      "cate_id"
    ],
    "parameter": {
      "file_compressor": "zstd"
    }
  },
  "indexs": [
    {
      "index_name": "id",
      "index_type": "PRIMARYKEY64",
      "index_fields": "pk",
      "has_primary_key_attribute": true,
      "is_primary_key_sorted": false
    },
    {
      "index_name": "vector",
      "index_type": "CUSTOMIZED",
      "index_fields": [
        {
          "field_name": "pk",
          "boost": 1
        },
        {
          "field_name": "cate_id",
          "boost": 1
        },
        {
          "field_name": "embedding",
          "boost": 1
        }
      ],
      "parameters": {
        "dimension": "128",
        "distance_type": "SquaredEuclidean",
        "vector_index_type": "Qc",
        "build_index_params": "{\"proxima.qc.builder.quantizer_class\":\"Int8QuantizerConverter\",\"proxima.qc.builder.quantize_by_centroid\":true,\"proxima.qc.builder.optimizer_class\":\"BruteForceBuilder\",\"proxima.qc.builder.thread_count\":10,\"proxima.qc.builder.optimizer_params\":{\"proxima.linear.builder.column_major_order\":true},\"proxima.qc.builder.store_original_features\":false,\"proxima.qc.builder.train_sample_count\":3000000,\"proxima.qc.builder.train_sample_ratio\":0.5}",
        "search_index_params": "{\"proxima.qc.searcher.scan_ratio\":0.01}",
        "embedding_delimiter": ",",
        "major_order": "col",
        "linear_build_threshold": "5000",
        "min_scan_doc_cnt": "20000",
        "enable_recall_report": "false",
        "is_embedding_saved": "false",
        "enable_rt_build": "false",
        "builder_name": "QcBuilder",
        "searcher_name": "QcSearcher"
      },
      "indexer": "aitheta2_indexer"
    }
  ],
  "attributes": [
    {
      "field_name": "pk",
      "file_compress": "no_compressor"
    },
    {
      "field_name": "embedding",
      "file_compress": "no_compressor"
    },
    {
      "field_name": "cate_id",
      "file_compress": "file_compressor"
    }
  ],
  "fields": [
    {
      "user_defined_param": {},
      "field_name": "pk",
      "field_type": "INTEGER",
      "compress_type": "equal"
    },
    {
      "user_defined_param": {
        "multi_value_sep": ","
      },
      "field_name": "embedding",
      "field_type": "FLOAT",
      "compress_type": "uniq",
      "multi_value": true
    },
    {
      "user_defined_param": {},
      "field_name": "cate_id",
      "field_type": "INTEGER",
      "compress_type": "equal"
    },
    {
      "field_name": "titile",
      "field_type": "TEXT",
      "analyzer": "chn_ecommerce_general"
    }
  ],
  "file_compress": [
    {
      "name": "file_compressor",
      "type": "zstd"
    },
    {
      "name": "no_compressor",
      "type": ""
    }
  ]
}
Add an index table
On the instance details page, choose Configuration Center > Index Schema and click Create Index Table.

Configure the index table. Select Common Template in the Select Template section.

Index Table: Enter a custom name.
Data Source: Select a data source based on your business requirements.
Data Shards: Enter a value that is less than or equal to the number of Searcher workers that you purchase.
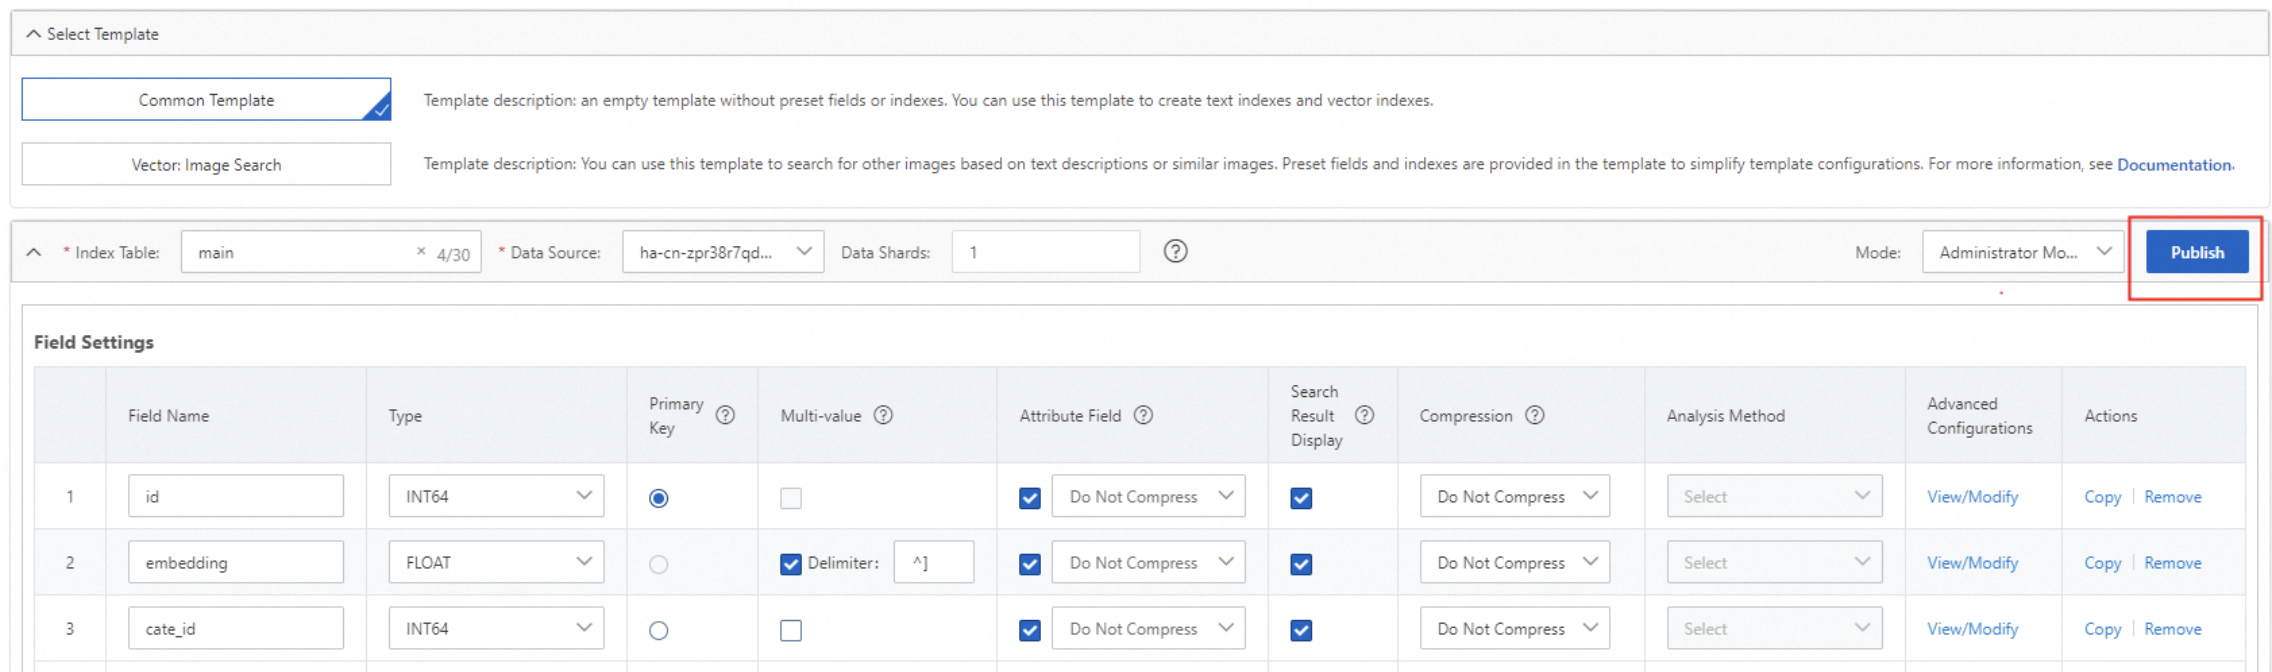
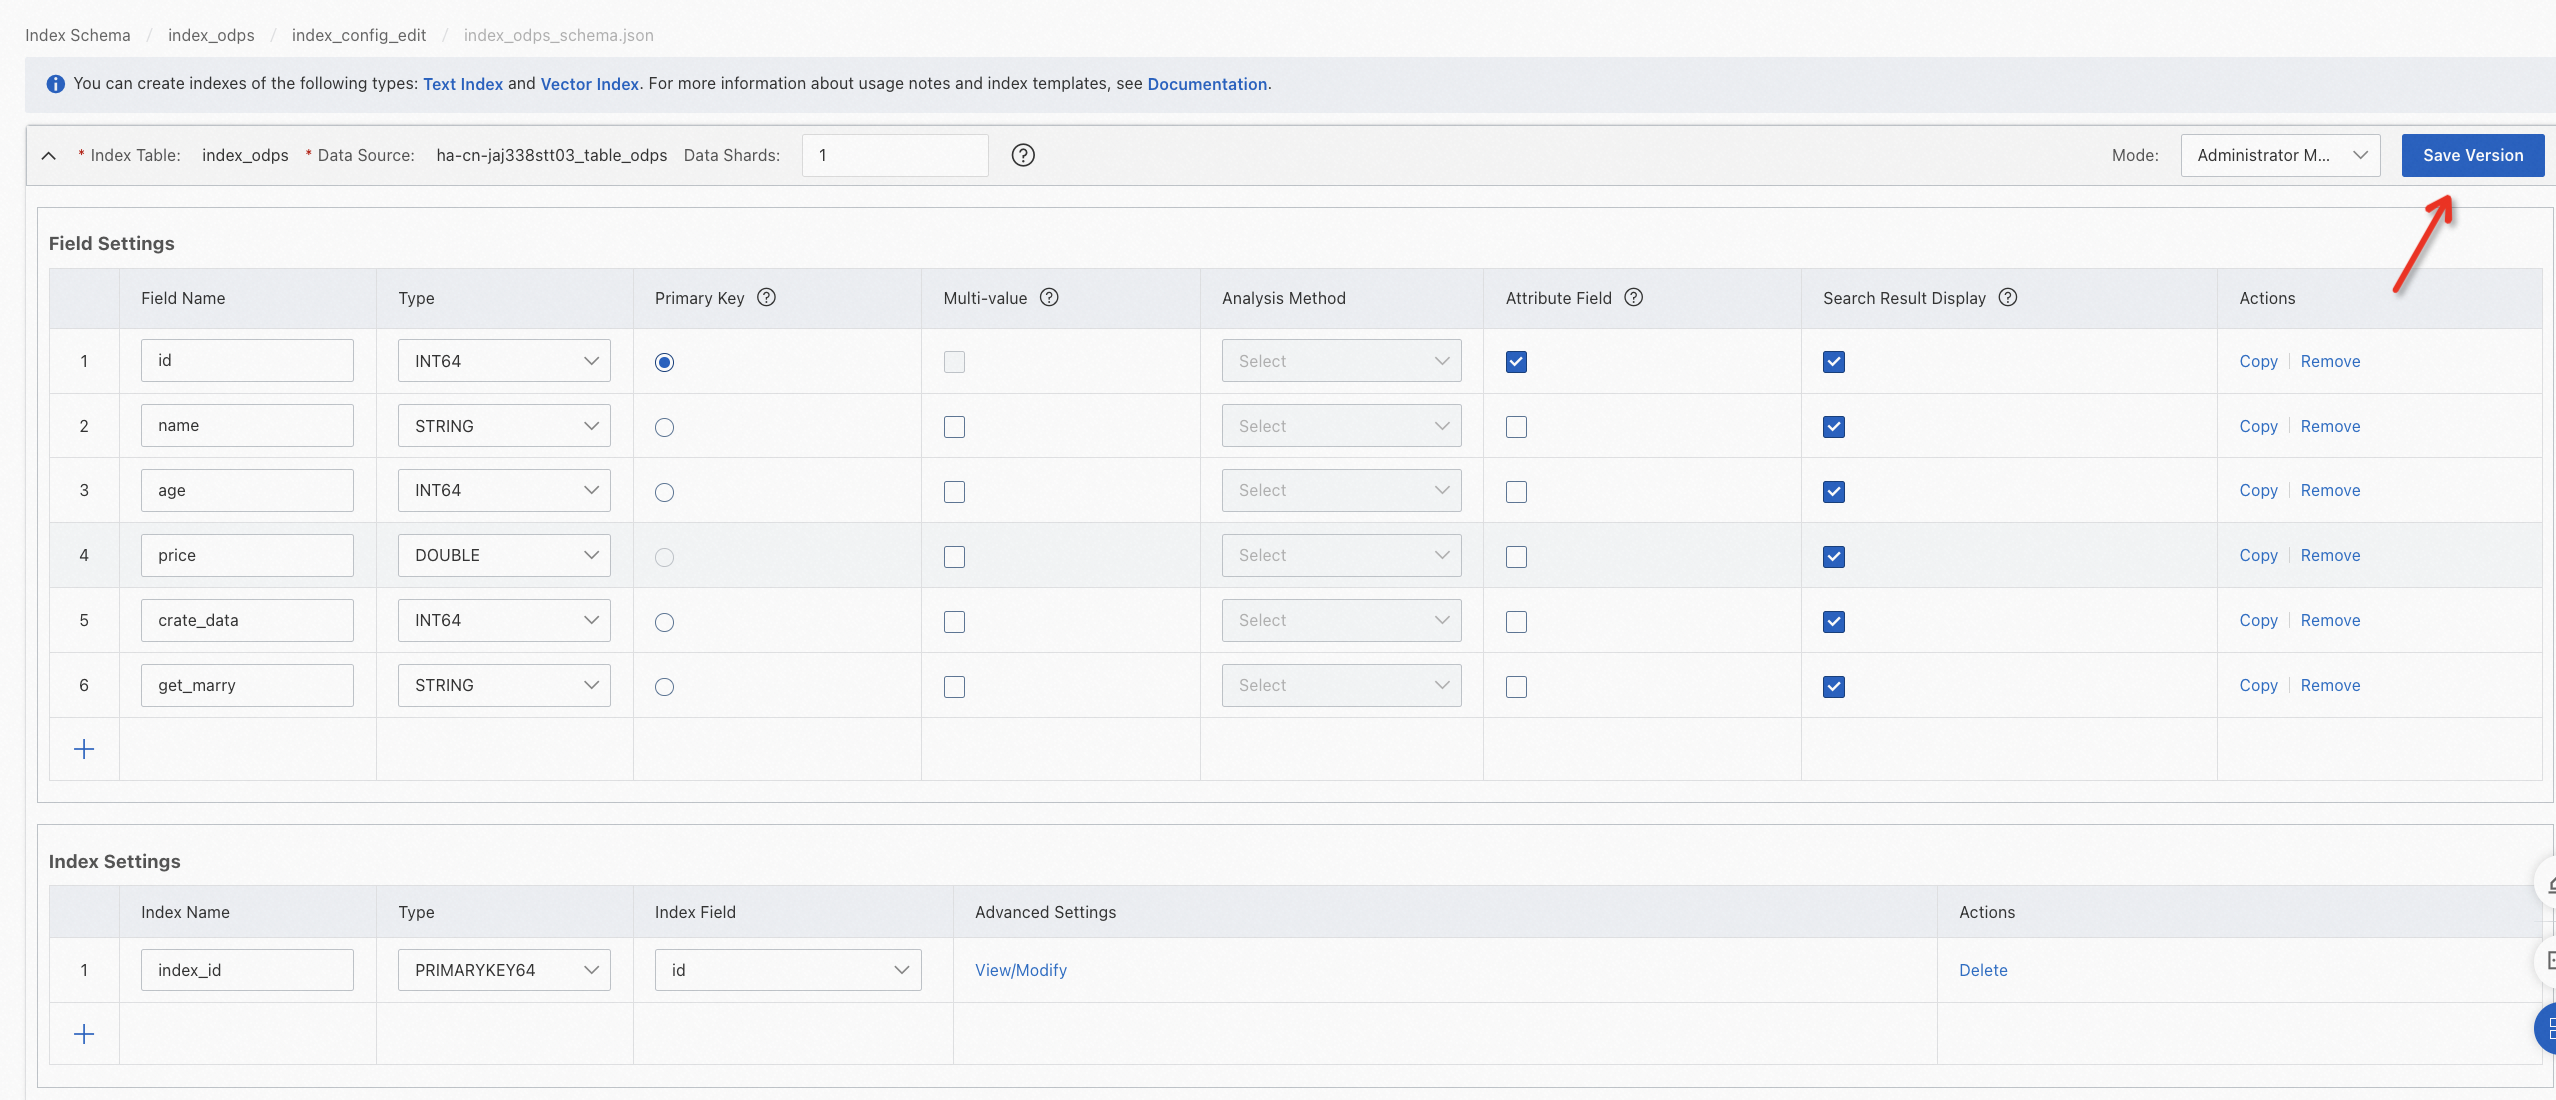
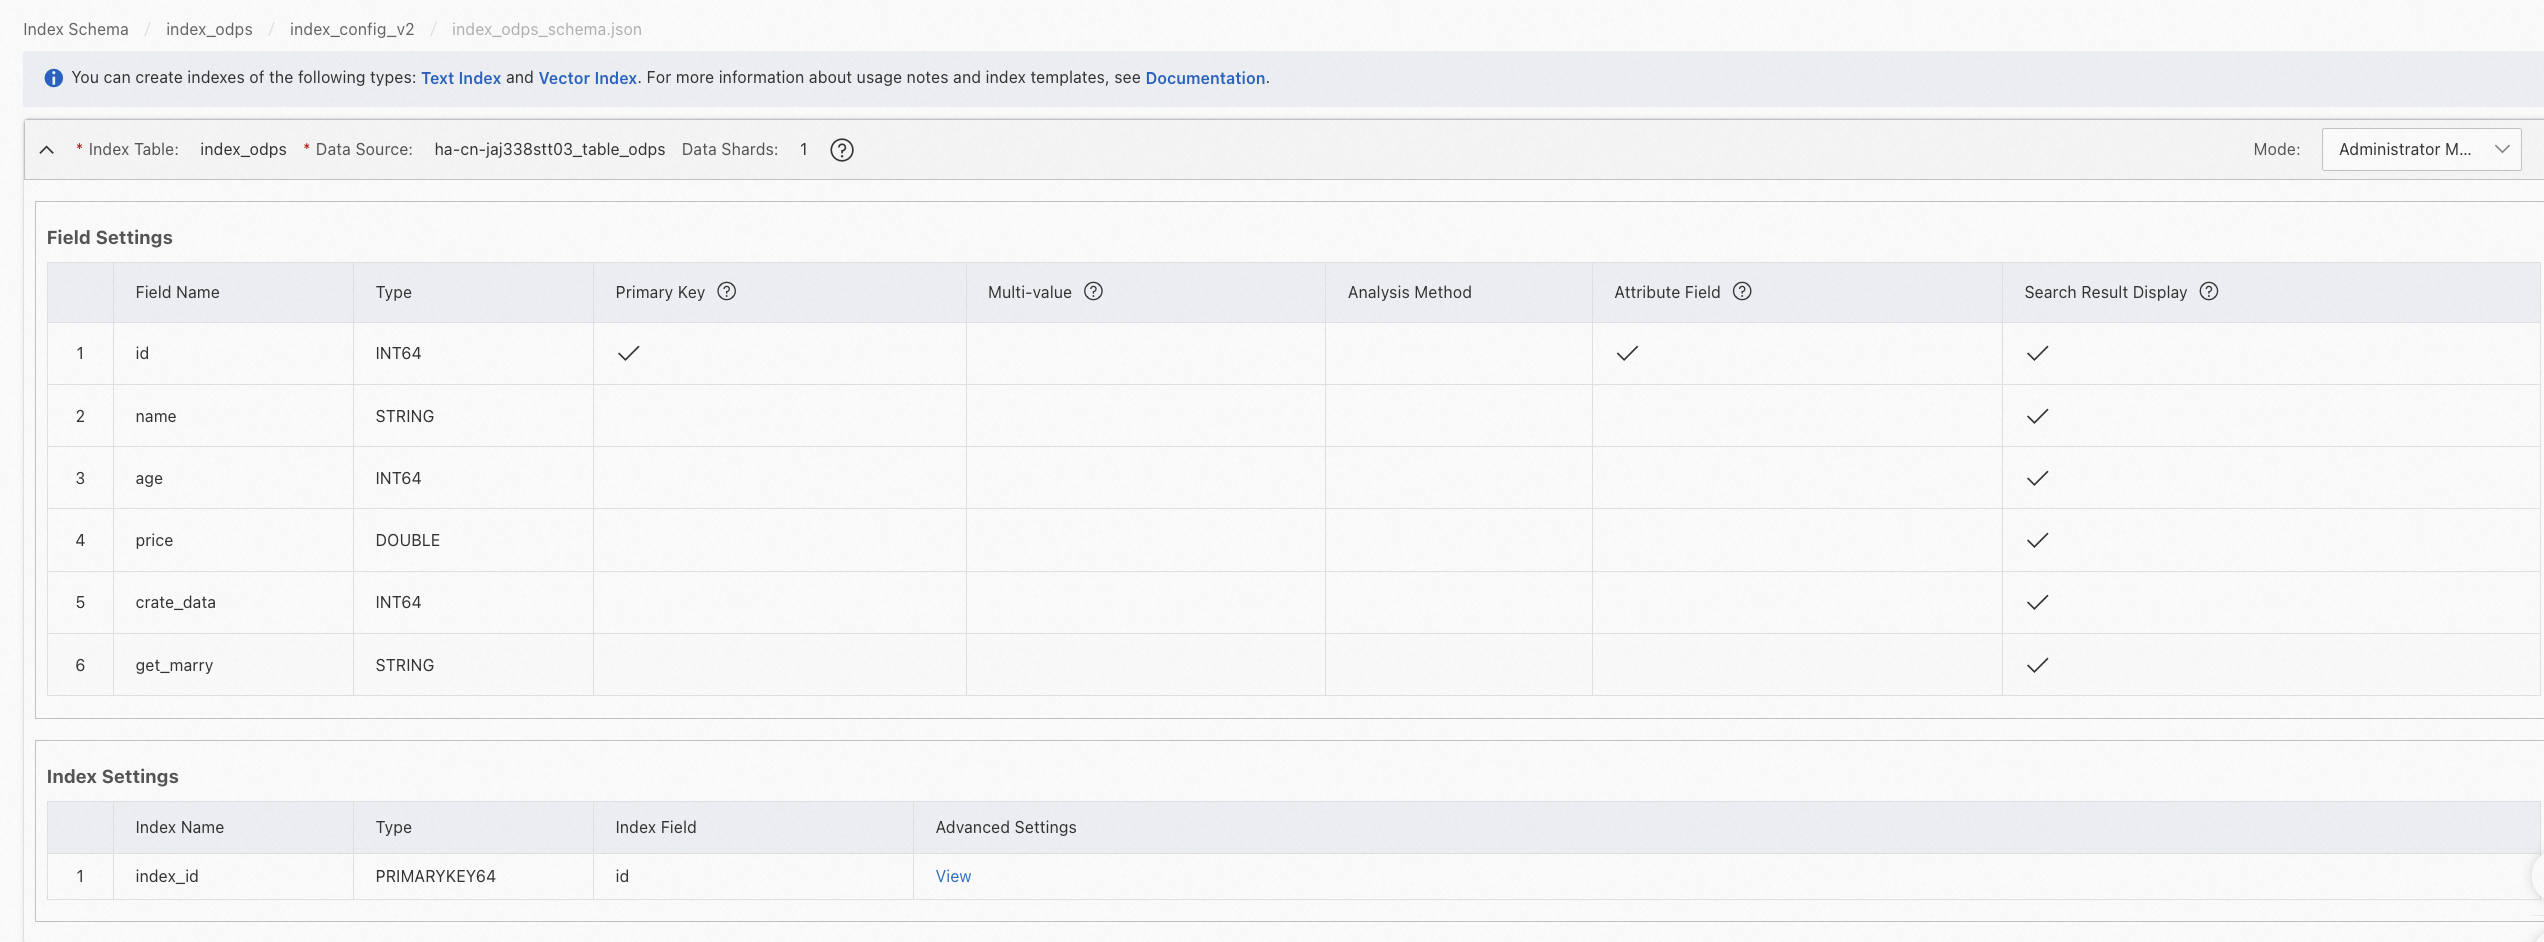
Configure fields. You must specify at least two fields: a primary key field and a vector field. The vector field must be of the multi-value FLOAT data type.

If you want to configure a vector index with categories, you can add a category field between the primary key field and the vector field. The category field must be a single-value or multi-value field of the INTEGER data type.

Specify whether to compress attribute fields and field data:
Attribute fields: By default, attribute fields are not compressed. If file_compressor is selected for an attribute field, the attribute field is compressed.
Field data: By default, field data is not compressed. For multi-value fields or fields of the STRING type, uniq is selected by default. For single-value fields, equal is selected by default.
When you configure a vector index, you must specify the fields in the order of the primary key field, category field, and vector field. The category field is optional. The preceding figure shows an example.
If you compress attribute fields, we recommend that you modify the index loading method to reduce the impact on performance. To modify the index loading method, perform the following operations: On the instance details page of an instance, click Deployment Management. On the page that appears, click the Searcher worker that you want to manage. In the Searcher Worker Configurations panel, click the Online Table Configurations tab.
Configure the indexes. You must set the type of the primary key index to PRIMARYKEY64 and set the type of the vector index to CUSTOMIZED.

Specify whether to compress index fields:
By default, index fields are not compressed. If file_compressor is selected for an index field, the index field is compressed.
The primary key index cannot be compressed.
If you compress index fields, we recommend that you modify the index loading method to reduce the impact on performance. To modify the index loading method, perform the following operations: On the instance details page of an instance, click Deployment Management. On the page that appears, click the Searcher worker that you want to manage. In the Searcher Worker Configurations panel, click the Online Table Configurations tab.
4.1. Specify the fields contained in the vector index.
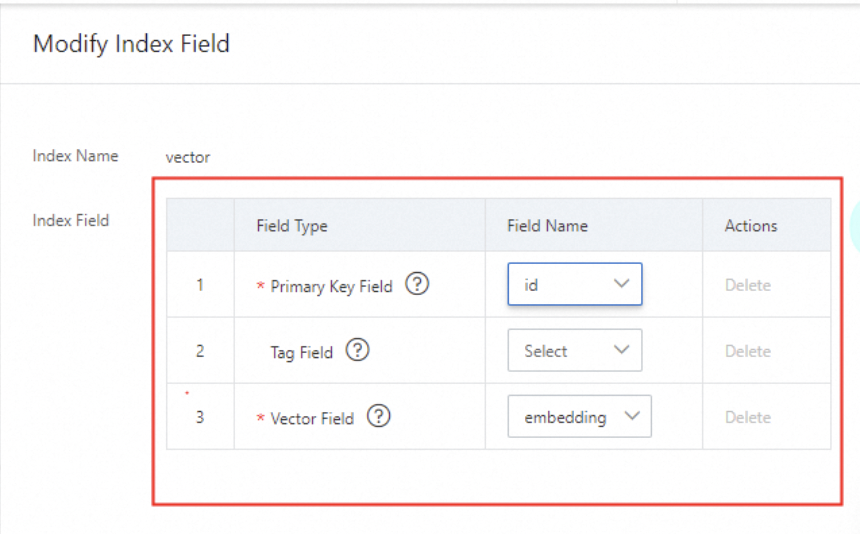
The primary key field and the vector field are required. The category field is optional and can be left empty.
You can select only the three fixed fields and cannot add new fields.
4.2. Configure advanced settings. You must configure the parameters for the vector index. The following figure shows an example. For more information, see Vector indexes.
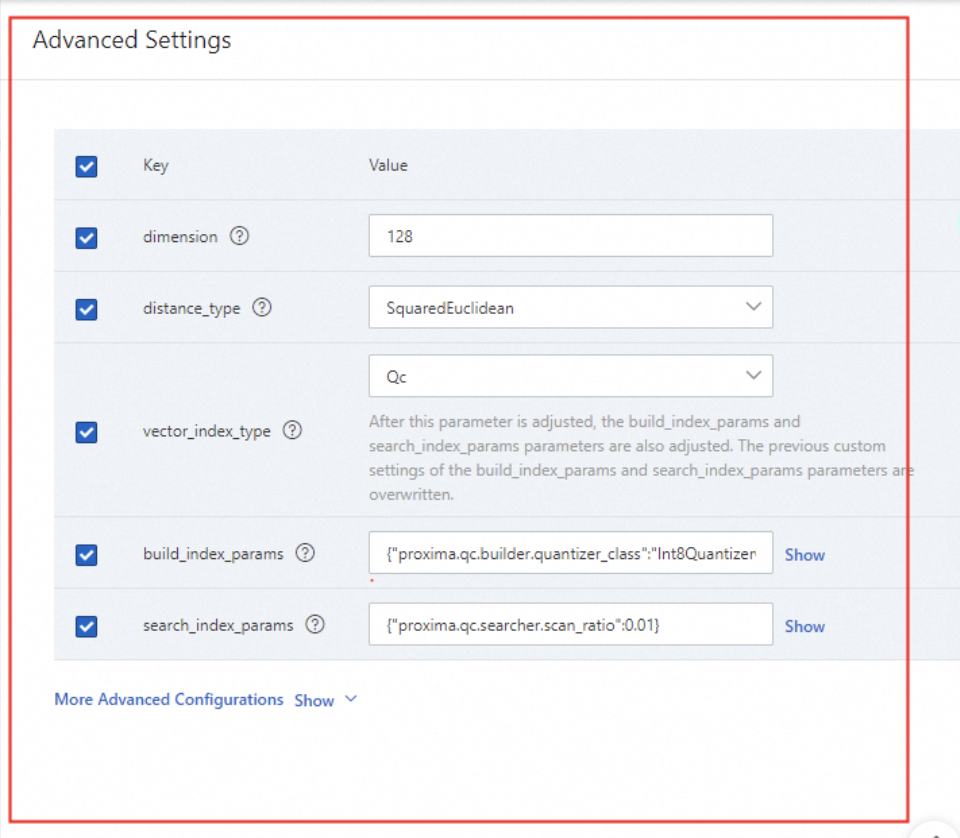
The following figure shows more parameters.

The following sample code provides an example on how to configure the build_index_params parameter.
{
  "proxima.qc.builder.quantizer_class": "Int8QuantizerConverter",
  "proxima.qc.builder.quantize_by_centroid": true,
  "proxima.qc.builder.optimizer_class": "BruteForceBuilder",
  "proxima.qc.builder.thread_count": 10,
  "proxima.qc.builder.optimizer_params": {
    "proxima.linear.builder.column_major_order": true
  },
  "proxima.qc.builder.store_original_features": false,
  "proxima.qc.builder.train_sample_count": 3000000,
  "proxima.qc.builder.train_sample_ratio": 0.5
}
The following sample code provides an example on how to configure the search_index_params parameter.
{
  "proxima.qc.searcher.scan_ratio": 0.01
}After the configuration is complete, click Save Version. In the dialog box that appears, enter the description and click Publish. The description is optional.
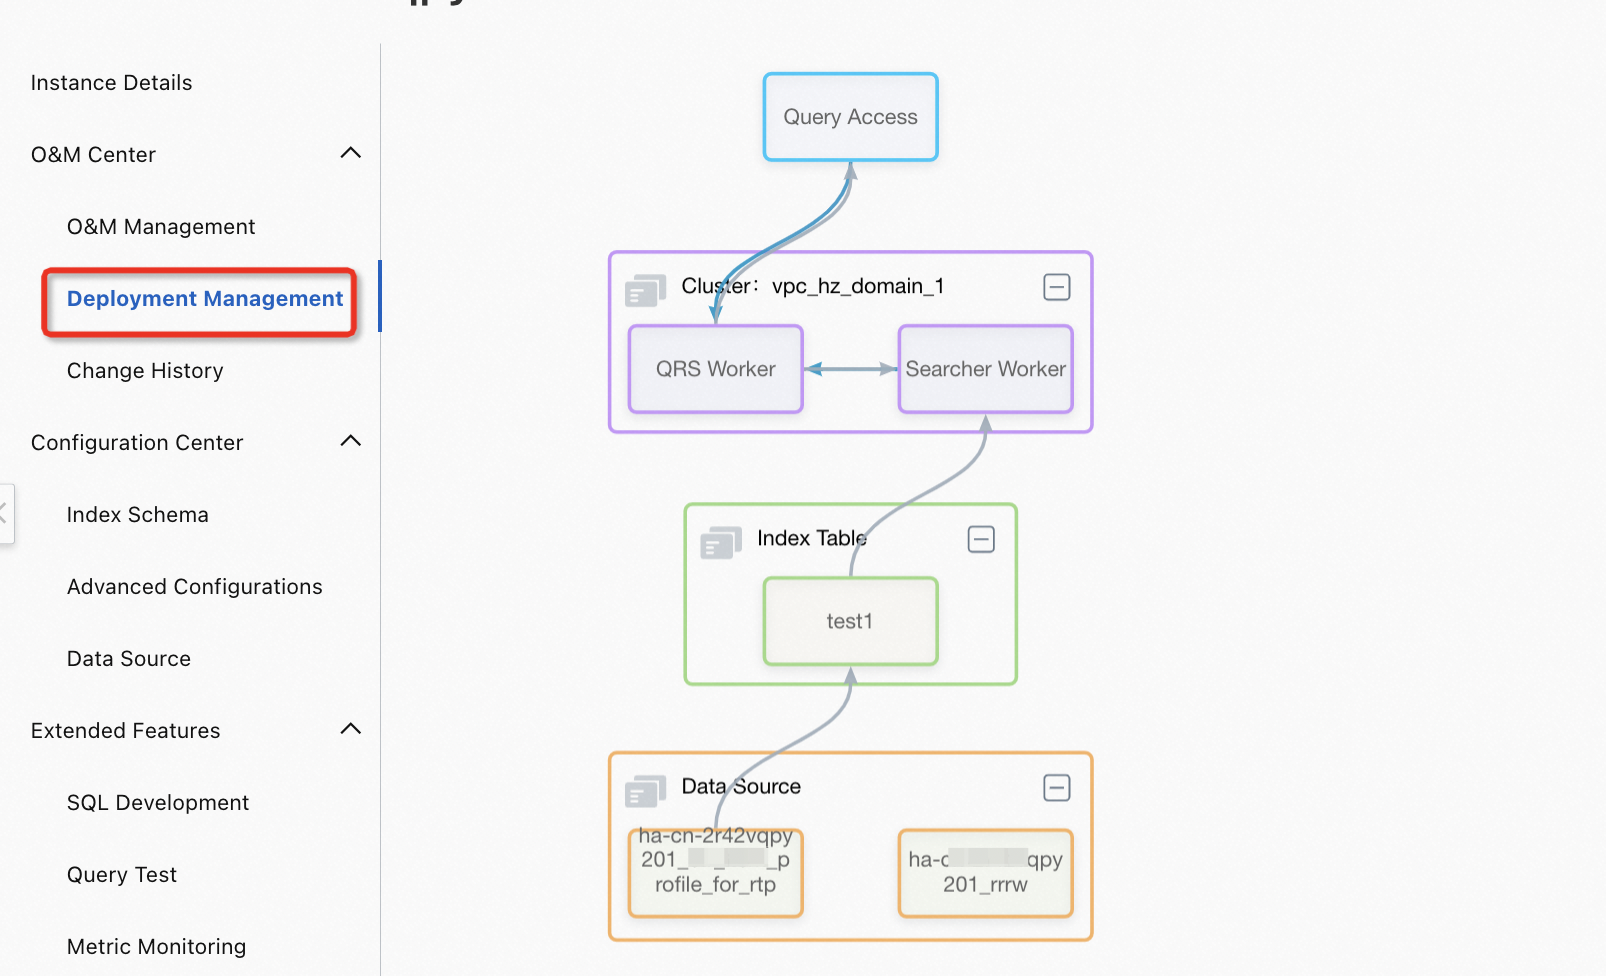
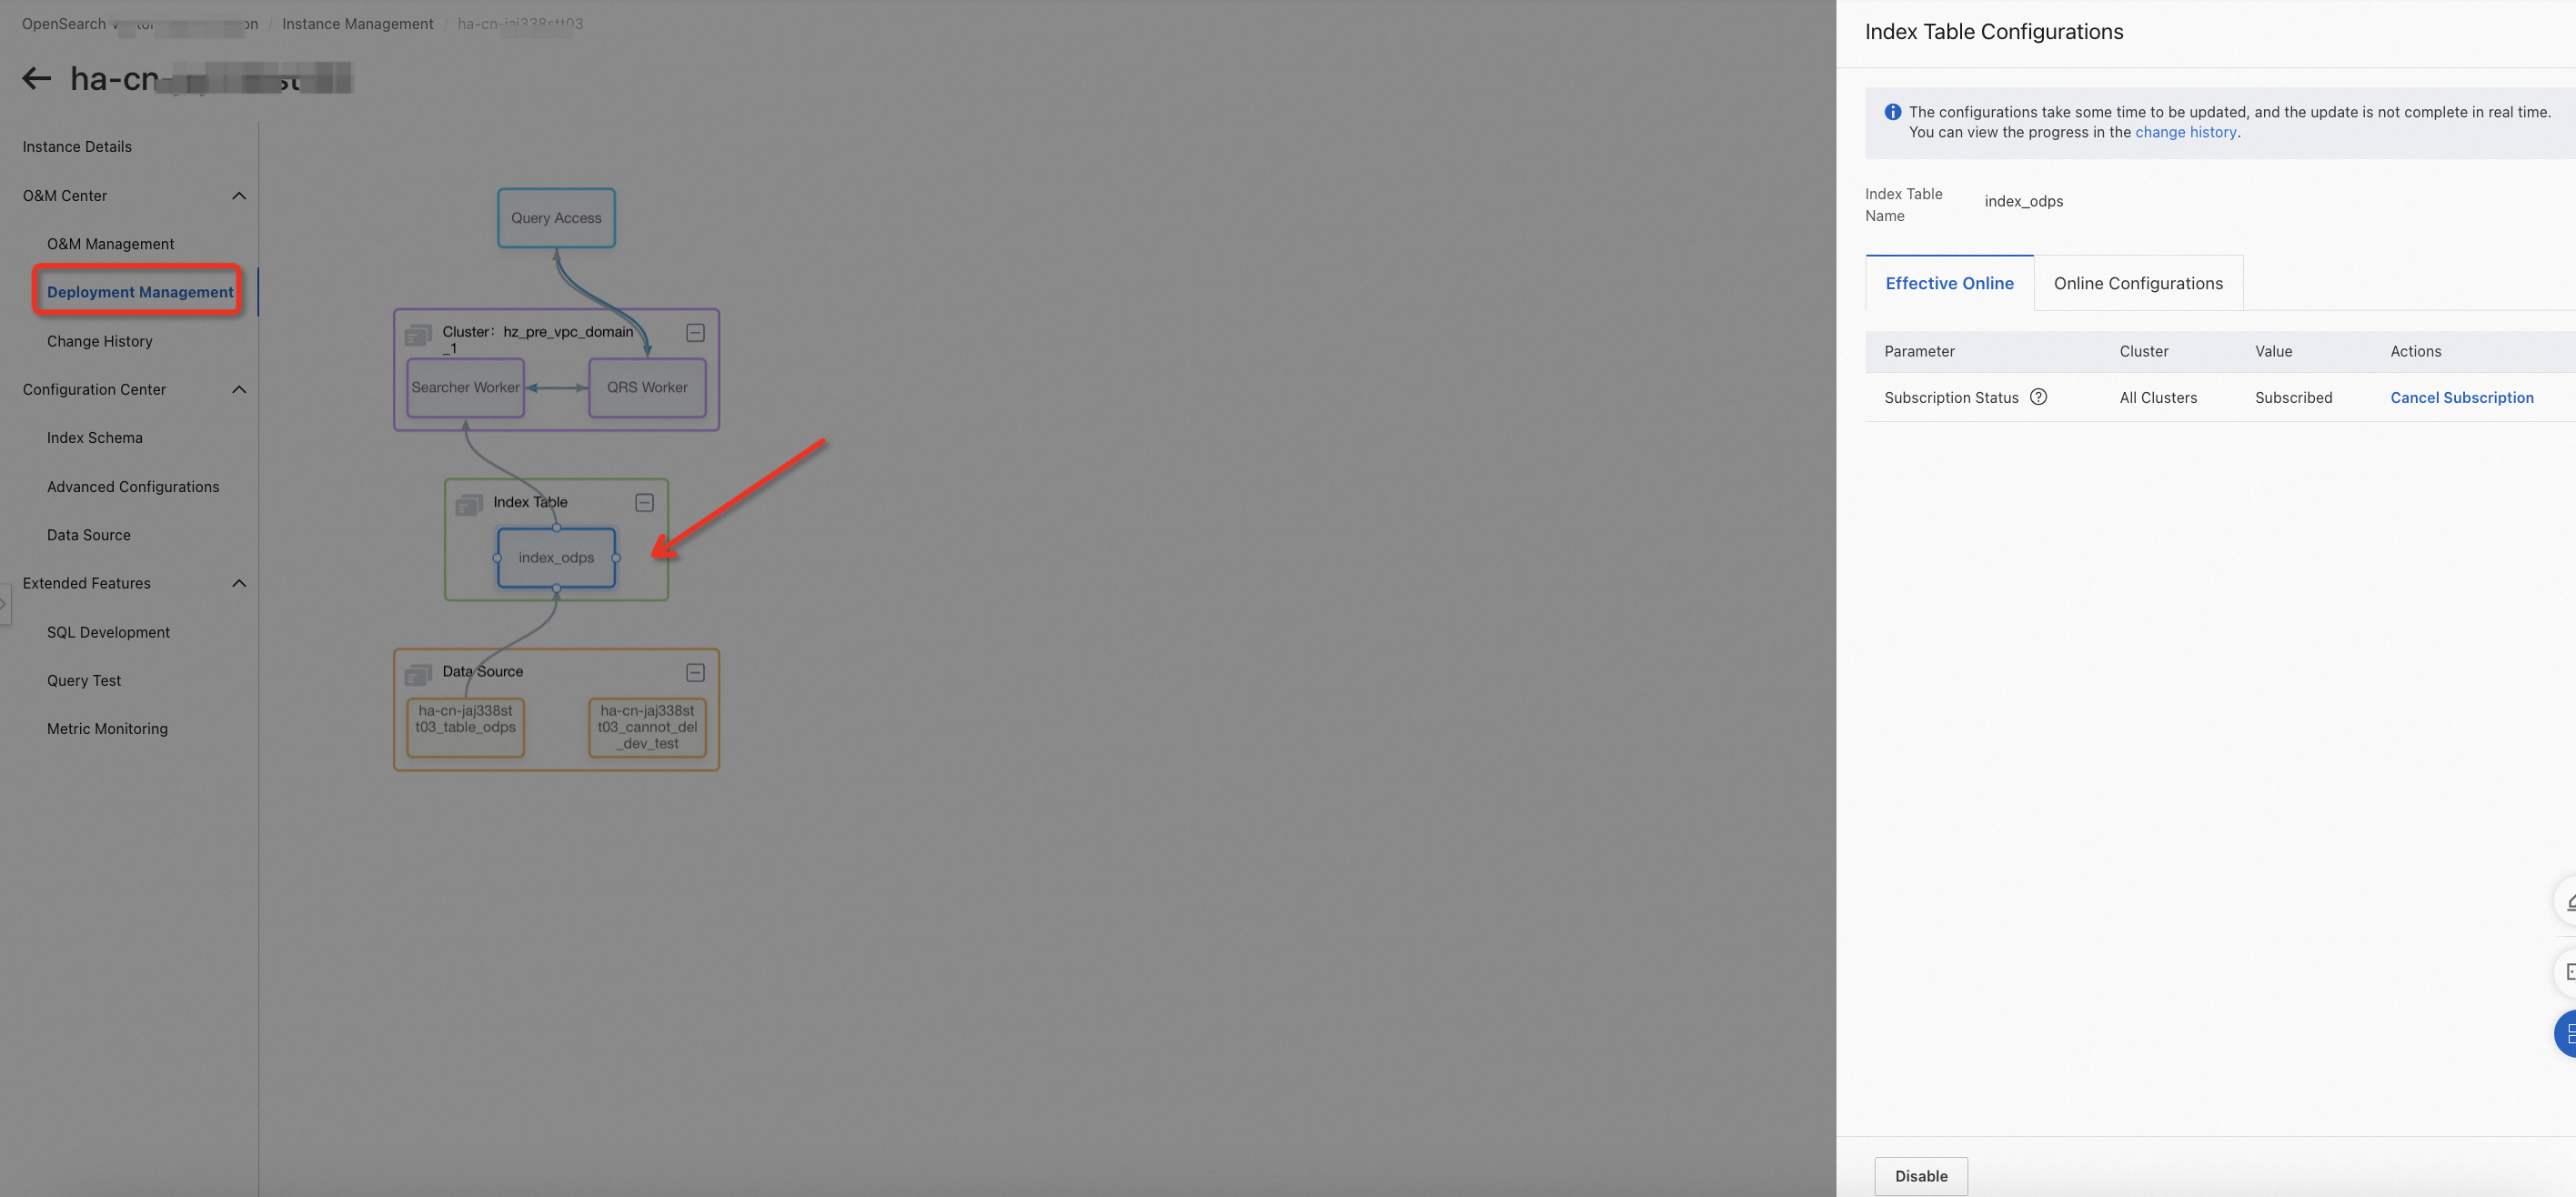
After the index table is added, you can choose O&M Center > Deployment Management to view the topology.
If you want to make the new index table take effect in the cluster, choose O&M Center > O&M Management to manually trigger reindexing.
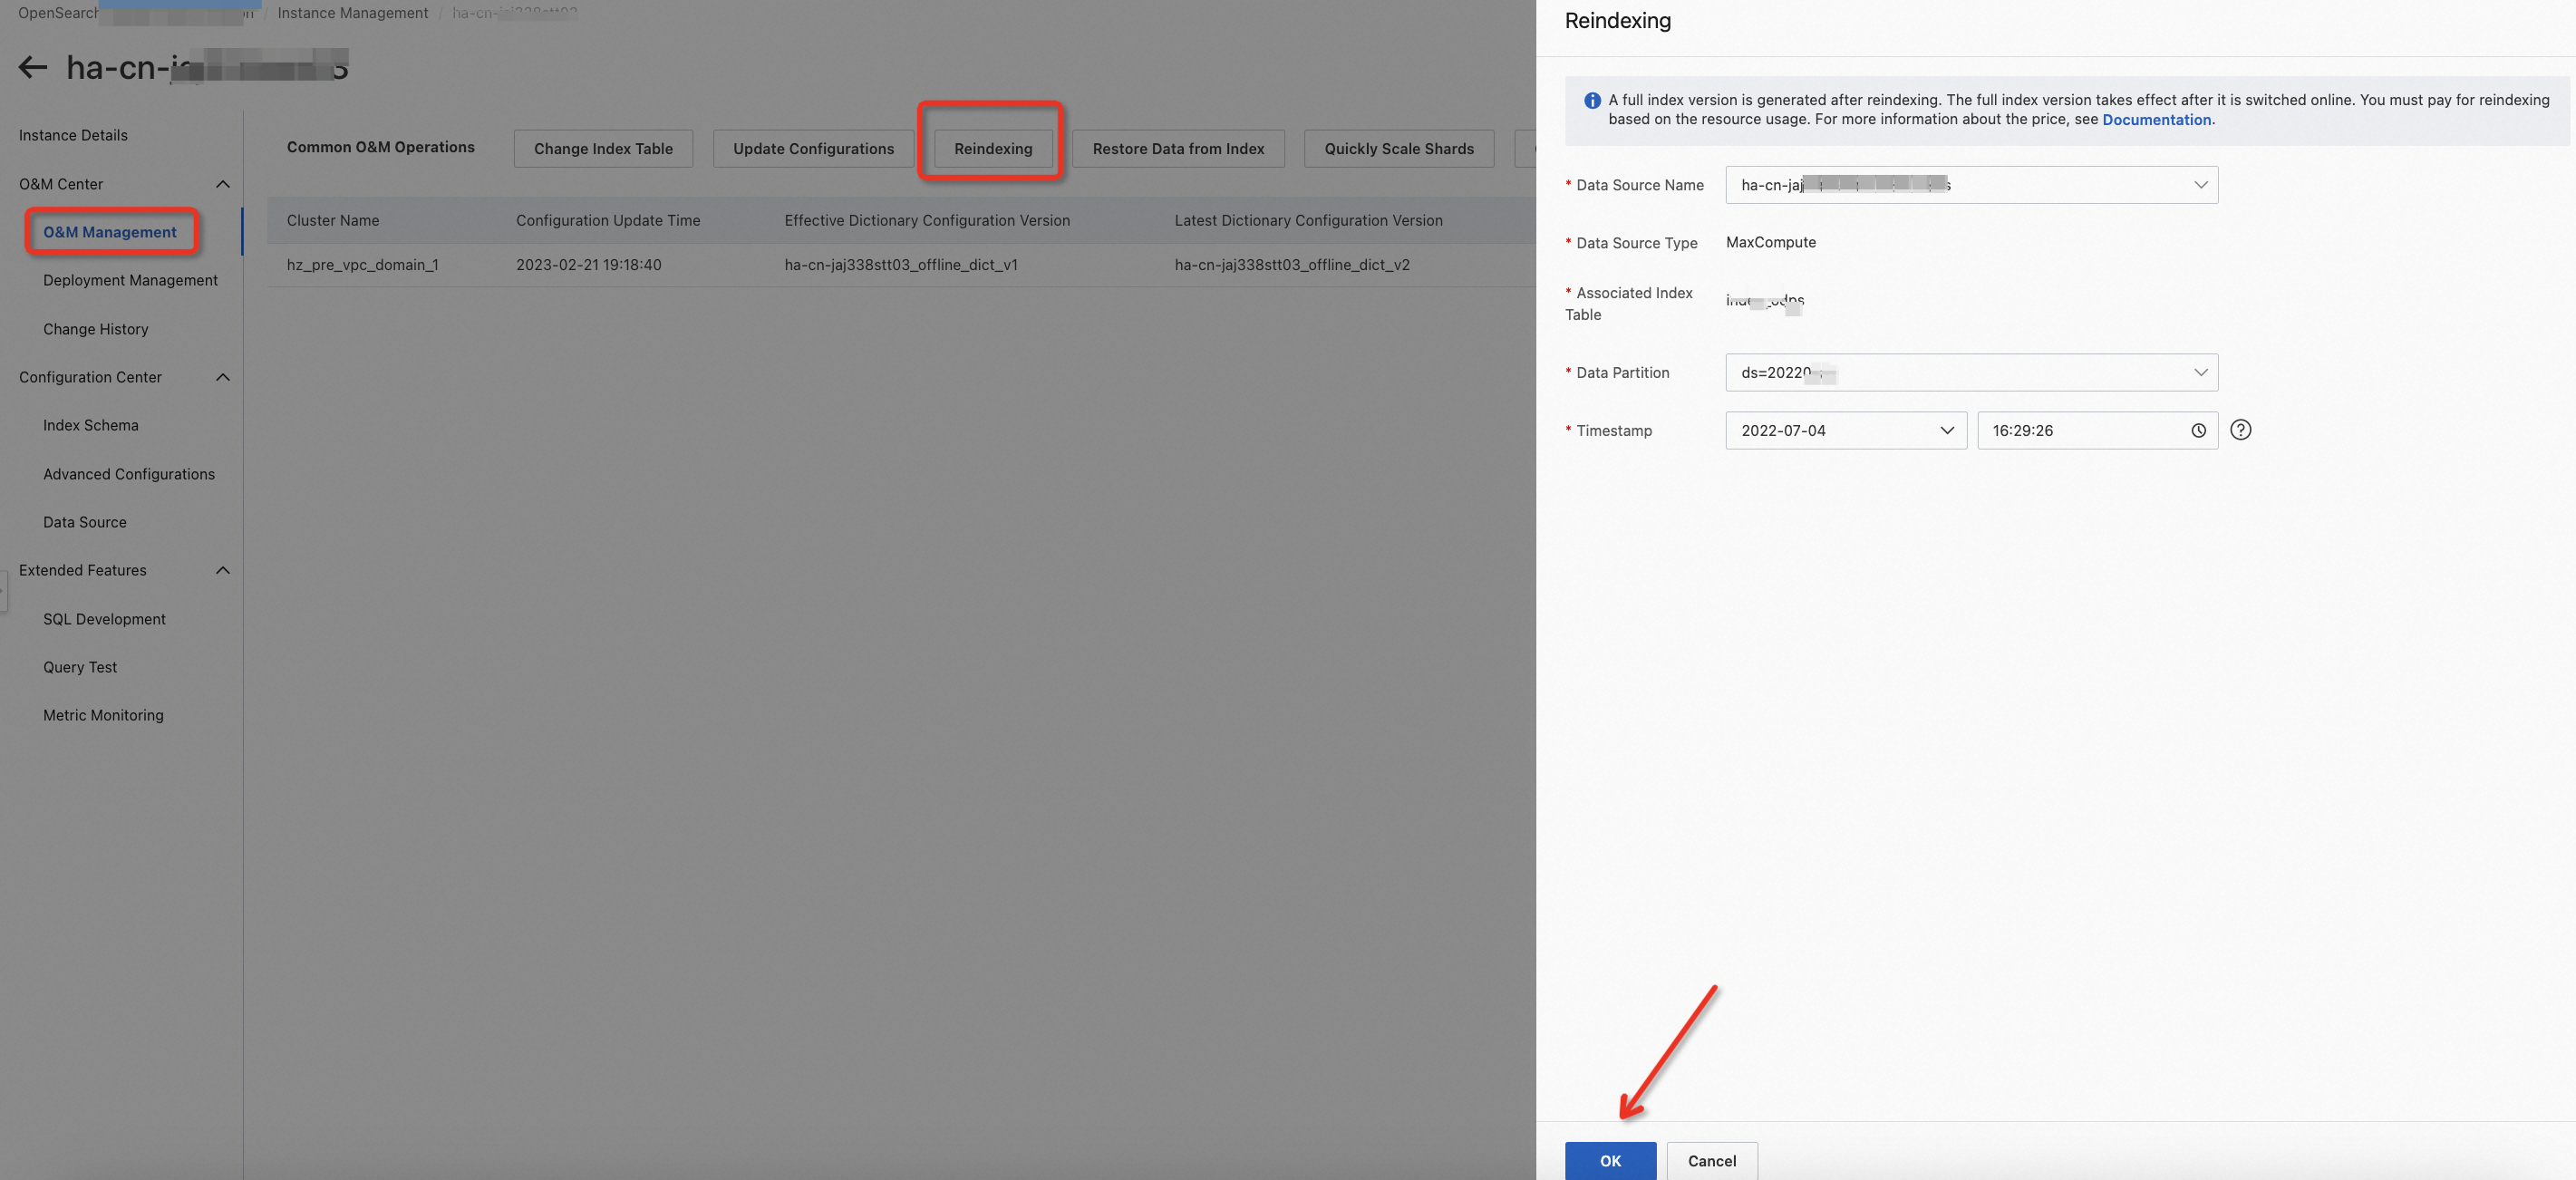
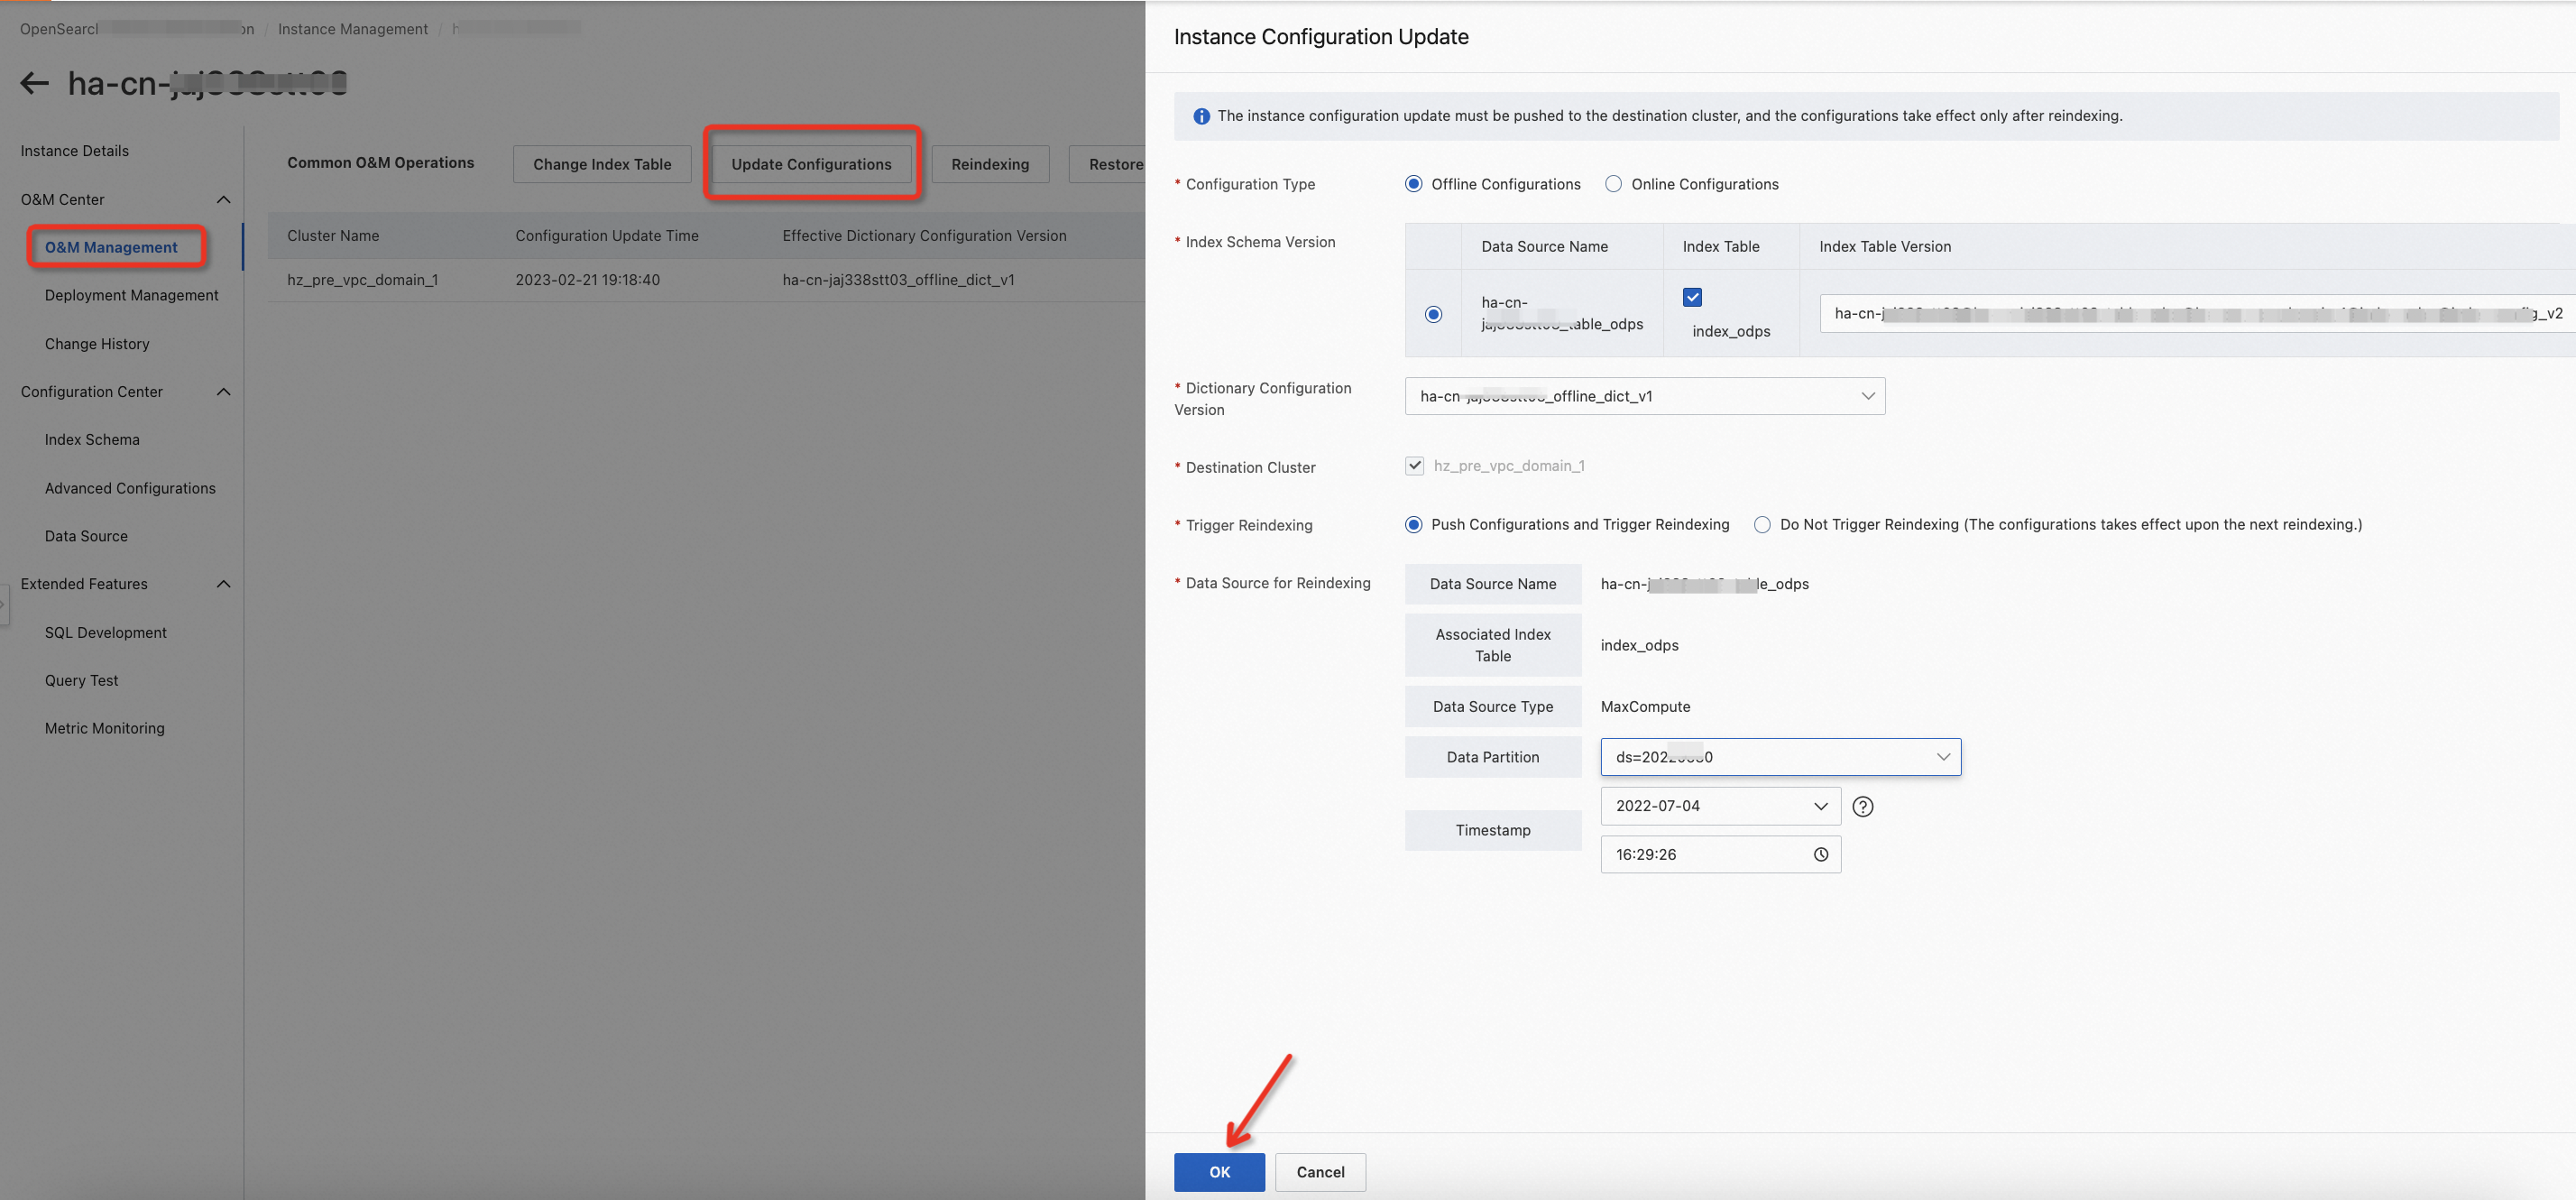
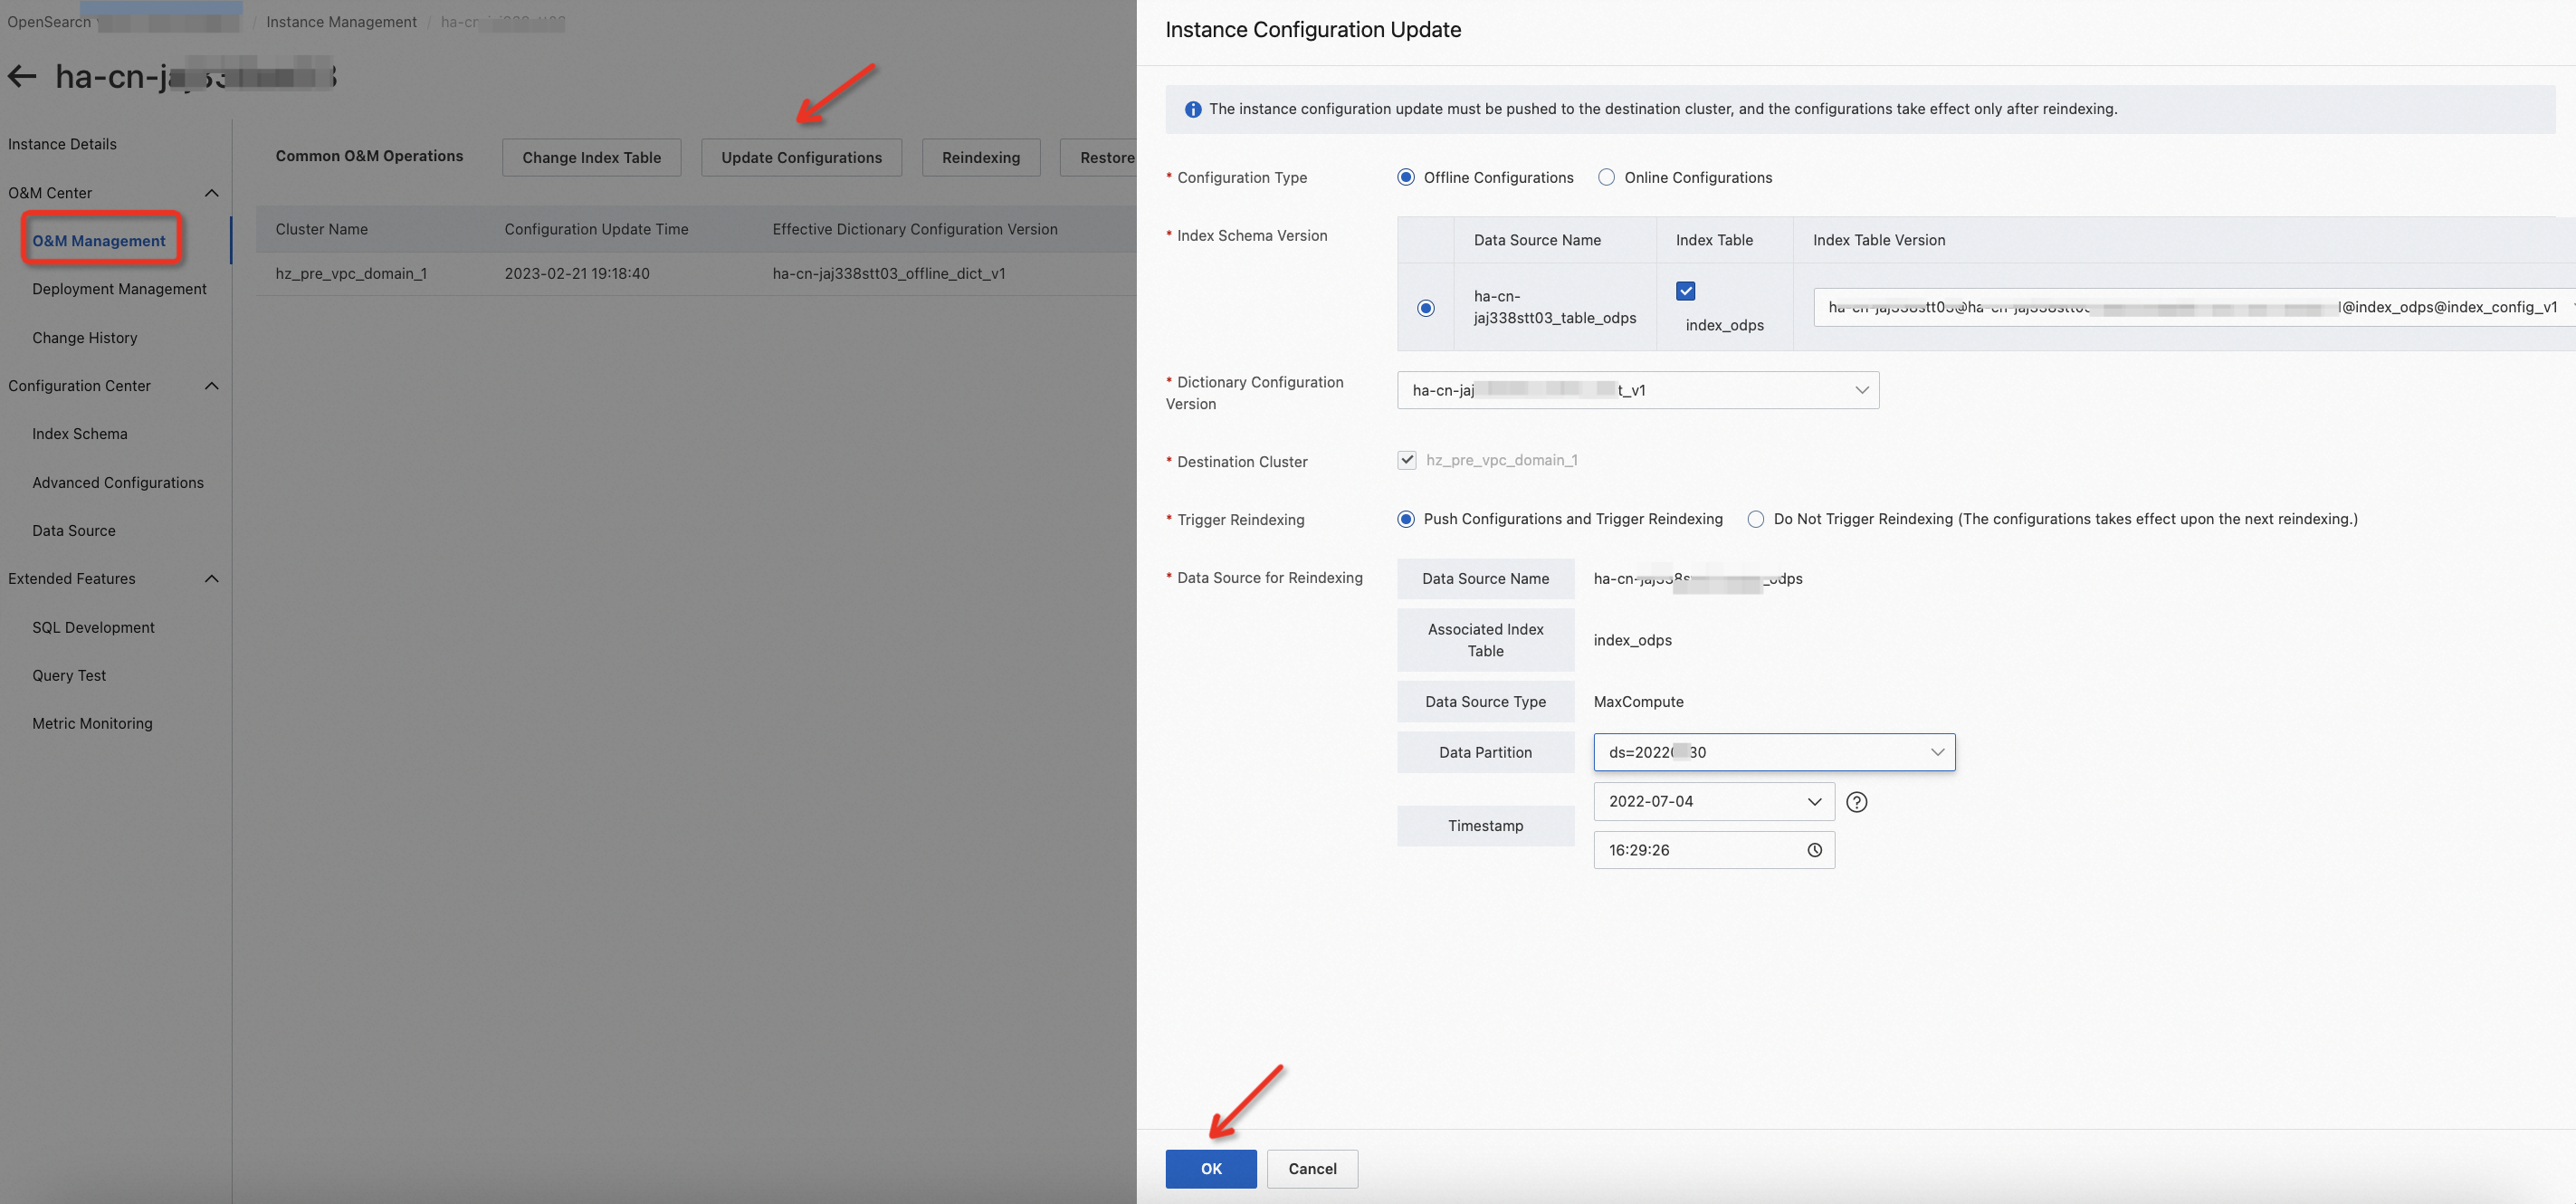
You can also perform the following operations to complete this step: Choose O&M Center > O&M Management, click Update Configurations, and then select Push Configurations and Trigger Reindexing in the panel that appears.
During reindexing, you can choose O&M Center > Change History and click the Data Source Changes tab to view the progress of the reindexing task.

After the reindexing task is complete, you can query data from the new index table.
You can specify only one primary key field.
In the field settings, you must select Search Result Display for at least one field.
For fields of the TEXT type, you must set an analysis method. Multi-value fields are not supported.
You can specify only one primary key index.
In addition to the default delimiter, the delimiters that are used to separate multi-value fields can only be single characters. Full-width characters are not supported.
If the number of replicas in the cluster is 2, set the Data Shards parameter to 2. When you purchase an instance, make sure that the number of Searcher workers is greater than the number of replicas multiplied by the number of data shards. Otherwise, the index table you added cannot be used.
A single shard can contain no more than 0.6 billion pieces of data (a maximum of 2.1 billion pieces in total). The index size of a single shard cannot exceed 300 GB. If data needs to be updated in real time, the total transactions per second (TPS) of the data update in a single shard cannot exceed 4,000. If you run the add command to add a document, the update TPS can reach 10,000.
Modify an index table
Introduction to index table versions:
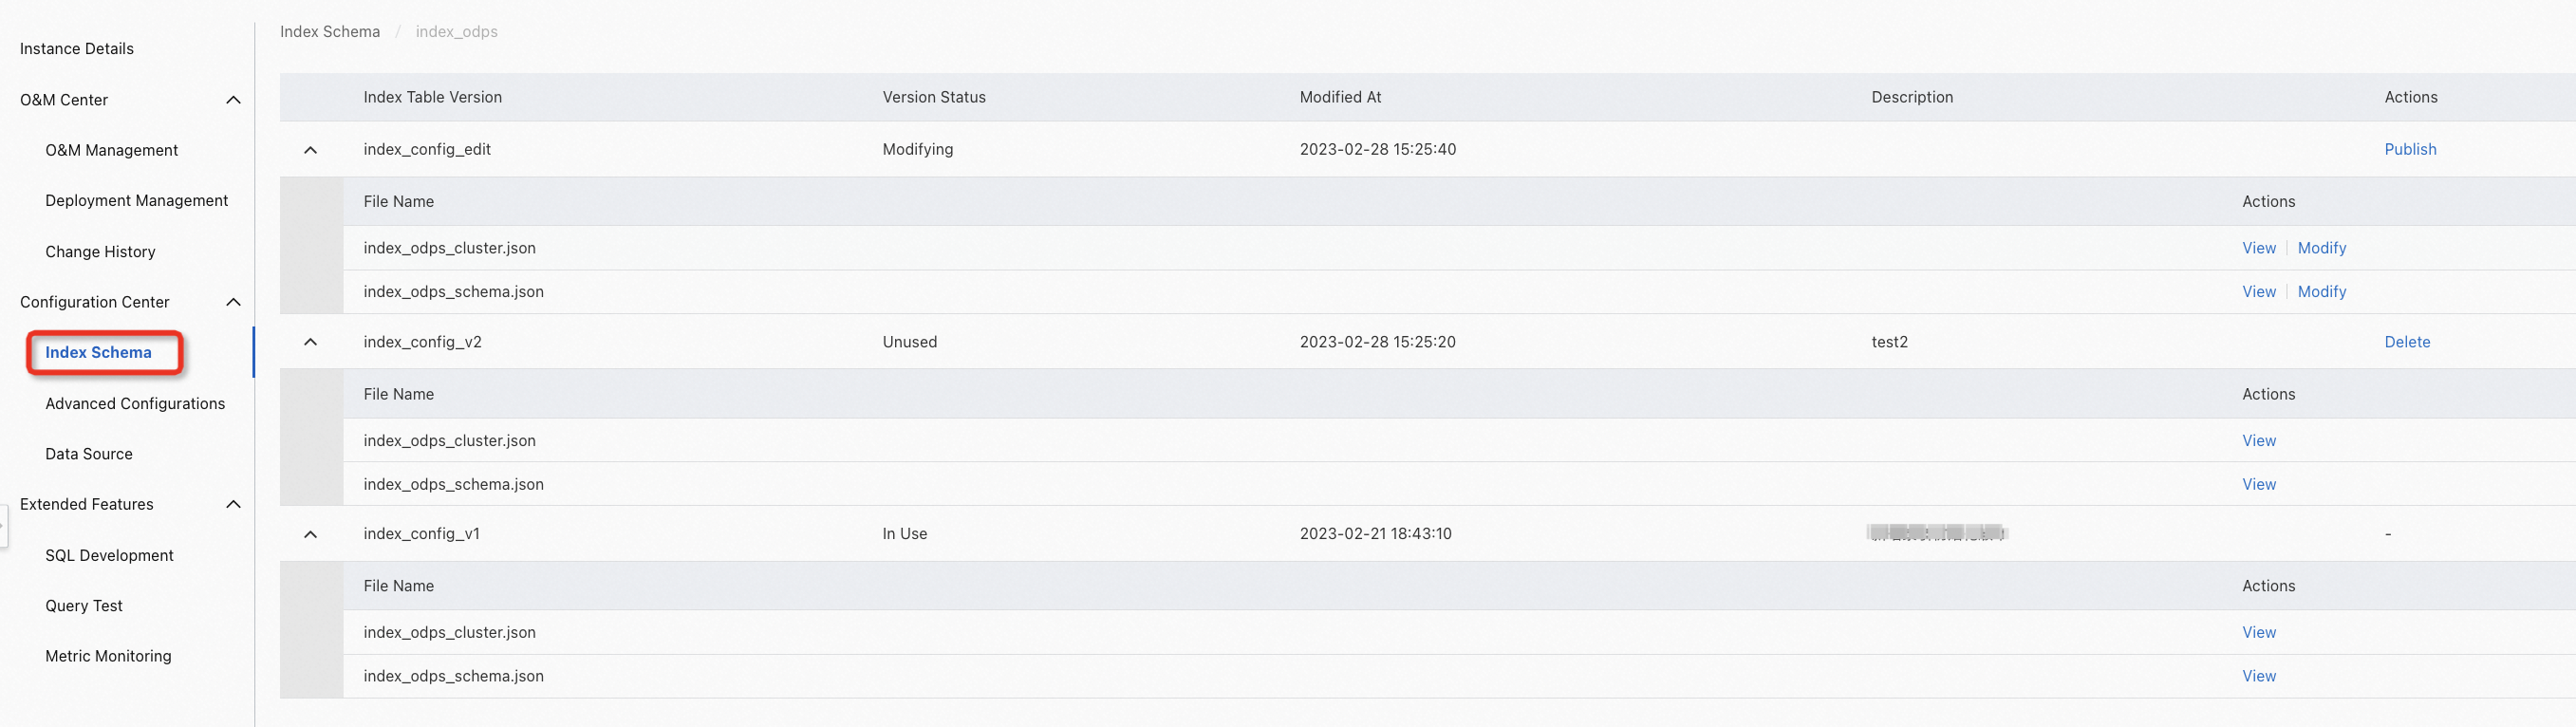
By default, two versions are available for newly created index tables.
index_config_v1: the index table that you configure for the first time. If you have pushed the configuration and rebuilt the indexes, the status of the index table changes to In Use. If you have not pushed the configuration or rebuilt the indexes, the status of the index table changes to Unused.
index_config_edit: the index table that is being modified. The index table is in the Modifying state.
If the index table versions are published in a consecutive manner, the version numbers are incremental. For example, the second version is named index_config_v2 and the third version is named index_config_v3. To distinguish index table versions, you must enter the description of each version.
Modify and publish a new index table version:
Find the version that is in the Modifying state and click Modify.

After modification, click Save Version.
You can also switch to developer mode to manually modify the schema.

Find the version that is in the Modifying state, click Publish, and then enter the description. Then, click OK.

In this step, the system generates a new index table version for the index table. The index table version is in the Unused state.
If you want to make the new index table take effect in the cluster, choose O&M Center > O&M Management, click Update Configurations, and then select Push Configurations and Trigger Reindexing in the panel that appears.
Delete an index table version:
You can delete an index table version that is in the Unused state.

View an index table version:
Click View to go to the configuration page of the index table version. You have read-only permissions on the page.
Administrator mode:
Developer mode:

Delete an index table
You can delete an index table that does not contain a version in the In Use state.

If an index table contains a version in the In Use state, you can delete the index table only by performing the following steps:

Choose O&M Management > Deployment Management, modify the index table, and then turn off Take Effect Online.
Then, choose Configuration Center > Index Schema, find the index table that you want to delete, and then click Delete.

Note: If Take Effect Online is turned off on the deployment management page, you must delete the index table from the index schema. Otherwise, the query performance of the online clusters will be affected.
Usage notes:
When you add an index table, you must specify a data source. If no data source exists, you must add a data source before you add an index table.
After an index table is created, you cannot change the index table name.
If an index table contains a version in the In Use state, you cannot directly delete the index table.
Each index table can contain only one version in the Modifying state.