This topic describes how to use the rsync command-line tool to migrate data between two NFS file systems.
Prerequisites
A source NFS file system with existing data.
A VPC-type mount target created for the source file system.
Billing
The migration between NAS file systems involves the following costs:
If you use an Elastic Compute Service (ECS) instance as the intermediate node for data transfer, you are charged for the ECS instance based on the instance configuration. For more information about the billing of ECS, see Overview.
You are charged for the storage usage of the two NAS file systems. Resource plans can be purchased to offset storage usage fees. For more information about the billing of NAS, see Billing overview.
If you use Cloud Enterprise Network (CEN) to connect VPCs, you are charged for the transit routers and inter-region connections that you use. For more information about the billing of CEN, see Billing rules.
Before you begin
The ECS instance used for migration must have network access to both the source and destination NAS file systems. This requires ensuring that both file systems are accessible from the same VPC.
View the information about the mount target of the source file system.
Before you migrate data, you must obtain the information about the mount target of the source file system and the VPC in which the mount target resides. For more information, see View mount targets.
NoteIf the mount target of your NFS file system is created in the classic network, you must create a mount target in a VPC for the file system. For more information, see Create a mount target.
Configure the mount target of the destination file system.
The file systems reside in the same region
If the mount targets of the destination file system and the source file system belong to the same VPC, obtain the information about the mount targets and migrate data. For more information, see Migrate data.
If the mount targets of the destination file system and the source file system belong to different VPCs, use one of the following methods to prepare the mount targets:
Create a file system in the destination region and zone. A mount target is automatically created for the file system. For more information, see Create a General-purpose NAS file system in the NAS console.
NoteWhen you purchase a pay-as-you-go General-purpose NAS file system (Capacity, Performance, or Premium) with the NFS protocol, select the same VPC and vSwitch that are used by the source mount target. A mount target is automatically created for the file system. After you create a file system, you can purchase resource plans to offset the storage usage fees of the file system.
Create a mount target for the destination file system. For more information, see Create a mount target.
Use CEN to connect the VPCs of the destination mount target and the source mount target. For more information, see Use CEN to mount a NAS file system across VPCs in the same region.
The file systems belong to different accounts or reside in different regions
If the mount targets of the destination file system and the source file system belong to different accounts or reside in different regions, you must use CEN to connect the VPCs. For more information, see Use CEN to mount a NAS file system across accounts and regions.
Migrate data
After ensuring network connectivity between the source and destination file systems, the data migration process involves using an ECS instance as a migration host. Perform the following steps to migrate data:
Mount the source and destination file systems on the ECS instance.
ImportantIt is recommended to use a new, dedicated ECS instance for the migration. Using an existing production ECS instance can impact its performance, as the migration process will consume CPU and network resources.
Log on to the ECS console and click Create Instance. On the page that appears, configure the following parameters:
Region: Select the region where the source file system resides.
Network and Zone: Select the VPC, zone, and vSwitch where the source file system resides.
Instance: Select the minimum specification.
Image: Select CentOS 7.6.
Storage: Click Elastic Ephemeral Disk | NAS File System | Dedicated Block Storage Cluster(Optional) and click Add File System. The following figure shows the detailed configurations.
NoteIf the source and destination mount targets reside in the same VPC, configure the mount information of NAS file systems on the ECS buy page. When you start the ECS instance, the source and destination NAS file systems are automatically mounted on the instance.
If the source and destination mount targets belong to different VPCs, regions, or accounts, you only need to configure the source file system on the ECS buy page. After you create an ECS instance, manually mount the destination file system on the ECS instance. For more information, see Mount an NFS file system on a Linux ECS instance.
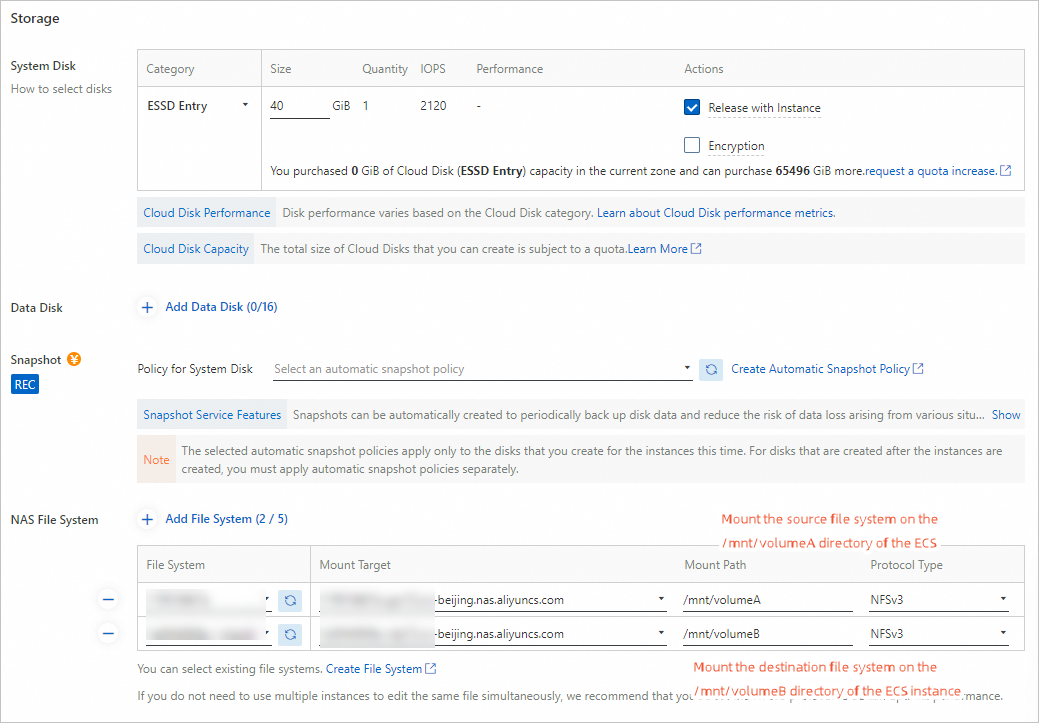
After you create an ECS instance and mount the source and destination NAS file systems on the ECS instance, run the following command to check whether the mount is successful:
mount | grep nas.aliyuncs.comIf an output that is similar to the following information appears, the file systems are mounted. The source file system is mounted to the
/mnt/volumeAdirectory, and the destination file system is mounted to the/mnt/volumeBdirectory.
Install the tools that are used to migrate data.
Run the following command to install the tools that are used to migrate data:
sudo yum install -y rsync tmuxNoteThe rsync tool is used to copy data.
The tmux tool is used to run the rsync process in a persistent session, allowing you to monitor its progress and prevent the process from being terminated if your SSH connection drops.
Migrate existing data.
Run the following command to synchronize existing data that is stored in the source file system to the destination file system:
tmux
sudo rsync -avP /mnt/volumeA/ /mnt/volumeB/
You can also use rsync to concurrently copy and upload data. Run the following command:
threads=<Number of threads>;
src=<Source path/>;
dest=<Destination path/>;
rsync -av -f"+ */" -f"- *" $src $dest && (cd $src && find . -type f | xargs -n1 -P$threads -I% rsync -av % $dest/% )
For example, the number of threads is 10, the source path is /abc, and the destination path is
/mnt1.threads=10; src=/abc/; dest=/mnt1/; rsync -av -f"+ */" -f"- *" $src $dest && (cd $src && find . -type f | xargs -n1 -P$threads -I% rsync -av % $dest/% )NoteThe source path in the rsync command must end with a forward slash (/). Otherwise, the source path does not match the destination path after the data is synchronized.
The tmux command creates a new tmux session. Enter
rsyncin a tmux session to view the data migration progress. If the ECS instance is disconnected during migration, log on to the ECS instance and run thetmux attachcommand to resume the tmux session and check the migration progress.As a reference, a test migration of 1 million 100 KiB files (100 GiB total) took approximately 320 minutes. Actual migration speed will vary based on file size, network conditions, and ECS instance performance.
Migrate incremental data.
If applications that run on other ECS instances write data to the source file system during data migration, you must migrate the incremental data to the destination file system after the existing data is migrated.
Stop running applications that use the source file system.
To ensure that no data is written to the source file system during incremental data migration, you must stop all running applications on ECS instances and containers that use the source file system before you synchronize incremental data.
ImportantAfter you stop all applications that use the source file system, do not delete data from the source file system. Otherwise, data may be lost during incremental data migration.
Migrate incremental data during off-peak hours. Run the fuser -mv
<dir>command to find the IDs of processes that read and write data to the source file system.
Synchronize incremental data.
Run the following command to synchronize the incremental data that is generated when you migrate existing data to the destination file system:
sudo rsync -avP --delete /mnt/volumeA/ /mnt/volumeB/The rsync command scans the source directory before the command synchronizes incremental data. Therefore, the time required to migrate a small amount of data may be longer than expected.
WarningThe --delete option in the command is used to delete data from the destination file system that is deleted from the source during incremental data migration. To prevent accidental deletion of data from the destination file system, proceed with caution when you use this option.
Check the migration result.
After the migration is complete, run the following command to check whether the data that is stored in the destination file system is consistent with the data that is stored in the source file system.
sudo rsync -rvn /mnt/volumeA/ /mnt/volumeB/If the data in the two file systems is consistent, no file path is returned, as shown in the following figure.

Switch workloads to the new file system
To switch your applications from the old file system to the new one after you migrate data, unmount the original file system from all ECS instances and containers and mount the new file system on the instances and containers.
To mount the new file system on an ECS instance, perform the following steps:
Run the
mount | grep nas.aliyuncs.comcommand to record the mount information of the existing NAS file system. Take note of the directory <dir> on which the file system is mounted.Run the
fuser -mv<dir>command to find the IDs of processes that read and write data to the file system. Then, run thekill -9command to stop the processes.Run the
umount <dir>command to unmount the original file system.Mount the new file system on the original <dir> directory. For more information about the mount parameters, see Mount an NFS file system on a Linux ECS instance.
Restart the processes that access the new file system to check whether the processes can perform read and write operations on the file system as expected.
Modify the automatic mount information in the /etc/fstab file by replacing the original mount target with the new mount target.
To mount the new file system on Kubernetes containers, perform the following steps:
Modify the YAML configuration file for dynamic volumes or persistent volumes by replacing the original mount target with the new mount target.
Use the modified configuration file to generate new pods. Make sure that the new file system is mounted on the pods and the pods can perform read and write operations on the file system as expected.
Terminate all pods that use the original file system.
After you switch workloads to the new file system, retain the data that is stored in the original file system for at least one week. If you immediately delete data from the original file system, data loss may occur due to accidental deletion or accidental synchronization.