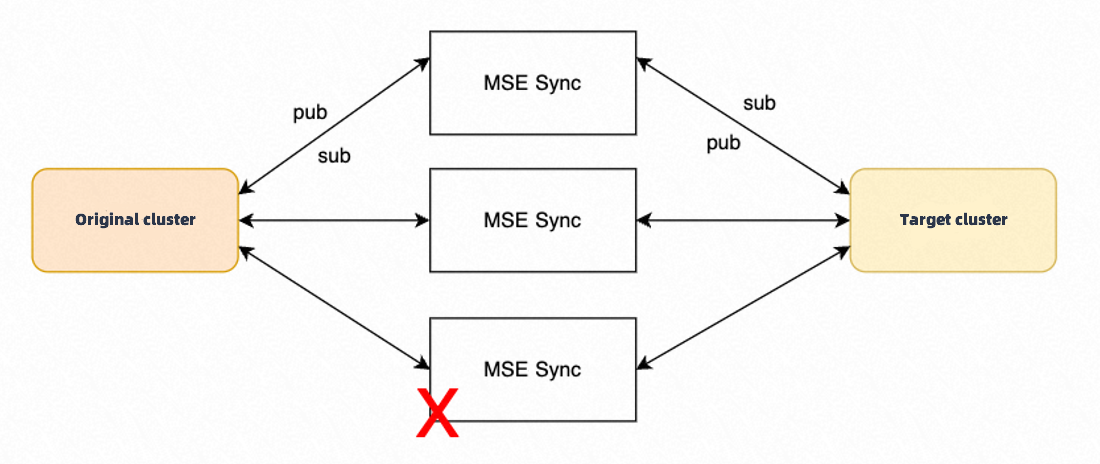
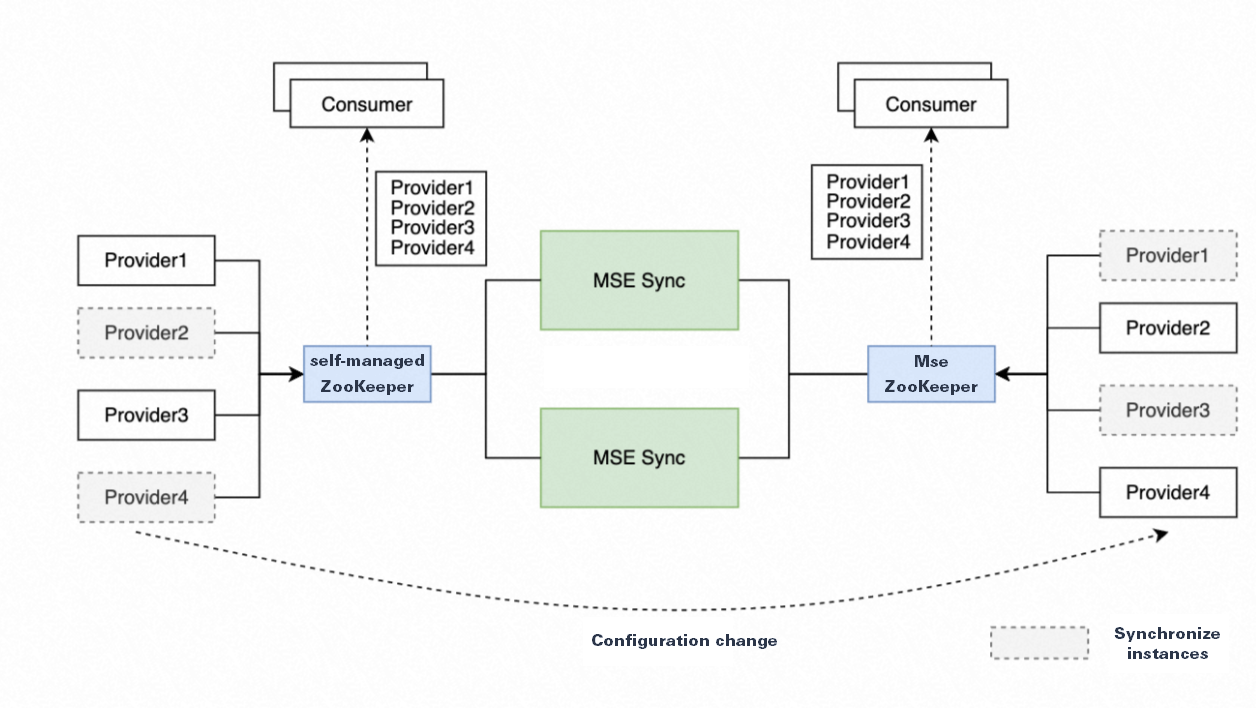
MSE Sync is a data synchronization tool that is a highly customized and optimized version of the open source Nacos Sync project. It provides two-way data synchronization and includes features such as automatic service discovery and one-click full service synchronization. MSE Sync uses a multi-instance deployment architecture to provide high availability and disaster recovery. This makes it ideal for scenarios that require a smooth migration between configuration management platforms such as Nacos, ZooKeeper, and Eureka.
Introduction to MSE Sync migration
Advantages of MSE Sync migration
Smooth migration
During migration, MSE Sync synchronizes service information between the source cluster and the MSE cloud product. This allows for a smooth migration from your self-managed registry center to the MSE product.
In the image, `pub` refers to the service publisher and `sub` refers to the service subscriber.

Multi-instance deployment
Multi-instance deployment is supported in service synchronization mode.

The sync tool uses scheduled tasks to recover data if a node goes down. Healthy nodes run a scheduled task to recover the data from the failed node. During the interval between the node failure and the completion of the scheduled task, the client's instance list may be temporarily empty. You can configure the scan interval for the scheduled task using the following parameter. This is a Java Virtual Machine (JVM) parameter that you can specify using the `JAVA_OPT` environment variable.
-Dmsesync.daemon.refresh.interval=60 // Unit: secondsThe following is an example.
JAVA_OPT="$JAVA_OPT -Dmsesync.daemon.refresh.interval=10"ImportantThe default scan interval for the scheduled task is 60 seconds. Do not set the scan interval to a small value. A short interval can cause excessive pressure on the server and sync nodes. The appropriate interval depends on the cluster load and the sync tool load. The recommended minimum value is 10 seconds.
Do not use a multi-instance deployment for configuration synchronization.
Simple operations
MSE Sync is compatible with the service registration logic of ZooKeeper, Nacos, and Eureka. It supports service information synchronization for paths such as ZooKeeper to ZooKeeper, ZooKeeper to Nacos, Nacos to Nacos, and Eureka to Nacos. MSE Sync also automatically retrieves service information from these registry centers, and a one-click selection feature simplifies the process.

Supported registry center types
MSE Sync supports the following synchronization instance types.
Source registry center type | Target registry center type | Synchronization support |
Nacos | Nacos | Native Nacos service type. |
ZooKeeper | ZooKeeper | Services and persistent configurations. Important
|
Eureka | Nacos | Native Eureka service type. For this synchronization type, service names registered in Nacos must be in lowercase. By default, Eureka registers service names in uppercase. However, when MSE Sync synchronizes these services to Nacos, it converts the service names to lowercase. If an original service name contains uppercase letters, the service synchronized to Nacos might not be interoperable. For example, a service `Service-1` is registered in Eureka with the name `SERVICE-1`. MSE Sync synchronizes it to Nacos with the name `service-1`. If a client then uses the Nacos software development kit (SDK) to register a service named `Service-1` in Nacos, `service-1` and `Service-1` are treated as two different services. The service instances are not interoperable. The instance registered directly in Nacos cannot discover the instance synchronized from Eureka by MSE Sync. If you change all service names to lowercase, MSE Sync converts the service names from Eureka to lowercase, which ensures interoperability between the services on both sides. |
Consul | Nacos | Native Consul service type. The tool synchronizes only healthy instance information. The sync tool does not currently detect changes in metadata. Therefore, metadata changes are not automatically synchronized. The sync tool also does not support the synchronization of Consul configuration information. |
Step 1: Deploy the MSE Sync migration tool
The migration tool must be able to connect to your self-managed cluster and the MSE cluster. You must deploy the migration tool in a network environment where it can access both clusters. For example, you can deploy the tool in the same Virtual Private Cloud (VPC) as your clusters or ensure that it can access both clusters over the public internet. Otherwise, the migration will fail.
Deployment modes
MySQL-dependent deployment
You must provide your own MySQL service. In your MySQL service, create a database and a user account with read and write permissions for MSE Sync. Pass the MySQL URL, username, and password using environment variables. Multiple MSE Sync instances can share a single MySQL service.
Derby-dependent deployment
MSE Sync supports an embedded Derby database and can be run on a single machine.
Environment variables
Database-related environment variables
MSE Sync automatically determines whether to use MySQL or the embedded Derby database based on environment variables. If the
MYSQL_URL,MYSQL_USER_NAME, andMYSQL_PASSWORDenvironment variables are all set, MSE Sync connects to a MySQL service at startup. Otherwise, it uses the embedded Derby database.Environment variable name
Description
Example
MYSQL_URL
The connection string for MySQL.
jdbc:mysql://localhost:3306/sync
MYSQL_USER_NAME
The username of the account that has read and write permissions for MSE Sync.
None
MYSQL_PASSWORD
The password for the `MYSQL_USER_NAME` account.
None
JVM-related environment variables
In the `java.env` file in the `conf` directory, add JVM parameters using the `JAVA_OPT` variable.
For example, to set the JVM heap memory size, add the following code:
JAVA_OPT="$JAVA_OPT -Xms2048m -Xmx2048m".
Deployment methods
Kubernetes deployment
Modify parameters such as the MySQL username, password, and
replicasin the following configuration. Save the configuration file asmse-sync-deployment.yaml.apiVersion: apps/v1 kind: Deployment metadata: labels: app.kubernetes.io/name: mse-sync name: mse-sync-svc spec: replicas: 3 selector: matchLabels: app.kubernetes.io/name: mse-sync template: metadata: labels: app.kubernetes.io/name: mse-sync spec: containers: - name: mse-sync image: msecrinstance-registry.cn-hangzhou.cr.aliyuncs.com/mse-demo/mse-sync:latest ports: - containerPort: 8000 env: - name: MYSQL_URL value: "jdbc:mysql://192.xx.xx.xx:3306/sync" - name: MYSQL_USER_NAME value: "mse-sync" - name: MYSQL_PASSWORD value: passwordNoteTo access the MSE Sync UI, add a Service that points to port 8000 of MSE Sync.
Run the following command to deploy MSE Sync.
kubectl apply -f mse-sync-deployment.yaml
ECS deployment
Download the MSE Sync binary package.
curl https://msesync.oss-cn-hangzhou.aliyuncs.com/MseSync.zip --output msesync.zipUnzip the binary package and navigate to the root directory of MSE Sync.
unzip ./msesync.zipOptional: If you use MySQL, configure the following environment variables.
export MYSQL_URL=""
export MYSQL_USER_NAME=""
export MYSQL_PASSWORD=""
Start the application.
./MseSync/bin/startup.sh start
Step 2: Configure cluster information and migration tasks
You can configure migration tasks in MSE Sync using the UI or a configuration file.
Migrate tasks using the UI:
Open the MSE Sync tool. In the navigation pane on the left, click Service Sync. Then, click Import Configuration. In the Import Configuration dialog box, enter the configuration content and click OK to import the configuration.
Migrate tasks using a configuration file:
Create a configuration file. The following YAML file is an example that automatically synchronizes all services from the `public` and `test` namespaces in the `src` cluster to the `dst` cluster. This task performs a two-way synchronization of service information.
The configuration contains two main fields:
clustersandtasks. These fields describe the cluster and sync task information, respectively. For more information about theclustersandtasksfields, see Configuration fields.clusters: - clusterName: src connectKeyList: - mse-xxxxx-nacos-ans.mse.aliyuncs.com:8848 clusterType: NACOS namespace: public,test - clusterName: dst connectKeyList: - mse-xxxxxx-nacos-ans.mse.aliyuncs.com:8848 clusterType: NACOS tasks: - source: src destination: dst type: Service mode: Bidirectional serviceMatchPattern: ".*" autoScanAndAddService: trueRun the following command to import the configuration.
./bin/msesyncCMD.sh apply -f {path_to_configuration_file}Mount or place the configuration file in
MseSync/conf/config.yamland start MSE Sync. When MSE Sync starts, it automatically initializes the configuration file and begins the data migration.
NoteThe configuration file can be automatically generated by configuring a migration task on the Cloud Migration page in the MSE console.
When you configure synchronization by importing a file, newly added services are automatically synchronized.
Configuration fields
The following sections describe the clusters and tasks fields. Both fields are of the List type.
Clusters field description
Field | Description | Example value |
clusterName | The cluster name. Note Cluster names in the configuration must be unique. | sourceCluster |
clusterType | The cluster type. |
|
namespace | The Nacos namespace name. Note You can enter multiple namespaces, separated by commas. |
|
connectKeyList | The access Endpoint for the cluster. This is a List type. | |
userName | The Nacos username. | None |
password | The Nacos password. | None |
Tasks field description
Field | Description | Example value |
source | The source cluster name. | None. |
destination | The target cluster name. | The namespace of the target cluster is automatically kept consistent with that of the source cluster. If the corresponding namespace does not exist in the target cluster, MSE Sync automatically creates it. |
type | The synchronization type. |
|
mode | The synchronization mode. |
|
serviceMatchPattern | The regular expression to match the services that you want to synchronize. | By default, all services are synchronized. |
autoScanAndAddService | Specifies whether to automatically scan for and synchronize new services added to the source cluster. | The default value is True. |
FAQ
A sync task was successfully added through the UI or a YAML file, but it does not appear in the task list.
Reason: MSE Sync cannot find the service. This can occur if no services exist in the source cluster's namespace or if the namespace ID was entered incorrectly. Verify that the cluster configuration is correct and that service instances (service providers) exist in the specified namespace.
Notes on taking a service provider offline during two-way synchronization.
During two-way synchronization, if you take a service provider offline from the console of the target instance, the offline status is not synchronized to the source instance.
Description of additional YAML configuration fields
Clusters field:
Field
Description
Example value
namespace
The Nacos namespace name.
Note: You can enter multiple namespaces, separated by commas. If this field is left empty and the instance is the synchronization source, data from all namespaces in the instance is synchronized.
public
test
test1
ak
The AccessKey for authenticating the cloud MSE Nacos instance.
LTAI5***********dXai6
sk
The AccessKey secret for authenticating the cloud MSE Nacos instance.
Jdvdj*************6vs7wBEKO