All Products
Search
Document Center

Alibaba Cloud Model Studio:Knowledge base

Last Updated:Dec 18, 2024

Large language models (LLMs) lack private and real-time knowledge, which can be solved by Retrieval-Augmented Generation (RAG). RAG retrieves information from external sources based on user input to enhance the accuracy of LLM responses. Alibaba Cloud Model Studio provides the knowledge base feature that uses RAG capabilities to retrieve private and real-time knowledge.

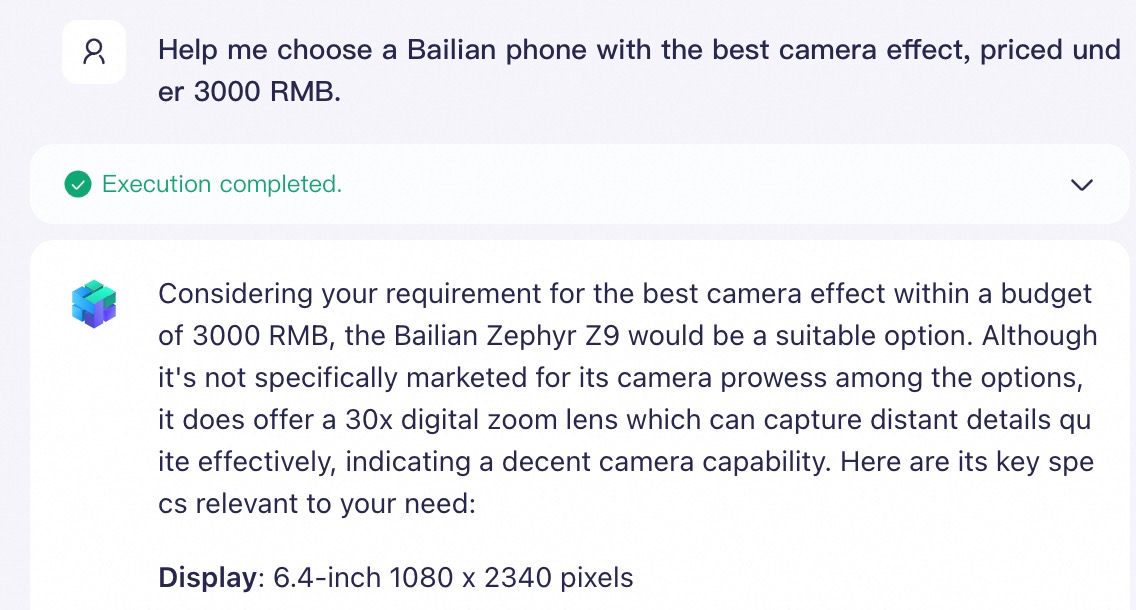
Application without private knowledge base

Without a private knowledge base, the LLM cannot accurately answer questions about "Bailian phones".

无

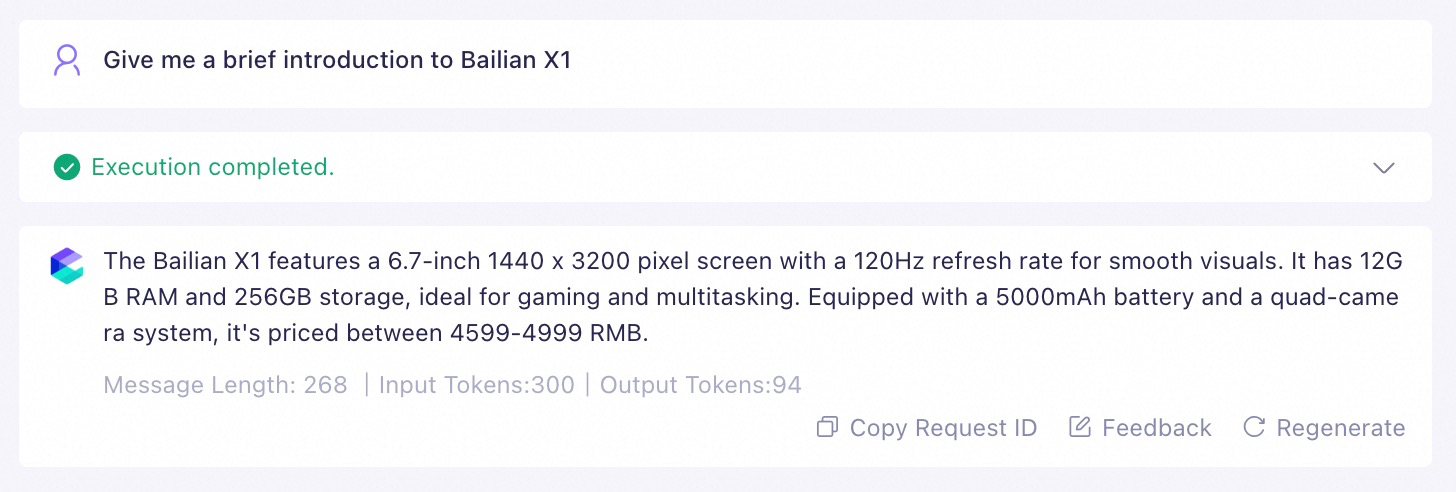
Application with private knowledge base

With a private knowledge base, the LLM can provide accurate answers to questions about "Bailian phones".

有

Supported formats

The knowledge base feature supports documents in the following formats:

  • Unstructured Data (pdf, docx, doc, txt, markdown, pptx, ppt, png, jpg, jpeg, bmp, gif, xlsx, and xls)

  • Structured Data (xlsx, xls, and others)

The list above is not exhaustive. A complete list of supported types is displayed on the Import Data page of Data Management.

You can import local files (unstructured and structured data), from Object Storage Service OSS (unstructured data) or from ApsaraDB RDS (structured data). Data sources outside Alibaba Cloud, such as GitHub or Notion, are not supported.

Supported models

The following models support knowledge base:

  • Qwen-Max/Plus/Turbo

  • Open Source Qwen 2

The list above is not exhaustive and is subject to change. For the latest information, go to the application management page of My Applications. All models in the Select Model drop-down list support RAG.

Create and reference a knowledge base

Step 1: Import data

Before creating a knowledge base, import your documents into Data Management and choose from Unstructured Data and Structured Data.

The documents that are imported to Data Management are intended for temporary storage before being added to knowledge bases and do not support long-term preservation. Save the original documents properly.
If you want to build a knowledge base from an RDS data table, go to Step 2: Create a knowledge base.
You can import data by using the console or the API. However, the API supports only unstructured data. For more information about the API, see AddFile.

Unstructured data

  1. Go to the Data Management page of the console and select the Unstructured Data tab.

  2. In the Category Management section on the left, select the desired category for data import.

    Select the Default Category or click image to create a new category. The number of categories is not limited.
    You can upload up to 10,000 documents to each workspace.

    image

  3. Click Import Data to go to the Import Data page.

  4. Select Upload Local File or OSS as the Import Method.

    Model Studio does not support OSS buckets in the following classes: Archive, Cold Archive, and Deep Cold Archive. Buckets with content encryption and private buckets are supported.
    Before importing, you must first add the bailian-datahub-access tag to the bucket. For more information, see Import data from OSS.
  5. Configure Document Recognition. Use the default value Intelligent Document Parsing.

    The parser can detect and extract text from images within the document to create text summaries. These summaries, along with other content, are segmented and transformed into vectors for knowledge base retrieval.
  6. (Optional) Configure tags for the document.

    When calling applications by using API, tags can be specified in the request parameter tags to filter related documents, enhancing retrieval efficiency.
  7. Click Confirm to initiate the document parsing and importing process. This may take some time.

    Document parsing converts the uploaded document into a format that Model Studio can process. During peak periods, this process may take longer.
  8. Once parsing and importing are complete, click Details on the right side of the corresponding document to review the imported content.

Structured data

  1. Go to the Data Management page of the console and select the Structured Data tab.

  2. Create a new data table or select an existing one.

    You can create up to 1,000 data tables in each workspace. Each table can contain up to 10,000 rows, including the table header. Exceeding this limit will result in a failed import, so you may need to split the data in advance.
    Create a new data table

    Click image to create a data table.

    image

    1. Enter a name for the data table.

    2. Configure the table by Upload Excel File or Custom Header.

      • Upload Excel File: Model Studio automatically detects the table header in the uploaded Excel file and create the data table structure accordingly, importing the remaining content as data records.

      • Custom Header: Column Name and Type is necessary and Description is optional.

        Note
        • Once the data table is created, you cannot modify the Column Name, Description, or Type.

        • Make sure the table schema matches the schema of the data to be imported. For example, if the data table to be imported has 2 columns, the structure here must also have 2 fields with corresponding column names. Click New Columns or Delete in the Actions column to adjust the fields.

        • When you set Type to link, make sure the link directs to an image file that is publicly accessible and valid. Otherwise, the knowledge base cannot recognize the image.

          Example link format: https://example.com/downloads/pic.jpg
          When creating a knowledge base, the link type field is used to generate an image index. Model Studio accesses the image, extracts its features, and saves them as vectors after image embedding. These vectors are used for similarity comparison during knowledge base retrieval.

        image

    3. Upload your document.

      1. Click image to select and upload an Excel document (xlsx or xls format).

        The document must have a table header that matches the header structure of the current data table. Otherwise, the import will fail.
      2. Click Preview to review the imported data.

    4. Click Confirm. The new data table appears in the Table Management pane on the left.

      image

    Select an existing data table

    Select an existing table from the Table Management pane on the left and click Import Data.

    1. Select Upload and Overwrite or Incremental Upload as the Import Type.

      You can click Download Template to download a blank document with the table header. Then, insert data to the template and upload it directly.
    2. Click image to select and upload an Excel document (xlsx or xls format).

      The document must have a table header that matches the header structure of the current data table. Otherwise, the import will fail.
    3. Click Preview to review the imported data.

Step 2: Create a knowledge base

The number of knowledge bases is not limited for both enterprise and individual accounts.

Console

  1. Go to the Knowledge Base Index page. Click Create Knowledge Base.

    • Data Type: Select Unstructured Data or Structured Data.

      After the knowledge base is created, the data type cannot be changed. A single knowledge base cannot support both unstructured and structured data.
      Note

      Use Unstructured data:

      • The documents are in the pdf, docx, doc, txt, markdown, pptx, ppt, png, jpg, jpeg, bmp, and, gif formats.

      • The documents are in xlsx or xls format, but the table structures of different documents may not be entirely the same.

      • Import documents from Object Storage Service (OSS).

      Use Structured data:

      • The documents are in xlsx or xls format, and the table structure is completely consistent across different documents.

      • The document is in xlsx or xls format and will be used in FAQ-type scenarios. For example, the Excel document contains two columns, namely question and answer. Structured data allows you to restrict the question column for knowledge base retrieval and use the answer column as a reference for model responses (Unstructured data can hardly achieve this effect).

    • Configuration Mode: We recommend that you select Recommended, which is the best practice from the Model Studio team. If you select Custom, you can configure the retrieval and recall-related parameters.

      After the knowledge base is created, all parameters in Configuration Mode, except for Similarity Threshold, cannot be changed.

      Custom Parameter Settings

      image

      Multi-round Conversation Rewriting: When enabled, Model Studio automatically adjust the original prompt based on the context to improve retrieval effectiveness.

      Embedding Model: Converts the original prompt and knowledge text into numerical vectors for similarity comparison. The DashScope text-embedding-v2 model is the default and only option. The model supports multiple languages, including English and Chinese, and normalizes the vector results.

      Rank Model: An external scoring system that calculates the similarity score between the query and each chunk in the knowledge base, sorts them in descending order, and returns the top K chunks with the highest scores. For semantic ranking, select GTE-ReRank. For semantic ranking and text matching features, choose Official Ranking (recommended).

      Similarity Threshold: The minimum similarity score required for recalled chunks, used to filter the chunks returned by the Rank model. Lowering this threshold may recall more chunks, including less relevant ones. Increasing it reduces the number of recalled chunks, and may discard relevant ones.

  2. Click Next Step, select the documents or data source to import:

    Unstructured Data

    Select the files you want to import from Data Management. If no file is available, you must first import your files to Data Management. For more information, see Knowledge base.

    • Select Category: Import all documents under the selected category. You can select multiple categories at a time.

    • Select File: Select the files you want to import.

      You can select up to 50 documents at a time. Each document can be up to 100 MB in size or contain up to 1,000 pages.

    Structured Data

    Select the Data Source from Data Management or Associate RDS.

    If you import structured data from Data Management, you will need to manually synchronize updates to the data table to the knowledge base later. For more information, see Update the knowledge base.
    If you import structured data from ApsaraDB RDS, data updates in the RDS table will be automatically synchronized to the knowledge base (usually within seconds, but slight delays may occur during peak request periods).

    Data Management

    Select the table you want to import from Data Management. If no table is available, you must first import your table to Data Management. For more information, see Unstructured Data.

    Associate RDS

    Synchronize data from specific data tables in the RDS instance to your knowledge base.

    • Instance limitations:

      • Only RDS instances with MySQL Engine (no version restrictions) are supported. PostgreSQL and other engines are not supported.

      • No restrictions on instance regions.

      • Only Basic Edition and High-availability Edition are supported.

      • Database proxy is not supported.

    • Database and Table Limitations:

      • The knowledge base has no limit on the amount of data in the associated RDS database and data table, but the size of each row must be less than 10 MB.

      • DDL operations on the source table are not recommended after creating the knowledge base (For example, DROP TABLE, RENAME TABLE, TRUNCATE TABLE, ADD COLUMN, DROP COLUMN), because they may cause data synchronization failures between RDS and the knowledge base. For more information, see DDL operations.

    To ensure the knowledge base can import data from RDS, you need to configure whitelist for the RDS instance. After the RDS data table is associated, the table header and the first ten rows of data are displayed.

  3. Click Next Step to configure the Data Processing strategy.

    Unstructured Data

    Metadata Extraction: Metadata consists of additional attributes related to the content of unstructured documents, presented in key-value pairs.

    The role of metadata: Metadata provides context for documents, significantly enhancing the precision of knowledge base retrieval. For example, search for "Feature Overview of Product A" in the knowledge base. If all documents include "Feature Overview" but none mention "Product A", the knowledge base may recall numerous unrelated chunks. However, if you associate product name as metadata with all documents and their related chunks, the knowledge base can accurately filter out chunks related to "Product A" and containing "Feature Overview", thereby improving retrieval accuracy and reducing input token consumption.
    How to use metadata: When calling the application using API, specify the metadata_filter parameter. During knowledge base retrieval, the application will filter documents based on metadata.
    Note: You cannot configure Metadata Extraction again after the knowledge base is created.

    Configure Metadata Extraction

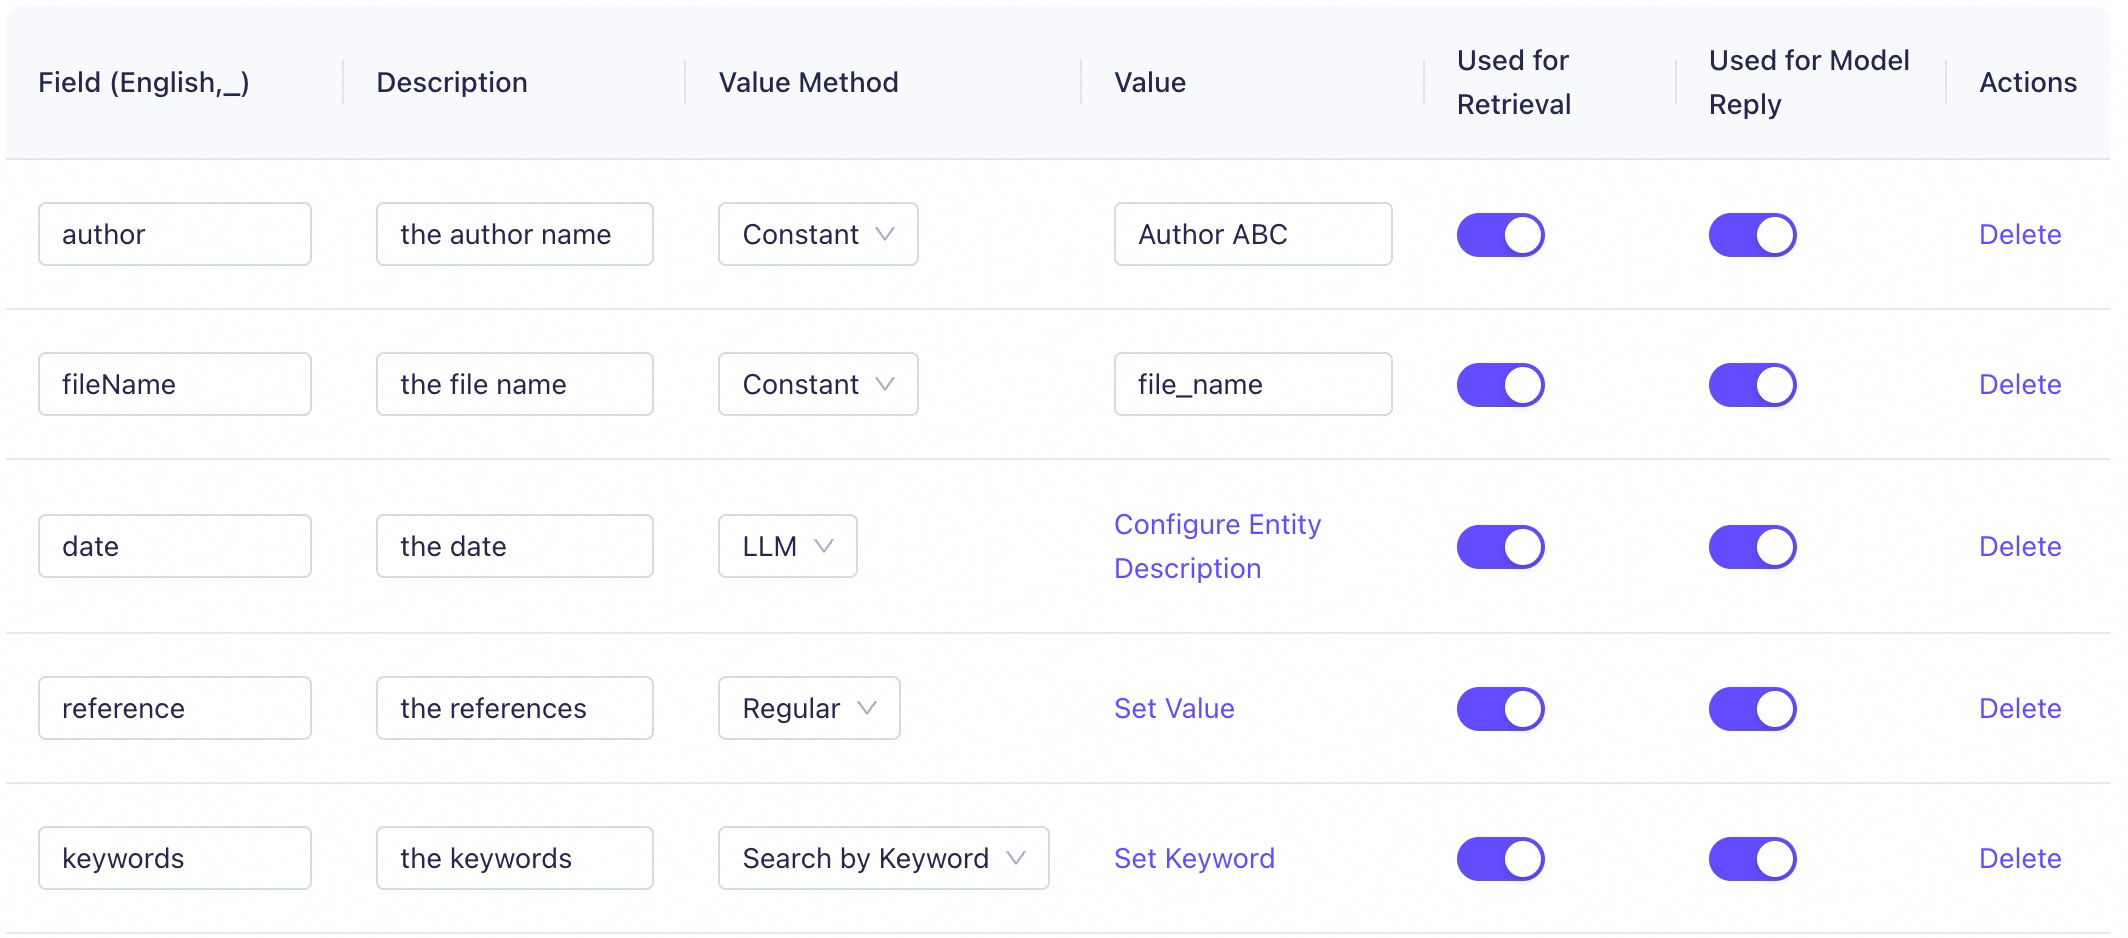
    The example below shows the metadata of a document, containing 5 custom attributes: date (all years in the document), reference (all references in the document), filename (the document name), keywords (keywords in the document), and author (the author information).

    image

    Enable Metadata Extraction, then click Meta Information Settings to attach uniform or personalized metadata to all documents in the knowledge base. The following image shows a metadata template as an example:

    image

    Description of the metadata template

    Value:

    • Constant: Attaches a fixed attribute to all documents in the knowledge base.

      For example, if all documents in the knowledge base share the same author, you can set author to constant.
    • Variable: Attaches a variable attribute to each document in the knowledge base. Valid values:

      • file_name: Attaches the name of the document to its metadata.

      • cat_name: Attaches the category name where the document is located to the metadata.

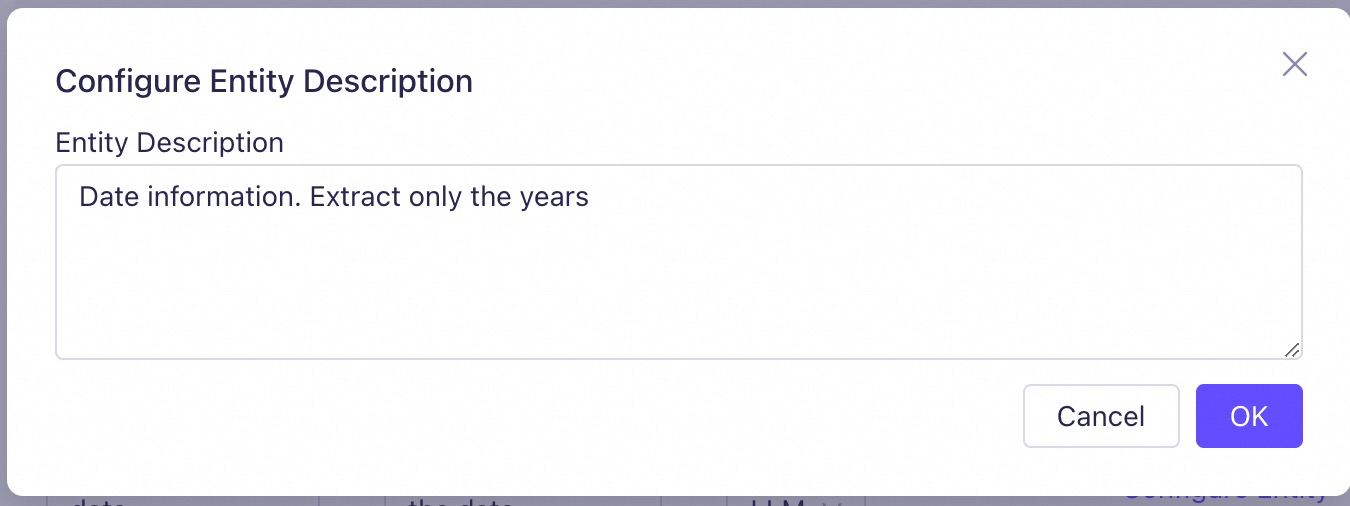
    • LLM: Matches the text content of each document in the knowledge base based on the Entity Description you specify. The system automatically recognizes and extracts relevant information from the document, then attach this information to the metadata.

      For example, to extract all years that appear in each document as a document attribute, set an LLM field named date and configure the following Entity Description:

      image

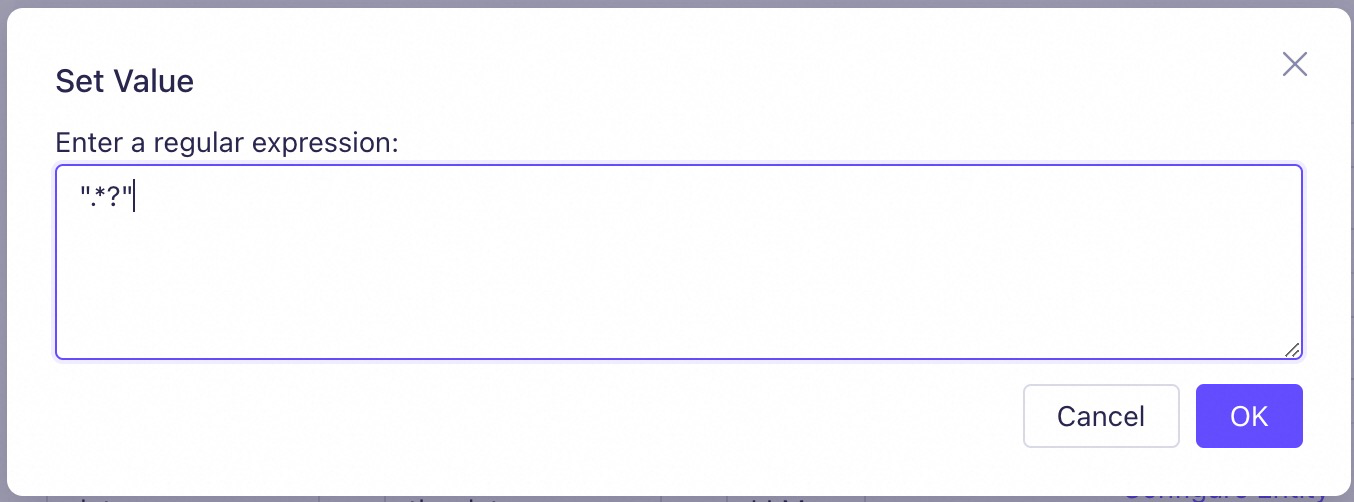
    • Regular: Matches the text content of each document in the knowledge base based on the regular expression you specify. Content that matches the expression is extracted and attached to the metadata.

      For example, to extract all references that appear in each document, assuming the references are enclosed in double quotation marks (""), set a regular field named reference and configure the following regular expression:

      image

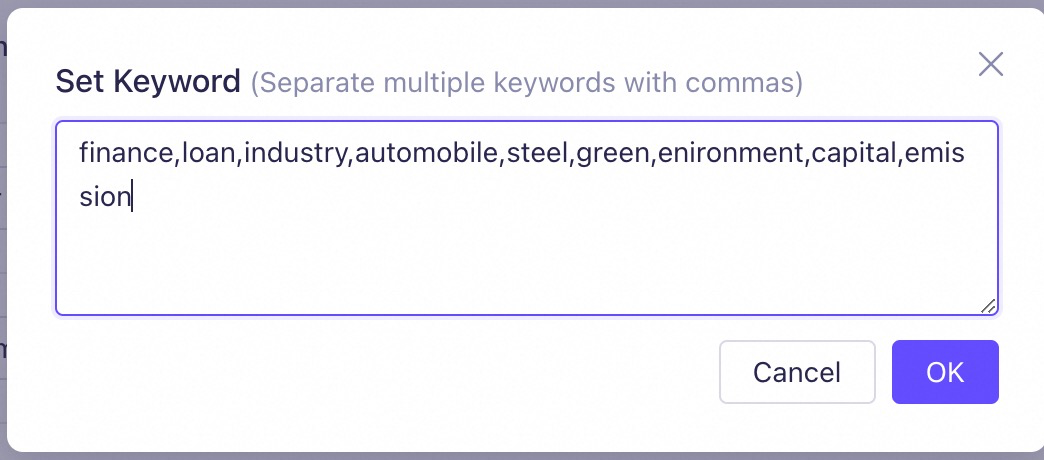
    • Search by Keyword: The system searches for preset keywords in each document and add the found keywords to the metadata.

      For example, set the following keywords:

      image

    Used for Retrieval: When enabled, this attribute is attached to all documents and their related chunks, used for knowledge base retrieval along with the chunks.

    Used for Model Reply: When enabled, this attribute is attached to all documents and their related chunks, used for response generation along with the chunks.

    Table Header Assemble for Excel Files: (Optional) We recommend that you enable this when all imported documents are of the xlsx or xls formats and contain table headers.

    When enabled, the knowledge base considers the first rows of all xlsx or xls documents as headers. The headers are then automatically removed to prevent the LLM from mistakenly processing headers as ordinary data rows.

    Document Splitting: Select Intelligent Splitting (recommended) or Custom Splitting.

    Role of document splitting: The knowledge base splits your documents into chunks and converts these chunks into vectors through the embedding model. The chunks and vectors are then stored in a vector database as key-value pairs. You can view the content of each chunk in the knowledge base. For more information, see View the knowledge base.
    Note: You cannot configure Document Splitting after the knowledge base is created. An inappropriate splitting strategy may reduce retrieval and recall performance. For more information, see How to evaluate the quality of chunks?.
    • Intelligent Splitting: Uses the built-in chunking strategy, evaluated to deliver the best retrieval performance for most documents.

    • Custom Splitting: If intelligent splitting does not work properly, you can customize the document splitting strategy.

      Custom Splitting parameters

      Clause Identifier: Split the document into small chunks according to one or more specified punctuations.

      Estimated Segment Length: The upper limit of the number of characters in a chunk.

      Segment Overlap Length: The length of the overlap between two consecutive segments. We recommend that you set it to 10% to 25% of the estimated segment length to maintain the semantic relevance between chunks and improve the recall quality of multiple chunks.

    Structured Data

    The following index configurations cannot be changed after the knowledge base is created.

    Parameter Name

    Parameter Description

    Used for Retrieval

    When enabled, that the knowledge base is allowed to search in this column data.

    Used for Model Reply

    When enabled, the retrieval results of this column will be used as input information when the LLM generates responses.

  4. Click Import.

API

  1. To build an unstructured knowledge base, use the CreateIndex API.

    You can not use the API to create a structured knowledge base. Please create such knowledge bases in the console.
    In the request return, the value of Data.Id is the primary key ID of the knowledge base. Please keep this value safe, as it will be used for all subsequent API operations related to the knowledge base.
    • In the StructureType field, specify the data structure type used to create the knowledge base. For unstructured data, pass in unstructured.

    • In the RerankModelName field, specify the name of the ranking model. For official reranking, pass in gte-rerank-hybrid.

      The rerank model is used to reorder the knowledge text results recalled from the knowledge base based on semantic relevance. Official Reranking is recommended.
    • In the SinkType field, specify the vector storage type of the knowledge base.

      The built-in vector database can meet basic needs. For advanced features such as management, audit, and monitoring of the database, ADB-PG (AnalyticDB for PostgreSQL) is recommended.
      • To specify the Built-in vector database, pass in DEFAULT.

      • To specify the ADB-PG (AnalyticDB for PostgreSQL) database, pass in ADB.

  2. The CreateIndex step initiates the knowledge base construction, but to finalize it, you must invoke the SubmitIndexJob interface. As this task requires some time to complete, you can monitor its progress by calling the GetIndexJobStatus interface. A return status of Data.Status as COMPLETED indicates the successful creation of the knowledge base.

Step 3: (Optional) Test the knowledge base

Hit Test is used to evaluate the semantic retrieval performance of a knowledge base under a given Similarity Threshold, for example, to check whether chunks are correctly recalled. The test helps determine whether further adjustment of the similarity threshold is needed to ensure that the LLM can obtain valid knowledge from the knowledge base. To perform a hit test, expand Hit Test (Optional) and take the steps.

Similarity Threshold: The minimum similarity score required for recalled chunks, used to filter the chunks returned by the Rank model. Lowering this threshold may recall more chunks, including less relevant ones. Increasing it reduces the number of recalled chunks, and may discard relevant ones.

Hit Test (Optional)

Recommended steps

  1. Design test cases that can cover common questions.

  2. Choose an appropriate similarity threshold based on the use scenario of the knowledge base and the quality of the documents.

  3. Perform the hit test and view the recall results of the knowledge base.

    Console

    1. Go to the Knowledge Base Index page, click Hit Test on the right side of the desired knowledge base.

      image

    2. Modify the Similarity Threshold and then enter keywords in the input box. Click Test to start the test.

    3. In the Recall Result section, view the hit situation of the keywords (sorted in descending order of similarity value). Click each chunk to view the corresponding chunk content.

    4. Click View Recall History to view the recall history of the keywords.

    API

    Call the Retrieve operation to retrieve data from a specified knowledge base.

    Before you call this operation, make sure that your knowledge base is created and is not deleted.
    We recommend that you set appropriate timeout and retry policy for requests if large-scale data retrieval is required.

    The RerankMinScore parameter specifies the similarity threshold.

  1. Adjust the similarity threshold of your knowledge base according to the recall results. For more information, see Modify the knowledge base.

Step 4: Associate the knowledge base

Go to My Applications and associate your knowledge base with your Agent Application or Workflow Application. Both applications support multiple knowledge bases simultaneously based on the multi-channel recall strategy.

Multi-channel recall strategy: If the application is associated with three knowledge bases, the system retrieves chunks related to the input from these bases, ranks them with the Rank model, and selects the top K most relevant ones as the reference for the LLM.

Agent Application

Scenario

This is an example of a Q&A agent application based on a knowledge base. The knowledge base effectively provides private and the latest information for the LLM. Such an application is suitable in scenarios such as personal assistants, customer service, and technical support.

image

Reference the knowledge base in an agent application

Go to My Applications and click Manage on the desired agent application card. Enable Knowledge Base Retrieval Augmentation. The corresponding prompt is automatically filled in Prompt. Click Configure Knowledge Base and add one or more knowledge bases.

image

Retrieval Configuration (Optional)

The following retrieval configurations work only for the current application.

  1. Assembly Strategy: Used to balance the comprehensiveness and performance of the knowledge base recall results, you can choose By Recall Quantity or Intelligent Assembly.

    Choose By Recall Quantity in scenarios with clear requirements for the amount of input information. Choose Intelligent Assembly to maximize the use of input space.
    • By Recall Quantity: You can configure both Number of Recalled Chunks and Maximum Length of Assembly. The system first splices the recalled chunks based on the number of recalled chunks, and then checks the overall length. If it exceeds the maximum length, the chunks are truncated.

    • Intelligent Assembly: You can configure only Maximum Length of Assembly. While ensuring the maximum length, the system recalls as many related chunks as possible.

    Parameter

    Description

    Number of Recalled Chunks

    The K value in the multi-channel recall strategy. It specifies the quantity of text chunks that the Rank model passes to the LLM. The value must not exceed the maximum length. Increasing the K value can enhance the precision of LLM responses at the cost of increased token consumption.

    Maximum Length of Assembly

    The upper limit of the assembled reference for the LLM. The chunks are truncated if excessing the limit and the excess part will be discarded. Increasing this value usually improves the coverage of the knowledge base, recalling more chunks that may be related to the user query, but it also increases the response delay for each question and answer.

  2. Response Range Setting: Controls the knowledge source referenced when the application responds, you can include or exclude the influence of the general knowledge of the LLM.

    • Knowledge Base + LLM Knowledge: The response integrates the knowledge retrieved from the knowledge base and the general knowledge of the LLM.

    • Knowledge Base Only: The response is strictly based on the knowledge retrieved from the knowledge base.

      • Knowledge Range Judgement: Choose Search Threshold or Search Threshold + LLM Judgement.

        If you choose Search Threshold, the search is based only on the similarity threshold. This method does not work well if the input keywords cannot precisely match the chunks in semantic terms. Instead, you can choose Search Threshold + LLM Judgement. The potential chunks are first filtered based on the similarity threshold, and then an LLM analyzes the relevance to further improve the accuracy.
        • Set Judgment Prompt: The rules used by the LLM to determine the relevance between the user input and the recalled chunks.

      • Not Processed in Knowledge Base: Choose Model Response or Fixed Reply.

        If you choose Model Response, the actual effect is the same as Knowledge Base + LLM Knowledge.
  3. Show Source: When enabled, all referenced sources are displayed in the response, but this increases the output token consumption.

    image

Workflow Application

Scenario

This is an example of a Q&A workflow application based on a knowledge base. The execution logic of the process is: First, perform knowledge retrieval in the knowledge base based on user query. The recalled chunks are then passed into the LLM node along with the query for answer generation.

image

Reference the knowledge base in a workflow application

Go to My Applications and click Manage on the desired workflow application card.

  1. Configure upstream node: Create a Knowledge Base node and connect it to the Start node.

    image

  2. Select query variable: In the Input dropdown list of the Knowledge Base node, select query.

    For Q&A workflow applications, the sys.query variable of the Start node is usually selected as the query variable.
  3. Select Knowledge Base: In the Select Knowledge Base dropdown list, select the knowledge base to be referenced.

  4. Adjust topK (optional): The K value of the multi-channel Recall Strategy. It specifies the quantity of text chunks that the Rank model passes to the LLM. The value must not exceed the maximum length. Increasing the K value can enhance the precision of LLM responses at the cost of increased token consumption.

  5. Configure downstream node: Create an LLM node and set it as the downstream node of the Knowledge Base node. In the Prompt of the large model node, guide the LLM to refer to the knowledge base.

    System Prompt:
    # Knowledge base
    Remember the following materials that may help you answer questions:${Retrieval_xxxx.result}
    
    User Prompt
    ${sys.query}
    Enter / to replace {{Retrieval_xxxx.result}} and {{sys.query}} to the actual variables in your workflow.
  6. Click Test or Publish. When the user asks a question, if the knowledge base node matches related chunks, the chunks are filled into the system variable sys.query to assist the LLM node in generating a response. If no related chunks are matched, the LLM node directly respond to the system variable sys.query.

Manage and maintain the knowledge base

View the knowledge base

Console

View the full list of knowledge bases, search for a specific knowledge base, and view the basic information, configuration, and content of a specified knowledge base.

  1. Go to the Knowledge Base Index page, you can:

    • Find a knowledge base: Enter the knowledge base name in the search box, then click image to find the knowledge base.

    • View knowledge base ID: Hover the cursor over image to display the knowledge base ID. Click image to copy the knowledge base ID. image

    • View the number of knowledge entries and the latest update time: The Number of Entries and Updated At columns shows the total number of knowledge entries in the knowledge base and the time of the last content update.

  2. Click View on the right side of the desired knowledge base.

    image

    • For an unstructured knowledge base, on this page you can:

      • View knowledge list: The page displays the full list of documents imported into the knowledge base, as well as their sizes, statuses, import times, and other information.

      • View the chunks of each document: Click View in the Actions column, and you can:

        • View all chunks of the document.

          You cannot view the historical version of chunks.
        • Modify the content of chunks.

          After you click save, the original content becomes invalid, and the new content is used for knowledge base retrieval.
        • Enable or disable specific chunks.

          The knowledge base cannot search in disabled chunks.

          image

      • Manage tags: Add or delete tags.

      • View metadata: View the metadata of the document.

        After the knowledge base is created, metadata cannot be modified.
    • For a structured knowledge base, on this page you can:

      • View the schema and data of the data table: The page displays the schema of the current knowledge base, including all column names, and fully presents the imported structured data.

      • View the index of the data table: Click View Index at the top right of the data table. Index configuration cannot be modified.

        image

API

  • View the list of knowledge bases

    Call the ListIndices operation to obtain a list of knowledge bases in a specified workspace. This operation provides details on each knowledge base, including their configuration statuses.

  • View the chunk list of a specified knowledge base

    Call the ListChunks operation to query detailed information on all text chunks within a document in an unstructured knowledge base. The operation queries detailed information on all text chunks of a structured knowledge base.

    Before you call this operation, make sure that your knowledge base is created and is not deleted.

Modify the knowledge base

After creating a knowledge base, you can customize and modify basic information and some configurations. You cannot use API to edit knowledge bases.

  1. Go to the Knowledge Base Index page.

  2. Click Modify on the right side of the desired knowledge base to enter the Modify Knowledge Base page, where you can modify the Name, Description, and Similarity Threshold.

Update the knowledge base

You can update the knowledge base by supplementing private knowledge, introducing the latest information, and removing outdated information. Regular updates help maintain the accuracy and timeliness of the knowledge base.

Console

Unstructured knowledge base

  1. Update documents

    To add or delete documents, you can directly add or delete the document as described below. If you want to modify the content of existing documents in the knowledge base, delete the old version first, and then import the new version.

    • Import documents: Go to the Knowledge Base Index page, click View on the right side of the desired knowledge base. Then, click Import Data. For more information, see Import unstructured data.

    • Delete documents: On the knowledge base details page, click Delete in the Actions column of the desired document. The imported data in Data Management is not deleted.

      Click Batch Management to delete one or more documents at a time.
    • Manage chunks (Optional): If you need to disable, enable, or modify the chunks of imported documents, you can click View on the right side of the document to manage the chunks.

      image

      • You can not Add new chunks.

      • View all chunks of the document.

        You cannot view the historical version of chunks.
      • Modify the content of chunks.

        After you click save, the original content becomes invalid, and the new content is used for knowledge base retrieval.
      • Enable or disable specific chunks.

        The knowledge base cannot search in disabled chunks.
    • Update document tags (Optional): Click Tag in the Actions column.

  2. Apply changes

    Your document updates and content modifications to the knowledge base take effect automatically in real time.

  3. Reference knowledge base

    Your changes take effect automatically in real time to all applications associated with the knowledge base.

Update structured knowledge base

If you import structured data from ApsaraDB RDS, skip the following content. Data updates in the RDS table are automatically synchronized to the knowledge base usually within seconds. But slight delays may occur during peak request periods.
  1. Update data table

    A structured knowledge base can be associated to a single data table in Data Management. To insert new entries, import a document with the table header and new data. To update or delete existing entries, import a document that includes the table header and full new data. Each table can contain up to 10,000 rows, including the table header. Exceeding this limit will result in a failed import, so you may need to split the data in advance.

    If you do not have a complete copy of data, you can first download the full data to your local device. Modify it and import again. Go to Data Management, select the Structured Data tab. Select the desired data table and click image to download the full data of this table in xlsx format to your local device.
    • Import data

      1. Go to Data Management, select the Structured Data tab.

      2. Select the desired data table then click Import Data.

      3. Select Incremental Upload (add data based on existing data) or Upload and Overwrite (overwrite all data in the table with the new data).

      4. Click image to select and upload the document.

        The document must have a table header that matches the header structure of the current data table. Otherwise, the import will fail.
        You can click Download Template to download a blank document with the table header. Then, insert data to the template and upload it directly.
      5. Click Preview to view the imported data.

      6. Click Confirm.

    • Manage chunks (Currently not supported)

  2. Apply changes

    Go to the Knowledge Base Index page, click View on the right side of the knowledge base that needs updating. Click the image icon at the top left of the data table, then click Confirm to synchronize the latest data from the imported data table to the knowledge base.

    If you update the data in the data table associated with the knowledge base on the Structured Data tab of Data Management in the future, repeat the above steps for synchronization. The console does not support automatic synchronization.
  3. Reference knowledge base

    Your changes take effect automatically in real time to all applications associated with the knowledge base.

API

  • Add documents to the knowledge base

    You cannot use APIs to manage stuctured knowledge bases. Use the console instead.

    To add new documents to an existing knowledge base, use the SubmitIndexAddDocumentsJob interface.

    Before you call this operation, make sure that your knowledge base is created and is not deleted. That is, the primary key ID of the knowledge baseIndexIdis valid.
    Call AddFile first to upload documents and obtain theFileId with ListIndexDocuments.
    • Task execution may take some time. Call GetIndexJobStatus to check the status of the task. When the task is done, the Data.Status parameter in the return is COMPLETED.

    • The document list (Documents) in the return contains all the documents you added this time, and you can check whether each document was imported.

    • You can also use ListIndexDocuments to retrieve the list of documents and their import status for a knowledge base.

  • Delete documents from the knowledge base

    To delete specific documents from the knowledge base, invoke the DeleteIndexDocument interface.

    Only documents with a status of INSERT_ERROR or FINISH can be deleted.
    You must specify the document ID FileId of the document to be deleted.

You may encounter the following questions when using the above APIs to update the knowledge base.

Question

Answer

When updating the knowledge base, is it necessary to call the above API interfaces in a specific order?

Whether you need to call the APIs in order depends on your business needs and update strategy. Below is an example of a possible API call order when updating the knowledge base:

  1. Begin by AddFile to upload documents to Data Management.

  2. Next, use SubmitIndexAddDocumentsJob to initiate a document addition task, ensuring the latest version of the document is synchronized with the knowledge base.

  3. Next, use GetIndexJobStatus to periodically check and ensure the document addition task has finished.

  4. Finally, call DeleteIndexDocument to remove the outdated document version.

Is it necessary to call DeleteIndexDocument to remove the outdated document versions?

Whether you need to delete old documents depends on your specific update strategy. If you need to ensure that the documents in the knowledge base are always up-to-date and old knowledge is no longer applicable, we recommend that you delete the outdated versions to avoid old knowledge being mistakenly retrieved.

Does Model Studio support the recording and query of API operation logs for the above addition and deletion operations?

The knowledge base function does not integrate API log recording and query functions. Therefore, you need to integrate a logging mechanism and verification logic in your own application to ensure the integrity of the knowledge.

Delete the knowledge base

If you no longer need a knowledge base, you can delete it. This operation will not delete the data imported in Data Management.

Console

  1. Go to the Knowledge Base Index page, click Delete on the right side of the desired knowledge base.

    image

  2. If the knowledge base is associated with an application, you need to dissociate it first.

    1. Go to My Applications, find the application and click Manage.

    2. Unselect the knowledge base. Then try deleting the knowledge base again.

API

To remove a knowledge base index, use the DeleteIndex operation.

If the knowledge base is associated with an application, you need to dissociate it first. This operation can only be completed through the console. For more information, see the Console tab.

FAQ

How to configure whitelist for an RDS instance?

To configure whitelist for an RDS instance, follow these steps:

  1. Go to the RDS Console, choose Instances in the left-side navigation pane, then click the RDS instance containing the data table.

  2. Click Database Connection in the left-side navigation pane, and click Configure Whitelist next to Public Endpoint. If your RDS instance has not enabled public access, click Apply for Public Endpoint and follow the guidance to enable it. image

  3. Click Create Whitelist and add all the following public IP addresses of DTS and Model Studio knowledge base to the whitelist group. Otherwise, data synchronization failures may occur:

    • All of DTS public IP addresses in the Singapore region, see: DTS IP Address segments.

    • The public IP address of Model Studio knowledge base: 47.245.110.18.

  4. Click Confirm, and the whitelist takes effect.

Does Model Studio support automatic update for knowledge bases?

For structured data, associate your knowledge base with ApsaraDB RDS to enable automatic updates. For more information, see Step 2: Create a knowledge base.

For unstructured data, implement automatic update by integrating OSS, Function Compute (FC), and the knowledge index API in the following steps:

  1. Create a bucket: Go to the OSS Console and create a bucket to store your documents.

  2. Create a knowledge base: Create a unstructured knowledge base in Model Studio.

  3. Create a custom function: On FC, set up a function to handle document change events, such as additions and deletions. For more information Create a web function. This function calls Model Studio APIs to update knowledge bases from OSS. When using the APIs, you may want to ask the following questions:

    Issue

    Description

    Is a specific order required when calling the API interfaces to update the knowledge base?

    The necessity of a specific API call order depends on your business requirements and update strategy. Here is an example sequence for updating the knowledge base:

    1. Start by importing documents into Bailian's Data Management using the AddFile interface.

    2. Proceed with the SubmitIndexAddDocumentsJob interface to initiate an add document task and synchronize the latest document version to the knowledge base.

    3. Next, use the GetIndexJobStatus interface to monitor and ensure the add document task is complete.

    4. Conclude by employing the DeleteIndexDocument interface to remove the outdated document version.

    Is it necessary to use the DeleteIndexDocument interface to delete old document versions from the knowledge base during updates?

    Whether to use this interface for deletion depends on your update strategy. If maintaining current knowledge in the knowledge base and eliminating outdated information is critical, deleting old documents is advisable to prevent retrieval errors.

    Does Bailian support API operation log recording and viewing for addition and deletion operations?

    Bailian's knowledge base functionality does not currently include integrated API log recording or querying. Implementing a logging mechanism and validation logic within your application is essential to maintain knowledge integrity.

  4. Create an OSS trigger: Associate the custom function from the previous step with an OSS Trigger on FC. When a document change event occurs, such as a new upload to OSS, the trigger prompts FC to execute the relevant function. For more information, see Triggers.

Is my knowledge base private? Can other companies or users access it?

Your knowledge base remains private and is exclusively accessible to your current account. It is not available to the public. Furthermore, users in sub-workspaces cannot access the knowledge bases in the default workspace, but users in the default workspace can view and use knowledge bases from all sub-workspaces.

Does Model Studio use my account's knowledge bases to respond to other users?

No, Model Studio does not use the knowledge bases of your account to respond to other users.

How to organize the content in unstructured documents to improve knowledge base retrieval performance?

We recommend that you use file formats such as txt or md, which are more easily parsed. Organize the document content with distinct titles and paragraphs, and use lists and numbering to structure information, emphasizing key terms and concepts.

Can I download the knowledge bases to my local devices?

No, you cannot download the knowledge bases to your local devices.

Can I delete documents or data tables in Data Management without affecting the knowledge bases?

Unstructured data can be removed, because the copies in Data Management and the knowledge base are independent. However, you cannot delete structured data. Otherwise, the structured knowledge base cannot function properly.

Am I billed for the knowledge base based on the document's text token count?

Step

Billing

Import data

Free

Creat knowledge base

Free

Test knowledge base

Free

Reference knowledge base

When you use an application, the recalled chunks from the knowledge bases increase the input token for the LLM, thus causing extra fees.

Manage and maintain knowledge base

Free

How to evaluate the quality of chunks?

Before integrating the knowledge base with your application, we recommend that you manually inspect the chunks for quality. For more information about how to view the chunks, see View the knowledge base. During your evaluation, pay attention to the following common issues:

Excessively short chunks

Excessively long chunks

Clear semantic truncation

Chunks that are too short may result in a loss of meaning, preventing accurate matches.

Chunks that are too long can introduce irrelevant information, diminishing the precision of matches.

Improper chunking that truncates semantics can lead to incomplete information retrieval.

How does Model Studio handle DDL operations on the RDS source table, such as DROP TABLE, RENAME TABLE, TRUNCATE TABLE, ADD COLUMN, and DROP COLUMN?

  • DROP TABLE: Deleting the source table does not automatically remove data from the knowledge base. To delete the knowledge base, you must do so manually, see Delete the knowledge base. If a new table with the same name is created, the new table resumes automatic synchronization with the knowledge base, but only through incremental synchronization, capturing new data changes.

  • RENAME TABLE, ADD COLUMN, DROP COLUMN: Modifying the name of the source table causes the synchronization to stop. If the original table name is restored, synchronization will resume, again only through incremental synchronization. During the interim, no data changes will be synchronized. Note that field changes in the source table will not update the knowledge base. As a result, newly added fields are not retrievable in the knowledge base. To avoid these issues, consider creating a new knowledge base when altering the source table.

  • TRUNCATE TABLE: Truncating the source table does not delete corresponding data in the knowledge base.