Before you can build a knowledge base, you must import your knowledge data into Alibaba Cloud Model Studio. This data serves as the initial source for your knowledge base.
Console restrictions: Only International Edition users who created applications before April 21, 2025 can access the Application Development tab, as shown in the following figure.
This tab contains the following features: Applications (agent application and workflow application), Components (prompt engineering and plug-in), and Data (knowledge base and application data). These are all preview features. Use them with caution in production environments.

API call limits: Only International Edition users who created applications before April 21, 2025, can call the application data, knowledge base, and prompt engineering APIs.
User guide
Import local files
Go to the File tab.
In the Category Management section on the left, select an existing category or click the
 icon to create one.
Alibaba Cloud Model Studio uses categories to manage imported files.
Click Import Data. On the Import Data page, set the import method to Upload Local File.
The platform does not currently support the direct import of JSON, CSV, or YAML files. You must convert these files to the XLSX or XLS format before importing them.
Select a Parsing Method from Default Settings or Custom Settings. When choosing Custom Settings, you can set parsing rules for specific formats to improve performance.
(Optional) Configure Tags for the file.
calling an application using an API, you can specify tags in the
tagsrequest parameter. The application then filters relevant files by these tags when retrieving information from the knowledge base to improve retrieval efficiency. For agent applications, you can set tags when you debug the knowledge base in the console.Click Confirm to begin parsing and importing the data. You can view the task progress on the page.
The file is converted into a format that Model Studio can process. This process may take several hours during peak business hours. Please wait for the process to complete.
After the import is complete, click Details next to the file to view it.
After a file is imported into Model Studio, it is stored as an independent replica in the free storage space provided by the platform. This replica is not associated with the original raw data, and no capacity limit is imposed.
You can view only files that were imported within the last 90 days. After this period, the imported files cannot be viewed, but they are not deleted.
Imported files can be used only by users in the current workspace. Model Studio does not use them for any commercial purposes or make them public.
Import local tables
Go to the Table tab.
In the Table Management section on the left, select an existing data table or click the
 icon to create a new one.
Alibaba Cloud Model Studio manages imported data using data tables.
Import to a new data table
Enter a Table Name. Then, configure the table schema by choosing to Upload Excel File or use Custom Header.
Upload Excel: Model Studio automatically detects the table header in the uploaded file, uses the header to create the data table schema, and imports the remaining content as data records into the table.
Custom Header: The Column Name and Type fields are required. The Description field is optional.
ImportantThe structure of the data table, including the column name, description, and type, cannot be modified after it is confirmed.
The schema of the uploaded file, including the number of columns and column names, must exactly match the schema of the target data table. Otherwise, the import fails. For example, if the data table to be imported has two columns, you must configure two fields for the table schema with identical column names. You can add or remove fields by clicking New Columns or Delete in the Actions column.
To help the model understand the meaning of each field, provide a clear, natural-language description in the "Description" field. For example, you can specify that the
agefield represents a user's age.If you set the field type to
image_url, ensure the value is a publicly accessible image URL. The knowledge base retrieves the image from this URL to generate a vector index, which is used for scenarios such as search by image.Example image_url format: https://example.com/downloads/pic.jpg
When you create a knowledge base, fields of the image_url type are used to generate an image index. Model Studio accesses the target image, extracts its features, converts the features into a vector using image embedding, and then saves the vector. During knowledge base retrieval, this vector is compared with the vector of the user-uploaded image for similarity.
Click the
 icon to select and upload a file (XLSX or XLS format).
The file must contain a table header. Otherwise, the import fails.
The platform does not currently support the direct import of JSON, CSV, or YAML files. You must convert these files to the XLSX or XLS format before importing them.
Click OK to start the import. The new data table will then appear in the Table Management navigation tree on the left.
Import to an existing data table
From the Table Management list on the left, select the data table and click Import Data.
Set the import type to Upload and Overwrite or Incremental Upload.
Click Download Template to download a blank file that contains only the table header. You can insert new data into this file and then use it for an overwrite or incremental upload.
Click the
 icon to select and upload a file (XLSX or XLS format).
The file must contain a table header that matches the structure of the header of the current data table. Otherwise, the import fails.
The platform does not currently support the direct import of JSON, CSV, or YAML files. You must convert these files to the XLSX or XLS format before importing them.
Import OSS files
Go to the File tab.
In the Category Management section on the left, you can select an existing category or click the
 icon to create a new one.
Alibaba Cloud Model Studio organizes imported files into categories.
Click Import Data to open the Import Data page. Set the import method to OSS.
When you import data from OSS to Alibaba Cloud Model Studio for the first time, you must complete the authorization as prompted and add the
bailian-datahub-accesstag to the target bucket. For more information, see Configure file import from OSS.Buckets of the Archive, Cold Archive, or Deep Cold Archive storage class are not supported.
Accessing files in the root directory of a bucket is not supported. Select an existing subdirectory or create a new one for Model Studio to access.
Buckets with content encryption are supported. Private buckets are supported.
If you want to use a bucket that has Referer hotlink protection enabled, you must add the domain name
*.console.aliyun.comto the Referer whitelist. For more information, see Allow access only from trusted websitesSelect a Parsing Method from Default Settings or Custom Settings. When choosing Custom Settings, you can set parsing rules for specific formats to improve performance.
(Optional) Configure Tags for the file.
calling an application using an API, you can specify tags in the
tagsrequest parameter. The application then filters relevant files by these tags when retrieving information from the knowledge base to improve retrieval efficiency. For agent applications, you can set tags when you debug the knowledge base in the console.Click OK. The system then begins to parse and import the data. You can monitor the task progress on the page.
The file is converted into a format that Model Studio can process. This process may take several hours during peak business hours. Please wait for the process to complete.
After the import is complete, click Details next to the file to view the results.
After a file is imported into Model Studio, it is stored as an independent replica in the free storage space provided by the platform. This replica is not associated with the original raw data, and no capacity limit is imposed.
Imported files can be used only by users in the current workspace. Model Studio does not use them for any commercial purposes or make them public.
Next step
More information
Configure file import from OSS
The first time you import files from OSS, you need to grant Model Studio access to your OSS resources. The authorization process is different for an Alibaba Cloud account and a RAM user.
Alibaba Cloud account authorization
Click Authorize Now, as shown in the following figure.

In the dialog box that appears, click Confirm Authorization. This automatically creates an OSS service-linked role that grants Alibaba Cloud Model Studio access to your OSS resources.
The authorization usually takes effect within seconds, but a slight delay may occur during peak hours.
What should I do if I receive the error 'This request failed. Try submitting again or contact an administrator. Error code: 10041495'?

Add the
bailian-datahub-accesstag to the target OSS bucket.This tag marks the buckets that Model Studio can access. Model Studio cannot access buckets that do not have this tag.
Log on to the OSS console. In the navigation pane on the left, click Buckets. Then, find the target bucket.
Hover over its
 icon, click Edit.
 On the Bucket Tag page, if no tags are set, click Create Tag. Otherwise, click Settings.
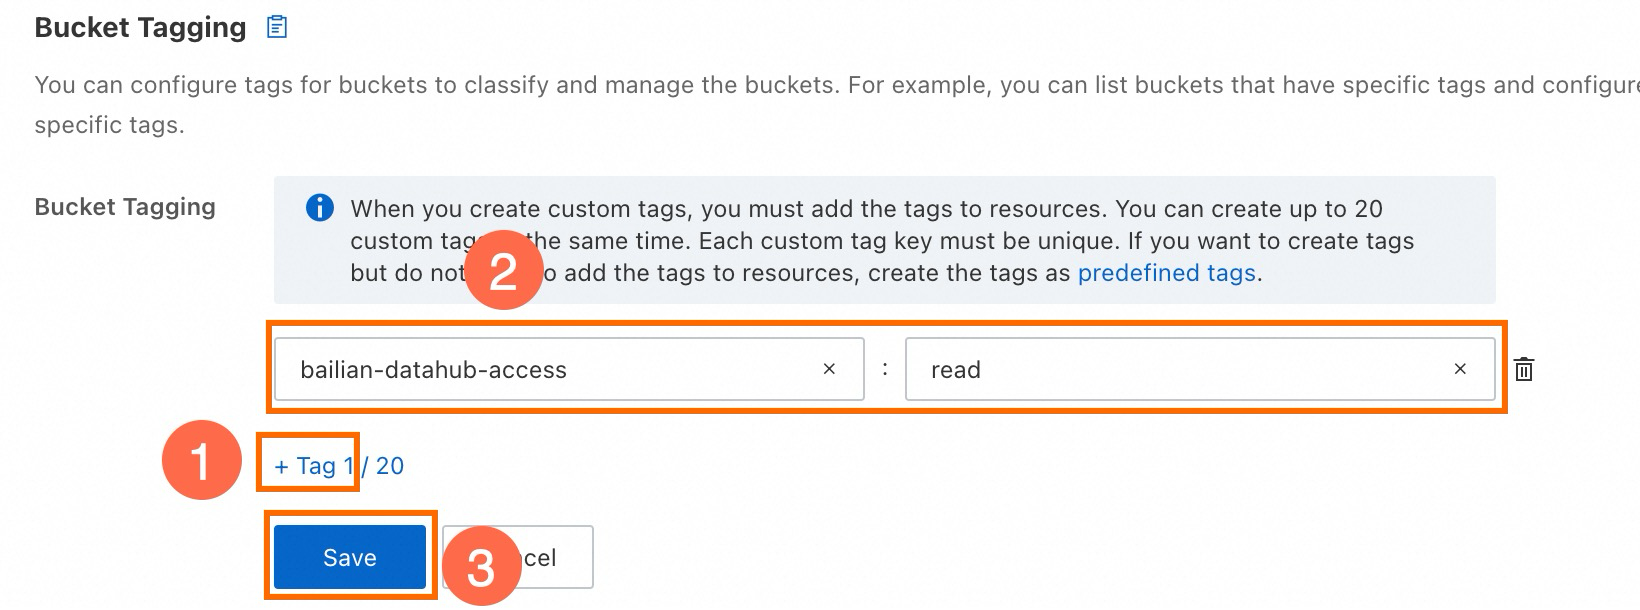
Click Tag, set the tag key to
bailian-datahub-accessand the tag value toread, and then click Save.
Return to the Import Data page, reselect the target bucket, and retry the import.
Note that Model Studio does not support accessing files in the root directory of a bucket. Select an existing subdirectory or create a new one for Model Studio to access.
RAM user authorization
Click Authorize Now, as shown in the following figure.

In the dialog box, click Confirm Authorization. If you receive an Authorization Failed or No Permission error, you must first grant the RAM user permission to create service-linked roles.
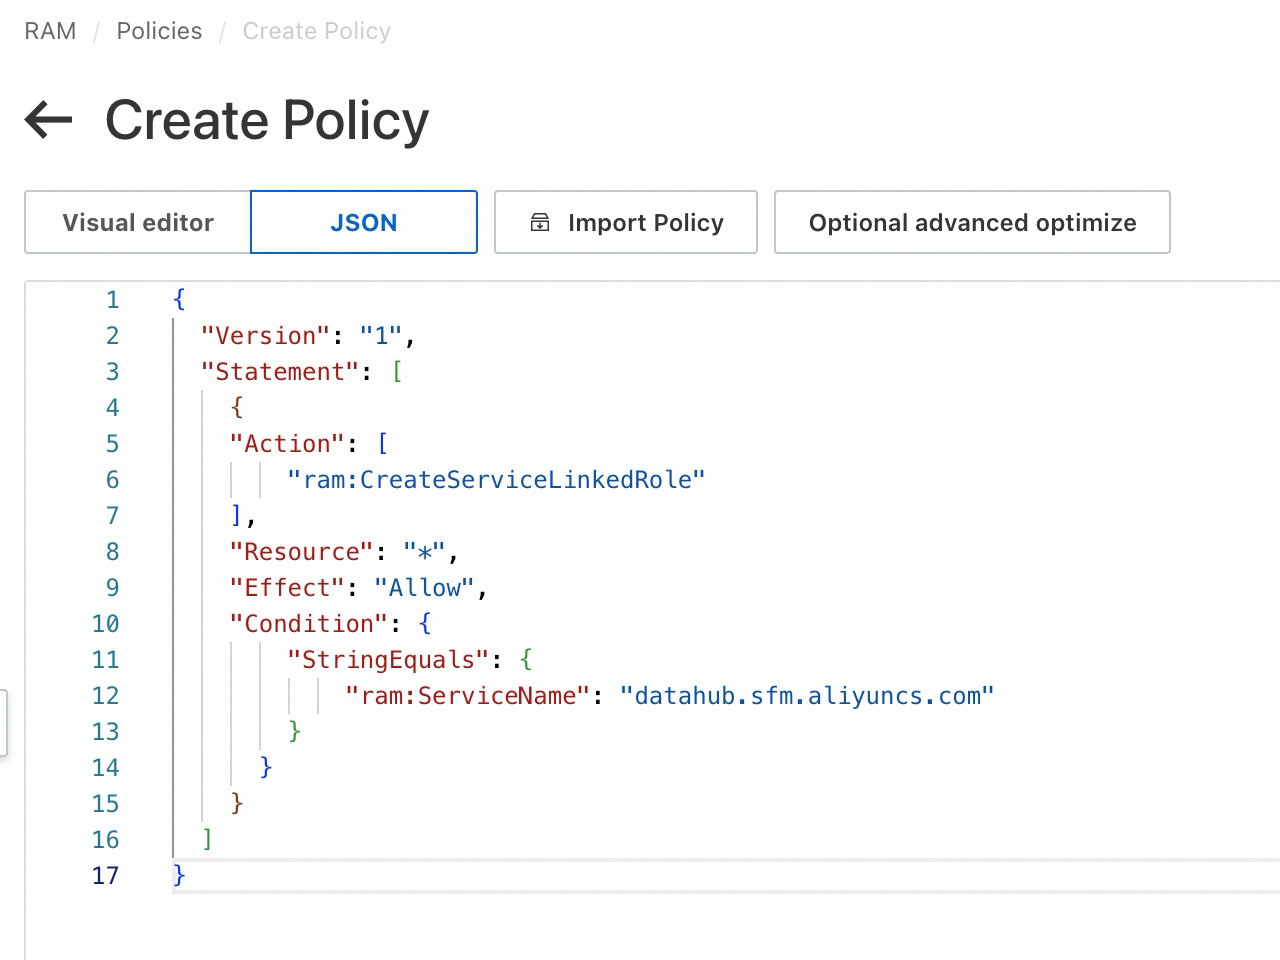
Log on to the RAM console. In the navigation pane on the left, select , and then click Create Policy.
Click the JSON tab. Copy and paste the following policy, and then click OK.
{
    "Action": [
        "ram:CreateServiceLinkedRole"
    ],
    "Resource": "*",
    "Effect": "Allow",
    "Condition": {
        "StringEquals": {
            "ram:ServiceName": "datahub.sfm.aliyuncs.com"
        }
    }
}
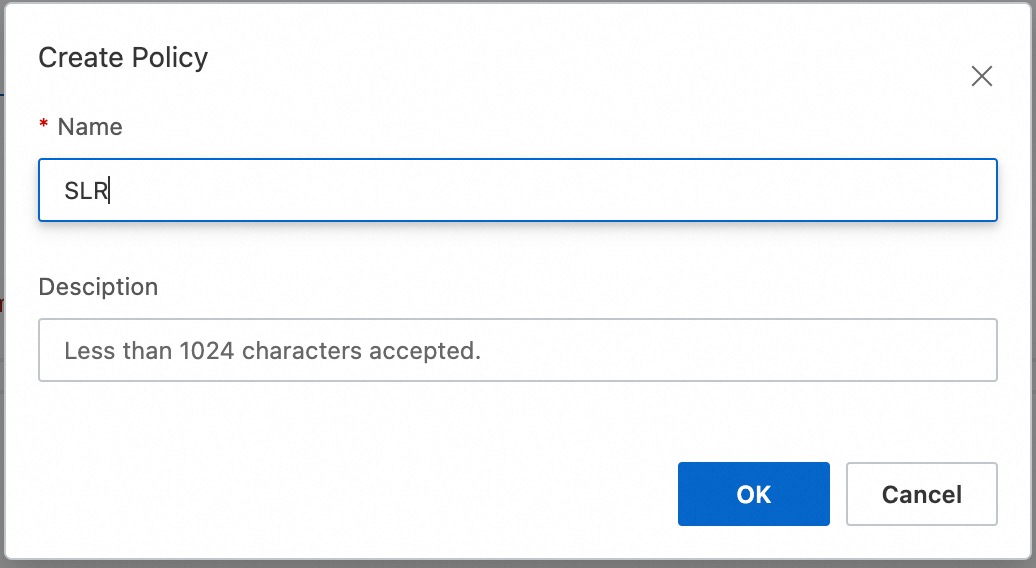
Enter a policy name and click OK.

In the navigation pane on the left, choose . On the page, find the RAM user that you want to authorize, and then in the Actions column, click Add Permissions.
In the access policy list, select the custom policy you just created and click Grant permissions. The RAM user now has permission to create service-linked roles.

Grant the RAM user permission to access OSS through Model Studio.
Return to the Import Data page and click Authorize Now.

In the dialog box that appears, click Confirm Authorization to automatically create the required OSS service-linked role.
The authorization usually takes effect within seconds, but a slight delay may occur during peak hours.
What should I do if I encounter the error "The request failed. Try to submit again or contact an administrator. Error code: 10041495"?

Add the
bailian-datahub-accesstag to the target OSS bucket.This tag marks the buckets that Model Studio can access. Model Studio cannot access buckets that do not have this tag.
Log on to the OSS console. In the navigation pane on the left, click Buckets. Then, find the target bucket.
Hover over the
 icon, click Edit.
 On the Bucket Tag page, click Create Tag if no tags are set. Otherwise, click Settings.
Click Tag, set the tag key to
bailian-datahub-accessand the tag value toread, and then click Save.
Return to the Import Data page, reselect the target bucket, and retry the import.
Note that Model Studio does not support accessing files in the root directory of a bucket. Select an existing subdirectory or create a new one for Model Studio to access.
Quotas and limits
For more information about supported data formats and capacity, see Knowledge base quotas and limits.

