This topic describes how to connect an inbound enterprise Active Directory (AD) as an identity provider. This connection lets you synchronize AD organizations and accounts to IDaaS and use AD identities to log on to IDaaS or applications.
About AD
Active Directory is a core directory service in the Microsoft Windows Server operating system. It provides centralized identity authentication, authorization, and directory management for enterprise network environments. Using the network endpoint feature, you can achieve AD data synchronization and delegated authentication without opening ports to the public internet.
Connect to AD
Step 1: Connect to AD
Log in to the IDaaS console. Select the target instance and click Manage in the Actions column.
Click , find AD in the list, and then click Add.

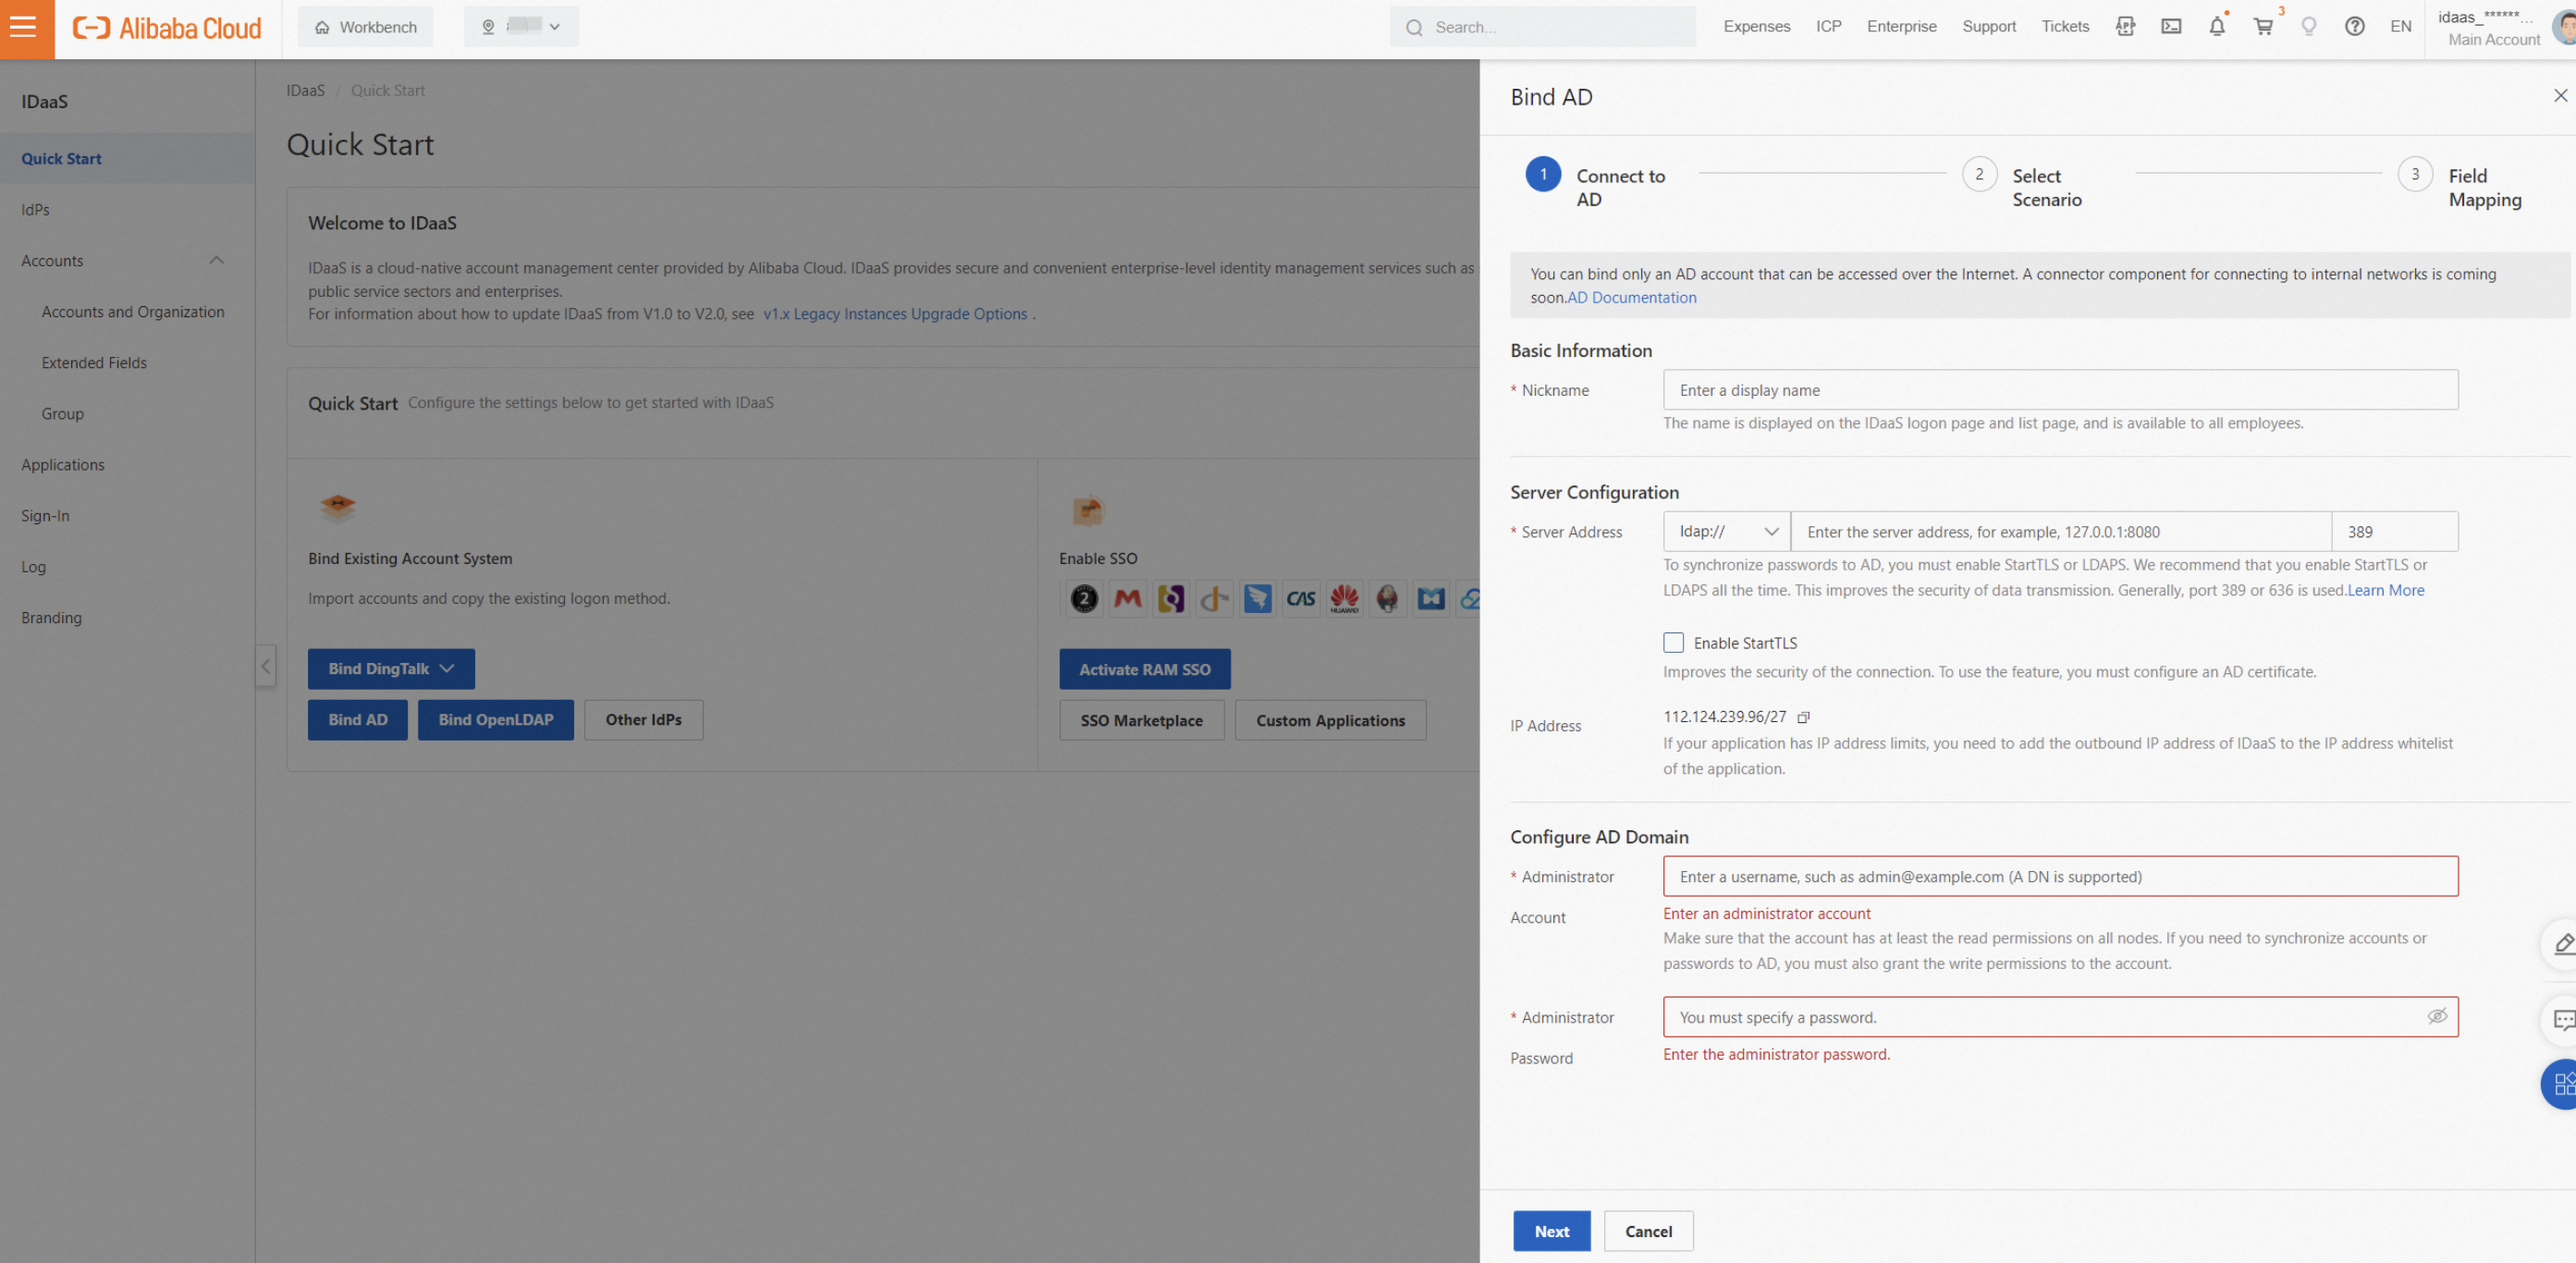
In the Connect to AD panel, configure the following parameters.

Display Name: The name displayed to users when they log on to and use IDaaS.
Network Access Endpoint: To allow IDaaS to access the AD server, you must add the outbound IP address of the IDaaS instance to the IP whitelist of the AD server. An IDaaS instance that uses a shared endpoint is provided with a shared, fixed public outbound IP address. An IDaaS instance that uses a dedicated endpoint is provided with a dedicated, custom private outbound IP address and a public outbound IP address. An IDaaS instance configured with a dedicated endpoint can access your Alibaba Cloud VPC over a private network. This lets you grant access to your AD without opening public ports. For more information, see Network Endpoints.
Server address: The address of the server where AD is located. AD typically uses port 389, for example, 127.0.0.1:389. Port 636 is typically used when LDAPS or StartTLS is enabled.
Enable StartTLS: We recommend that you enable this option to improve connection security. For more information, see the AD security configuration section of this topic.
Administrator Account: IDaaS uses this AD administrator account to read AD information for data synchronization or delegated authentication. The account must have at least read permissions. The User Principal Name (UPN) format, such as example@example.com, and the Distinguished Name (DN) format, such as cn=admin,ou=Technical Department,dc=example,dc=com, are supported.
Administrator Password: The logon password for the administrator account.
Step 2: Select a scenario
Select the features that you want to enable for AD.

Feature description
Synchronization Direction: Imports user or organization data from the selected AD source to this node in IDaaS. For Source Node, you must enter the DN of the AD node. The DN of the AD root node is typically in the format of dc=example,dc=com, where example.com is your domain.
Incremental Synchronization: IDaaS listens for changes to AD user or organization data and runs a synchronization task approximately every 10 minutes to import the changed data into IDaaS. If a large volume of data is changed in a single incremental synchronization, processing may be delayed. We recommend that you run a full synchronization periodically to ensure data consistency.
You can set a mapping identifier in the field mapping step. This identifier matches a field in an IDaaS account, such as a phone number, with a field in an AD user account. If a match is found, the accounts are attached, and the IDaaS account is overwritten with updates. Otherwise, a new IDaaS account is created.
When you run incremental synchronization for the first time, a full synchronization is automatically performed.
If a single account record fails to import, it does not affect the import of other data.
You can view failure information in Synchronization Logs.
You must enable AD Recycle Bin to receive messages about deletion events in AD. For more information about how to enable this feature, see the Incremental synchronization section of this topic.
Delegated Authentication: Users can use their AD username and password to log on to IDaaS.
Automatic Password Update: When a user logs on to IDaaS using AD delegated authentication, if the IDaaS account has no password, it is updated with the AD user's password. The AD password must meet the IDaaS password policy requirements. Otherwise, the password cannot be updated automatically.
Advanced settings
User or organization
ObjectClass: You can useObjectClassto define whether an object is a user or an organization. For example, an object withObjectClass=userin the query results is considered a user. You do not typically need to change this setting.User logon identity: When a user logs on to IDaaS using AD delegated authentication, IDaaS uses these properties to query the user in AD and match the password. If the password is correct, the user is allowed to log on to IDaaS. You can use a comma (,) to separate multiple properties. This creates an OR relationship, which means a user can log on with any of the specified properties. Make sure that multiple properties correspond to the same AD user. Otherwise, the user cannot log on.
User filtering: You can customize a
filterstatement to synchronize specific users from different organizations to IDaaS. Only users that meet the filter conditions are synchronized to IDaaS. By default, thefilterstatement containsObjectClassconditions in an AND relationship. You can click View Details to view the complete statement. For more information, see Filtering.
Step 3: Field mapping
If you have existing data in IDaaS and need to attach AD users or organizations to existing IDaaS accounts or organizations, you can configure field mapping. You can also use this step to use data from specific fields in AD as data for IDaaS accounts. For example, you can use the phone number of an AD user as the username for an IDaaS account. To use the mapping identifier feature, you must enable it manually, for example, for the mobile phone field shown in the following figure.

For more information, see Field mappings.
AD security configuration
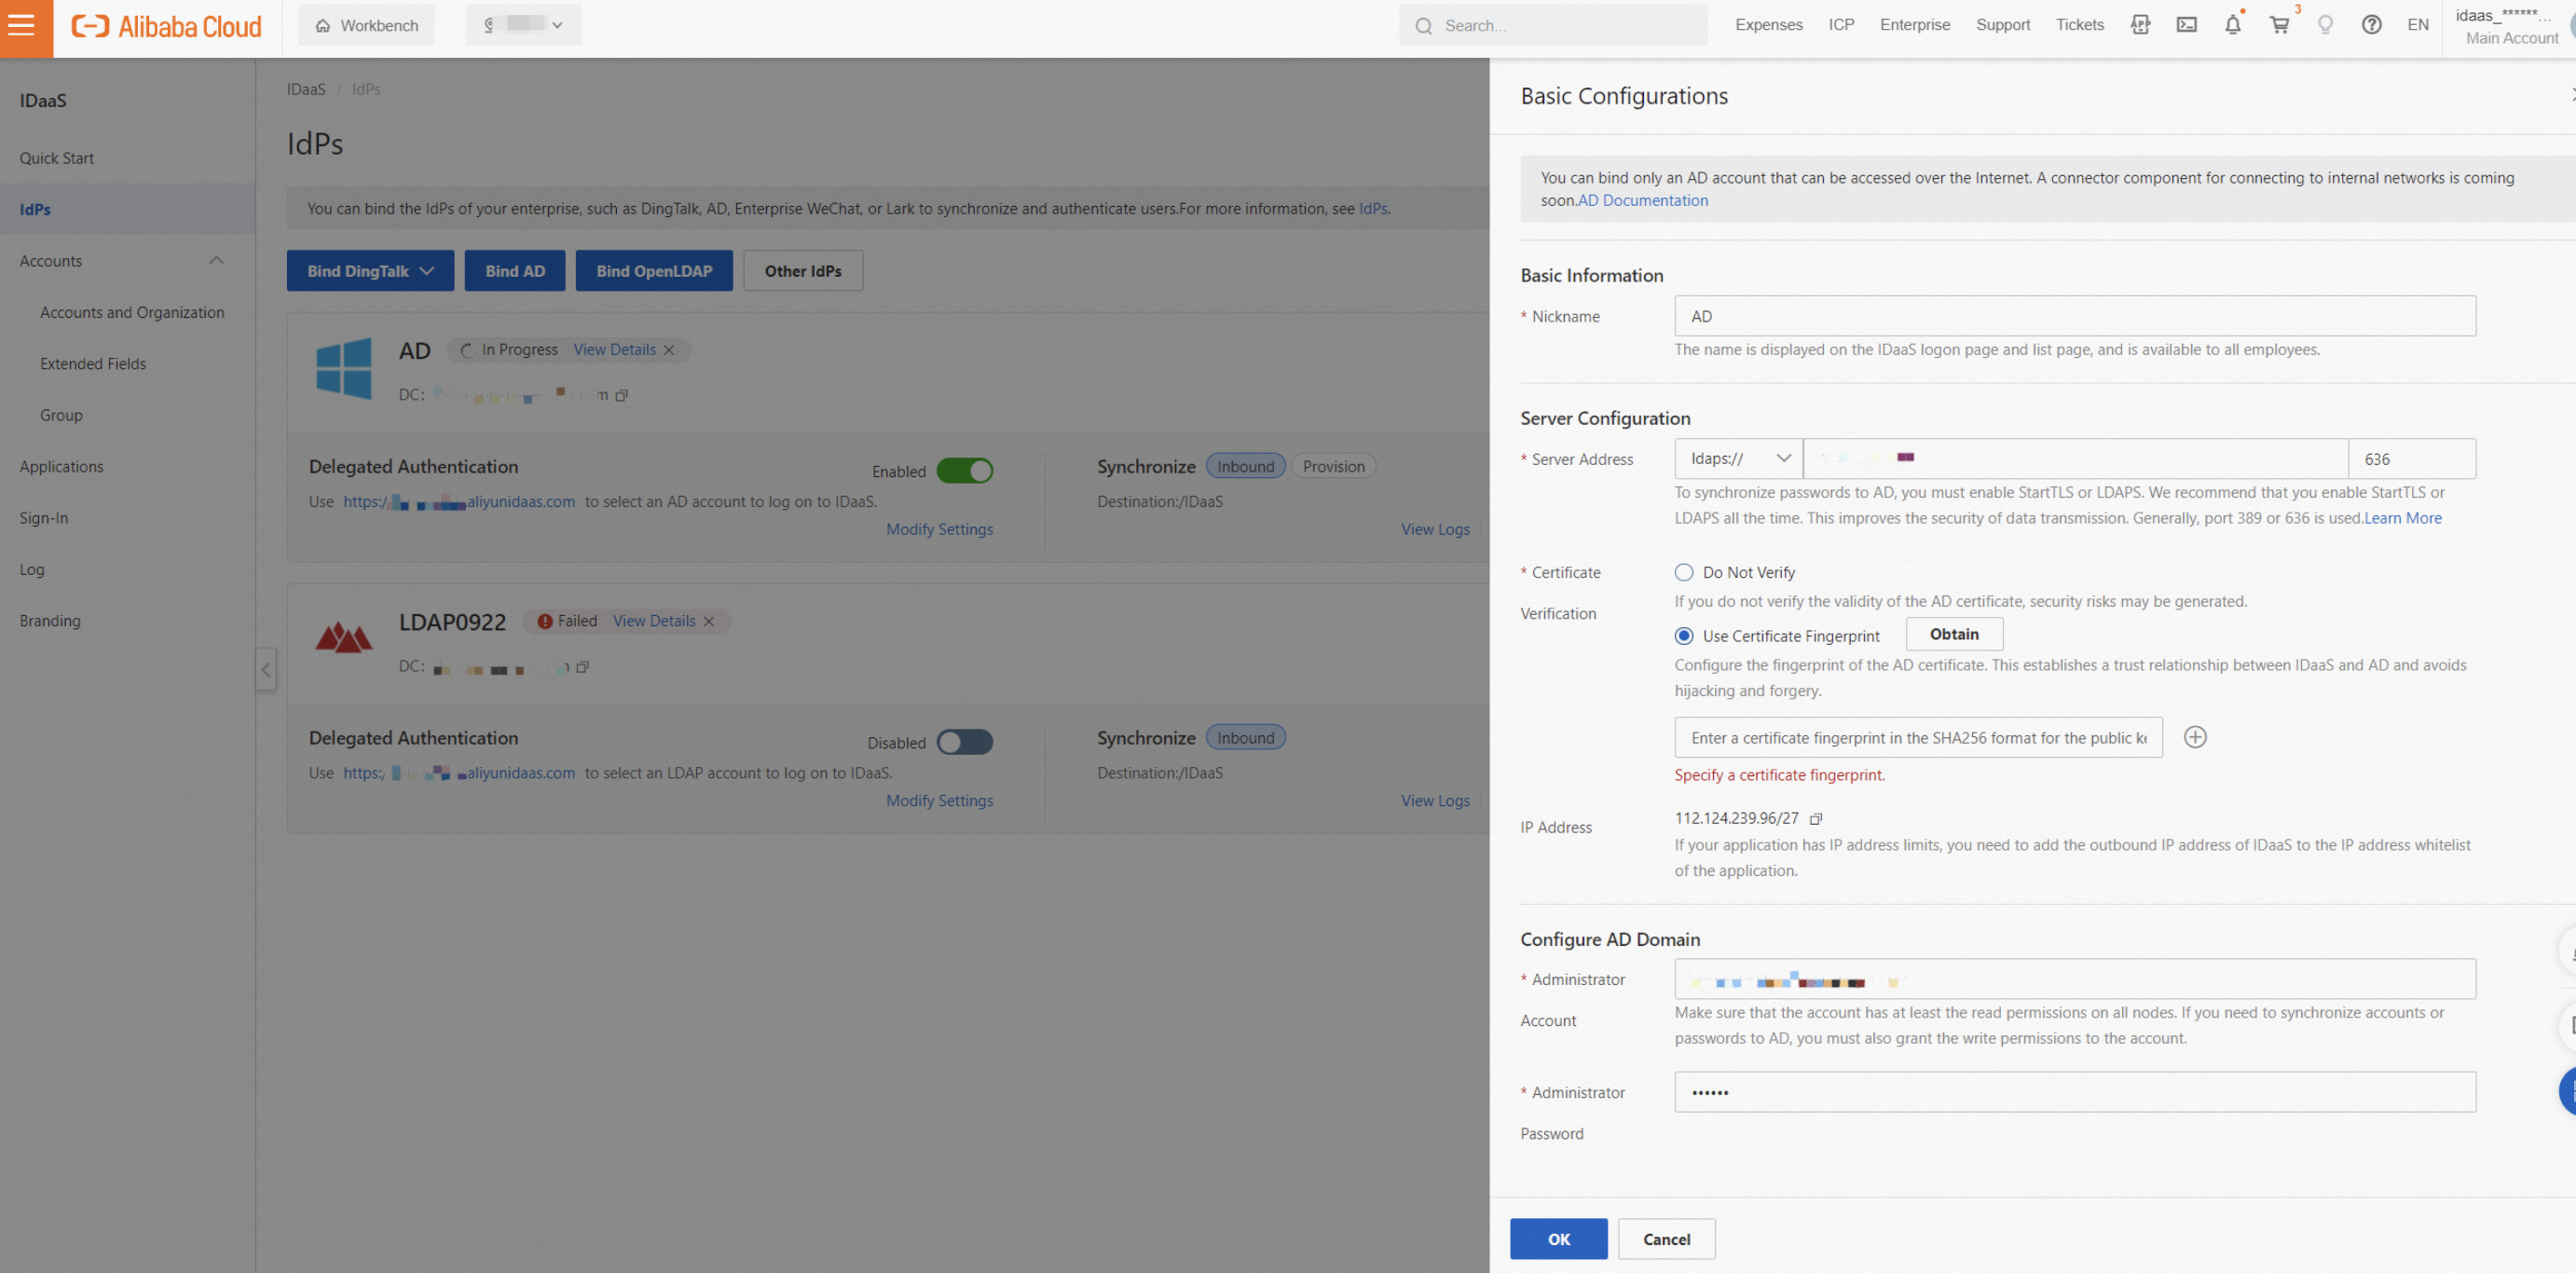
By default, LDAP data is not encrypted or protected during transmission. This creates a risk of plaintext data being intercepted. Using LDAPS or StartTLS can significantly improve the security of data transmission. After you configure a certificate in AD, you can use LDAPS or StartTLS in IDaaS. We strongly recommend that you enable this feature.
In Server Configuration, install the role, upgrade the server to a domain controller, and add a certificate. Use SHA256 as the signature algorithm. After you complete these steps, the certificate configuration is complete.
After you configure the certificate, you can obtain the certificate fingerprint in IDaaS with a single click. This establishes a trust relationship between IDaaS and the AD certificate and reduces the risk of forged certificates.

To quickly verify that the certificate fingerprint displayed in the AD interface is the same as the one obtained from IDaaS, run the following script:
openssl s_client -connect server_host:port | openssl x509 -noout -pubkey | openssl pkey -pubin -outform DER | openssl dgst -sha256AD custom configuration
ObjectClass
In AD, ObjectClass is a collection of attributes. Every object must have an ObjectClass. You can use ObjectClass to define an object as a user, organization, or computer. For example, you can find the user shown in the following figure with the filter statements objectclass=person or objectclass=user. You can view the ObjectClass in the Properties of an AD object.
Logon identity
When a user logs on to IDaaS using AD delegated authentication, IDaaS uses these properties to query the user in AD and match the password. If the password is correct, the user is allowed to log on to IDaaS.
You can typically use properties such as userPrincipalName, sAMAccountName, phone number, mailbox, or employee ID for logon. If required, you can define these properties when you create the identity provider or in the Delegated Authentication settings. If you use multiple properties, make sure they are unique and correspond to the same AD user. Otherwise, the user cannot use delegated authentication.
Filter
Changes to ObjectClass and filter affect the AD filter conditions. During a full synchronization, IDaaS accounts and organizations that do not meet the filter conditions are deleted. Before you make changes, adjust the synchronization protection limit and fully test that the filter results are as expected. For example, you can use another IDaaS instance for testing.
Introduction
To sync only specific users from different organizations to IDaaS, you can define a custom filter statement. Only users who meet the conditions are synced to IDaaS. By default, the filter statement includes an ObjectClass condition that is combined with other conditions using an AND operator. You can click View Details to see the complete statement.

The following sections describe common syntax and statements for the AD filter.
Common syntax
Operator | Meaning | Example |
= | Equal to | (cn=Alice) |
>= | Greater than or equal to | (pwdLastSet>=1319563845000000000) |
<= | Less than or equal to | (sAMAccountName<=a) |
& | AND relationship. All conditions must be met. | (&(cn=CN*)(memberOf=cn=Test,ou=HQ,dc=Domain,dc=com)) |
| | OR relationship. Any one of the conditions must be met. | (|(cn=Test*)(cn=Admin*)) |
! | NOT relationship. None of the conditions must be met. | (!(memberOf=cn=Test,ou=HQ,dc=Domain,dc=com)) |
Common statements
Scenario | Example |
Username starts with "CN" | (cn=CN*) |
User with a specific mailbox | (|(proxyAddresses=*:alice@example.com)(mail=alice@example.com)) |
User in a specific group | (memberOf=cn=Test,ou=HQ,dc=Domain,dc=com) |
AD synchronization configuration
Obtain Base DN
The Base DN is the path identifier for a node in AD. IDaaS performs operations, such as queries and data synchronization, only under this node. You can set the Base DN of the source node in the Synchronization Direction settings.
The format of a DN is ou=Some Organization,dc=example,dc=com. The DN of the root node is typically in the format of dc=example,dc=com, where example.com is your domain. You can also view the DN of a node directly in the AD Administrative Center, as shown in the following figure:
When the path of a node changes, its Base DN also changes. To prevent AD data synchronization errors caused by node path changes, IDaaS uses the node's ObjectGuid as a node fingerprint when you configure the Base DN of the source node. If the Base DN changes and no longer matches the node fingerprint, data synchronization is blocked. After you reconfigure the source node, synchronization can proceed.
Incremental synchronization
When user or organization data in IDaaS changes, IDaaS pushes the changed data to AD if the data is within the scope of the configured source node.