Loggie is a lightweight, high-performance, and cloud-native agent that is based on Golang and can be used to collect logs. You can use Loggie in functions that run in custom runtimes to collect logs from files, and upload the logs to Simple Log Service for storage and analysis.
Prerequisites
A project and a Logstore are created in Simple Log Service. For more information, see Manage a project and Create a Logstore.
The log project that you created must be in the same region as the function to be created.
Procedure
Step 1: Create a function
Log on to the Function Compute console. In the left-side navigation pane, choose .
In the top navigation bar, select a region. On the Functions page, click Create Function.
In the dialog box that appears, select the Web Function type and click Create Web Function.
On the Create Web Function page that appears, configure the following parameters, retain the default values for other parameters, and then click Create.
For more information, see Create a function.
Basic Configurations: Specify a Function Name.
Scaling configuration: Keep the default values for the function instance specifications and single-instance concurrency.
Code: Configure the runtime and code-related information of the function.
Parameter
Example
Sample Code
Code Upload Method
Select Upload Folder. The name of the folder to upload is
code. Theapp.pyfile is stored in thecodedirectory. The following code snippet provides sample code ofapp.py:from flask import Flask from flask import request import logging import os REQUEST_ID_HEADER = 'x-fc-request-id' app = Flask(__name__) format_str = '[%(asctime)s] %(levelname)s in %(module)s: %(message)s' logging.basicConfig(filename='/tmp/log/fc-flask.log', filemode='w', format=format_str, encoding='utf-8', level=logging.DEBUG) @app.route("/invoke", methods = ["POST"]) def hello_world(): rid = request.headers.get(REQUEST_ID_HEADER) logger = logging.getLogger() print("FC Invoke Start RequestId: " + rid) logger.info("FC Invoke Start RequestId: " + rid) data = request.stream.read() print(str(data)) logger.info("receive event: {}".format(str(data))) print("FC Invoke End RequestId: " + rid) logger.info("FC Invoke Start RequestId: " + rid) return "Hello, World!" if __name__ == '__main__': app.run(host='0.0.0.0',port=9000)NoteYou can change
filename='/tmp/log/fc-flask.log'to the actual log type and log location in the code. Make sure that the configuration is consistent with the value ofsources.pathsconfigured in Step 2.Startup Command
/code/bootstrapNoteThe bootstrap file is created in Step 2.
Listening Port
9000
Step 2: Create a bootstrap file to serve as the startup command
After the function is created, use WebIDE on the Code tab to create a
bootstrapfile in thecodedirectory.The following code shows a sample
bootstrapfile.#!/bin/bash #1. Create the pipelines.yml file. mkdir -p /tmp/log /code/etc cat << EOF > /code/etc/pipelines.yml pipelines: - name: demo sources: - type: file name: fc-demo addonMeta: true fields: topic: "loggie" fieldsUnderRoot: true paths: - "/tmp/log/*.log" sink: type: sls endpoint: ${LOGGIE_SINK_SLS_ENDPOINT} accessKeyId: ${LOGGIE_SINK_SLS_ACCESS_ID} accessKeySecret: ${LOGGIE_SINK_SLS_ACCESS_SECRET} project: ${LOGGIE_SINK_SLS_PROJECT} logstore: ${LOGGIE_SINK_SLS_LOGSTORE} topic: ${LOGGIE_SINK_SLS_TOPIC} EOF #2. Create the loggie.yml file. cat << EOF > /code/etc/loggie.yml EOF #3. Start Loggie and run it as a background process. /opt/bin/loggie -config.system=/code/etc/loggie.yml -config.pipeline=/code/etc/pipelines.yml > /tmp/loggie.log 2>&1 & #4. Start the application. exec python app.pyThe script performs the following operations:
Create the pipelines.yml file, which is the pipeline configuration file.
sourcesSpecifies the type and path of logs. This example shows how to collect logs from all files that end with .log in the /tmp/log directory.
addonMeta in
sourcesspecifies to add the default state metadata of log collection. For more information aboutsources, see Overview.sinkSpecifies information about Simple Log Service. The variables in the script are configured in Step 4.
Create the loggie.yml file, which is the Loggie configuration file.
If this file is empty, the default configurations are used. In this example, the default configurations are used. However, the loggie.yml file must exist. If the file is not empty, see Overview for the detailed configurations.
Start Loggie and run it as a background process. Running logs of Loggie are printed to the /tmp/loggie.log file.
Start the application. In this example, a Python runtime is used. The actual runtime that you use shall prevail.
Configure the executable permissions on the
bootstrapfile.In WebIDE, choose and run the
chmod 777 bootstrapcommand to configure the permissions.Click Deploy to deploy the code.
Step 3: Add the Loggie common layer
Click the Configurations tab. Find the Advanced Settings section, click Modify, and then find and edit the Layers section in the Advanced Settings panel.
In the Layers section, choose and configure the Loggie agent
The following table provides information about the Loggie common layer.
Layer name
Compatible runtime
Layer version
ARN
Loggie
Custom runtimes
This example uses Version 1.
acs:fc:{region}:official:layers/Loggie13x/versions/1
Click Deploy to add the Loggie common layer.
Step 4: Configure environment variables
Click the Configurations tab. Find the Advanced Settings section, click Modify, and then find and edit the Environment Variables section in the Advanced Settings panel.
In the Environment Variables section, add the following environment variables. For more information about how to configure environment variables, see Configure environment variables.
Set
FC_EXTENSION_SLS_LOGGIEto true.After you add this environment variable, an instance is frozen 10 seconds after an invocation. This ensures that Loggie can report logs as expected.
ImportantDuring the period between the completion of an invocation and the frozen of the instance, fees continue to generate based on the same billing rules during the invocation. For more information, see Billing.
Set the following environment variables in the pipelines.yml file:
LOGGIE_SINK_SLS_ENDPOINT,LOGGIE_SINK_SLS_ACCESS_ID,LOGGIE_SINK_SLS_ACCESS_SECRET,LOGGIE_SINK_SLS_PROJECT,LOGGIE_SINK_SLS_LOGSTORE, andLOGGIE_SINK_SLS_TOPIC.Environment variable
Description
LOGGIE_SINK_SLS_ENDPOINTThe endpoint of Simple Log Service. For more information, see Endpoints.
LOGGIE_SINK_SLS_ACCESS_IDThe AccessKey ID. For more information about how to obtain an AccessKey ID, see AccessKey pair.
LOGGIE_SINK_SLS_ACCESS_SECRETThe AccessKey secret. For more information about how to obtain an AccessKey secret, see AccessKey pair.
LOGGIE_SINK_SLS_PROJECTThe project to which the Logstore belongs.
LOGGIE_SINK_SLS_LOGSTOREThe Logstore that is used to store logs.
LOGGIE_SINK_SLS_TOPICThe topic of logs. You can specify a custom value.
Click Deploy. After the function configurations are updated, execution logs of the function can be uploaded to Simple Log Service by using Loggie.
Step 4: Verify results
On the Code tab, click Test Function to debug the function in the Function Compute console.
You may experience some delay in the first test. We recommend that you invoke the function several more times.
Log on to the Simple Log Service console. Query logs based on the region, project, and Logstore information in the pipelines.yml file. The following code snippet shows an example.
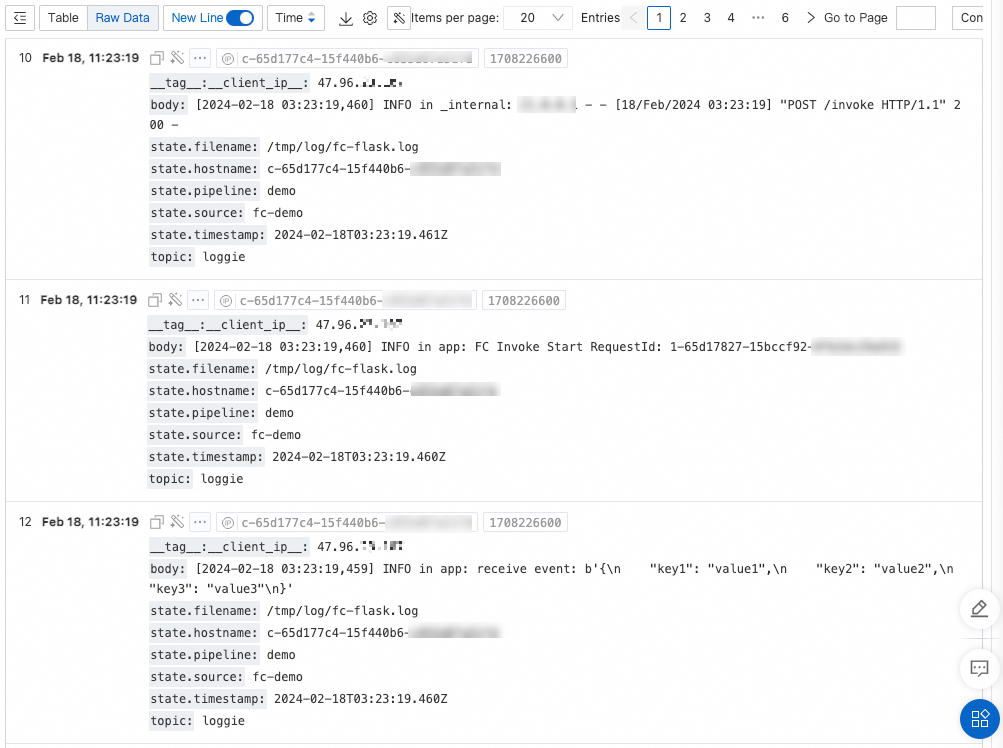
body: the log body.state.*: the state metadata of log collection.hostnameis the ID of the instance where the function runs.
Troubleshooting
Loggie runs independently in a function instance. Function Compute cannot detect whether the Loggie is normal. Execution of functions is not affected even if Loggie is abnormal.
When you query logs that are related to Loggie in Simple Log Service, latency at the second level may occur. If you cannot find logs that are related to Loggie in Simple Log Service, perform the following operations to troubleshoot the issue:
Function runs as expected
In this case, the instance is alive for several minutes after the function is invoked. You can log on to the instance to view the running status and logs of Loggie. For more information about how to log on to an instance, see CLI-based instance management.
If logs do not exist, you can start Loggie in the command line.
If logs exist, troubleshoot the issue based on the logs.
Check whether the pipelines.yml file is correctly configured.
Check whether the Simple Log Service sink is successfully started. Logs are similar to
pipeline sink(sink/sls)-0 invoke loop start.Check whether a log file is obtained. A log fie is similar to
start collect file: /tmp/log/fc-flask.log. If no similar log is available, check whether a log file is generated based on thepathspath in the pipelines.yml file configuration.
The first time you connect to a Simple Log Service Logstore, latency may occur. If no anomaly is found in the logs, you can invoke the function multiple times and wait a few minutes before you query the logs.
Function fails to run
If a function fails to run, you can remove the startup logic from Loggie and check whether the function is running as expected. In most cases, Loggie does not affect the running of functions because Loggie is an external extension. If unexpected exits of processes or execution timeouts occur, you can scale up the memory or increase the CPU specifications.
References
For more information about Loggie, see Loggie.
In this example, Loggie collects logs and uploads them as is, without any processing. If you want to process logs before you upload them, such as parsing JSON format logs or removing DEBUG logs, you can add Interceptor configurations in the pipelines.yml file. For more information, see Overview.