In Function Compute, states are not shared between different execution environment instances. You can use databases to persist structured data to achieve state sharing. By accessing cloud databases through Function Compute, you can perform operations such as data queries and data insertion. This topic uses Python 3 as an example to describe how to access Tair (Redis OSS-compatible) within the same VPC or across VPCs and regions.
Prerequisites
Procedure
Step 1: Configure the database whitelist
Scenario 1: Access a Redis database within the same VPC
Make sure that the database instance that you create is in the same region as the function that needs to access the database instance.
You create a database instance in a zone that is supported by Function Compute. For more information, see Zones supported by Function Compute.
If your database instance is not deployed in a zone that is supported by Function Compute, create a vSwitch in your VPC. The vSwitch must be in the same zone as Function Compute. In addition, you must specify the vSwitch ID in the VPC configuration of the specified service in Function Compute. Because private networks can communicate with each other between different vSwitches in the same VPC, Function Compute can access resources in VPCs in other zones through the vSwitch. For more information, see What do I do if the vSwitch is in unsupported zone error occurs?.
Log on to the Tair (Redis OSS-compatible) console, select a region in the top navigation bar, click the target instance ID, click Instance Information, and view the VPC information of the Redis instance.

Log on to the Function Compute console, create a Python web function, enable VPC access for the function, and configure the target VPC resource.
NoteMake sure that the VPC configured for the function is the same as the VPC to which the database instance is attached.
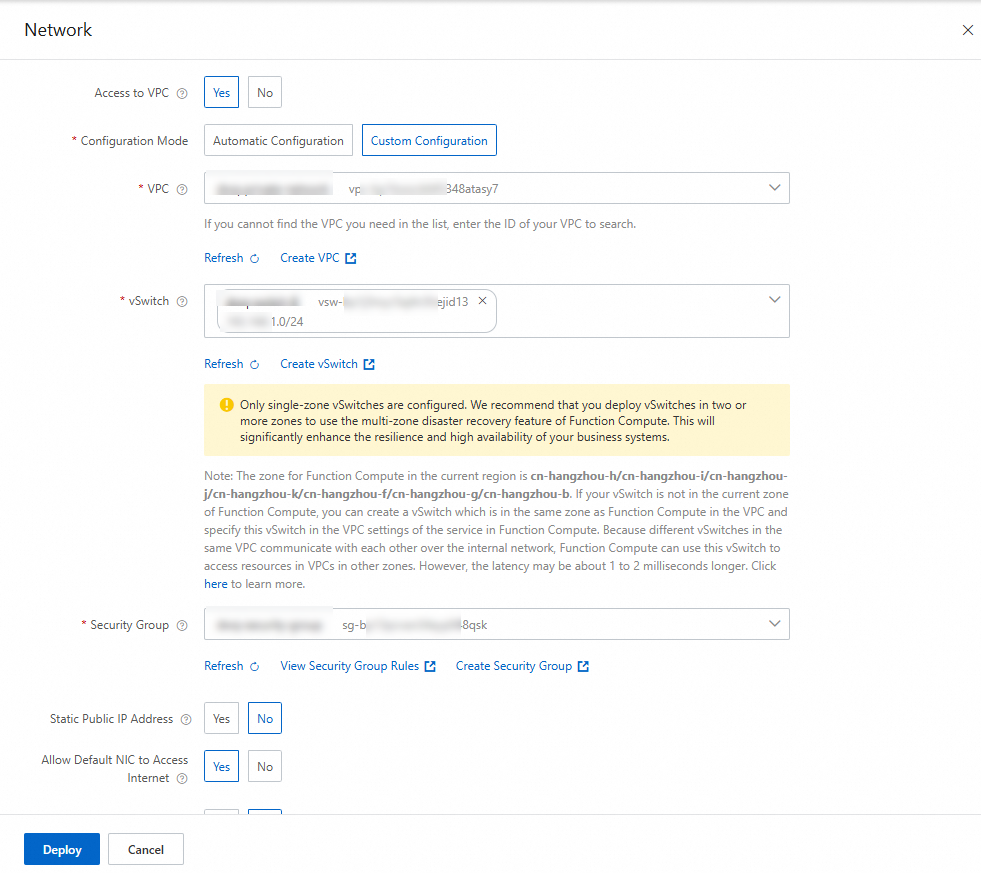
On the function details page, choose , and then obtain the CIDR block of the vSwitch in the function configuration on the Network page.

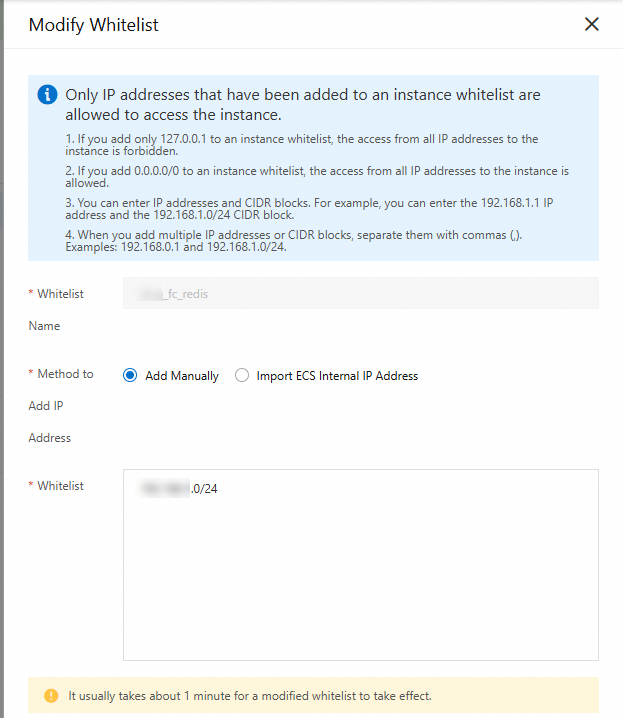
Add the CIDR block of the vSwitch in the function configuration obtained in the previous step to the database access whitelist.
ImportantUse an IP address whitelist to authorize functions to access the database. Do not use the security group mode. Otherwise, functions may occasionally fail to connect to the database, which affects the businesses.
Log on to the console, select a region in the top navigation bar, and then click the target instance ID.
In the left-side navigation pane of the instance details page, click Whitelist Settings. On the Whitelist Settings tab, find the target whitelist group and click Modify in the Actions column.
In the Modify Whitelist Group panel that appears, enter the CIDR block of the vSwitch to which the target instance is attached in the IP Addresses In Whitelist Group field, and then click OK.
After the configuration is complete, the function can access the Redis database through the internal endpoint of the database.
Scenario 2: Access a Redis database across VPCs or regions
Different VPCs and regions are completely logically isolated from each other. In general, you cannot access databases across VPCs or regions. If you need to access a database across VPCs or regions, you can configure a static public IP address for the function. In this case, the system creates a public NAT Gateway in the virtual private cloud (VPC) to which the function is attached. You can access the database through the public IP address by using the public gateway.
Log on to the Tair (Redis OSS-compatible) console, click Instance Information, and view the VPC information of the Redis instance.
Log on to the Function Compute console, create a Python web function. On the function details page, choose . In the Network panel, configure a static public IP address for the function, and then click Deploy.
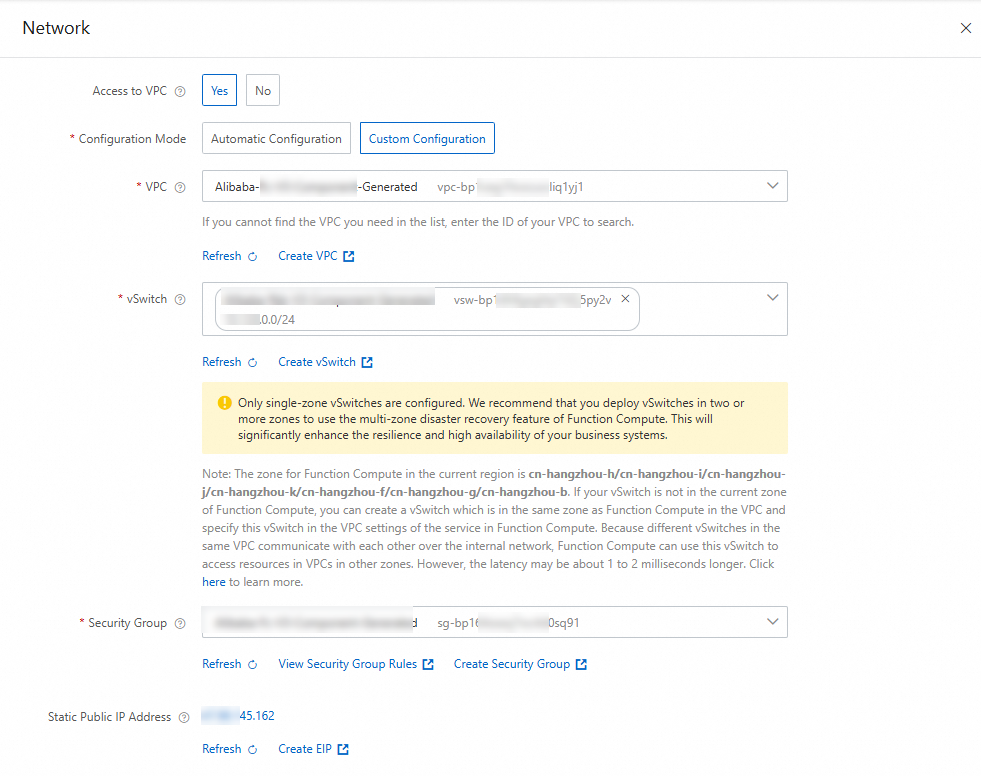
In the Static Public IP Configuration dialog box that appears, select the check box in the prompt box, and then click OK. After the configuration is complete, set the Allow Default NIC To Access Internet parameter to No to make the configured static public IP address take effect. For more information, see Configure a static public IP address.
NoteAfter you set the Allow Default NIC To Access Internet parameter to No, the static public IP address takes effect. Function Compute disables the default network interface card (NIC) to force traffic to access the Internet through the NIC that is attached to the VPC.
On the function details page, choose , and then obtain the static public IP address configured for the function on the Network page.

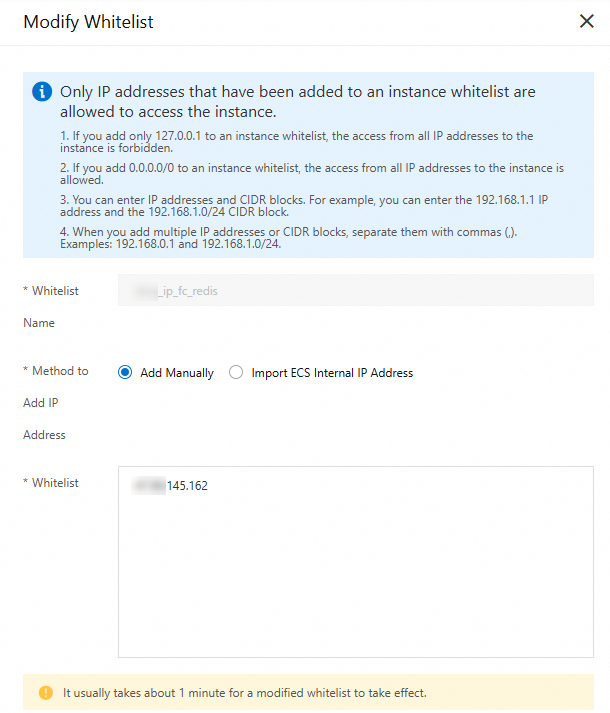
Add the static public IP address of the function obtained in the previous step to the database access whitelist.
ImportantUse an IP address whitelist to authorize functions to access the database. Do not use the security group mode. Otherwise, functions may occasionally fail to connect to the database, which affects the businesses.
Log on to the Management Console, select a region at the top, and then click the target instance ID.
In the left-side navigation pane of the instance details page, click Whitelist Settings. On the Whitelist Settings tab, find the target whitelist group and click Modify in the Actions column.
In the Modify Whitelist Group panel that appears, configure the static public IP address in the whitelist in the IP Addresses In Whitelist Group dialog box, and then click OK.
After the configuration is complete, the function can access the Redis database through the public endpoint of the database.
Step 2: Access Redis in a function
Log on to the Function Compute console, find the target function in the function list, click the Code tab on the function details page, and write the following sample code in the code editor.
from flask import Flask,jsonify
import os
import redis

app = Flask(__name__)

# Global variable for storing Redis singleton connection
_redis_connection = None

# Create database connection (singleton pattern)
def getConnection():
    global _redis_connection
    try:
        # If the connection already exists and is not disconnected, return it directly
        if _redis_connection is not None:
            try:
                # Test if the connection is valid (simple ping command)
                if _redis_connection.ping():
                    return _redis_connection
            except redis.ConnectionError:
                # If the connection is disconnected, reset it
                _redis_connection = None

        # If the connection does not exist or is disconnected, recreate it
        _redis_connection = redis.Redis(
            host=os.environ['REDIS_HOST'],
            password=os.environ['REDIS_PASSWORD'],
            port=os.environ['REDIS_PORT'],
            db=1,
            decode_responses=True
        )
        # Test if the new connection is successful
        if not _redis_connection.ping():
            raise Exception("Redis connection failed after creation.")
        return _redis_connection
    except Exception as e:
        print(f"Failed to initialize Redis connection: {e}")
        raise

@app.route('/', defaults={'path': ''})
@app.route('/<path:path>', methods=['GET', 'POST', 'PUT', 'DELETE'])
def hello_world(path):
    try:
        r = getConnection()
        counter = r.get('counter')
        if counter is None:
            counter = 0
        else:
            counter = int(counter)
        print('counter: ' + str(counter))
        r.set('counter', str(counter + 1))
        return str(counter)
    except Exception as e:
        print(f"An error occurred: {e}")
        return jsonify({"error": str(e)}), 500


if __name__ == '__main__':
        app.run(host='0.0.0.0',port=9000)
On the Function Details page, choose , click Edit, and configure the following environment variables in the Environment Variables panel.
Environment variable name
Environment variable value
Description
REDIS_HOST
r-bp*****.redis.rds.aliyuncs.com
The endpoint of the database instance. If you select the Redis database within the same VPC scenario, set this environment variable to the VPC endpoint of the database. If you select the Redis database across VPCs or regions scenario, set this environment variable to the public endpoint of the database.
Visit the Instance List, select a region in the top navigation bar, and then click the target instance ID. In the left-side navigation pane, click Instance Information. In the Connection Information section, obtain the connection address information for connecting to the database.

REDIS_PASSWORD
*****
The password of the database.
REDIS_PORT
6379
The port number of the database
Set the initial value in the Redis database. On the function details page, click the Code tab, click Test Function, and check the returned result after successful execution.

More information
For more examples of accessing Tair (Redis OSS-compatible), see Function Compute Python accessing Tair (Redis OSS-compatible).
For more exception cases about accessing Tair (Redis OSS-compatible), see Common errors.
If the exception problem you encounter has not been resolved, you need to troubleshoot based on the problem symptoms. For more information, see Common causes of database access failures.
If you want to use the Serverless Devs command-line tool to create functions and access the Tair (Redis OSS-compatible) database, see the following steps.