A workflow is a visual directed acyclic graph (DAG) that you can create by dragging and connecting task nodes. To run tasks at a specific time, you must also define the scheduling nodes and policies for the workflow. This topic describes how to create and run a workflow.
Limits
You can create a workflow to schedule only deployed batch jobs.
The task orchestration feature is in public preview. A Service-Level Agreement (SLA) is not guaranteed during the public preview. For more information, see Realtime Compute for Apache Flink Service Level Agreement (SLA). If you have questions about this feature, you can submit a ticket.
The task orchestration feature is supported only in the China (Shanghai), China (Hangzhou), China (Beijing), China (Shenzhen), China (Zhangjiakou), and Singapore regions.
Create a workflow
Log on to the Realtime Compute for Apache Flink console.
In the Actions column of the target workspace, click Console.
In the navigation pane on the left, choose .
Click Create Workflow and enter the required information.
Parameter
Description
Workflow name
The workflow name must be unique within the current project.
Variable configuration
Supports data computation based on preset values.
Variable name: A custom variable name, such as
${date}.Variable value: A static date, time format, or expression.
The following system time variables are supported:
Variable name
system.biz.dateand value${system.biz.date}: The day before the scheduled time of a daily scheduling instance. The format isyyyyMMdd.Variable name
system.biz.curdateand value${system.biz.curdate}: The scheduled date of a daily scheduling instance. The format isyyyyMMdd.Variable name
system.datetimeand value${system.datetime}: The scheduled time of a daily scheduling instance. The format isyyyyMMddHHmmss.
NoteThis configuration is not required if you create a workflow for a materialized table.
The parameters apply to all jobs associated with the nodes. Workflow-level configurations have a higher priority than job-level configurations.
Scheduling type
Two scheduling types are supported:
Manual Trigger: Manually run the workflow by clicking Run. This is suitable for temporary tests or immediate processing.
Recurring Schedule: The workflow is triggered based on scheduler rules. You can run it at regular intervals, such as by the minute, hour, or day.
ImportantYou must select Recurring Schedule for workflows that create materialized table nodes.
Scheduling cycle
This parameter is required only for the Recurring Schedule type. You can use cron expressions to set complex rules. Examples:
0 0 */4 ? * *: Runs every 4 hours.0 0 2 ? * *: Runs at 02:00 every day.0 0 5,17 ? * MON-FRI: Runs at 05:00 and 17:00 from Monday to Friday.
For more information about how to write cron expressions, see Rules for writing cron expressions.
Scheduling start time
The time when the schedule takes effect. This parameter is required only for the Recurring Schedule type.
ImportantAfter you create a recurring workflow, you must enable its Scheduling State to run it at the effective time.
When you set the start time, make sure to set it to a future time. Otherwise, the task may result in a dry-run or failure because of a missed scheduling window.
Failure retries
The number of times to retry a failed node in the workflow. By default, a failed node is not retried.
Failure notification
The default email address for notifications when a workflow node fails.
NoteYou can configure alerts through Cloud Monitor to be sent by DingTalk, text message, and other methods. For more information, see Configure monitoring and alerting.
Resource queue
The deployment target for the workflow. For more information, see Manage resource queues. This setting applies to all nodes by default. No extra configuration is needed for the nodes.
NoteThis configuration does not change the deployment target of corresponding deployed batch jobs.
Tags
You can set a tag name and tag value for the workflow.
Click Create.
You are redirected to the workflow node editor page.
Configure the initial node of the workflow.
By default, the workflow node editor page contains an initial node. Click the initial node, configure the parameters in the Edit Node panel, and then click Save.
Job
Parameter
Description
Job
You can only select deployed batch jobs from the current project. Fuzzy search is supported.
Node name
The name of the node in the current workflow.
Upstream nodes
The upstream dependencies of the current node. You can only select other nodes in the current workflow.
NoteThe initial node has no upstream dependencies and does not support selecting upstream nodes.
Failure retries
The number of times to retry a failed node. By default, this is the same as the workflow's retry count. If set, the node-level setting has a higher priority.
Status subscription
Configure the node status subscription policy and notification email. Subscriptions for Start and Fail statuses are supported.
Timeout
The timeout duration for node execution. If the running time exceeds this duration, the node is considered to have failed.
Resource queue
The deployment target for the node. For more information, see Manage resource queues. If not specified, the resource queue configured for the workflow is used by default.
NoteThis configuration does not change the deployment target of corresponding deployed batch jobs.
Tags
You can set a tag name and tag value for the workflow node.
Materialized table
Parameter
Description
Materialized table
You can only select partitioned tables that are created in Ververica Runtime (VVR) 11.0 or later and have a stream refresh mode.
Node name
The name of the node in the current workflow.
Time partition
Partition field: The time partition field of the materialized table.
Partition format: For example,
yyyyMMdd.
Resource configuration
You can customize the amount of resources used for scheduled backfills. For concurrency, you can check Auto-infer to automatically adapt to a suitable concurrency.
Upstream nodes
The upstream dependencies of the current node. You can only select other nodes in the current workflow.
NoteThe initial node has no upstream dependencies and does not support selecting upstream nodes.
After a materialized table node is created, descendant nodes are automatically inferred based on data lineage.
Failure retries
The number of times to retry a failed node. By default, this is the same as the workflow's retry count. If set, the node-level setting has a higher priority.
Status subscription
Configure the node status subscription policy and notification email. Subscriptions for Start and Fail statuses are supported.
Timeout
The timeout duration for node execution. If the running time exceeds this duration, the node is considered to have failed.
Resource queue
The deployment target for the node. For more information, see Manage resource queues. If not specified, the resource queue configured for the workflow is used by default.
NoteThis configuration does not change the deployment target of the corresponding deployed materialized table.
Tags
You can set a tag name and tag value for the workflow node.
NoteAfter you create a materialized table node, a dialog box appears. This dialog box uses the data lineage of the materialized table to help you quickly build descendant nodes. You can then select the corresponding nodes to quickly create them.
Descendant nodes are subject to the same limits. You can select only partitioned tables that are created in VVR 11.0 or later and use a stream refresh mode with a freshness of less than 30 minutes.
(Optional) Click Add Node at the bottom of the page to add more nodes.
Save the workflow configuration.
Click Save in the upper-right corner of the node editor page.
In the dialog box that appears, click OK.
Run a workflow
Each time a workflow runs, a workflow instance is generated on the Workflow Instance List and Details tab of the workflow details page.
Manual trigger: Immediately runs the current workflow task once. This method is suitable for temporary tests or immediate processing.
In the Actions column of the target workflow, click Run. In the dialog box that appears, select Manual Execution, and then click OK. Each time you perform this operation, the workflow runs once.
Recurring schedule: After you start a recurring schedule, the workflow task is triggered at the specified time.
To run the workflow at the specified effective time, you must enable its Scheduling State.
To backfill historical data or reprocess data in a specific partition for a certain period of time, you can use the data backfill feature.
Data backfill
Data backfill supplements or updates data within a specific time period. It is mainly used for scenarios such as retransmitting historical data from upstream, correcting dimension tables, and adding new interfaces.
Perform a data backfill
Log on to the Realtime Compute for Apache Flink console.
In the Actions column of the target workspace, click Console.
In the navigation pane on the left, choose .
In the Actions column of the target workflow, click Run.
In the Run dialog box, select Data Backfill as the scheduling method and configure the scheduling information.
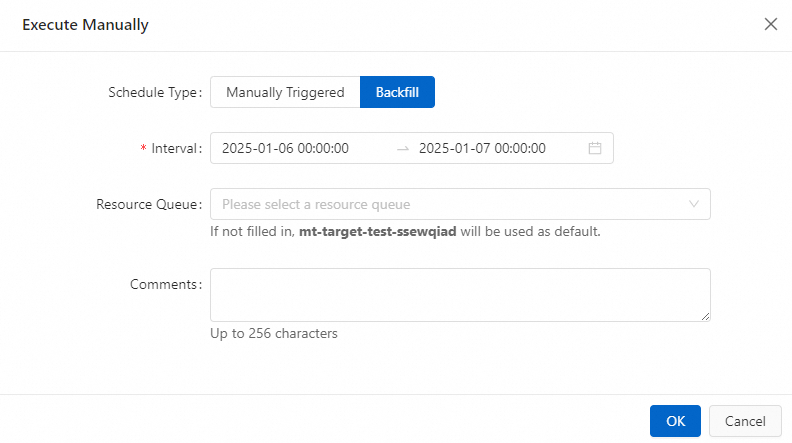
Parameter
Description
Time interval
The time period is passed to the workflow's time variables to refresh the data in the partitions for that period.
Resource queue
The target queue where the data backfill task runs. The default is
default-queue.Click OK.
Manage data backfill instances
Data backfill instances are managed in the same way as workflow instances. For more information, see Manage workflow instances and node instances. To view a data backfill instance, click the name of the target workflow to go to its instance page.
Click the name of the target workflow to go to the workflow instance page.
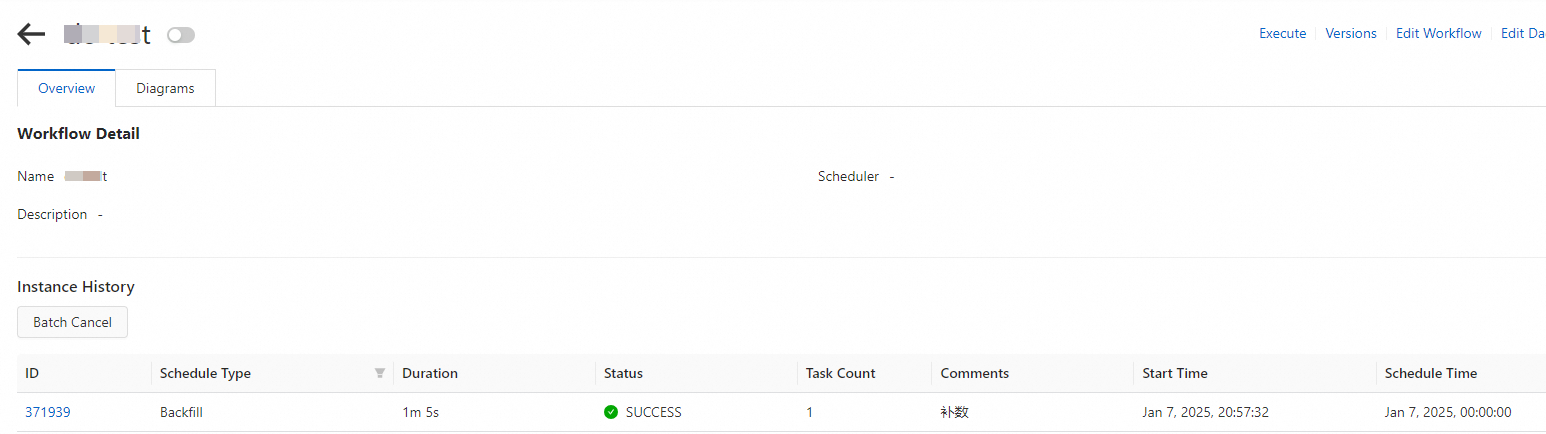
On the Workflow Instance List and Details tab, you can view the data backfill instances and their details, such as running times and statuses.
Workflow status
In the Running Status column for a workflow, you can view the aggregated running status of all its instances. For example, if a workflow runs once a day for five days, it generates five workflow instances. The Running Status column displays a statistical summary of the running statuses of these five instances.
Status | Description |
Purple | Queuing |
Blue | Running |
Green | Success |
Red | Failed |
Edit a workflow
Log on to the Realtime Compute for Apache Flink console.
In the Actions column of the target workspace, click Console.
In the navigation pane on the left, click Task Orchestration.
In the Actions column of the target workflow, click Edit Workflow.
For more information about parameter configuration, see Create a workflow.
NoteYou cannot edit a workflow when its Scheduling State is Enabled.
References
You can schedule Flink SQL batch tasks on the DataWorks platform. For more information, see Flink SQL Batch node and Node scheduling configuration.
For more information about the basic concepts of task orchestration, see Task orchestration (public preview).
For more information about how to view workflow instances and node logs, see Manage workflow instances and node instances.
You can add resource queues to isolate and manage resources. For more information, see Manage resource queues.
For more information about how to deploy batch jobs (SQL, JAR, and Python), see Deploy a job.