You can use VPC peering connections to connect two virtual private clouds (VPC) in either the same or different accounts, and either the same or different regions. After you create a peering connection, cloud resources in the connected VPCs can access resources in the peer using a private IPv4 or IPv6 address.
Scenario
A company has established VPC1 and VPC2 in the China (Beijing) and China (Shanghai) regions respectively.
To secure resource access, the company sets up a peering connection between VPC1 and VPC2. As inter-region traffic remains in the private network, it mitigates common security threats such as data leakage and DDoS attacks.
Before you create a VPC peering connection across accounts, make sure that both the requester and accepter have a VPC in place.

Procedure
Step 1: Create a VPC peering connection
Log on to the VPC peering connection console. In the top navigation bar, select the region where the requester VPC is located, which is China (Beijing) in this example. In the left-side navigation pane, click VPC Peering Connection.
If you have not used VPC peering connection before, click Activate CDT on the VPC Peering Connection page, and then click OK in the dialog box.
NoteTo create a VPC peering connection across accounts, ensure that the accepter has enabled the Cloud Data Transfer (CDT) feature.
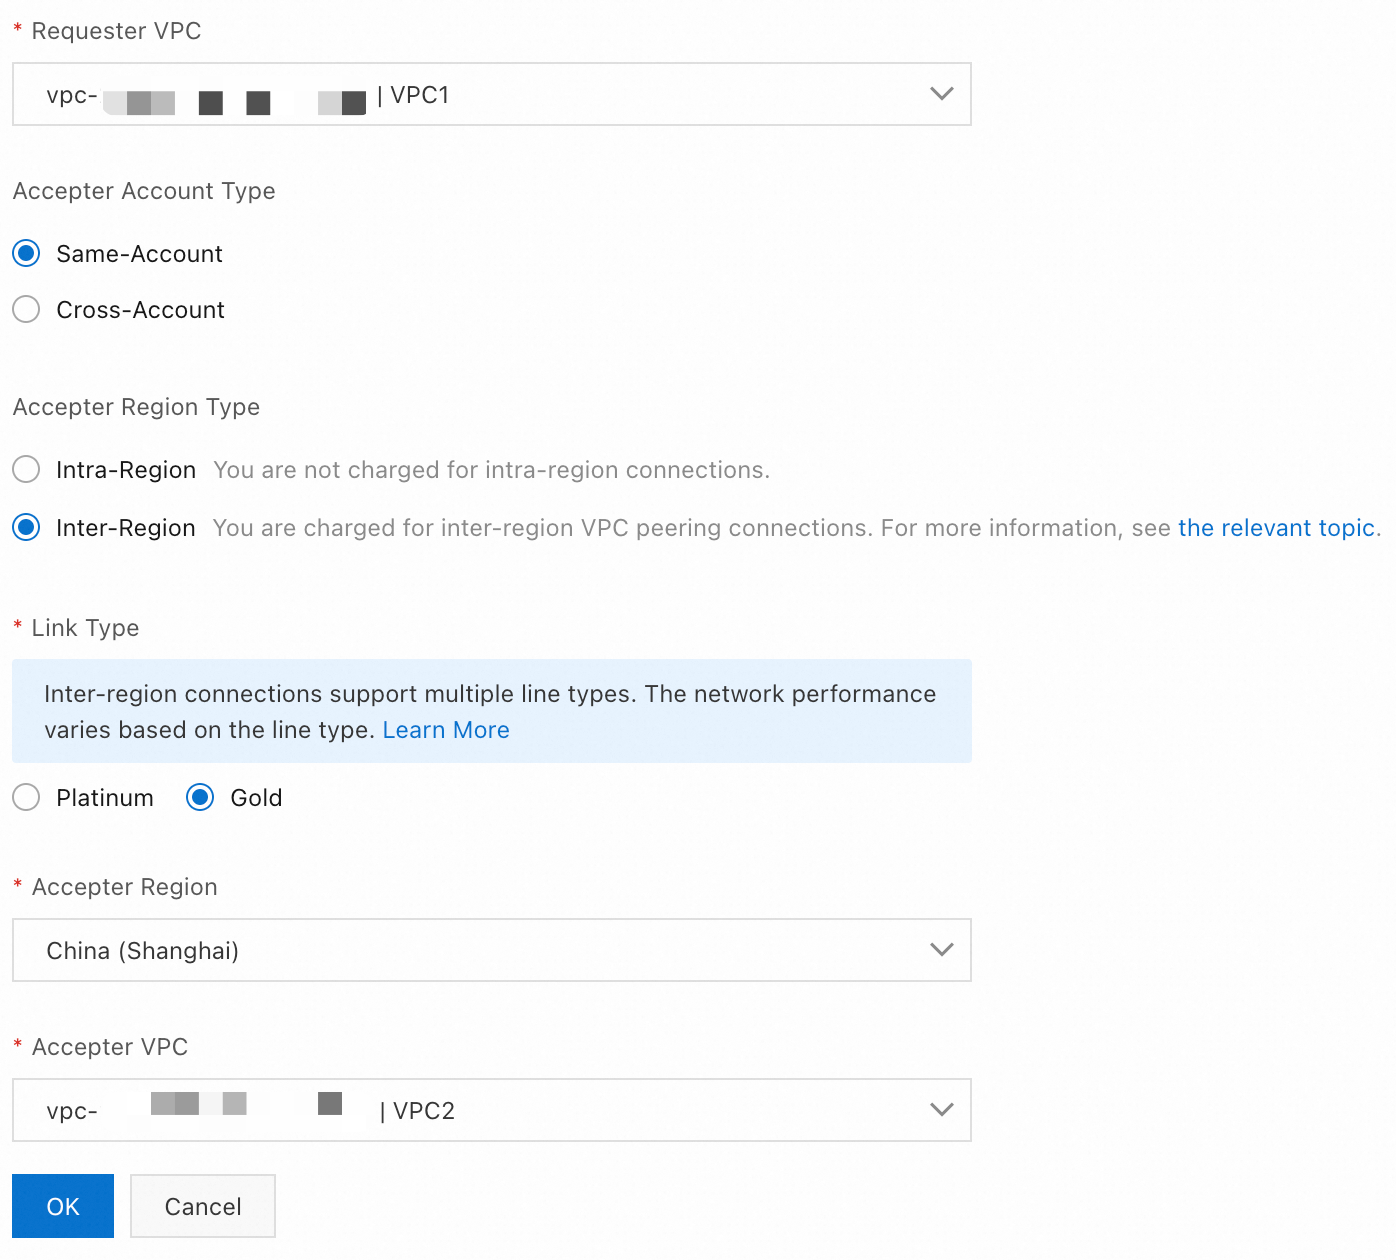
Go to the VPC Peering Connection page, click Create VPC Peering Connection, and set the parameters as follows:

Inter-region scenarios allow you to select the Link Type based on business latency requirements.
Gold (default): Meet general requirements for latency and connection quality.
Platinum: Best suited for scenarios that require lower latency and more stable connections, such as securities trading and real-time gaming.
NoteYou can create four types of VPC peering connections: intra-region same-account, inter-region same-account, intra-region cross-account, and inter-region cross-account.
When the accepter account is Same-Account, the system automatically establishes the connection after the requester initiates the request. No action is required from the accepter.
When the accepter account is Cross-Account, the accepter needs to accept the peering request before the VPC peering connection can be created. The accepter may reject the request and terminate the VPC peering connection process. The steps that need to be taken by the accepter are as follows :
Log on to the VPC console with the accepter account. In the left-side navigation pane, click VPC Peering Connection.
Find the target VPC peering connection on the VPC Peering Connection page. Currently, the status of the connection is Accepting.
 Decide whether to accept the request:
Accept: The status changes from Accepting to Updating.
When the status changes to Activated, it indicates the connection is ready for use.
Reject: The status changes from Accepting to Rejected.
A Rejected VPC peering connection cannot be used. You can Delete it from either the requester or the accepter end.
If the accepter takes no action on a cross-account VPC peering connection request, the connection status changes to Expired after 7 days.
Step 2: Configure routes
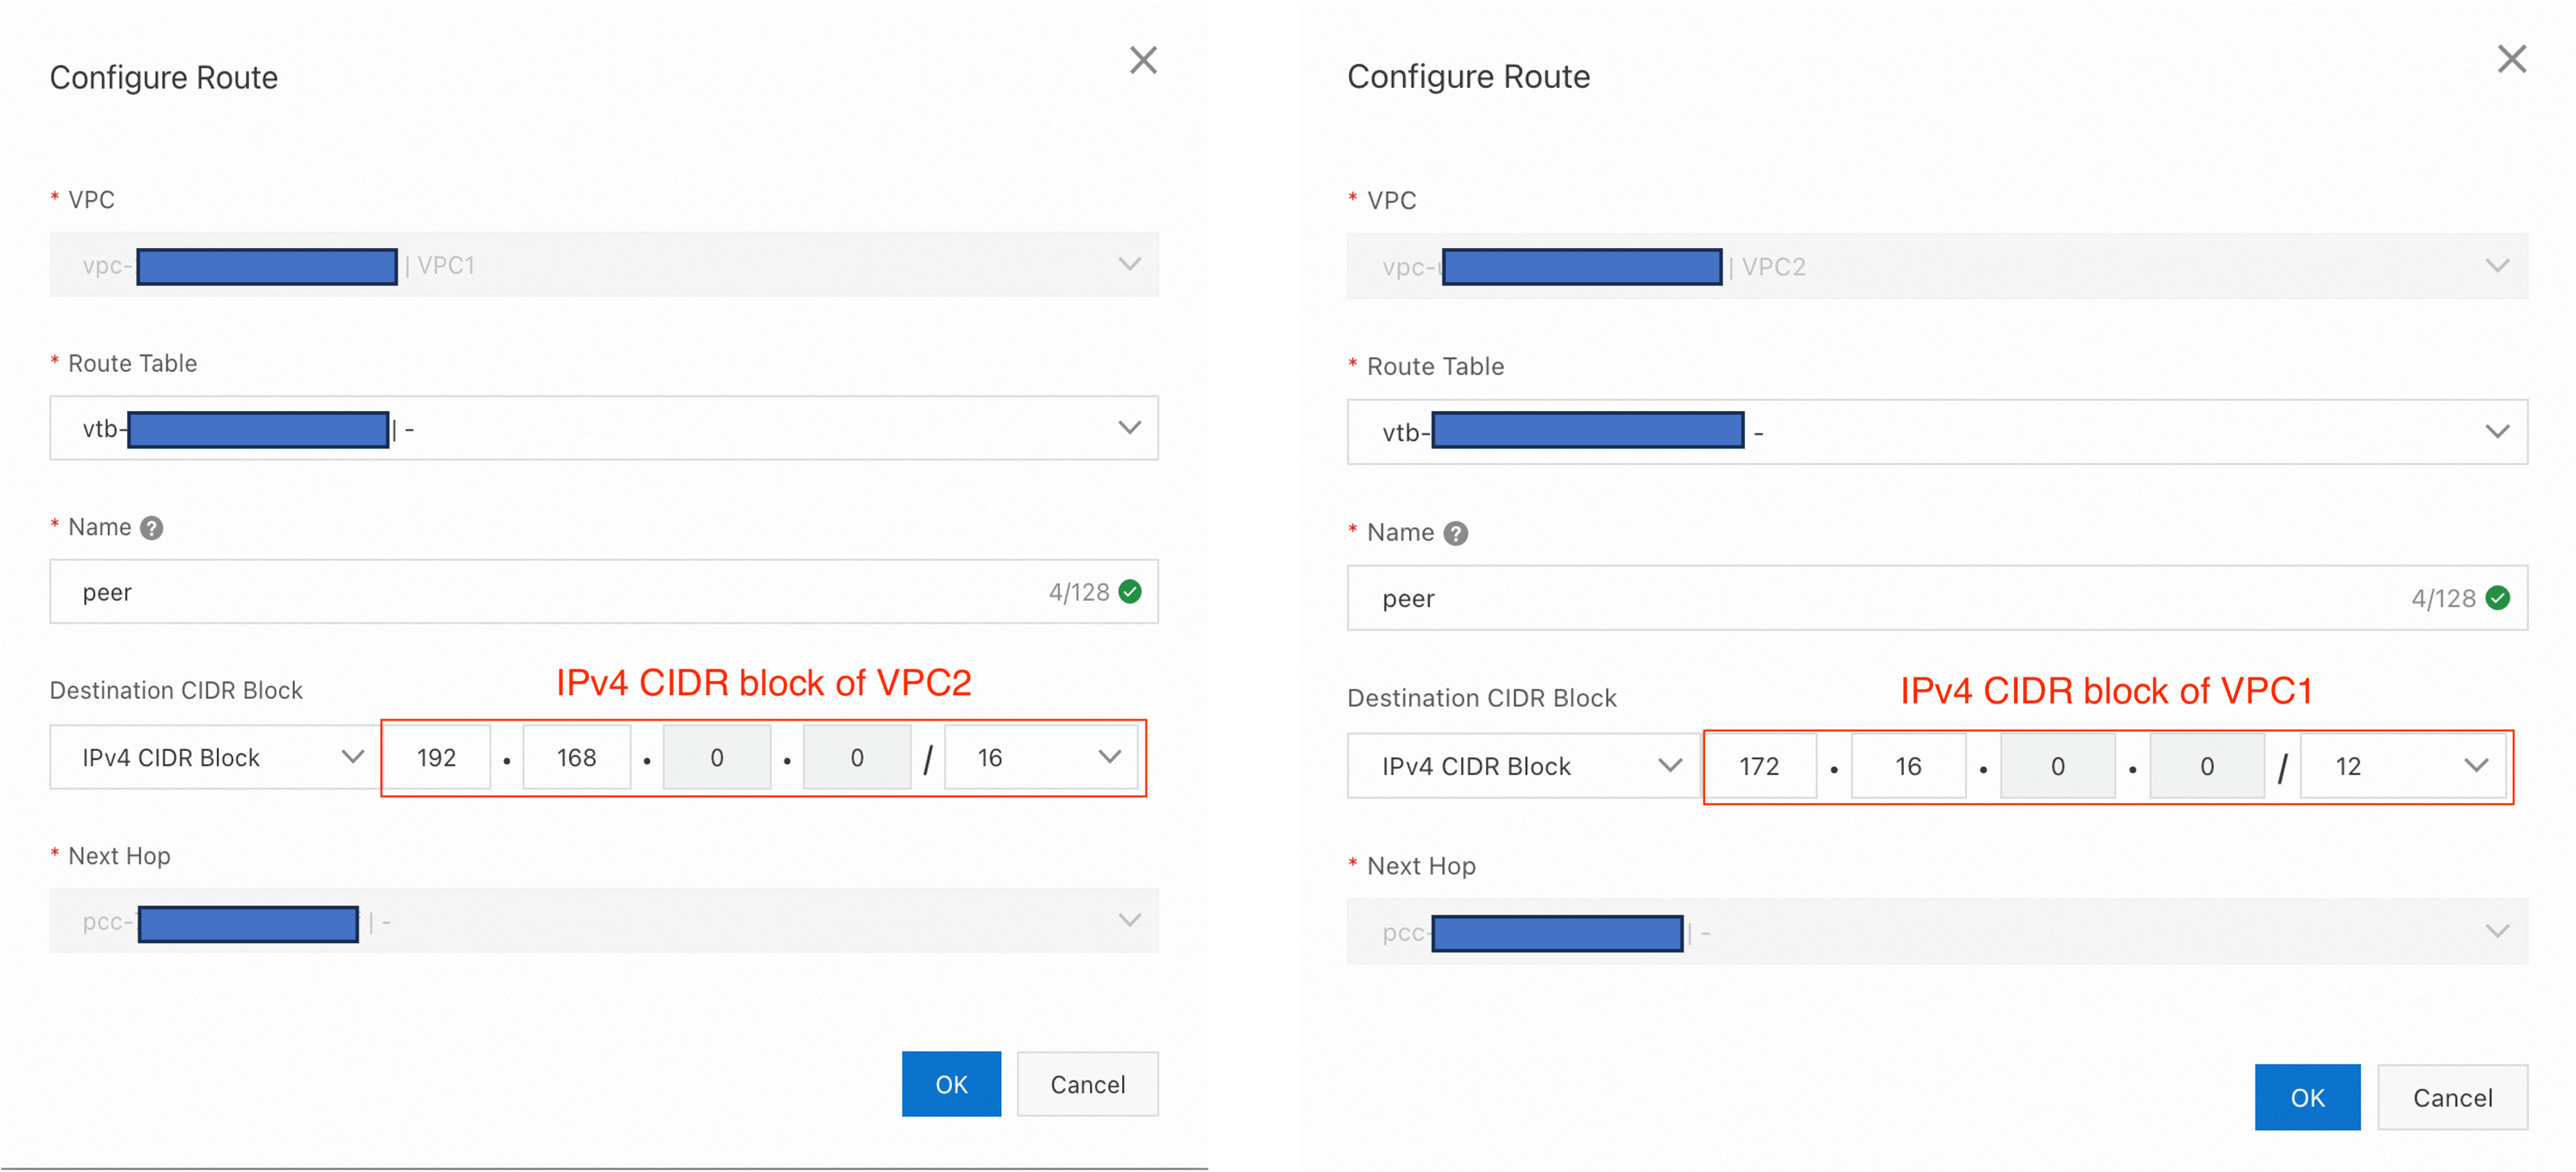
After a VPC peering connection has been created and Activated, you need to add route entries that point to the peer VPC on both ends to enable the connection.
Find the VPC peering connection on the VPC Peering Connection page and click Configure Route in either the Requester VPC or Accepter VPC column.

Configure the IPv4 or IPv6 route entries for both the requester and accepter VPCs. Below is an example of configuring an IPv4 route entry.

For cross-account peering connections, log on to the VPC consol with the accepter account. Enter the IPv4 or IPv6 CIDR block of the requester VPC to add a route for the accepter VPC.
Step 3: Verify connectivity
Check the configurations of Network ACLs and Security rules to avoid impacting connectivity tests.
Before running the ping command, you must allow the ICMP traffic in security groups.
Log on to the ECS1 instance and access the private IP address of the ECS2 instance.


Log on to the ECS2 instance and access the private IP address of the ECS1 instance.


If you receive the return message shown in the preceding figures, it indicates VPC1 and VPC2 are connected. After verification, you can deploy and use business applications in the two connected VPCs for secure access.
If you experience network connectivity issues, use the Network Intelligence Service (NIS) and reverse path analytics to diagnose configuration issues and verify the connectivity of bidirectional paths. Make sure the following configurations are set up correctly:
The IPv4/IPv6 route entries of VPCs at both ends of the peering connection have been configured correctly. The destination CIDR block is that of the peer VPC and the next hop is VPC peering connection.
The Inbound and outbound rules for the ECS security group have been set up to allow traffic from the peer IP address.
The inbound and outbound rules of the network ACLs associated with the vSwitches have been configured to allow traffic from the peer IP address.
FAQ
Why does the connection fail after the VPC peering connection is configured?
Check the following configurations or use the Network Intelligence Service (NIS) along with Reverse Path Analytics to verify bidirectional connectivity.
Check the Initiator CIDR Block and Accepter CIDR Block and ensure the CIDR blocks of VPCs and vSwitches on the two sides of the peering connection do not overlap.
For example, if a VPC has a CIDR block of 192.168.0.0/16 and the other 192.168.0.0/24, there will be no connectivity even with the peering connection. You can change the VPC of an ECS instance to a VPC with non-overlapping CIDR blocks and then re-create the peering connection.
Click the peering connection ID, check the Route Entry List, and confirm that both VPCs are correctly configured with IPv4/IPv6 route entries directed to the peer VPC, with the next hop set to the VPC peering connection.
For example, if route entries are only configured on one VPC or if the destination for the route entries is the local VPC, network connectivity will fail.
Ensure that you have configured inbound and outbound rules in the security groups of the ECS instances to allow the peer IP addresses.
For example, before running the command
ping <private IP address>, you must allow ICMP protocol rules in the security group.Check the network ACLs associated with the vSwitches to ensure that they allow inbound and outbound rules for the peer IP addresses.
Related steps
Delete a VPC peering connection
You can delete VPC peering connections that are no longer needed.
After you delete a VPC peering connection, the private network access is terminated and cannot be restored. Ensure that your business is not affected before deleting the connection and proceed with caution.
Go to the VPC Peering Connection page, find the VPC peering connection you want to remove, and click Delete in the Actions column.
In the dialog box that appears, click Confirm.
Natural deletion: Before deleting the VPC peering connection, you must remove the route entries that point to it from the route table.
Forceful deletion: The system automatically deletes the route entries that point to the VPC peering connection.
To forcefully delete the VPC peering connection, click I confirm that my services will not be affected and want to delete all the preceding VPC peering connections and routes.
Modify the bandwidth of an inter-region VPC peering connection
Go to the VPC Peering Connection page, find the inter-region VPC peering connection for which you want to adjust the bandwidth, and click its instance ID.
On the details page, find the Basic Information section and click Edit next to Bandwidth (Mbit/s).
In the dialog box that appears, enter the new bandwidth value and click OK.
The bandwidth value must be a positive integer and cannot exceed 1024.
Use PrivateLink to access OpenAPI service of VPC peering connection
Use PrivateLink to access OpenAPI service of VPC peering connection in the following regions: China (Hangzhou), China (Shanghai), China (Qingdao), China (Beijing), China (Shenzhen), Hong Kong (China), Singapore, US (Silicon Valley), and US (Virginia).
Log on to the endpoint console. Go to the Endpoints page and click Create Endpoint.
On the Create Endpoint page, set up the endpoint based on the following table and click OK. Only parameters pertinent to this topic are presented in the table. For other parameters, see Create and manage endpoints. After creation, the VPC peering connection API can be accessed by using the endpoint domain name
vpcpeer.vpc-proxy.aliyuncs.com.Parameter
Description
Endpoint Type
Interface Endpoint is chosen in this example.
Endpoint Service
Select an endpoint service.
Alibaba Cloud service is chosen in this example. Then, select the endpoint service named
com.aliyuncs.privatelink.cn-[Region-ID].vpcpeer.
References
For more details about VPC peering connections, such as introduction, scenarios, limits, and billing, see VPC peering connections.
For route configuration examples for VPC peering connections, see Examples of VPC peering connections.
You can also manage VPC peering connections through SDK, Terraform, or ROS by calling the following APIs:
CreateVpcPeerConnection: Create a VPC peering connection.
DeleteVpcPeerConnection: Delete a VPC peering connection.
AcceptVpcPeerConnection: Accept a VPC peering connection request.
RejectVpcPeerConnection: Reject a VPC peering connection request.
GetVpcPeerConnectionAttribute: Query the details of a VPC peering connection.
ModifyVpcPeerConnection: Modify a VPC peering connection.
CreateRouteEntry: Add a custom route entry.
DeleteRouteEntry: Delete a custom route entry.