This topic describes how to use EventBridge to push data from ApsaraMQ for MQTT to Function Compute.
Before you start
Make sure that the following operations are performed:
EventBridge
Function Compute
ApsaraMQ for RocketMQ
ApsaraMQ for MQTT
Usage notes
EventBridge does not allow you to pull events from topics in ApsaraMQ for MQTT. You can use the data outflow feature provided by ApsaraMQ for MQTT to forward data in the topics in ApsaraMQ for MQTT to the topics in ApsaraMQ for RocketMQ and then use ApsaraMQ for RocketMQ as a custom event source of EventBridge to integrate data in ApsaraMQ for MQTT into EventBridge.
Step 1: Create a data outflow rule
Log on to the ApsaraMQ for MQTT console. In the left-side navigation pane, click Instances.
In the top navigation bar, select the region where the instance that you want to manage resides. On the Instances page, click the instance name to go to the Instance Details page.
In the left-side navigation pane, click Rules. In the upper-left corner of the Rules page, click Create Rule.
On the Create Rule page, perform the following steps:
In the Configure Basic Information step, configure the following parameters and click Next.
Parameter
Example
Description
Rule ID
111111
The ID of the rule. An ID is a globally unique identifier of a rule.
A rule ID can contain only letters, digits, hyphens (-), and underscores (_) and must contain at least one letter or digit.
A rule ID must be 3 to 64 characters in length. If the value contains more than 64 characters, it is automatically truncated.
The ID of a rule cannot be updated after the rule is created.
Description
migrate from rocketmq
The description of the rule.
Status
Enable
Specifies whether to enable the current rule. Valid values:
Enable
Disable
Rule Type
Data Outbound
The type of the rule. Valid values:
Data Outbound: The rule is used to export data from ApsaraMQ for MQTT to other Alibaba Cloud services. For more information, see Export data from ApsaraMQ for MQTT to other Alibaba Cloud services.
Data Inbound: The rule is used to import data from other Alibaba Cloud services to ApsaraMQ for MQTT. For more information, see Import data from other cloud services to ApsaraMQ for MQTT.
Client Status Notification: The rule is used to export the data for online and offline events of ApsaraMQ for MQTT clients to other Alibaba Cloud services. For more information, see Export online and offline events of Message Queue for MQTT clients.
In the Configure Rule Source step, specify the data source and click Next.
Parameter
Example
Description
Topic
TopicA
The source topic from which you want to export data. Specify a topic in ApsaraMQ for MQTT.
In the Configure Rule Destination step, specify the destination to which the data is forwarded and click Create.
Parameter
Example
Description
Destination Service Type
Message Queue for Apache RocketMQ
The cloud service to which the data of the source topic is forwarded.
NoteOnly ApsaraMQ for RocketMQ is supported.
Message Queue for Apache RocketMQ Instance
MQ_INST_13801563067*****_BbyOD2jQ
The ID of the ApsaraMQ for RocketMQ instance to which the data is forwarded.
NoteYou can select only an instance that resides in the same region as the ApsaraMQ for MQTT instance.
Topic
TopicB
The ApsaraMQ for RocketMQ topic to which the data is forwarded. In this example, the data of the source topic is forwarded to Topic B.
You can view the data outbound rule that you create on the Rules page.
Step 2: Create a custom event source
Log on to the EventBridge console.
In the left-side navigation pane, click Event Buses.
In the top navigation bar, select a region.
On the Event Buses page, click the name of the custom event bus that you created.
In the left-side navigation pane, click Event Sources.
On the Event Source page, click Add Event Source.
In the Add Custom Event Source panel, configure the Name and Description parameters and select ApsaraMQ for RocketMQ from the Event Provider drop-down list. Then, follow the on-screen instructions to select the resources in the ApsaraMQ for RocketMQ instance that you created and click OK.
Step 3: Create an event rule
The event targets that you want to configure for an event rule must reside in the same region as the event rule.
Log on to the EventBridge console. In the left-side navigation pane, click Event Buses.
In the top navigation bar, select a region. On the Event Buses page, click the name of the event bus that you want to manage.
In the left-side navigation pane, click Event Rules. On the page that appears, click Create Rule.
In the Create Rule wizard, perform the following steps:
In the Configure Basic Info step, enter a rule name in the Name field and a rule description in the Description field. Then, click Next Step.
In the Configure Event Pattern step, set the Event Source Type parameter to Custom Event Source and select the custom event source that you configured in Step 1 from the Event Source drop-down list. Then, in the Pattern Content code editor, specify an event pattern and click Next step.
For more information, see Event patterns.
In the Configure Targets step, configure event targets and click Create.
NoteYou can configure up to five event targets for an event rule.
Parameter
Description
Service Type
Select Function Compute from the drop-down list.
Function
Select the function that you created from the drop-down list.
Event
Select Complete Event, Partial Event, Fixed Value, or Template based on your business requirements. In this example, Template is selected. For more information, see Event Transformation.
The following sample code provides examples of variables and templates:
Sample variables:
{
  "source":"$.source",
  "type":"$.type"
}
Sample template:
The event comes from ${source},event type is ${type}.Version and Alias
Select Specified Version or Specified Alias.
If you select Specified Version, you must configure the Version parameter.
If you select Specified Alias, you must configure the Alias parameter.
Invocation Mode
Select Synchronous or Asynchronous. For more information, see Synchronous invocations and Overview.
Synchronous: During a synchronous invocation, the result is directly returned after an event is processed by a function.
Asynchronous: When Function Compute receives an asynchronous invocation request, Function Compute immediately returns a response after the request is persisted instead of waiting for the request to be executed before a response is returned.
Event Format
The format in which events are delivered to the download function. Valid values:
Object: Events are delivered to the downstream function in objects.
ObjectList: Events are delivered to the downstream function in arrays.
NoteThis parameter is optional. If you do not specify this parameter, events are delivered to downstream functions in the ObjectList format.
Retry Policy and Dead-letter Queue
For more information, see Retry policies and dead-letter queues.
Step 4: Publish an event
import java.util.concurrent.ExecutorService;
import java.util.concurrent.LinkedBlockingQueue;
import java.util.concurrent.ThreadPoolExecutor;
import java.util.concurrent.TimeUnit;
import org.eclipse.paho.client.mqttv3.IMqttDeliveryToken;
import org.eclipse.paho.client.mqttv3.MqttCallbackExtended;
import org.eclipse.paho.client.mqttv3.MqttClient;
import org.eclipse.paho.client.mqttv3.MqttException;
import org.eclipse.paho.client.mqttv3.MqttMessage;
import org.eclipse.paho.client.mqttv3.persist.MemoryPersistence;

/**
 * The following sample code provides an example on how an ApsaraMQ for MQTT client object sends messages to itself in signature authentication mode. Modify the parameters for client initialization based on your business requirements.
 * In signature authentication mode, the AccessKey ID and AccessKey secret that are obtained from the Resource Access Management (RAM) console are used to calculate an independent signature for the authentication of the client object.
 * In actual business scenarios, you can complete the signature process in a trusted environment because the AccessKey secret is private.
 *
 * For information about the complete demo project, visit https://github.com/AliwareMQ/lmq-demo.
 */
public class MQ4IoTProducerDemo {
    public static void main(String[] args) throws Exception {
        /**
         * The ID of the ApsaraMQ for MQTT instance. You can obtain the ID from the ApsaraMQ for MQTT console after you purchase the instance.
         */
        String instanceId = "XXXXX";
        /**
         * The endpoint of the ApsaraMQ for MQTT instance. You can obtain the endpoint from the ApsaraMQ for MQTT console after you purchase and configure the instance. You must use the assigned domain name instead of the IP address to connect to the instance. Otherwise, an exception may occur on the client object.
         */
        String endPoint = "XXXXX.mqtt.aliyuncs.com";
        /**
         * The AccessKey ID. You can obtain the AccessKey ID from the RAM console.
         */
        String accessKey = System.getenv("ALIBABA_CLOUD_ACCESS_KEY_ID");
        /**
         * The AccessKey secret. You can obtain the AccessKey secret from the RAM console. The secretKey parameter is required only in signature authentication mode.
         */
        String secretKey = System.getenv("ALIBABA_CLOUD_ACCESS_KEY_SECRET");
        /**
         * The ID that the system assigns to the ApsaraMQ for MQTT client object. Each TCP connection must use a unique client ID. If different TCP connections use the same client ID, an exception occurs and the connections are closed.
         * The value of the clientId parameter is in the GroupID@@@DeviceID format. GroupID is the ID of the consumer group that you created in the ApsaraMQ for MQTT console, and DeviceID is the custom ID of the device. The value of the clientId parameter can be up to 64 characters in length.
         */
        String clientId = "GID_XXXXX@@@XXXXX";
        /**
         * The parent topic that you created in the ApsaraMQ for MQTT console.
         * If you specify a topic that does not exist or a topic that the ApsaraMQ for MQTT client object is not authorized to access, the ApsaraMQ for MQTT broker closes the connection.
         */
        final String parentTopic = "XXXXX";
        /**
         * ApsaraMQ for MQTT allows you to use a subtopic to filter messages. You can specify a string as a subtopic name.
         */
        final String mq4IotTopic = parentTopic + "/" + "testMq4Iot";
        /**
         * The quality of service (QoS) level in message transmission. Valid values: 0, 1, and 2.
         */
        final int qosLevel = 0;
        ConnectionOptionWrapper connectionOptionWrapper = new ConnectionOptionWrapper(instanceId, accessKey, secretKey, clientId);
        final MemoryPersistence memoryPersistence = new MemoryPersistence();
        /**
         * The protocol and port that are used by the ApsaraMQ for MQTT client object must match.
         * If Secure Sockets Layer (SSL) encryption is enabled, the protocol and port must be specified as ssl://endpoint:8883.
         */
        final MqttClient mqttClient = new MqttClient("tcp://" + endPoint + ":1883", clientId, memoryPersistence);
        /**
         * The timeout period for the ApsaraMQ for MQTT client object to wait for a response. After the timeout period ends, the client object no longer waits for a response.
         */
        mqttClient.setTimeToWait(5000);
        final ExecutorService executorService = new ThreadPoolExecutor(1, 1, 0, TimeUnit.MILLISECONDS,
            new LinkedBlockingQueue<Runnable>());
        mqttClient.setCallback(new MqttCallbackExtended() {
            @Override
            public void connectComplete(boolean reconnect, String serverURI) {
                /**
                 * The topic to which the consumer must subscribe at the earliest opportunity after the client connection is established.
                 */
                System.out.println("connect success");
            }

            @Override
            public void connectionLost(Throwable throwable) {
                throwable.printStackTrace();
            }

            @Override
            public void messageArrived(String s, MqttMessage mqttMessage) throws Exception {
                /**
                 * The callback that is invoked to consume messages. Make sure that the callback does not throw exceptions. If a response is returned for the callback, the messages are consumed.
                 * Messages must be consumed in the specified period. If specific messages are not consumed within the timeout period specified by the ApsaraMQ for MQTT broker, the broker may attempt to resend the messages. Make sure that deduplication is performed to ensure idempotence for message consumption. For information about the specified timeout period, see Limits.
                 */
                System.out.println(
                    "receive msg from topic " + s + " , body is " + new String(mqttMessage.getPayload()));
            }

            @Override
            public void deliveryComplete(IMqttDeliveryToken iMqttDeliveryToken) {
                System.out.println("send msg succeed topic is : " + iMqttDeliveryToken.getTopics()[0]);
            }
        });
        mqttClient.connect(connectionOptionWrapper.getMqttConnectOptions());
        for (int i = 0; i < 10; i++) {
            MqttMessage message = new MqttMessage("hello mq4Iot pub sub msg".getBytes());
            message.setQos(qosLevel);
            /**
             * The topic to which messages are sent. This topic must be the one to which the consumer subscribes or can be matched by using wildcards.
             */
            mqttClient.publish(mq4IotTopic, message);
            /**
             * ApsaraMQ for MQTT supports point-to-point (P2P) messaging. If the producer sends a message to an only consumer and obtains the value of the clientId parameter, a P2P message is sent.
             * In P2P messaging, the consumer does not need to subscribe to the topic to which the producer sends messages. This way, the consumption logic is simplified. In P2P messaging, a topic must be specified in the {{parentTopic}}/p2p/{{targetClientId}} format.
             */
            String receiverId = "xxx";
            final String p2pSendTopic = parentTopic + "/p2p/" + receiverId;
            message = new MqttMessage("hello mq4Iot p2p msg".getBytes());
            message.setQos(qosLevel);
            mqttClient.publish(p2pSendTopic, message);
        }
        Thread.sleep(Long.MAX_VALUE);
    }
}
Verify the result
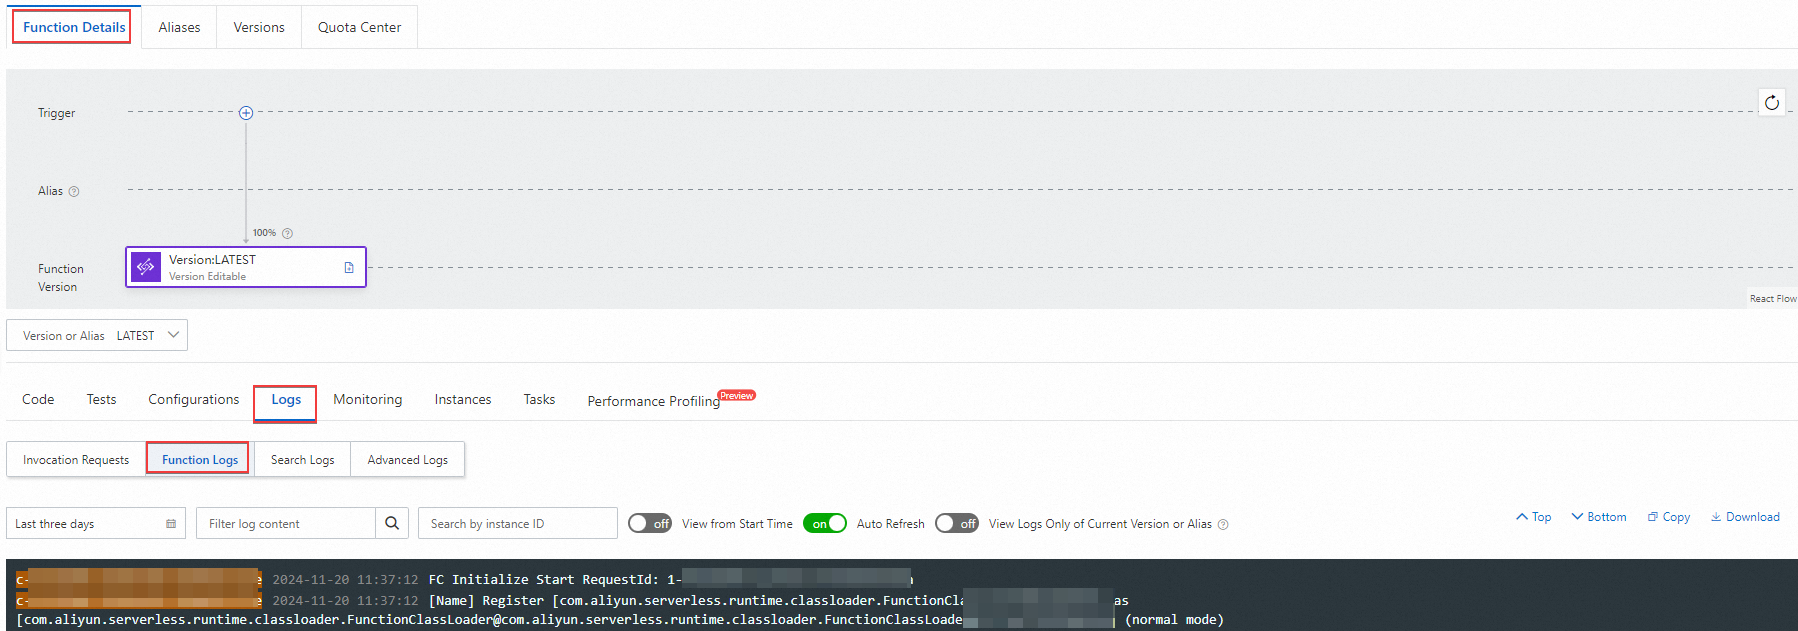
To verify the results, you can view logs in the Function Compute console.
Log on to the Function Compute console.
In the left-side navigation pane, click Functions. In the top-navigation bar of the page that appears, select the region where the function that you want to manage resides.
On the Functions page, click the name of the function that you want to manage.
On the Function Details page, click the Logs tab and then click Function Logs to view the logs of the function.
FAQ
How can I locate the issue if the event fails to be published?
If an event fails to be published, you can view the response to the publishing request for troubleshooting. You can go to the EventBridge console and view the related information in the Event Delivery section of the Event Trace message. Then, take appropriate measures based on the response returned.
What can I do if an event fails to be published to Function Compute and the "[500]ConnectErrorconnectiontimedout" error is returned in the response?
You can perform the following steps:
Log on to the Function Compute console. Execute the function to which the event is routed and check the execution duration.
If the execution duration is longer than 15 seconds, check the network connection. If the execution duration is shorter than 15 seconds, check whether you can access the endpoint for the region where the service to which the event is routed is deployed.
If you cannot access the endpoints of the region where Function Compute is deployed, contact the Function Compute engineers.