Alibaba Cloud Edge Node Service (ENS) is integrated with Terraform. You can use Terraform to quickly configure ENS. This topic describes how to use Terraform in Cloud Shell to create an ENS instance.
You can run the sample code with a few clicks. You can run the sample code in this topic with a few clicks.
Prerequisites
An Alibaba Cloud account has full permissions on all resources that belong to this account. If the credentials of an Alibaba Cloud account are leaked, security risks may arise. We recommend that you use a Resource Access Management (RAM) user and create an AccessKey pair for the RAM user. For more information, see Create a RAM user and Create an AccessKey pair.
The following sample code describes how to attach the AliyunBSSFullAccess policy and grant the required permissions on Cloud Firewall to a RAM user. For more information, see Grant permissions to RAM users.
{
  "Version": "1",
  "Statement": [
    {
      "Effect": "Allow",
      "Action": "ens:*",
      "Resource": "*"
    },
    {
      "Effect": "Allow",
      "Action": [
        "bssapi:*",
        "bss:*",
        "efc:*"
      ],
      "Resource": "*"
    }
  ]
}
Prepare the Terraform environment. You can use one of the following methods to use Terraform:
Use Terraform in Terraform Explorer: Alibaba Cloud provides Terraform Explorer, an online runtime environment for Terraform. You can use Terraform after you log on to Terraform Explorer without the need to install Terraform. For more information, see Use Terraform in Terraform Explorer. This method is suitable for scenarios in which you want to use and debug Terraform in a fast and convenient manner at no additional cost.
Use Terraform in Cloud Shell: Terraform is preinstalled in Cloud Shell and identity credentials are configured. You can directly run Terraform commands in Cloud Shell. This method is suitable for scenarios in which you want to use and debug Terraform in a fast and convenient manner at low costs.
Install and configure Terraform on your on-premises machine: This method is suitable for scenarios in which network connections are unstable or a custom development environment is required.
You must install Terraform 0.12.28 or later. You can run the terraform --version command to query the Terraform version.
Fees are generated for specific resources in this example. Unsubscribe from the resources when you no longer need them.
Required resources
alicloud_ens_instance: ENS instance.
Use Terraform to create an ENS instance
Procedure
In this example, an ENS instance is created.
Create a working directory and a configuration file named
main.tfin the directory. main.tf: This file is the main file of Terraform and defines the resources that you want to deploy.variable "region" { default = "cn-hangzhou" } provider "alicloud" { region = var.region } variable "image_id" { default = "win2022_21H2_x64_dtc_zh-cn_40G_alibase_20211116" } variable "instance_type" { default = "ens.sn1.small" } variable "internet_charge_type" { default = "BandwidthByDay" } # ENS instance resources resource "alicloud_ens_instance" "instance" { # (Optional, Int, available since v1.208.0) Resource purchase duration. Setting method: If you set PeriodUnit to Day, you must set Period to 3. If you set PeriodUnit to Month, you can set Period to 1 to 9 or 12. period = 1 # Data disk #data_disk { # The size of a data disk. Unit: GiB. #size = 20 # The type of a data disk. Valid values: cloud_efficiency, cloud_ssd, local_hdd, and local_ssd. #category = "cloud_efficiency" #} # (Optional, Int, available since v1.208.0) Specifies whether to assign a public IP address. Valid values: true and false. Default value: true. public_ip_identification = true # The unit of the subscription duration. Valid values: Month and Day. Default value: Month. period_unit = "Month" # Scheduling policy. Valid values: Concentrate (node-level scheduling) and Disperse (regional scheduling). scheduling_strategy = "Disperse" # The scheduling level, which is used for configuring node-level scheduling or regional scheduling. Set this parameter to Region if scheduling_strategy is set to Concentrate. Valid values if scheduling_strategy is set to Disperse: Big, Middle, and Small. schedule_area_level = "Big" # The image ID of the instance. This parameter is not available for Arm instances. image_id = var.image_id # The instance specification. instance_type = var.instance_type # The hostname of the instance. host_name = "Host80" # The password of the instance. password = "Ens-test@" # The billing method of the instance bandwidth. This parameter is required at the first time you purchase an ENS instance. The value that you specified is used as the default value for subsequent purchases. Valid values: BandwidthByDay and 95bandwidthbymonth. internet_charge_type = var.internet_charge_type # The payment method of the instance. payment_type can be modified since v1.230.0. Valid values: Subscription and PayAsYouGo. payment_type = "PayAsYouGo" # The ISP. This parameter is required if scheduling_strategy is set to Disperse. Valid values: cmcc, unicom, and telecom. carrier = "cmcc" # The scheduling pricing policy. Default value: PriceLowPriority. scheduling_price_strategy = "PriceLowPriority" # Maximum public bandwidth internet_max_bandwidth_out = 1 # The ID of the edge node. EnsRegionId is required if ScheduleAreaLevel is set to Region. EnsRegionId is invalid if ScheduleAreaLevel is set to Big, Middle, or Small. # ens_region_id = "cn-zhengzhou-telecom" # Add the net_district_code parameter. net_district_code = "100102" # Specify this parameter based on actual specifications. // System disk specifications. system_disk { size = 40 } }Run the following command to initialize
Terraform:terraform initIf the following information is returned, Terraform is initialized.
Initializing the backend...

Initializing provider plugins...
- Reusing previous version of hashicorp/alicloud from the dependency lock file
- Using previously-installed hashicorp/alicloud v1.231.0

Terraform has been successfully initialized!

You may now begin working with Terraform. Try running "terraform plan" to see
any changes that are required for your infrastructure. All Terraform commands
should now work.

If you ever set or change modules or backend configuration for Terraform,
rerun this command to reinitialize your working directory. If you forget, other
commands will detect it and remind you to do so if necessary.
Create an execution plan and preview the changes.
terraform planRun the following command to create an ENS instance:
terraform applyDuring the execution, enter
yesas prompted and press the Enter key. Wait until the command is executed. If the following information is returned, the instance is created.Plan: 1 to add, 0 to change, 0 to destroy. Do you want to perform these actions? Terraform will perform the actions described above. Only 'yes' will be accepted to approve. Enter a value: yes alicloud_ens_instance.instance: Creating... alicloud_ens_instance.instance: Still creating... [10s elapsed] alicloud_ens_instance.instance: Still creating... [20s elapsed] ... alicloud_ens_instance.instance: Still creating... [11m30s elapsed] alicloud_ens_instance.instance: Creation complete after 11m31s [id=i-5495sqdyatehco3teqtls****] Apply complete! Resources: 1 added, 0 changed, 0 destroyed.Verify the result.
Run the terraform show command
Run the following command to query the resources that have been created by Terraform:
terraform show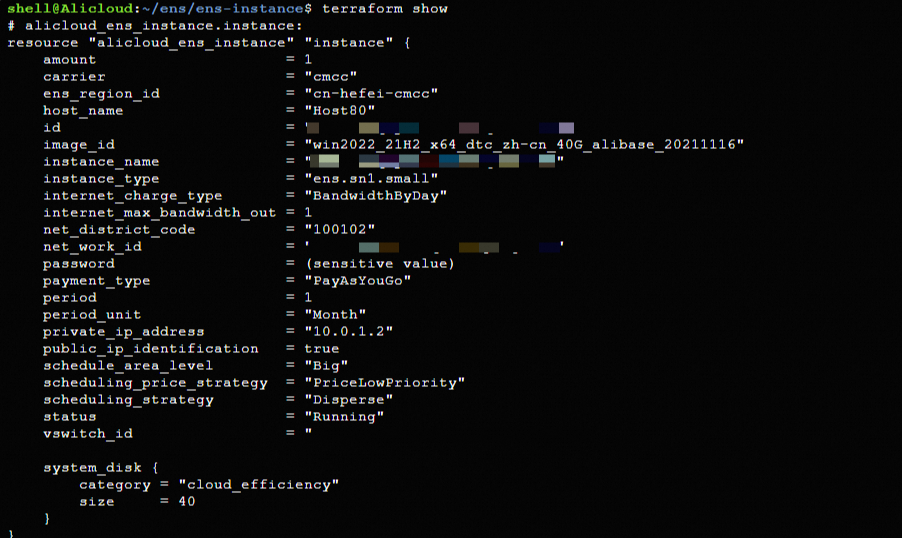
Log on to the ENS console
Log on to the ENS console to view the created instance.

Resource release
If you no longer require the preceding resources that are created or managed by using Terraform, run the following command to release the resources. For more information about the terraform destroy command, see Common commands.
terraform destroySample code
You can run the sample code with a few clicks. You can run the sample code in this topic with a few clicks.
Sample code
To view more sample code, visit GitHub.