Namespace Service of JindoFS supports different metadata storage methods. This topic
describes how to configure a Tablestore instance as the metadata storage backend.
Prerequisites
- An E-MapReduce (EMR) cluster is created.
For more information, see Create a cluster.
- A Tablestore instance is created. We recommend that you use a high-performance instance.
For more information, see Create instances.
Note You must enable the transaction feature.
Background information
In SmartData 2.6.X and later, Namespace Service allows you to use Tablestore instances
to store metadata. You can bind a Tablestore instance to each EMR JindoFS cluster.
Namespace Service creates a Tablestore table for each namespace to manage and store
metadata.
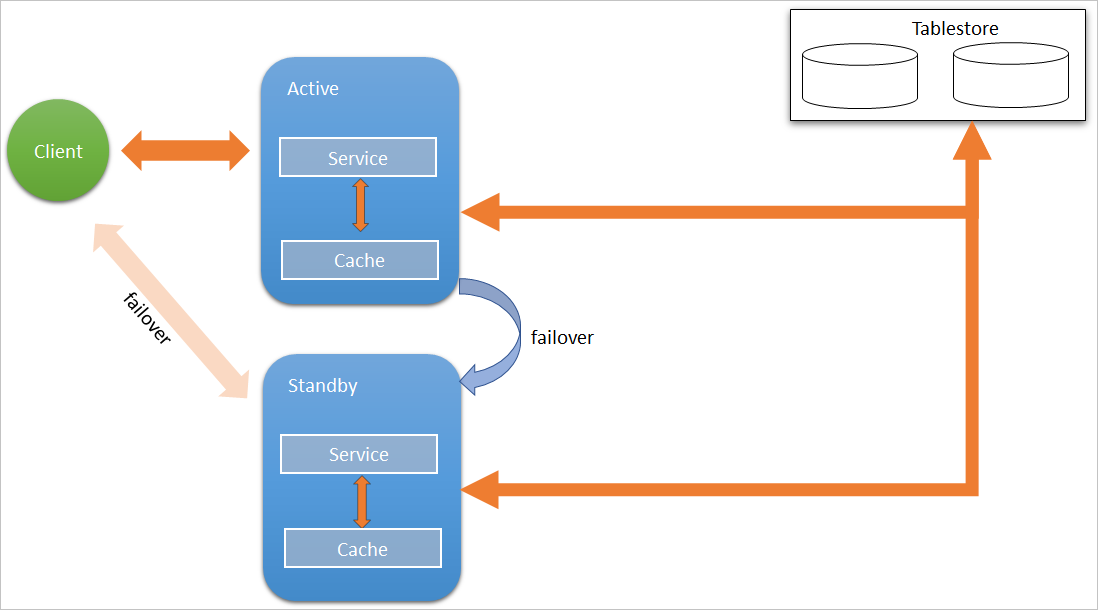
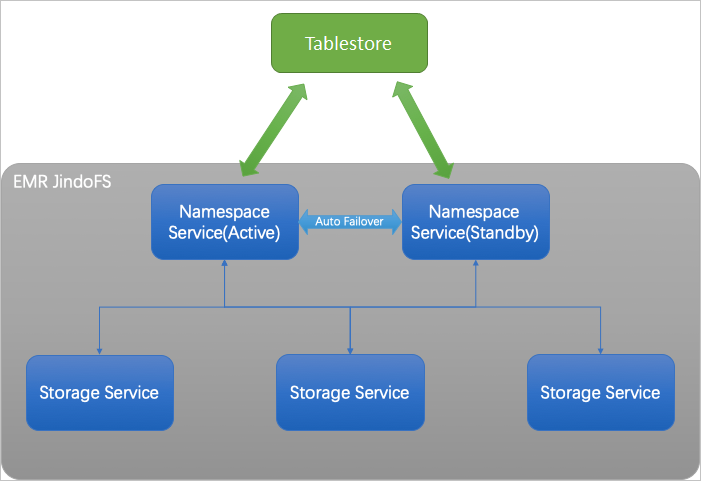
The following figure shows the structure of Namespace Service in high availability
(HA) mode with a Tablestore instance as the metadata storage backend.

Configure a Tablestore instance
To use a Tablestore instance as the metadata storage backend, you must first bind
the Tablestore instance to Namespace Service. Perform the following steps:
- Go to the SmartData service.
- Log on to the EMR console.
- In the top navigation bar, select the region where your cluster resides. Select the resource group as required. By default, all resources of the account appear.
- Click the Cluster Management tab.
- On the Cluster Management page that appears, find the target cluster and click Details in the Actions column.
- In the left-side navigation pane, click Cluster Service and then SmartData.
- Configure bigboot parameters.
- Click the Configure tab.
- Click the bigboot tab in the Service Configuration section.
- Configure the parameters described in the following table.
For example, you have created a Tablestore instance named emr-jfs in the China (Hangzhou)
region. Your EMR cluster is deployed in a VPC network. You have obtained the AccessKey
ID and AccessKey secret that are used to access the Tablestore instance.
| Parameter |
Description |
Required |
Example |
| namespace.backend.type |
The backend storage type of Namespace Service.
Default value: rocksdb. Set this parameter to ots.
|
Yes |
ots |
| namespace.ots.instance |
The name of the Tablestore instance. |
Yes |
emr-jfs |
| namespace.ots.accessKey |
The AccessKey ID that is used to access the Tablestore instance. |
No |
kkkkkk |
| namespace.ots.accessSecret |
The AccessKey secret that is used to access the Tablestore instance. |
No |
XXXXXX |
| namespace.ots.endpoint |
The endpoint of the Tablestore instance. We recommend that you use a VPC endpoint. |
Yes |
http://emr-jfs.cn-hangzhou.vpc.tablestore.aliyuncs.com |
- Save the configurations.
- In the upper-right corner of the Service Configuration section, click Save.
- In the Confirm Changes dialog box, specify Description and turn on Auto-update Configuration.
- Click OK.
- Select Restart Jindo Namespace Service from the drop-down list in the upper-right corner.
Configure a Tablestore instance (HA mode)
If your EMR cluster is deployed in HA mode, we recommend that you deploy Namespace
Service in HA mode.

In HA mode, Namespace Service supports automatic failover. If the active namespace
fails, the client automatically switches services to the standby namespace.

- Go to the bigboot tab for the SmartData service and perform the following operations:
- Change the value of the jfs.namespace.server.rpc-address parameter to emr-header-1:8101,emr-header-2:8101.
- In the upper-right corner of the Service Configuration section, click Custom Configuration. In the Add Configuration Item dialog box, add namespace.backend.ots.ha as a key and set this parameter to true.
- Click OK.
- Save the configurations.
- In the upper-right corner of the Service Configuration section, click Save.
- In the Confirm Changes dialog box, specify Description and turn on Auto-update Configuration.
- Click OK.
- Select Restart Jindo Namespace Service from the drop-down list in the upper-right corner.
- Select Restart Jindo Storage Service from the drop-down list in the upper-right corner.


