In Enterprise Distributed Application Service (EDAS), you can configure the end-to-end traffic adjustment feature for Spring Cloud and Dubbo microservices applications that are deployed in a Kubernetes environment. This feature helps you route traffic that has specific characteristics to applications of a specified version.
Prerequisites
Before you configure end-to-end traffic adjustment for applications, make sure that the following prerequisites are met:
Applications of a new version are deployed, or applications are updated. For more information, see Overview of application upgrades and rollbacks (applicable to Kubernetes clusters).
If you want to use a Spring Cloud Gateway or Spring Cloud Netflix Zuul microservices gateway as an ingress application, make sure that the microservices gateway is built and is associated with a microservices namespace of EDAS.
If you want to build an ingress gateway based on Spring Cloud Gateway, make sure that the version of Spring Cloud Gateway is 2.1.x or later.
A Server Load Balancer (SLB) instance is bound to the ingress application. For more information, see Bind CLB instances or Reuse a CLB instance.
Background information
This section describes how to use the end-to-end traffic adjustment feature in the order placement scenario of an e-commerce architecture.
After a customer places an order, the traffic comes in from the ingress application, which can also be a microservices gateway. The ingress application calls the transaction center, the transaction center calls the commodity center, and then the commodity center calls the downstream inventory center.
Both the transaction center and the commodity center are running in two new versions: V1.0 and V2.0. The two versions need to be verified during a canary release. You want to route the request traffic that matches specific traffic adjustment rules in the ingress application to applications of the new versions, and route all the remaining traffic to applications of the online version, which is the official version.
Create a lane group
Log on to the EDAS console.
In the left-side navigation pane, choose .
In the top navigation bar, select a region. On the End-to-end Traffic Adjustment page, select a microservices namespace.
On the End-to-end Traffic Adjustment page, click Create.
If a lane group is already created in the selected microservices namespace, click Create to the right of the Select Lane Group drop-down list.
NoteA microservices namespace can contain up to two lane groups.
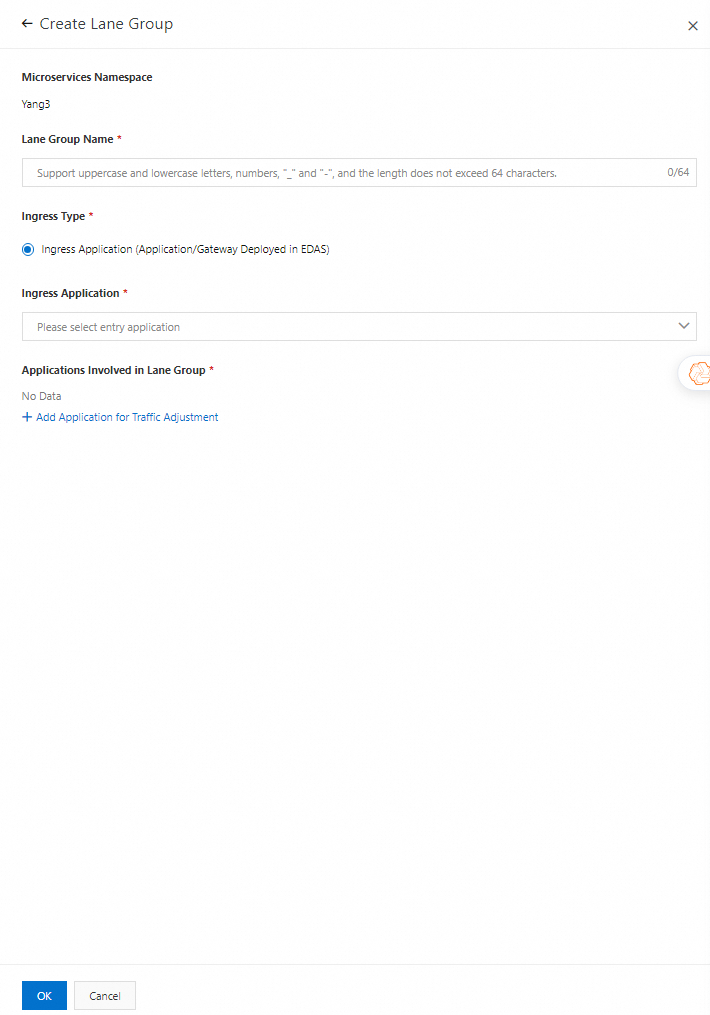
In the Create Lane Group panel, configure the required parameters and click OK. The following table describes the parameters.

Parameter
Description
Microservices Namespace
The microservices namespace that you selected on the End-to-end Traffic Adjustment page appears. The selected microservices namespace cannot be changed.
Lane Group Name
Specify a name for the lane group. The name must be 1 to 64 characters in length and contain letters, digits, hyphens (-), and underscores (_).
Ingress Type
Specify the ingress type. Default value: Ingress Application (Application/Gateway Deployed in EDAS).
Ingress Application
Select an ingress application based on your business requirements.
Applications Involved in Lane Group
Click Add Application for Traffic Adjustment and select all applications that are involved based on the ingress application or ingress gateway that you selected.
After you create the lane group, the involved applications of the created lane group are displayed in the Applications Involved in Lane Group section of the End-to-end Traffic Adjustment page. Check whether the ingress application and the involved applications are correct. To modify the information about the lane group, click Edit and modify the information based on your business requirements.
Create a lane
On the End-to-end Traffic Adjustment page, select the same microservices namespace as the lane group that you created. Then, click Create Lane in the lower part of the page.
ImportantAfter you configure end-to-end traffic adjustment for applications, these applications no longer support a canary release.
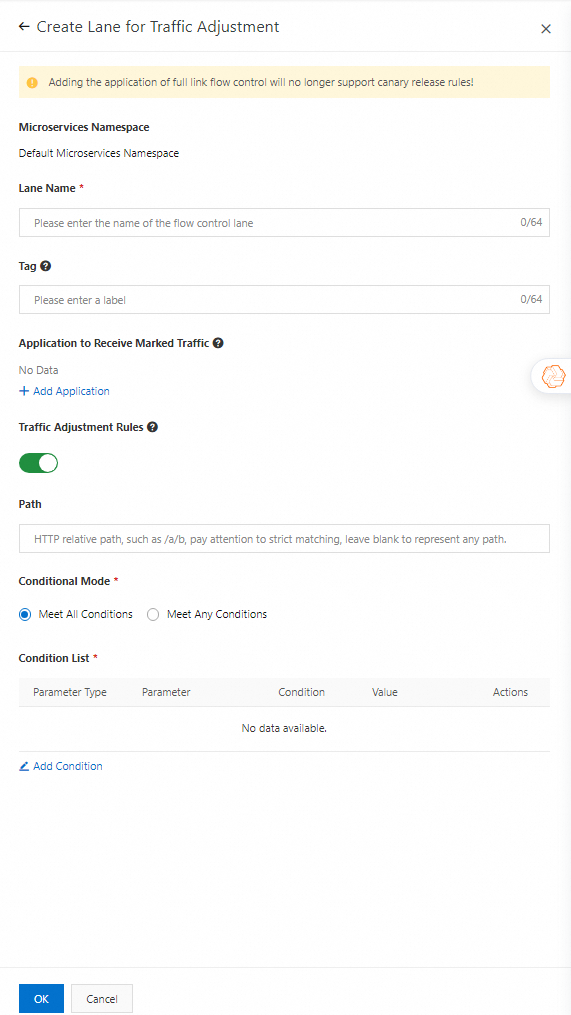
In the Create Lane for Traffic Adjustment panel, configure the relevant parameters and click OK.

Parameter
Description
Microservices Namespace
By default, the microservices namespace that you selected on the End-to-end Traffic Adjustment page appears. Make sure that your lane group is created in the microservices namespace. The selected microservices namespace cannot be changed.
Lane Name
Specify a name for the lane. The name can be up to 64 characters in length, and can contain letters, digits, hyphens (-), and underscores (_).
Application to Receive Marked Traffic
Click Add Application and select applications from the lane group.
NoteYou can select multiple applications for a lane. You can also create a lane for each application.
The quotas of lane groups and lanes vary based on the edition of EDAS. For more information, see Overview.
When you create a lane, the Application to Receive Marked Traffic parameter is optional. You can specify the Application to Receive Marked Traffic parameter when you edit the created lane.
Traffic Adjustment Rules
Specify whether to turn on the switch to enable traffic adjustment rules. By default, the switch is turned on.
Path
Specify an HTTP relative path based on your business requirements. If you leave this parameter empty, the rules take effect for all paths.
Conditional Mode
Select the mode in which conditions are met based on your business requirements. Valid values:
Meet All Conditions: The rules take effect when all the conditions are met at the same time.
Meet Any Conditions: The rules take effect when one of the conditions is met.
Condition List
Click Add Condition and add one or more conditions based on your business requirements. You can add conditions based on the following types of parameters: Cookie, Header, and Parameter.
In this example, the following conditions are added:
The parameter type is Parameter and the condition is env=red. When the condition is met, the traffic is routed to the applications that are running in V1.0.
The parameter type is Parameter and the condition is env=blue. When the condition is met, the traffic is routed to the applications that are running in V2.0.
After you create the lane, the lane appears in the Flow Control Distribution section of the End-to-end Traffic Adjustment page. Check whether the lane name, traffic adjustment rules, and applications that receive the marked traffic are correct. If you want to modify the information about the lane, click Edit and modify the information.
(Optional) To create more lanes, click Create Lane in the Flow Control Distribution section and configure the relevant parameters.
NoteA lane group can contain up to five lanes.
Verify that traffic is routed to specific applications
Obtain the endpoint of the SLB instance that is bound to the ingress application or ingress gateway that you want to manage.
On the Applications page, click the name of the ingress application or ingress gateway.
In the Access configuration section of the Application Overview page, copy the endpoint of the SLB instance.
Use a browser or other tools to access an application in a lane of the lane group multiple times.
For example, enter http://ip:prt/**?env=red in the address bar of a browser to access the transaction center application several times. If the same result is returned, the traffic that has specific characteristics is routed to the specified application.
In the URL that you entered, ** is the path that you specify in the traffic adjustment rules, and env=red is a condition in the traffic adjustment rules.
A2[172.20.**.**] -> B2[172.20.**.**] -> C[172.20.**.**]
Configure two versions for the same application
Create two identical applications by using the same package and register the same service for the applications.
Add one of the applications to a lane. The application in the lane runs in a canary release environment. Then, use the package of the application in the canary release version to deploy a new application in a canary release environment.