After expanding a cloud disk's capacity (system disk or data disk) in the ECS console, the corresponding partition's file system remains unextended. You must access the ECS instance to extend the partition and file system of the cloud disk. This topic explains how to integrate the additional storage capacity of a Windows instance into an existing or new partition.
Prerequisites
Ensure the instance meets the following requirements:
The instance status is Running.
Image version: Windows Server 2003 operating system is not supported.
Kernel version: The virtio driver of the Windows instance must be version 58011 or later. For more information, see Update the virtio driver for Windows instances.
Ensure the cloud disk status is In_use.
The cloud disk capacity has been resized in the ECS console. For specific operations, see Step 1: Resize the cloud disk capacity.
NoteIf you select Offline Resize when resizing the cloud disk capacity, you must restart the instance through the ECS console or API interface (rebooting by executing the
rebootcommand inside the instance is ineffective) for the changes to take effect. For specific operations, see Restart the instance.
Preparations
(Strongly recommended) Create a snapshot of the cloud disk to back up data. For specific operations, see Manually create a single disk snapshot.
NoteWhile extending partitions and file systems typically does not result in data loss, creating snapshots is recommended to safeguard against data loss or issues due to accidental operations.
Familiarize yourself with the overall process of cloud disk extension. For more information, see Cloud disk extension guide.
Procedure
This operation uses the public image Windows Server 2016 64-bit operating system as an example, extending the cloud disk from 40 GiB to 60 GiB within the ECS instance. Please perform the operation according to your actual environment.
Step 1: Confirm whether the cloud disk needs partition conversion
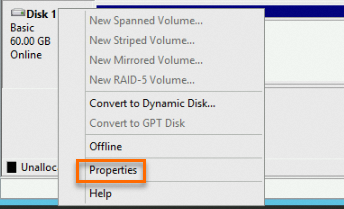
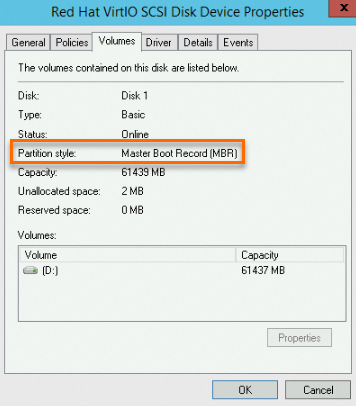
If the cloud disk capacity is less than or equal to 2 TiB or is a GPT partition, skip this step.
If the cloud disk capacity is greater than 2 TiB and is an MBR partition, you must first convert the partition type of the Windows data disk, and then proceed to Step 2: Extend partitions and file systems.
Step 2: Extend partitions and file systems
Extend existing partitions and file systems
This step demonstrates how to add the extended 20 GiB capacity to the existing partition (C drive) within the ECS instance, using the system disk as an example.
Connect to the ECS instance remotely.
Log on to ECS console, click Instances in the left-side navigation pane, select the destination instance, and click Remote Connection to log on to the instance. For specific operations, see Log on to a Windows instance by using the Workbench tool over RDP.
Verify the virtio driver version of the Windows instance. Online disk extension requires the virtio driver version to be 58011 or later. Otherwise, you may need to restart the instance to detect unallocated space. Open the Run dialog box, type powershell to access the PowerShell command line, and execute the following command to check the virtio driver version.
[System.Diagnostics.FileVersionInfo]::GetVersionInfo("C:\Windows\System32\drivers\viostor.sys")The command line output is displayed below.

Determine if the driver needs updating based on whether the last number of ProductVersion is less than
58011. For update instructions, see Update the virtio driver for Windows instances.On the Windows Server desktop, right-click the
 icon, and then click Disk Management.
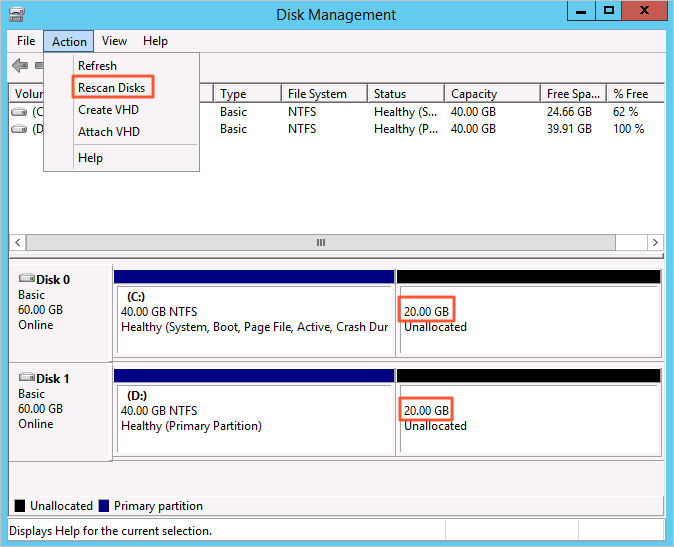
In the Disk Management dialog box, select to verify the unallocated disk capacity.
The illustration below depicts Disk 0 (C drive) as the system disk and Disk 1 (D drive) as the data disk.
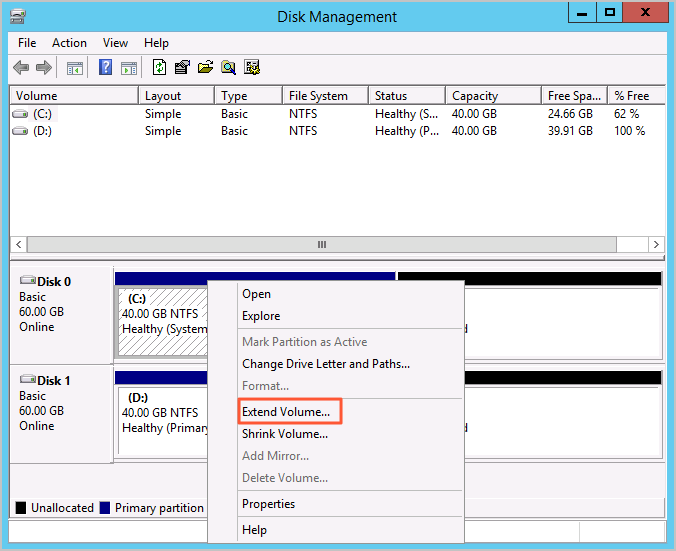
Right-click the primary partition's blank area (using Disk 0 as an example) and select Extend Volume.
ImportantCross-partition extension is not permitted. Due to Windows operating system limitations, you cannot extend a partition across another. Unallocated space can only be added to the adjacent partition on the left.
Cross-disk extension is not possible. Space from Disk 1 cannot be directly allocated to Disk 0. Each disk's partitions and file systems are independent, and the extended space can only be used to enlarge the current disk's partitions or to create new ones.
Follow the default settings in the Extend Volume Wizard to complete the volume extension.
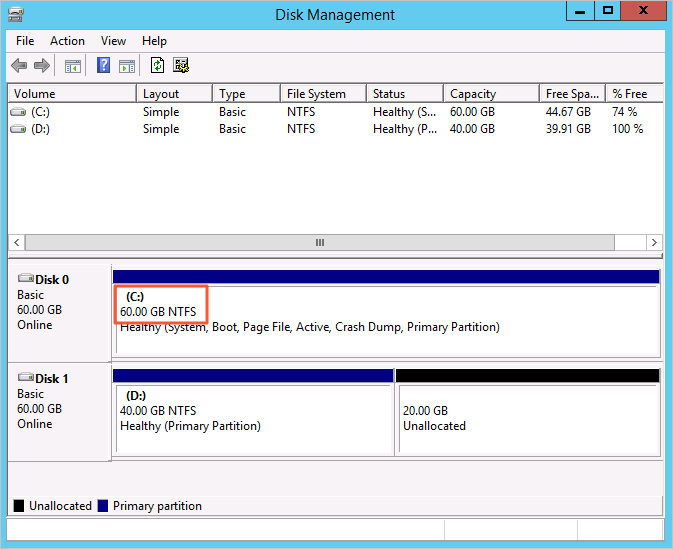
Once the extension process is finished, the additional capacity is automatically allocated to the original C drive. As illustrated below, the C drive now has 60 GB of free space, based on the example capacity.
Create a new partition
This step uses the data disk as an example to illustrate how to create a new partition (such as the E drive) with the extended 20 GB capacity within the ECS instance.
Connect to the ECS instance remotely.
Log on to ECS console, click Instances in the left-side navigation pane, select the destination instance, and click Remote Connection to log on to the instance. For specific operations, see Log on to a Windows instance by using the Workbench tool over RDP.
Verify the virtio driver version of the Windows instance. Online disk extension requires the virtio driver version to be 58011 or later. If not, unallocated space may not be detected online. Open the Run dialog box, type powershell to access the PowerShell command line, and execute the following command to check the virtio driver version.
[System.Diagnostics.FileVersionInfo]::GetVersionInfo("C:\Windows\System32\drivers\viostor.sys")The command line output is shown below.

Determine if the driver needs updating based on whether the last number of ProductVersion is less than
58011. For update instructions, see Update the virtio driver for Windows instances.In the Disk Management dialog box, select to verify the unallocated disk capacity.
The illustration below depicts Disk 0 (C drive) as the system disk and Disk 1 (D drive) as the data disk.

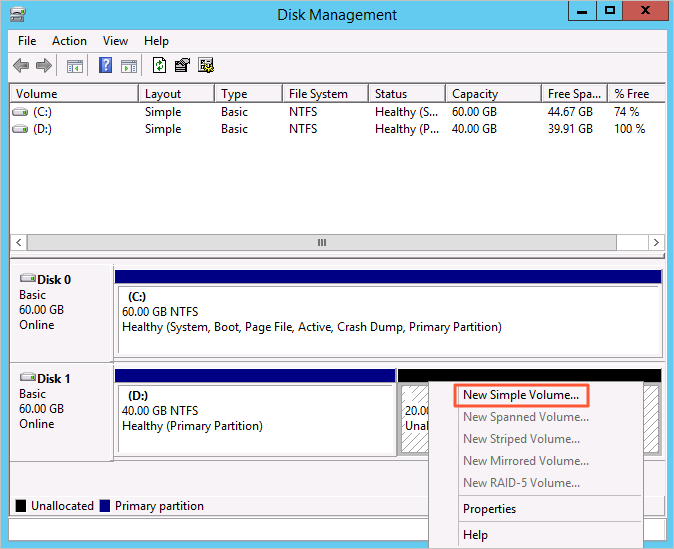
Right-click the unallocated space on Disk 1 and select New Simple Volume.
Follow the default settings in the New Simple Volume Wizard to complete the creation of the new volume.
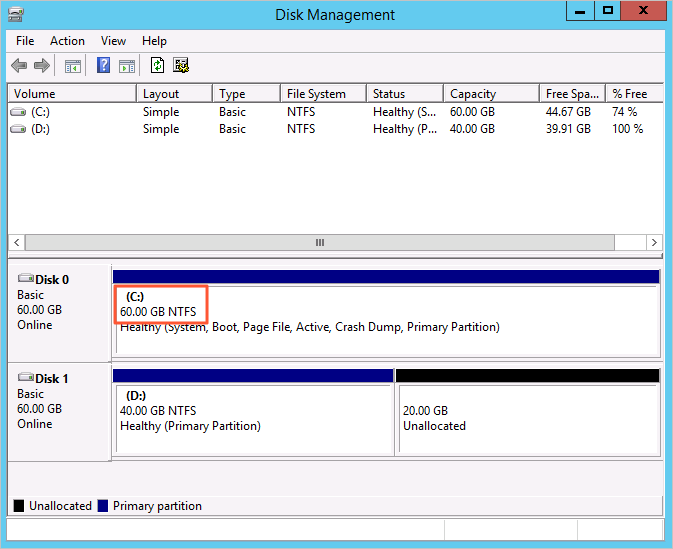
After the extension is complete, the new E drive will be visible. As shown in the figure below, the E drive has 20 GB of free space according to the example capacity.
After completing the extension, verify the cloud disk data is intact and that the business applications on the ECS instance are functioning normally according to the actual situation.
