In a distributed application system that consists of multiple Elastic Compute Service (ECS) instances, the applications that are hosted on each ECS instance generate a large number of log files. The number of log files rapidly increases over time, and a large amount of disk space is occupied by the log files. As a result, the disk space may become insufficient, which affects application performance and service stability. You can configure one or more rules by using CloudOps Orchestration Service (OOS) to periodically and automatically batch delete files from disks to maintain sufficient disk space and ensure that the system runs as expected.
CloudOps Orchestration Service (OOS) is a comprehensive and automated O&M service provided by Alibaba Cloud free of charge to help you manage and execute O&M tasks in the cloud. OOS also serves as a standardization platform for O&M tasks and allows you to perform operations as code. For more information, see What is OOS?
Prerequisites
The ECS instances that you want to manage are in the Running (Running) state.
Cloud Assistant Agent, which is required to execute O&M tasks in OOS, is installed on the ECS instances. For more information, see Install Cloud Assistant Agent.
Procedure
Before you run a clean-up task on disks of ECS instances, we recommend that you back up data on the ECS instances to prevent data loss. For example, you can back up data by creating snapshots for disks.
Log on to the CloudOps Orchestration Service (OOS) console.
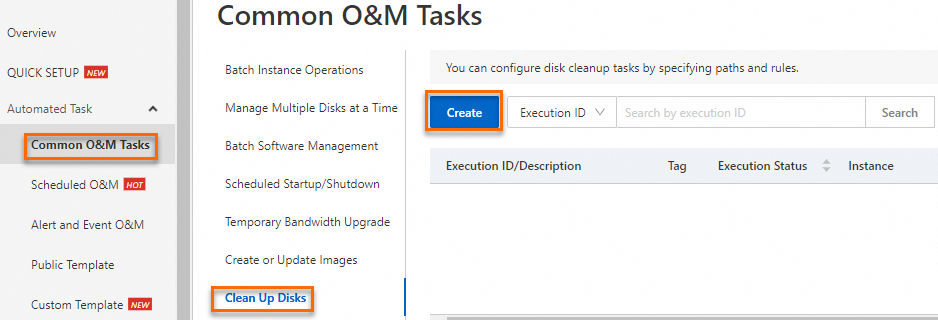
In the left-side navigation pane, choose . In the left-side navigation pane of the Common O&M Tasks page, click the Clean Up Disks tab. Then, click Create.

In the Set Rule section, configure the parameters, including the File Retention Period, Unit, Path, and File parameters, to specify a retention period for the files that you want to delete.
For example, configure the parameters to specify a 7-day retention period for the
*.logfiles in the/home/admin/logs/directory, as shown in the following figure. After the 7-day retention period ends, the files are automatically deleted.
You can click the
 icon to add files and directories that you want to automatically delete after a specific retention ends. Important
Make sure that the files and directories you added are correct to prevent the accidental deletion of important data.
Click Cleanup Time and specify the schedule of the clean-up task and the permissions used to run the task.
Scheduled Task Type: Select Executed Periodically and configure the Repeat Period parameter to specify the schedule of the clean-up task.
You can click Execution Schedule Preview and select times and dates in the dialog box to specify the schedule, or use a cron expression to specify the schedule. In this example, a cron expression is used. For information about cron expressions, see Cron expressions.
For example, configure the parameters to run the clean-up task at 23:00:00 on the 5th day of each month before 23:00:00 on August 31, 2024, as shown in the following figure.

Permissions: Select Specify RAM Role and Use Permissions Granted to This Role, which is the default value, and then select OOSServiceRole, which is the default role. For more information, see Create a RAM role for OOS and grant permissions.
Click Select Instances and select ECS instances from the instance list.

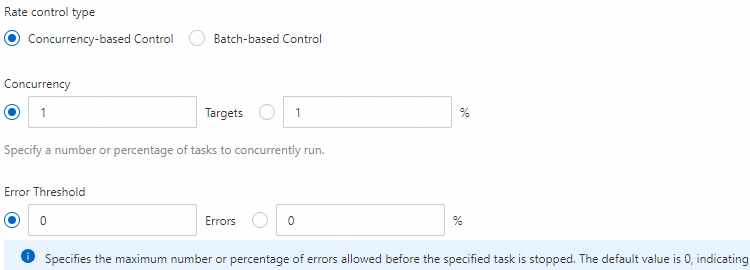
Click Advanced(Optional), set the Rate control type parameter to Concurrency-based Control, and then configure the Concurrency and Error Threshold parameters.
Rate control type:
Concurrency-based Control: The task is run based on a specific concurrency value until the task is completed. This value is suitable if you want to control resource usage to prevent resource overutilization.
Batch-based Control: The selected ECS instances are divided into multiple batches that sequentially run the clean-up task. This value is suitable if you want to control the execution pace, mitigate instantaneous pressure, or maintain the data processing sequence.
Concurrency: specifies the number or percentage of the selected ECS instances that concurrently run the clean-up task. In this example, this parameter is set to 1, which specifies that one of the selected ECS instances runs the clean-up task at a time.
Error Threshold: specifies the maximum number of errors that can occur before the clean-up task stops running. Enter a number or percentage. Default value: 0, which specifies that the clean-up task stops running when an error occurs. If you set this parameter to 100, the clean-up task runs to completion regardless of how many errors occur.

Click Execution Settings(Optional), retain the default settings for the parameters, and then click Create.
In the Parameter Confirmation dialog box, confirm the configurations and click OK.
View the execution details of the clean-up task.
Go back to the Clean Up Disks tab, find the clean-up task that you created, and then click Details in the Actions column to view the execution details of the task.