If the space of a logical volume (LV) created by using Logical Volume Manager (LVM) is insufficient, you can extend the LV. This topic describes how to use LVM to extend an LV on an Elastic Compute Service (ECS) instance.
Prerequisites
An LV is created. For more information, see Use LVM to create an LV.
Procedures
You can use one of the following methods to extend an LV:
Method 1: Extend an LV by resizing one of the associated disks
How the extend operation works
If the capacity of an LV does not meet your business requirements, you can extend the LV by resizing one of the associated disks. The following figure shows how the extend operation works.

Procedure
In this example, the /dev/vdb disk is resized by 10 GiB to extend the capacity of the lv01 LV by 10 GiB.
(Optional) Create a snapshot-consistent group to back up data. For more information, see Create a snapshot-consistent group.
Connect to an ECS instance.
For information about the connection methods, see Connection method overview.
Resize a disk. In this example, the
/dev/vdbdisk is used.Resize the disk to extend its capacity. In this example, the capacity is extended by 10 GiB. For more information, see Step 1: Resize a disk to extend its capacity.
(Optional) If the disk is partitioned, extend the partition. For more information, see Extend the partitions and file systems of disks on a Linux instance. If the disk is not partitioned, skip this step.
You can run the
lsblkcommand to check whether the disk is partitioned. For example, the following figure shows that the/dev/vdbdisk is not partitioned and the/dev/vdcdisk is partitioned.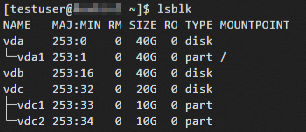
Extend the physical volume (PV).
Run the following command to obtain the name of the PV that corresponds to the resized disk or disk partition. The name is required to run subsequent commands.
The values in the PV column indicate the names of PVs. The values in the Devices column indicate the corresponding disks or disk partitions.
sudo pvs -a -o +devices
The preceding figure shows that
/dev/vdbis the name of the PV that corresponds to the/dev/vdbdisk.Run the following command to extend the PV that corresponds to the disk:
sudo pvresize <PV name>For example, to extend the
/dev/vdbPV, run the following command:sudo pvresize /dev/vdbThe following command output indicates that the PV is extended as expected.

Extend the LV and file system.
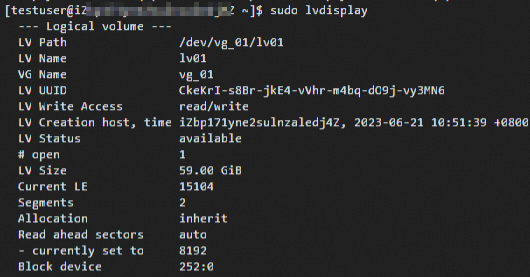
Run the follow command to obtain the attributes of the LV, such as the LV path, LV name, and volume group (VG) name. The attributes are required to run subsequent commands.
sudo lvdisplayLV Path: the path of the LV. Example:
/dev/vg_01/lv01.LV Name: the name of the LV. Example:
lv01.VG Name: the name of the VG to which the LV belongs. Example:
vg_01.LV Size: the size of the LV. Example: 59 GiB.
Run the following command to extend the LV:
sudo lvextend -L <Amount to increase the LV capacity by> <LV path>For example, to extend the capacity of the LV whose path is
/dev/vg_01/lv01by 10 GiB, run the following command:sudo lvextend -L +10G /dev/vg_01/lv01The following command output indicates that the capacity of the lv01 LV is extended by 10 GiB.

Run one of the following commands to extend the file system of the LV based on the type of the file system.
You can run the
df -Thcommand to check the file system type of the LV. The values in the Type column indicate the file system types. Commands vary based on file system types.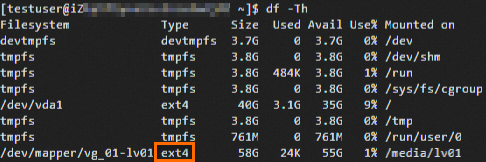
Ext4 file system
sudo resize2fs <LV path>For example, to extend the lv01 LV whose path is /dev/vg_01/lv01, run the following command:
sudo resize2fs /dev/vg_01/lv01XFS file system
sudo xfs_growfs <Mount point of the LV>For example, to extend the lv01 LV whose mount point is /media/lv01, run the following command:
sudo xfs_growfs /media/lv01
Run the following command to check whether the LV is extended as expected:
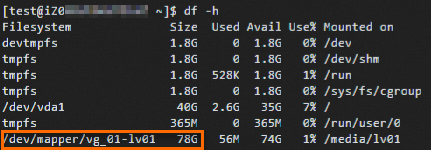
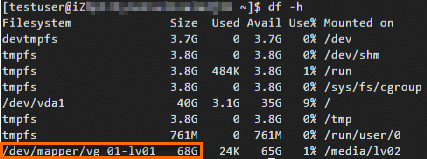
df -hThe following command output indicates that the capacity of the LV is extended by 10 GiB. The file system of the LV occupies a portion of the LV capacity.
Method 2: Extend an LV by adding more disks
How the extend operation works
If the capacity of an LV does not meet your business requirements, you can extend the LV by adding more disks to the VG. The following figure shows how the extend operation works.

Procedure
In this example, a disk whose device name is /dev/vdd and capacity is 20 GiB is created, a PV is created based on the disk, and the PV is added to the VG.
Create a disk for the ECS instance that is associated with the LV you want to extend. Do not initialize the disk.
For information about how to create and attach a data disk, see Create a disk and Attach a data disk.
Connect to an ECS instance.
For information about the connection methods, see Connection method overview.
Run the following command to create a PV based on the new disk:
sudo pvcreate <Disk device name>For example, to create a PV based on the
/dev/vdddisk, run the following command:sudo pvcreate /dev/vddThe following command output indicates that the PV is created as expected.

Extend the VG.
Run the following command to view information about the VG:
sudo vgsThe following command output indicates that the total capacity of the
vg_01VG is 59.99 GiB and the remaining available capacity is less than 1 GiB.
Run the following command to extend the VG:
sudo vgextend <VG name> <PV name>For example, to add the
/dev/vddPV to thevg_01VG, run the following command:sudo vgextend vg_01 /dev/vddThe following command output indicates that the VG is extended as expected.

Run the following command to view information about the VG:
sudo vgsThe following command output indicates that the capacity of the
vg_01VG is extended from 59.99 GiB to 79.99 GiB.
Extend the LV and file system.
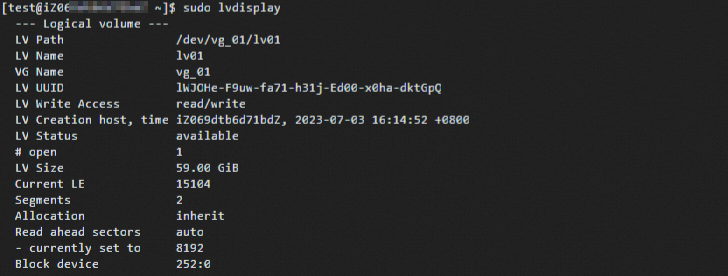
Run the follow command to obtain the attributes of the LV, such as the LV path, LV name, and VG name. The attributes are required to run subsequent commands.
sudo lvdisplayLV Path: the path of the LV. Example:
/dev/vg_01/lv01.LV Name: the name of the LV. Example:
lv01.VG Name: the name of the VG to which the LV belongs. Example:
vg_01.LV Size: the size of the LV. Example: 59 GiB.
Run the following command to extend the LV:
sudo lvextend -L <Amount to increase the LV capacity by> <LV path>For example, to extend the capacity of the LV whose path is
/dev/vg_01/lv01by 20 GiB, run the following command:sudo lvextend -L +20G /dev/vg_01/lv01The following command output indicates that the capacity of the lv01 LV is extended by 20 GiB.

Run one of the following commands to extend the file system of the LV based on the type of the file system.
You can run the
df -Thcommand to check the file system type of the LV. The values in the Type column indicate the file system types. Commands vary based on file system types.
Ext4 file system
sudo resize2fs <LV path>For example, to extend the lv01 LV whose path is /dev/vg_01/lv01, run the following command:
sudo resize2fs /dev/vg_01/lv01XFS file system
sudo xfs_growfs <Mount point of the LV>For example, to extend the lv01 LV whose mount point is /media/lv01, run the following command:
sudo xfs_growfs /media/lv01Run the following command to check whether the LV is extended as expected:
df -hThe following command output indicates that the capacity of the LV is extended by 20 GiB. The file system of the LV occupies a portion of the LV capacity.
