This topic describes how to view and change the default port for Remote Desktop on a Windows Elastic Compute Service (ECS) instance.
Usage notes
The default port for Remote Desktop on Windows instances is 3389. For security reasons, you may want to change the default port for Remote Desktop to prevent attacks against and unauthorized scans of ECS instances by using Remote Desktop. This topic describes how to view and change the default port for Remote Desktop on a Windows ECS instance. Before you change the register, take note of the following items:
To prevent accidental operations, you must be familiar with the operating mechanism of Windows.
To prevent data loss, we recommend that you create snapshots for the system disk and data disks of the instance. For more information, see Create a snapshot for a disk.
View the port for Remote Desktop on a Windows instance
Use one of the following methods to view the port for Remote Desktop on a Windows instance:
Method 1
Connect to the Windows instance.
For more information, see Connect to a Windows instance by using a password or key.
In the lower part of the Windows desktop, click the Start icon and select Run. In the Run dialog box, enter cmd to open the command prompt.
Run the following command to view the information about Remote Desktop Services (TermService):
tasklist /svc | find "Ter"The following command output indicates that the process ID (PID) of TermService is 1592.

Run the following command to view the port that is used by TermService:
netstat -ano | find "1592"The following command output indicates that the port that is used by TermService is 3389.

Method 2
Connect to the Windows instance.
For more information, see Connect to a Windows instance by using a password or key.
In the lower part of the Windows desktop, click the Start icon and select Run. In the Run dialog box, enter regedit to start the register editor.
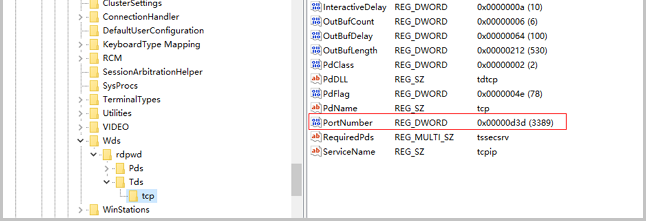
Navigate to the following registry subkey: HKEY_LOCAL_MACHINE\SYSTEM\CurrentControlSet\Control\Terminal Server\Wds\rdpwd\Tds\tcp. Then, view the value in the Data column that corresponds to PortNumber, as shown in the following figure.

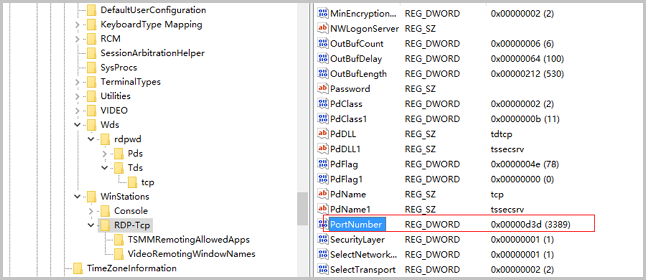
Navigate to the following registry subkey: HKEY_LOCAL_MACHINE\SYSTEM\CurrentControlSet\Control\Terminal Server\WinStations\RDP-Tcp. Then, view the value in the Data column that corresponds to PortNumber. In most cases, the value is the same as the value obtained in the previous step and indicates the port for Remote Desktop.

Method 3
Connect to the Windows instance.
For more information, see Connect to a Windows instance by using a password or key.
In the lower part of the Windows desktop, click the Start icon and select Run. In the Run dialog box, enter cmd to open the command prompt.
Run the following command to obtain the list of items within a register subkey that belongs to the HKEY_LOCAL_MACHINE\SYSTEM\CurrentControlSet\Control\Terminal Server\Wds\rdpwd\Tds register subkey:
reg query "hklm\SYSTEM\CurrentControlSet\Control\Terminal Server\Wds\rdpwd\Tds" /sThe following command output indicates that the value of PortNumber is 0xd3d in hexadecimal notation, which is equal to 3389 in decimal notation.

Run the following command to obtain the PortNumber value in the HKEY_LOCAL_MACHINE\SYSTEM\CurrentControlSet\Control\Terminal Server\WinStations\RDP-Tcp register subkey:
reg query "HKEY_LOCAL_MACHINE\SYSTEM\CurrentControlSet\Control\Terminal Server\WinStations\RDP-Tcp" /v portnumber
Change the port for Remote Desktop on a Windows instance
To change the port for Remote Desktop on a Windows instance, perform the following steps:
Connect to the Windows instance.
For more information, see Connect to a Windows instance by using a password or key.
In the lower part of the Windows desktop, click the Start icon and select Run. In the Run dialog box, enter regedit to start the register editor.
Navigate to the following registry subkey: HKEY_LOCAL_MACHINE\SYSTEM\CurrentControlSet\Control\Terminal Server\Wds\rdpwd\Tds\tcp. Then, change the value in the Data column that corresponds to PortNumber to the number of the new port.
Navigate to the following registry subkey: HKEY_LOCAL_MACHINE\SYSTEM\CurrentControlSet\Control\TerminalServer\WinStations\RDP-Tcp. Then, change the value in the Data column that corresponds to PortNumber to the number of the new port.
What to do next
After you change the default port for Remote Desktop on the instance, perform the following operations:
Make sure that the firewall and TCP/IP security rules allow traffic on the new port. For more information, see Configure Windows Firewall rules for Windows Server instances.
Make sure that the rules of the security groups to which the instance belongs allow traffic on the new port. For more information, see Add a security group rule.
Restart the instance for the change to take effect. For more information, see Restart instances.