This topic describes how to use Data Transmission Service (DTS) to migrate data from a self-managed PostgreSQL database to an RDS for PostgreSQL instance. DTS supports schema migration, full data migration, and incremental data migration. You can use these three migration types together to migrate your self-managed PostgreSQL database to the cloud with minimal service interruptions.
Prerequisites
Create a destination RDS for PostgreSQL instance with more storage space than the source self-managed PostgreSQL database. For more information about creating an RDS for PostgreSQL instance, see Create an RDS for PostgreSQL instance.
NoteFor information about the supported versions of the source and destination databases, see Overview of data migration scenarios.
To ensure compatibility, the version of the destination database must be the same as or later than that of the source database. If the version of the destination database is earlier than that of the source database, database compatibility issues may occur.
Create a database in the destination RDS for PostgreSQL instance to store the migrated data. For more information, see Create a database.
Precautions
Type | Description |
Source database limits |
|
Other limits |
|
Special cases |
|
Migration types
Schema migration
DTS migrates the schemas of the selected objects from the source database to the destination database.
NoteDTS supports schema migration for the following types of objects: tables, triggers, views, sequences, functions, user-defined types, rules, domains, operations, and aggregates.
Full migration
DTS migrates the historical data of required objects from the source database to the destination database.
Incremental migration
After full data migration is complete, DTS migrates incremental data from the source database to the destination database. Incremental data migration allows data to be migrated smoothly without interrupting the services of self-managed applications during data migration.
Supported objects for migration
SCHEMAandTABLE.NoteIncludes
PRIMARY KEY,UNIQUE KEY,FOREIGN KEY,DATATYPE(built-in data types), andDEFAULT CONSTRAINT.VIEW,PROCEDURE(for PostgreSQL 11 or later),FUNCTION,RULE,SEQUENCE,EXTENSION,TRIGGER,AGGREGATE,INDEX,OPERATOR, andDOMAIN.
SQL operations that support incremental migration
Operation type | SQL statement |
DML |
|
DDL |
|
Permissions required for database accounts
Database | Schema migration | Full migration | Incremental migration |
Self-managed PostgreSQL database | USAGE permission on pg_catalog | Permissions for SELECT statement on the objects to be migrated | superuser |
RDS for PostgreSQL instance | CREATE and USAGE permissions on the objects to be migrated | Permissions of the schema owner | Permissions of the schema owner |
To create a database account and grant permissions:
For a self-managed PostgreSQL database, see the CREATE USER and GRANT syntax.
For an RDS for PostgreSQL instance, see Create an account.
Preparations
If your source database is an Amazon RDS for PostgreSQL instance, see Preparations. If your source database is an Amazon Aurora PostgreSQL instance, see Preparation 1: Adjust the inbound rules of the Amazon Aurora PostgreSQL instance.
The following steps are for a Linux operating system.
Perform the following preparations for all versions of a self-managed PostgreSQL database.
Log on to the server that hosts the self-managed PostgreSQL database.
Run the following command to query the number of used replication slots in the database.
select count(1) from pg_replication_slots;Modify the
postgresql.conffile. Set thewal_levelparameter tological. Ensure that the values of themax_wal_sendersandmax_replication_slotsparameters are greater than the sum of the used replication slots and the number of DTS instances that will use this self-managed PostgreSQL database as the source.# - Settings - wal_level = logical # minimal, replica, or logical # (change requires restart) ...... # - Sending Server(s) - # Set these on the master and on any standby that will send replication data. max_wal_senders = 10 # max number of walsender processes # (change requires restart) #wal_keep_segments = 0 # in logfile segments, 16MB each; 0 disables #wal_sender_timeout = 60s # in milliseconds; 0 disables max_replication_slots = 10 # max number of replication slots # (change requires restart)NoteAfter you modify the configuration file, restart the self-managed PostgreSQL database for the parameter settings to take effect.
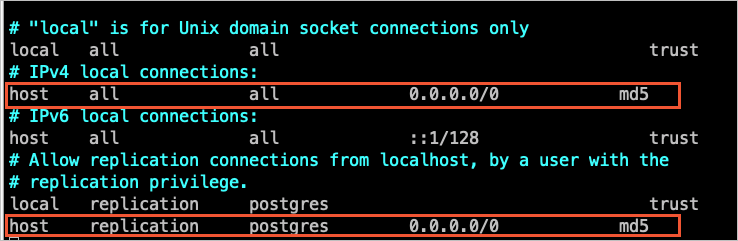
Add the IP addresses of the DTS servers to the pg_hba.conf configuration file of the self-managed PostgreSQL database. Add only the IP address CIDR blocks for the DTS servers that are in the same region as the destination database. For more information, see Add the CIDR blocks of DTS servers to the whitelist of a database.
NoteAfter you modify the configuration file, run the
SELECT pg_reload_conf();command or restart the self-managed PostgreSQL database for the parameter settings to take effect.For more information about the settings of this configuration file, see The pg_hba.conf File. If you have configured the trusted address as
0.0.0.0/0(as shown in the following figure), you can skip this step.
Based on the database and schema information of the objects to be migrated, create the corresponding database and schema in the destination RDS for PostgreSQL instance. The schema names must be the same. For more information, see Create a database and Manage schemas.
If the version of your self-managed PostgreSQL database is from 9.4.8 to 10.0, you must also perform the following preparations.
Download the PostgreSQL source code, and then compile and install it.
Download the source code that corresponds to the version of your source self-managed PostgreSQL database from the PostgreSQL official website.
Run the
sudo ./configure,sudo make, andsudo make installcommands in sequence to configure, compile, and install the source code.ImportantWhen you compile and install PostgreSQL, the operating system version must be compatible with the GCC (GNU Compiler Collection) version.
If an error occurs when you run the
sudo ./configurecommand, you can modify the command based on the error message. For example, if the error message isreadline library not found. Use --without-readline to disable readline support., you can change the command tosudo ./configure --without-readline.If you installed PostgreSQL using another method, you must compile the ali_decoding plugin in a staging environment that has the same operating system and GCC version as your production environment.
Download the ali_decoding plugin provided by DTS, and then compile and install it.
Download ali_decoding.
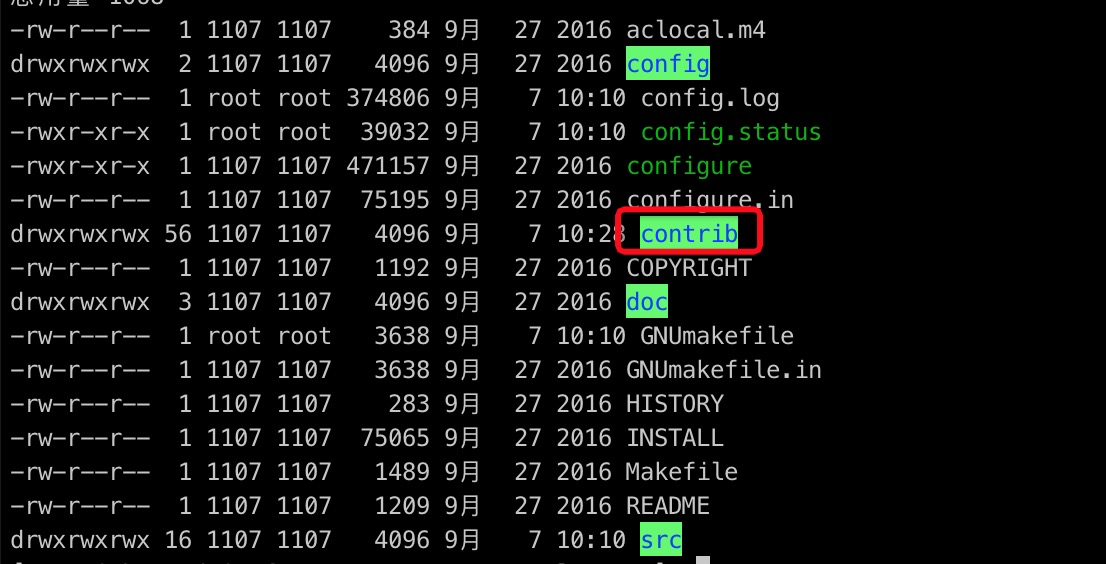
Copy the entire ali_decoding directory to the `contrib` directory of the compiled and installed PostgreSQL source code.
Go to the ali_decoding directory and replace the content of the `Makefile` file with the following script:
# contrib/ali_decoding/Makefile
MODULE_big = ali_decoding
MODULES = ali_decoding
OBJS    = ali_decoding.o

DATA = ali_decoding--0.0.1.sql ali_decoding--unpackaged--0.0.1.sql

EXTENSION = ali_decoding

NAME = ali_decoding

#subdir = contrib/ali_decoding
#top_builddir = ../..
#include $(top_builddir)/src/Makefile.global
#include $(top_srcdir)/contrib/contrib-global.mk

#PG_CONFIG = /usr/pgsql-9.6/bin/pg_config
#pgsql_lib_dir := $(shell $(PG_CONFIG) --libdir)
#PGXS := $(shell $(PG_CONFIG) --pgxs)
#include $(PGXS)

# Use the following for source code installation
ifdef USE_PGXS
PG_CONFIG = pg_config
PGXS := $(shell $(PG_CONFIG) --pgxs)
include $(PGXS)
else
subdir = contrib/ali_decoding
top_builddir = ../..
include $(top_builddir)/src/Makefile.global
include $(top_srcdir)/contrib/contrib-global.mk
endif
Go to the ali_decoding directory. Run the
sudo makeandsudo make installcommands in sequence to compile the ali_decoding plugin and retrieve the files required for installation.Copy the following files to the specified locations.

Based on the database and schema information of the objects to be migrated, create the corresponding database and schema in the destination RDS for PostgreSQL instance. The schema names must be the same. For more information, see Create a database and Manage schemas.
Procedure
Use one of the following methods to go to the Data Migration page and select the region in which the data migration instance resides.
DTS console
Log on to the DTS console.
In the left-side navigation pane, click Data Migration.
In the upper-left corner of the page, select the region in which the data migration instance resides.
DMS console
NoteThe actual operation may vary based on the mode and layout of the DMS console. For more information, see Simple mode and Customize the layout and style of the DMS console.
Log on to the DMS console.
In the top navigation bar, move the pointer over .
From the drop-down list to the right of Data Migration Tasks, select the region in which the data synchronization instance resides.
Click Create Task to go to the task configuration page.
Configure the source and destination databases. The following table describes the parameters.
Category
Configuration
Description
N/A
Task Name
The name of the DTS task. DTS automatically generates a task name. We recommend that you specify an informative name that makes it easy to identify the task. You do not need to specify a unique task name.
Source Database
Select Existing Connection
If you use a database instance that is registered with DTS, select the instance from the drop-down list. DTS automatically populates the following database parameters for the instance. For more information, see Manage database connections.
NoteIn the DMS console, you can select the database instance from the Select a DMS database instance drop-down list.
If you fail to register the instance with DTS, or you do not need to use the instance that is registered with DTS, you must configure the following database information.
Database Type
Select PostgreSQL.
Access Method
Select a connection type based on the deployment location of the source database. This topic uses Cloud Enterprise Network (CEN) as an example.
NoteIf the source instance is a self-managed database, you must also perform the necessary preparations. For more information, see Preparations.
Instance Region
Select the region where the self-managed PostgreSQL database is located.
CEN Instance ID
Select the ID of the CEN instance to which the self-managed PostgreSQL database belongs.
VPC Connected to Database
Select the VPC that is connected to the self-managed PostgreSQL database.
Domain Name or IP Address
Enter the IP address of the server that hosts the self-managed PostgreSQL database.
Port
Enter the service port of the self-managed PostgreSQL database. The default value is 5432.
Database Name
Enter the name of the database in the self-managed PostgreSQL instance that contains the objects to be migrated.
Database Account
Enter the database account for the self-managed PostgreSQL database. For information about the required permissions, see Permissions required for database accounts.
Database Password
The password that is used to access the database instance.
Encryption
Specifies whether to encrypt the connection to the source database. You can configure this parameter based on your business requirements. In this example, Non-encrypted is selected.
If you want to establish an SSL-encrypted connection to the source database, perform the following steps: Select SSL-encrypted, upload CA Certificate, Client Certificate, and Private Key of Client Certificate as needed, and then specify Private Key Password of Client Certificate.
NoteIf you set Encryption to SSL-encrypted for a self-managed PostgreSQL database, you must upload CA Certificate.
If you want to use the client certificate, you must upload Client Certificate and Private Key of Client Certificate and specify Private Key Password of Client Certificate.
For information about how to configure SSL encryption for an ApsaraDB RDS for PostgreSQL instance, see SSL encryption.
Destination Database
Select Existing Connection
If you use a database instance that is registered with DTS, select the instance from the drop-down list. DTS automatically populates the following database parameters for the instance. For more information, see Manage database connections.
NoteIn the DMS console, you can select the database instance from the Select a DMS database instance drop-down list.
If you fail to register the instance with DTS, or you do not need to use the instance that is registered with DTS, you must configure the following database information.
Database Type
Select PostgreSQL.
Access Method
Select Cloud Instance.
Instance Region
Select the region where the destination RDS for PostgreSQL instance is located.
Instance ID
Select the ID of the destination RDS for PostgreSQL instance.
Database Name
Enter the name of the database in the destination RDS for PostgreSQL instance that will receive the migrated objects.
Database Account
Enter the database account for the destination RDS for PostgreSQL instance. For information about the required permissions, see Permissions required for database accounts.
Database Password
The password that is used to access the database instance.
Encryption
Specifies whether to encrypt the connection to the source database. You can configure this parameter based on your business requirements. In this example, Non-encrypted is selected.
If you want to establish an SSL-encrypted connection to the source database, perform the following steps: Select SSL-encrypted, upload CA Certificate, Client Certificate, and Private Key of Client Certificate as needed, and then specify Private Key Password of Client Certificate.
NoteIf you set Encryption to SSL-encrypted for a self-managed PostgreSQL database, you must upload CA Certificate.
If you want to use the client certificate, you must upload Client Certificate and Private Key of Client Certificate and specify Private Key Password of Client Certificate.
For information about how to configure SSL encryption for an ApsaraDB RDS for PostgreSQL instance, see SSL encryption.
In the lower part of the page, click Test Connectivity and Proceed.
NoteMake sure that the CIDR blocks of DTS servers can be automatically or manually added to the security settings of the source and destination databases to allow access from DTS servers. For more information, see Add DTS server IP addresses to a whitelist.
If the source or destination database is a self-managed database and its Access Method is not set to Alibaba Cloud Instance, click Test Connectivity in the CIDR Blocks of DTS Servers dialog box.
Configure the objects to be migrated.
On the Configure Objects page, configure the objects that you want to migrate.
Configuration
Description
Migration Types
To perform only full data migration, select Schema Migration and Full Data Migration.
To migrate data without service downtime, select Schema Migration, Full Data Migration, and Incremental Data Migration.
NoteIf you select Schema Migration, DTS migrates the schemas of the tables to be migrated from the source database to the destination database. The schemas include foreign keys.
If you do not select Incremental Data Migration, we recommend that you do not write data to the source database during data migration. This ensures data consistency between the source and destination databases.
Processing Mode of Conflicting Tables
Precheck and Report Errors: checks whether the destination database contains tables that use the same names as tables in the source database. If the source and destination databases do not contain tables that have identical table names, the precheck is passed. Otherwise, an error is returned during the precheck and the data migration task cannot be started.
NoteIf the source and destination databases contain tables with identical names and the tables in the destination database cannot be deleted or renamed, you can use the object name mapping feature to rename the tables that are migrated to the destination database. For more information, see Map object names.
Ignore Errors and Proceed: skips the precheck for identical table names in the source and destination databases.
WarningIf you select Ignore Errors and Proceed, data inconsistency may occur and your business may be exposed to the following potential risks:
If the source and destination databases have the same schema, and a data record has the same primary key as an existing data record in the destination database, the following scenarios may occur:
During full data migration, DTS does not migrate the data record to the destination database. The existing data record in the destination database is retained.
During incremental data migration, DTS migrates the data record to the destination database. The existing data record in the destination database is overwritten.
If the source and destination databases have different schemas, only specific columns are migrated or the data migration task fails. Proceed with caution.
Capitalization of Object Names in Destination Instance
The capitalization of database names, table names, and column names in the destination instance. By default, DTS default policy is selected. You can select other options to make sure that the capitalization of object names is consistent with that of the source or destination database. For more information, see Specify the capitalization of object names in the destination instance.
Source Objects
Select one or more objects from the Source Objects section. Click the
 icon to add the objects to the Selected Objects section. Note
You can select schemas or tables as the objects to be migrated. If you select tables as the objects to be migrated, DTS does not migrate other objects, such as views, triggers, and stored procedures, to the destination database.
If a table to be migrated contains SERIAL data type, and you select Migration Types as Schema Migration, we recommend that you also select Sequence or entire schema migration.
Selected Objects
To change the name of a single migration object in the destination instance, right-click the migration object in the Selected Objects box. For instructions, see Map a single database, table, or column name.
To batch change the names of migration objects in the destination instance, in the upper-right corner of the Selected Objects box, click Batch Edit. For more information, see Batch Mapping for Database, Table, and Column Names.
NoteIf you use the object name mapping feature, other objects that depend on the renamed object may fail to migrate.
To set a WHERE condition to filter data, right-click the table to be migrated in the Selected Objects box and set the filter condition in the dialog box that appears. For more information, see Set filter conditions.
To select the SQL operations to be migrated at the database or table level, right-click the migration object in the Selected Objects box and select the desired SQL operations in the dialog box that appears.
Click Next: Advanced Settings to configure advanced settings.
Configuration
Description
Dedicated Cluster for Task Scheduling
By default, DTS schedules the data migration task to the shared cluster if you do not specify a dedicated cluster. If you want to improve the stability of data migration tasks, purchase a dedicated cluster. For more information, see What is a DTS dedicated cluster.
Retry Time for Failed Connections
The retry time range for failed connections. If the source or destination database fails to be connected after the data migration task is started, DTS immediately retries a connection within the retry time range. Valid values: 10 to 1,440. Unit: minutes. Default value: 720. We recommend that you set the parameter to a value greater than 30. If DTS is reconnected to the source and destination databases within the specified retry time range, DTS resumes the data migration task. Otherwise, the data migration task fails.
NoteIf you specify different retry time ranges for multiple data migration tasks that share the same source or destination database, the value that is specified later takes precedence.
When DTS retries a connection, you are charged for the DTS instance. We recommend that you specify the retry time range based on your business requirements. You can also release the DTS instance at the earliest opportunity after the source database and destination instance are released.
Retry Time for Other Issues
The retry time range for other issues. For example, if DDL or DML operations fail to be performed after the data migration task is started, DTS immediately retries the operations within the retry time range. Valid values: 1 to 1440. Unit: minutes. Default value: 10. We recommend that you set the parameter to a value greater than 10. If the failed operations are successfully performed within the specified retry time range, DTS resumes the data migration task. Otherwise, the data migration task fails.
ImportantThe value of the Retry Time for Other Issues parameter must be smaller than the value of the Retry Time for Failed Connections parameter.
Enable Throttling for Full Data Migration
Specifies whether to enable throttling for full data migration. During full data migration, DTS uses the read and write resources of the source and destination databases. This may increase the loads of the database servers. You can enable throttling for full data migration based on your business requirements. To configure throttling, you must configure the Queries per second (QPS) to the source database, RPS of Full Data Migration, and Data migration speed for full migration (MB/s) parameters. This reduces the loads of the destination database server.
NoteYou can configure this parameter only if you select Full Data Migration for the Migration Types parameter.
Enable Throttling for Incremental Data Migration
Specifies whether to enable throttling for incremental data migration. To configure throttling, you must configure the RPS of Incremental Data Migration and Data migration speed for incremental migration (MB/s) parameters. This reduces the loads of the destination database server.
NoteYou can configure this parameter only if you select Incremental Data Migration for the Migration Types parameter.
Environment Tag
You can select an environment tag to identify the instance as needed. For this topic, a selection is not required.
Configure ETL
Specifies whether to enable the extract, transform, and load (ETL) feature. For more information, see What is ETL? Valid values:
Yes: configures the ETL feature. You can enter data processing statements in the code editor. For more information, see Configure ETL in a data migration or data synchronization task.
No: does not configure the ETL feature.
Monitoring and Alerting
Specifies whether to configure alerting for the data migration task. If the task fails or the migration latency exceeds the specified threshold, the alert contacts receive notifications. Valid values:
No: does not configure alerting.
Yes: configures alerting. In this case, you must also configure the alert threshold and alert notification settings. For more information, see the Configure monitoring and alerting when you create a DTS task section of the Configure monitoring and alerting topic.
Click Next Step: Data Verification to configure the data verification task.
For more information about how to use the data verification feature, see Configure a data verification task.
Save the task settings and run a precheck.
To view the parameters to be specified when you call the relevant API operation to configure the DTS task, move the pointer over Next: Save Task Settings and Precheck and click Preview OpenAPI parameters.
If you do not need to view or have viewed the parameters, click Next: Save Task Settings and Precheck in the lower part of the page.
NoteBefore you can start the data migration task, DTS performs a precheck. You can start the data migration task only after the task passes the precheck.
If the task fails to pass the precheck, click View Details next to each failed item. After you analyze the causes based on the check results, troubleshoot the issues. Then, run a precheck again.
If an alert is triggered for an item during the precheck:
If an alert item cannot be ignored, click View Details next to the failed item and troubleshoot the issues. Then, run a precheck again.
If the alert item can be ignored, click Confirm Alert Details. In the View Details dialog box, click Ignore. In the message that appears, click OK. Then, click Precheck Again to run a precheck again. If you ignore the alert item, data inconsistency may occur, and your business may be exposed to potential risks.
Purchase the instance.
Wait until Success Rate becomes 100%. Then, click Next: Purchase Instance.
On the Purchase Instance page, configure the Instance Class parameter for the data migration instance. The following table describes the parameters.
Section
Parameter
Description
New Instance Class
Resource Group
The resource group to which the data migration instance belongs. Default value: default resource group. For more information, see What is Resource Management?
Instance Class
DTS provides instance classes that vary in the migration speed. You can select an instance class based on your business scenario. For more information, see Instance classes of data migration instances.
Read and agree to Data Transmission Service (Pay-as-you-go) Service Terms by selecting the check box.
Click Buy and Start. In the message that appears, click OK.
You can view the progress of the task on the Data Migration page.
NoteIf a data migration task cannot be used to migrate incremental data, the task automatically stops. The Completed is displayed in the Status section.
If a data migration task can be used to migrate incremental data, the task does not automatically stop. The incremental data migration task never stops or completes. The Running is displayed in the Status section.