This topic describes how to use Data Transmission Service (DTS) to migrate data from a self-managed MongoDB database that uses the sharded cluster architecture to an ApsaraDB for MongoDB replica set or sharded cluster instance. DTS allows you to migrate the existing and incremental data of on-premises databases to Alibaba Cloud without service interruptions.
Prerequisites
The destination ApsaraDB for MongoDB replica set or sharded cluster instance is created. For more information, see Create a replica set instance or Create a sharded cluster instance.
ImportantThe available storage space of the destination ApsaraDB for MongoDB sharded cluster instance is 10% larger than the total size of the data in the source self-managed MongoDB database. This is a recommended prerequisite.
For more information about the supported database versions, see Overview of data migration scenarios.
The account that is used to access the shards in the source self-managed MongoDB database is created, and the shards share the same account and password.
If the destination ApsaraDB for MongoDB instance is a sharded cluster instance:
Each shard in the destination sharded cluster instance has sufficient storage space.
NoteFor example, a self-managed MongoDB database has three shards, and one of these shards occupies a maximum storage space of 500 GB. In this case, the storage space of each shard in the destination instance must be larger than 500 GB.
The following operations are performed based on the method of migrating schemas:
Do not use the schema migration feature of DTS:
Do not select Schema Migration for the Migration Types parameter on the Configure Objects page. You must create databases and collections to be sharded in the destination ApsaraDB for MongoDB instance, and configure data sharding based on your business requirements. We recommend that you enable the balancer and perform pre-sharding. For more information, see Configure sharding to maximize the performance of shards and What do I do if the data of a MongoDB database deployed in the sharded cluster architecture is not evenly distributed? in the FAQ topic.
Use the schema migration feature of DTS:
Select Schema Migration for the Migration Types parameter on the Configure Objects page. We recommend that you enable the balancer and perform pre-sharding after the schema migration is complete. For more information, see What do I do if the data of a MongoDB database deployed in the sharded cluster architecture is not evenly distributed? in the FAQ topic.
NoteAfter you configure sharding for a sharded cluster instance, the migrated data will be distributed among different shards. This maximizes the performance of the sharded cluster. You can enable the balancer and perform pre-sharding. This prevents data skew issues.
Usage notes
Category | Description |
Limits on the source database |
|
Other limits |
|
Billing
Migration type | Task configuration fee | Data transfer cost |
Schema migration and full data migration | Free of charge | Free of charge |
Incremental data migration | Charged. For more information, see Billing overview. |
Migration types
Migration type | Description |
Schema migration | DTS migrates the schemas of the objects to be migrated from the source self-managed MongoDB database instance to the destination ApsaraDB for MongoDB instance. |
Full data migration | DTS migrates the existing data of the objects to be migrated from the source self-managed MongoDB database instance to the destination ApsaraDB for MongoDB instance. Note DTS supports full data migration for databases and collections. |
Incremental data migration | After full data migration is completed, DTS migrates incremental data from the source self-managed MongoDB database instance to the destination ApsaraDB for MongoDB instance. Note DTS migrates incremental data generated by the following operations:
|
Permissions required for database accounts
Database type | Schema migration | Full data migration | Incremental data migration |
Self-managed MongoDB database | The read permissions on the database to be migrated and the config database. | Read permissions on the source database. | Read permissions on the source database, the admin database, and the local database. |
ApsaraDB for MongoDB instance | The dbAdminAnyDatabase permission, the read and write permissions on the destination database, and the read permissions on the local database. | ||
For information about how to create and authorize a database account, see the following topics:
Self-managed MongoDB database: db.createUser()
ApsaraDB for MongoDB instance: Manage user permissions on MongoDB databases
Preparations
Required: Disable the balancer of the self-managed MongoDB database. This prevents the impact of chunk migration on data consistency. For more information, see Manage the ApsaraDB for MongoDB balancer.
WarningIf the balancer is not disabled, chunk migration affects the consistency of the data read by DTS.
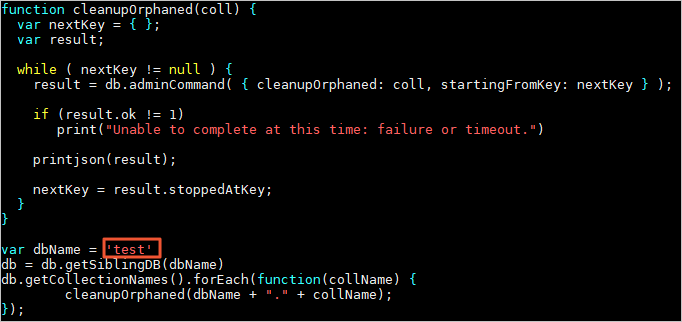
Delete the orphaned documents that are generated due to chunk migration failures from the self-managed MongoDB database.
NoteIf you do not delete the orphaned documents, the migration performance will be compromised. In addition, some documents may have duplicate
_idvalues and data that you do not want to migrate may be migrated.Download the cleanupOrphaned.js file.
wget "https://docs-aliyun.cn-hangzhou.oss.aliyun-inc.com/assets/attach/120562/cn_zh/1564451237979/cleanupOrphaned.js"Replace
testin the cleanupOrphaned.js file with the name of the database from which you want to delete orphaned documents.NoteIf you want to delete orphaned documents from multiple databases, repeat Substep b and Substep c in Step 2.
Run the following command on a shard to delete the orphaned documents from all collections in the specified database:
NoteYou must repeat this step on each shard.
mongo --host <Shardhost> --port <Primaryport> --authenticationDatabase <database> -u <username> -p <password> cleanupOrphaned.jsNote<Shardhost>: the IP address of the shard.
<Primaryport>: the service port of the primary node in the shard.
<database>: the name of the database to which the database account belongs.
<username>: the account that is used to log on to the self-managed MongoDB database.
<password>: the password that is used to log on to the self-managed MongoDB database.
Example:
In this example, a self-managed MongoDB database has three shards, and you must delete the orphaned documents on each shard.
mongo --host 172.16.1.10 --port 27018 --authenticationDatabase admin -u dtstest -p 'Test123456' cleanupOrphaned.jsmongo --host 172.16.1.11 --port 27021 --authenticationDatabase admin -u dtstest -p 'Test123456' cleanupOrphaned.jsmongo --host 172.16.1.12 --port 27024 --authenticationDatabase admin -u dtstest -p 'Test123456' cleanupOrphaned.js
Create databases and collections to be sharded in the destination ApsaraDB for MongoDB instance, and configure data sharding based on your business requirements. For more information, see Configure sharding to maximize the performance of shards.
NoteIf you configure data sharding before you start data migration, data in the self-managed MongoDB database is evenly migrated to the shards in the destination sharded cluster instance. This prevents the overloading of a single shard.
Procedure
Use one of the following methods to go to the Data Migration page and select the region in which the data migration instance resides.
DTS console
Log on to the DTS console.
In the left-side navigation pane, click Data Migration.
In the upper-left corner of the page, select the region in which the data migration instance resides.
DMS console
NoteThe actual operation may vary based on the mode and layout of the DMS console. For more information, see Simple mode and Customize the layout and style of the DMS console.
Log on to the DMS console.
In the top navigation bar, move the pointer over .
From the drop-down list to the right of Data Migration Tasks, select the region in which the data synchronization instance resides.
Click Create Task to go to the task configuration page.
Configure the source and destination databases. The following table describes the parameters.
WarningAfter you configure the source and destination databases, we recommend that you read the Limits that are displayed in the upper part of the page. Otherwise, the task may fail or data inconsistency may occur.
Section
Parameter
Description
N/A
Task Name
The name of the DTS task. DTS automatically generates a task name. We recommend that you specify an informative name that makes it easy to identify the task. You do not need to specify a unique task name.
Source Database
Select Existing Connection
If you use a database instance that is registered with DTS, select the instance from the drop-down list. DTS automatically populates the following database parameters for the instance. For more information, see Manage database connections.
NoteIn the DMS console, you can select the database instance from the Select a DMS database instance drop-down list.
If you fail to register the instance with DTS, or you do not need to use the instance that is registered with DTS, you must configure the following database information.
Database Type
The type of the source database. Select MongoDB.
Access Method
The access method of the source database. In this example, Public IP Address is selected.
NoteIf you choose other methods to access the source self-managed MongoDB database, you must deploy the network environment for the database. For more information, see Preparation overview.
Instance Region
The region in which the source self-managed MongoDB database resides.
NoteIf the region in which the self-managed MongoDB database resides is not displayed in the drop-down list, select a region that is geographically closest to the self-managed MongoDB database.
Architecture
The architecture in which the source database is deployed. Select Sharded Cluster.
NoteThe Sharded Cluster option appears only if you set the Access Method parameter to Express Connect, VPN Gateway, or Smart Access Gateway, Public IP Address, or Cloud Enterprise Network (CEN).
Migration Method
The method used to migrate incremental data from the source database. Select a method based on your business requirements. Valid values:
Oplog (recommended):
This option is available if the oplog feature is enabled for the source database.
NoteBy default, the oplog feature is enabled for both self-managed MongoDB databases and ApsaraDB for MongoDB instances. This feature allows you to migrate incremental data at a low latency because of a fast log pulling speed. Therefore, we recommended that you select Oplog for the Migration Method parameter.
ChangeStream: This option is available if change streams are enabled for the source database. For more information, see Change Streams.
NoteIf the source database is an inelastic Amazon DocumentDB cluster, you can set the Migration Method parameter only to ChangeStream.
If you select Sharded Cluster for the Architecture parameter, you do not need to configure the Shard account and Shard password parameters.
Endpoint Type
Select Standalone or Multi-node based on your business needs.
NoteThis parameter appears only if you set the Access Method parameter to Express Connect, VPN Gateway, or Smart Access Gateway, Public IP Address, or Cloud Enterprise Network (CEN).
Mongos Domain Name or IP Address
The endpoint or IP address of a mongos node in the self-managed MongoDB database. In this example, the public IP address of a mongos node is used.
NoteThis parameter appears only if the Endpoint Type parameter is set to Standalone.
Set the Domain Name or IP parameter to the domain name or IP address of any mongos node. Set the Port Number parameter to the port of any mongos node.
Port Number
The service port number of the self-managed MongoDB database.
NoteThis parameter appears only if the Endpoint Type parameter is set to Standalone.
The service port of the mongos node must be accessible over the Internet.
Mongos endpoint
The endpoint of the self-managed MongoDB database.
NoteThis parameter appears only if the Endpoint Type parameter is set to Multi-node.
Specify the parameter in the
<IP>:<Port>format. Replace<IP>with the domain name or an IP address. We recommend that you use a domain name that can be accessed over the Internet.Separate multiple endpoints with line feeds.
Authentication Database
The name of the authentication database that stores the database accounts and passwords of the source self-managed MongoDB database. If you did not change the name of the authentication database before, the default value is admin.
Database Account
The account that is used to access the mongos nodes in the self-managed MongoDB database. For more information about the permissions that are required for the account, see the Permissions required for database accounts section of this topic.
NoteIf you set the Access Method parameter to Self-managed Database on ECS or Database Gateway, enter the account that is used to access the shards in the self-managed MongoDB database.
Database Password
The password that is used to access the database instance.
Access to Multiple Shard Nodes
The information that is used to access the shard nodes of the self-managed MongoDB database.
NoteThis parameter is available only if the self-managed MongoDB database is the source database, the Architecture parameter is set to Sharded Cluster, the Migration Method parameter is set to Oplog and the Endpoint Type parameter is set to Multi-node.
Click Add to the right of Access to Multiple Shard Nodes.
In the Shard Node Endpoint field, enter the endpoint of a shard node of the self-managed MongoDB database.
NoteIf you set the Architecture parameter to Replica Set, specify the Endpoint parameter. If you set the Architecture parameter to Sharded Cluster, specify the Mongos endpoint parameter.
An endpoint is in the
<IP>:<Port>format. Replace<IP>with a domain name or an IP address. We recommend that you use a domain name that is publicly resolvable.Separate multiple endpoints with line feeds.
Repeat the preceding steps to configure the access information for each shard node.
Shard access information (IP:Port)
The access information about the shards in the self-managed MongoDB database, including the IP address and port number of the shards. The format is
IP address:Port number.NoteThis parameter appears only if the Endpoint Type parameter is set to Standalone.
Separate the access information of multiple shards with commas (,).
Shard account
The account that is used to access the shards in the source self-managed MongoDB database.
Shard password
The password that is used to access the shards in the source self-managed MongoDB database.
Encryption
Specifies whether to encrypt the connection to the source database. You can select Non-encrypted, SSL-encrypted, or Mongo Atlas SSL based on your business requirements. The options available for the Encryption parameter are determined by the values selected for the Access Method and Architecture parameters. The options displayed in the DTS console prevail.
NoteIf the Architecture parameter is set to Sharded Cluster, and the Migration Method parameter is set to Oplog for the ApsaraDB for MongoDB database, the Encryption parameter SSL-encrypted is unavailable.
If the source database is a self-managed MongoDB database that uses the Replica Set architecture, the Access Method parameter is not set to Alibaba Cloud Instance, and the Encryption parameter is set to SSL-encrypted, you can upload a certification authority (CA) certificate to verify the connection to the source database.
Destination Database
Select Existing Connection
If you use a database instance that is registered with DTS, select the instance from the drop-down list. DTS automatically populates the following database parameters for the instance. For more information, see Manage database connections.
NoteIn the DMS console, you can select the database instance from the Select a DMS database instance drop-down list.
If you fail to register the instance with DTS, or you do not need to use the instance that is registered with DTS, you must configure the following database information.
Database Type
The type of the destination database. Select MongoDB.
Access Method
The access method of the destination database. Select Alibaba Cloud Instance.
Instance Region
The region in which the destination ApsaraDB for MongoDB instance resides.
Replicate Data Across Alibaba Cloud Accounts
In this example, a database instance of the current Alibaba Cloud account is used. Select No.
Architecture
The architecture in which the destination ApsaraDB for MongoDB instance is deployed.
Instance ID
The ID of the destination ApsaraDB for MongoDB instance.
Authentication Database
The name of the authentication database that stores the database accounts and passwords of the destination ApsaraDB for MongoDB instance. If you did not change the name of the authentication database before, the default value is admin.
Database Name
The name of the database to which the migrated objects in the destination ApsaraDB for MongoDB instance belong.
Database Account
The database account of the destination ApsaraDB for MongoDB instance. For more information about the permissions that are required for the account, see the Permissions required for database accounts section of this topic.
Database Password
The password that is used to access the database instance.
Encryption
Specifies whether to encrypt the connection to the destination database. You can select Non-encrypted, SSL-encrypted, or Mongo Atlas SSL based on your business requirements. The options available for the Encryption parameter are determined by the values selected for the Access Method and Architecture parameters. The options displayed in the DTS console prevail.
NoteIf the destination database is an ApsaraDB for MongoDB instance and the Architecture parameter is set to Sharded Cluster, the Encryption parameter SSL-encrypted is unavailable.
If the destination database is a self-managed MongoDB database that uses the Replica Set architecture, the Access Method parameter is not set to Alibaba Cloud Instance, and the Encryption parameter is set to SSL-encrypted, you can upload a CA certificate to verify the connection to the destination database.
In the lower part of the page, click Test Connectivity and Proceed.
NoteMake sure that the CIDR blocks of DTS servers can be automatically or manually added to the security settings of the source and destination databases to allow access from DTS servers. For more information, see Add the CIDR blocks of DTS servers.
If the source or destination database is a self-managed database and its Access Method is not set to Alibaba Cloud Instance, click Test Connectivity in the CIDR Blocks of DTS Servers dialog box.
Configure the objects to be migrated.
On the Configure Objects page, configure the objects that you want to migrate.
Parameter
Description
Migration Types
To perform only full data migration, select Schema Migration and Full Data Migration.
To ensure service continuity during data migration, select Schema Migration, Full Data Migration, and Incremental Data Migration.
NoteIf you do not select Schema Migration, make sure a database and a table are created in the destination database to receive data and the object name mapping feature is enabled in Selected Objects.
If you do not select Incremental Data Migration, we recommend that you do not write data to the source database during data migration. This ensures data consistency between the source and destination databases.
Processing Mode of Conflicting Tables
Precheck and Report Errors: checks whether the destination database contains tables that use the same names as tables in the source database. If the source and destination databases do not contain tables that have identical table names, the precheck is passed. Otherwise, an error is returned during the precheck and the data migration task cannot be started.
NoteIf the source and destination databases contain tables with identical names and the tables in the destination database cannot be deleted or renamed, you can use the object name mapping feature to rename the tables that are migrated to the destination database. For more information, see Map object names.
Ignore Errors and Proceed: skips the precheck for identical table names in the source and destination databases.
WarningIf you select Ignore Errors and Proceed, data inconsistency may occur and your business may be exposed to the following potential risks:
If the source and destination databases have the same schema, and a data record has the same primary key as an existing data record in the destination database, the following scenarios may occur:
During full data migration, DTS does not migrate the data record to the destination database. The existing data record in the destination database is retained.
During incremental data migration, DTS migrates the data record to the destination database. The existing data record in the destination database is overwritten.
If the source and destination databases have different schemas, only specific columns are migrated or the data migration task fails. Proceed with caution.
Capitalization of Object Names in Destination Instance
The capitalization of database names and collection names in the destination instance. By default, DTS default policy is selected. You can select another option to ensure that the capitalization of object names is the same as that of the source or destination database. For more information, see Specify the capitalization of object names in the destination instance.
Source Objects
Select one or more objects from the Source Objects section. Click the
 icon to add the objects to the Selected Objects section. Note
You can select collections or databases as the objects to be migrated.
Selected Objects
To specify the name of an object to be migrated in the destination instance or specify the object to receive data in the destination instance, right-click the object in the Selected Objects section. For more information, see Map object names.
To remove one or more objects that are selected for migration, click the objects in the Selected Objects section and then click the
 icon to move the objects to the Source Objects section.
NoteTo select the incremental migration mode for databases and collections, right-click objects to be migrated in the Selected Objects section and then select the mode in the dialog box that appears.
To specify WHERE conditions to filter data, right-click a table in the Selected Objects section. In the dialog box that appears, specify the conditions. For more information, see Specify filter conditions. You can specify WHERE conditions during full migration but not incremental migration.
If you use the object name mapping feature to specify databases or collections for receiving data, other objects depending on the specified objects may fail to be migrated.
Click Next: Advanced Settings to configure advanced settings.
Parameter
Description
Dedicated Cluster for Task Scheduling
By default, DTS schedules the data migration task to the shared cluster if you do not specify a dedicated cluster. If you want to improve the stability of data migration tasks, purchase a dedicated cluster. For more information, see What is a DTS dedicated cluster.
Retry Time for Failed Connections
The retry time range for failed connections. If the source or destination database fails to be connected after the data migration task is started, DTS immediately retries a connection within the retry time range. Valid values: 10 to 1,440. Unit: minutes. Default value: 720. We recommend that you set the parameter to a value greater than 30. If DTS is reconnected to the source and destination databases within the specified retry time range, DTS resumes the data migration task. Otherwise, the data migration task fails.
NoteIf you specify different retry time ranges for multiple data migration tasks that share the same source or destination database, the value that is specified later takes precedence.
When DTS retries a connection, you are charged for the DTS instance. We recommend that you specify the retry time range based on your business requirements. You can also release the DTS instance at the earliest opportunity after the source database and destination instance are released.
Retry Time for Other Issues
The retry time range for other issues. For example, if DDL or DML operations fail to be performed after the data migration task is started, DTS immediately retries the operations within the retry time range. Valid values: 1 to 1440. Unit: minutes. Default value: 10. We recommend that you set the parameter to a value greater than 10. If the failed operations are successfully performed within the specified retry time range, DTS resumes the data migration task. Otherwise, the data migration task fails.
ImportantThe value of the Retry Time for Other Issues parameter must be smaller than the value of the Retry Time for Failed Connections parameter.
Enable Throttling for Full Data Migration
Specifies whether to enable throttling for full data migration. During full data migration, DTS uses the read and write resources of the source and destination databases. This may increase the loads of the database servers. You can enable throttling for full data migration based on your business requirements. To configure throttling, you must configure the Queries per second (QPS) to the source database, RPS of Full Data Migration, and Data migration speed for full migration (MB/s) parameters. This reduces the loads of the destination database server.
NoteYou can configure this parameter only if you select Full Data Migration for the Migration Types parameter.
Only one data type for primary key _id in a table of the data to be synchronized
Specifies whether the data type of the primary key
_idis unique in a collection to be migrated.ImportantEnable this parameter based on your business requirements. Otherwise, data loss may occur.
This parameter is required only if you select Full Data Migration for the Migration Types parameter.
Valid values:
Yes: The data type is unique. During full migration, DTS does not scan the data type of the primary key in source database. DTS only migrates a data type of the primary key in a collection to be migrated.
No: The data type is not unique. During full migration, DTS scans the data types of the primary key in source database and migrates the data of all data types.
Enable Throttling for Incremental Data Migration
Specifies whether to enable throttling for incremental data migration. To configure throttling, you must configure the RPS of Incremental Data Migration and Data migration speed for incremental migration (MB/s) parameters. This reduces the loads of the destination database server.
NoteYou can configure this parameter only if you select Incremental Data Migration for the Migration Types parameter.
Environment Tag
The environment tag that is used to identify the DTS instance. You can select an environment tag based on your business requirements. In this example, you do not need to configure this parameter.
Configure ETL
Specifies whether to enable the extract, transform, and load (ETL) feature. For more information, see What is ETL? Valid values:
Yes: configures the ETL feature. You can enter data processing statements in the code editor. For more information, see Configure ETL in a data migration or data synchronization task.
No: does not configure the ETL feature.
Monitoring and Alerting
Specifies whether to configure alerting for the data migration task. If the task fails or the migration latency exceeds the specified threshold, the alert contacts receive notifications. Valid values:
No: does not configure alerting.
Yes: configures alerting. In this case, you must also configure the alert threshold and alert notification settings. For more information, see the Configure monitoring and alerting when you create a DTS task section of the Configure monitoring and alerting topic.
Click Next Step: Data Verification to configure the data verification task.
For more information about how to use the data verification feature, see Configure a data verification task.
Save the task settings and run a precheck.
To view the parameters to be specified when you call the relevant API operation to configure the DTS task, move the pointer over Next: Save Task Settings and Precheck and click Preview OpenAPI parameters.
If you do not need to view or have viewed the parameters, click Next: Save Task Settings and Precheck in the lower part of the page.
NoteBefore you can start the data migration task, DTS performs a precheck. You can start the data migration task only after the task passes the precheck.
If the task fails to pass the precheck, click View Details next to each failed item. After you analyze the causes based on the check results, troubleshoot the issues. Then, run a precheck again.
If an alert is triggered for an item during the precheck:
If an alert item cannot be ignored, click View Details next to the failed item and troubleshoot the issues. Then, run a precheck again.
If the alert item can be ignored, click Confirm Alert Details. In the View Details dialog box, click Ignore. In the message that appears, click OK. Then, click Precheck Again to run a precheck again. If you ignore the alert item, data inconsistency may occur, and your business may be exposed to potential risks.
Purchase an instance.
Wait until Success Rate becomes 100%. Then, click Next: Purchase Instance.
On the Purchase Instance page, configure the Instance Class parameter for the data migration instance. The following table describes the parameters.
Section
Parameter
Description
New Instance Class
Resource Group
The resource group to which the data migration instance belongs. Default value: default resource group. For more information, see What is Resource Management?
Instance Class
DTS provides instance classes that vary in the migration speed. You can select an instance class based on your business scenario. For more information, see Instance classes of data migration instances.
Read and agree to Data Transmission Service (Pay-as-you-go) Service Terms by selecting the check box.
Click Buy and Start. In the message that appears, click OK.
You can view the progress of the task on the Data Migration page.
NoteIf a data migration task cannot be used to migrate incremental data, the task automatically stops. The Completed is displayed in the Status section.
If a data migration task can be used to migrate incremental data, the task does not automatically stop. The incremental data migration task never stops or completes. The Running is displayed in the Status section.
Optional. If you set the Access Method parameter to Self-managed Database on ECS or Database Gateway for the source self-managed MongoDB database, you need to repeat Steps 1 to 7 to create data migration tasks for the remaining shards.
Stop the data migration tasks.
Full data migration
We recommend that you do not manually stop the task during full data migration. Otherwise, the data migrated to the destination database may be incomplete. You can wait until the full data migration task automatically stops.
Incremental data migration
An incremental data migration task does not automatically stop. You must manually stop the task.
NoteWe recommend that you select an appropriate time to manually stop a data migration task. For example, you can stop the task during off-peak hours or before you switch your workloads to the ApsaraDB for MongoDB instance.
Wait until Incremental Data Migration is displayed in the Running progress bar of the data migration task and Undelayed is displayed in Operation Info. Then, stop writing data to the source database for a few minutes. The latency of incremental data migration may be displayed in the progress bar.
After the status of Incremental Data Migration changes to Undelayed again, manually stop the migration tasks for all shards.
Switch your workloads to the destination ApsaraDB for MongoDB instance.