This topic describes how to configure a data integration task between ApsaraDB RDS for MySQL instances.
You cannot configure data integration tasks in the new Data Transmission Service (DTS) console. To configure the tasks, log on to the Data Management (DMS) console. For more information, see Overview.
All databases that support full data migration support the data integration feature. For more information, see Overview of data migration scenarios.
Prerequisites
ApsaraDB RDS for MySQL instances are created and used as the source and destination instances. For more information, see Create an ApsaraDB RDS for MySQL instance.
Background information
DTS provides the data integration feature. The feature allows you to configure a scheduling policy to migrate schemas and historical data from the source database to the destination database on a regular basis. The data integration feature allows you to flexibly build data warehouses. For more information, see Scheduling policies of data integration.
Precautions
The source database must have PRIMARY KEY or UNIQUE constraints and all fields must be unique. Otherwise, the destination database may contain duplicate data records.
Limits
DTS supports the following types of objects for schema migration: table, view, trigger, stored procedure, and function.
NoteDuring schema migration, DTS changes the value of the SECURITY attribute from
DEFINERtoINVOKERfor views, stored procedures, and functions.DTS does not migrate user information from the source database. After data migration is complete, if you want to call a view, stored procedure, or function of the destination database, you must grant the read and write permissions to INVOKER.
Billing
| Migration type | Task configuration fee | Internet traffic fee |
| Schema migration and full data migration | Free of charge. | Charged only when data is migrated from Alibaba Cloud over the Internet. For more information, see Billing overview. |
Procedure
In this example, a data integration task is configured between ApsaraDB RDS for MySQL instances that reside in the China (Qingdao) region.
Log on to the DTS console.
NoteIf you are redirected to the Data Management (DMS) console, you can move the pointer over the
 icon in the lower-right corner and click the
  icon to go to the previous version of the DTS console.
 If you are redirected to the new DTS console, you can click the
 icon in the lower-right corner to go to the previous version of the DTS console.
In the left-side navigation pane, click Data Integration.
At the top of the Migration Tasks page, select the region in which the destination instance resides. In this example, the China (Qingdao) region is selected.
In the upper-right corner of the page, click Create Data Integration Task.
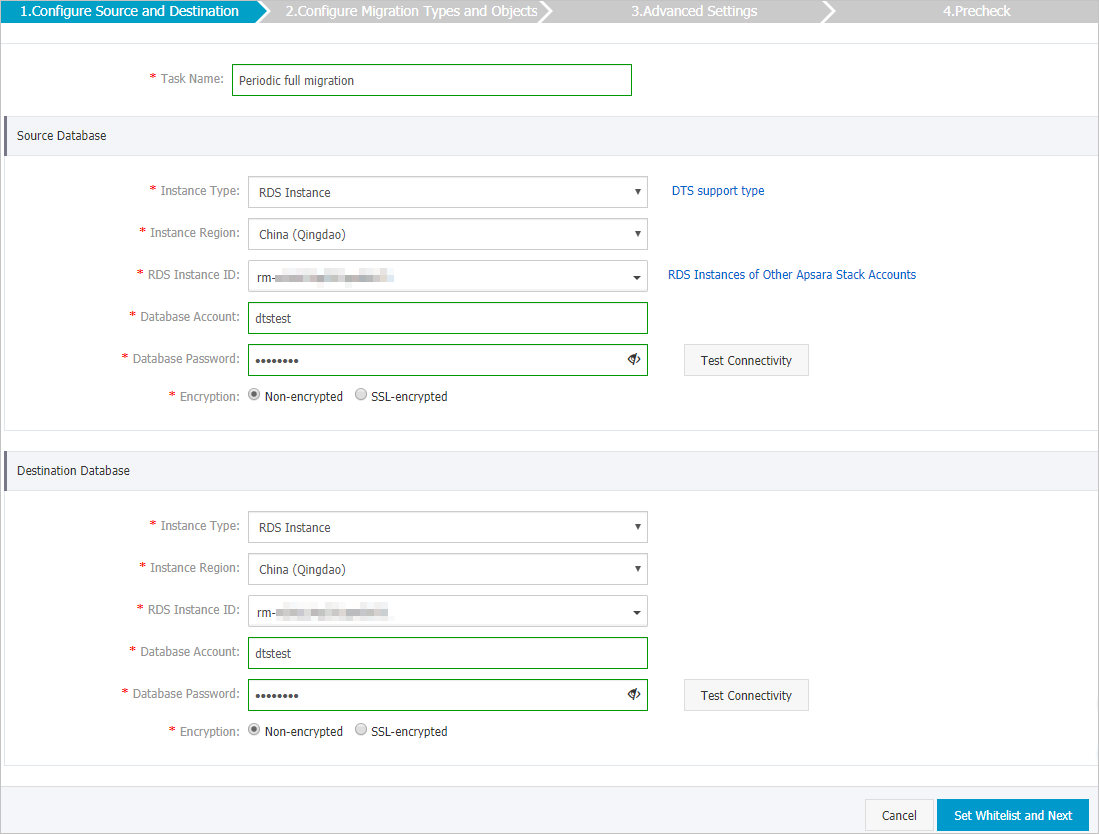
Configure the source and destination databases.

Section
Parameter
Description
N/A
Task Name
The task name that DTS automatically generates. We recommend that you specify a descriptive name that makes it easy to identify the task. You do not need to specify a unique task name.
Source Database
Instance Type
The instance type of the source database. Select RDS Instance.
Instance Region
The region in which the source ApsaraDB RDS for MySQL instance resides. In this example, China (Qingdao) is selected.
Database Account
The database account of the source ApsaraDB RDS for MySQL instance. The account must have the read and write permissions on the source database.
NoteFor more information about how to create a database account and grant the permissions to the account, see Create an account.
Database Password
The password of the database account.
NoteAfter you specify the source database parameters, click Test Connectivity next to the Database Password parameter to verify whether the specified parameters are valid. If the specified parameters are valid, the Passed message is displayed. If the Failed message is displayed, click Check next to Failed. Modify the source database parameters based on the check results.
Encryption
Specifies whether to encrypt the connection to the source instance. Select Non-encrypted or SSL-encrypted. If you select SSL-encrypted, you must enable SSL encryption for the ApsaraDB RDS for MySQL instance before you configure the data integration task. For more information, see Use a cloud certificate to enable SSL encryption.
NoteThe Encryption parameter is available only for regions in the Chinese mainland and the China (Hong Kong) region.
Destination Database
Instance Type
The instance type of the destination database. Select RDS Instance.
Instance Region
The region in which the destination ApsaraDB RDS for MySQL instance resides. In this example, China (Qingdao) is selected.
Database Account
The database account of the destination ApsaraDB RDS for MySQL instance. The account must have the read and write permissions on the destination database.
NoteFor more information about how to create a database account and grant the permissions to the account, see Create an account.
Database Password
The password of the database account.
NoteAfter you specify the destination database parameters, click Test Connectivity next to the Database Password parameter to verify whether the specified parameters are valid. If the specified parameters are valid, the Passed message is displayed. If the Failed message is displayed, click Check next to Failed. Modify the destination database parameters based on the check results.
Encryption
Specifies whether to encrypt the connection to the destination instance. Select Non-encrypted or SSL-encrypted. If you select SSL-encrypted, you must enable SSL encryption for the ApsaraDB RDS for MySQL instance before you configure the data integration task. For more information, see Use a cloud certificate to enable SSL encryption.
NoteThe Encryption parameter is available only for regions in the Chinese mainland and the China (Hong Kong) region.
In the lower-right corner of the page, click Set Whitelist and Next.
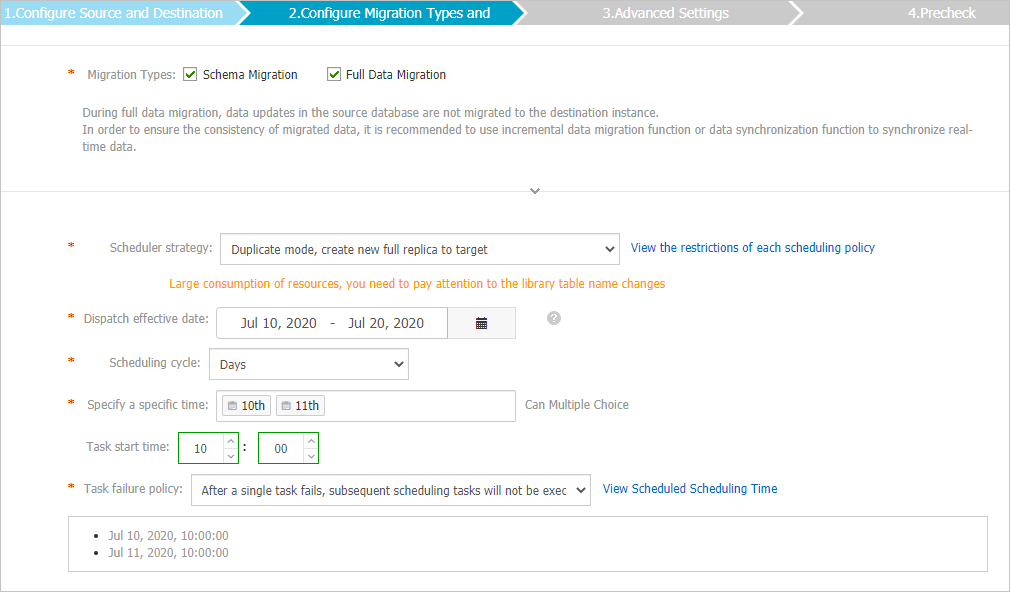
Configure a scheduling policy and select the objects to be migrated.
Configure a scheduling policy.

Parameter
Description
Migration Type
Select Schema Migration and Full Data Migration. DTS migrates the schemas and historical data of objects from the source database to the destination database.
Scheduler strategy
Duplicate mode, create new full replica to target
Resynchronize mode, delete the existing data at the target end, and resynchronize the data in full
Based on the incremental mode of time stamp, the new data generated by two scheduling intervals before and after synchronization
NoteFor more information about the scheduling policies, see Scheduling policies.
Dispatch effective date
Click the
 icon, and specify the start date and end date of the schedule. The maximum effective duration is 365 days.
 Scheduling cycle
Select Days or Weeks as the scheduling cycle and set the specific scheduled time.
NoteDuring full data migration, DTS uses read and write resources of the source and destination databases. This may increase the loads of the database servers. Before you start scheduling, evaluate the impact of scheduling on the performance of the source and destination databases. We recommend that you set the scheduled time to off-peak hours.
After you complete the settings, click View Scheduled Scheduling Time next to Task failure policy to check whether the set scheduled time meets your expectation.
Task failure policy
Select one of the following policies based on your business requirements:
After a single task fails, subsequent scheduling tasks will not be executed
After a single task fails, ignore the failure and execute the next scheduled task
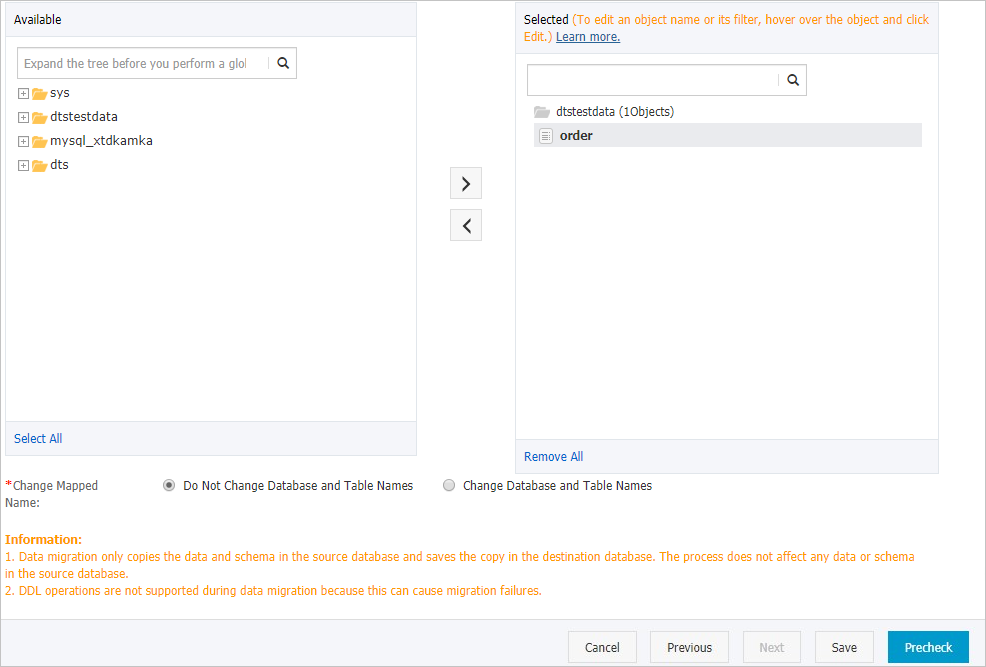
Select the objects to be migrated.

Setting
Description
Select the objects to be migrated
Select objects from the Available section and click the
 icon to move the objects to the Selected section. You can select columns, tables, or databases as the objects to be migrated. Note
If you set the Scheduler strategy parameter to Based on the incremental mode of time stamp, the new data generated by two scheduling intervals before and after synchronization, you can select only columns or tables as the objects to be migrated. If you select databases, you cannot specify the timestamp field in the next step.
By default, after an object is migrated to the destination instance, the name of the object remains unchanged. You can use the object name mapping feature to change the names of the objects that are migrated to the destination instance. For more information, see Object name mapping.
If you use the object name mapping feature to rename an object, other objects that are dependent on the object may fail to be migrated.
In the lower-right corner of the page, click Next. On the page that appears, specify the timestamp field.
NoteThis step is required only if you set the Scheduler strategy parameter to Based on the incremental mode of time stamp, the new data generated by two scheduling intervals before and after synchronization.

In the lower-right corner of the page, click Precheck.
NoteBefore you can start the data migration task, DTS performs a precheck. You can start the data migration task only after the task passes the precheck.
If the task fails to pass the precheck, you can click the
 icon next to each failed item to view details.
 You can troubleshoot the issues based on the causes and run a precheck again.
If you do not need to troubleshoot the issues, you can ignore failed items and run a precheck again.
After the task passes the precheck, click Next.
In the Confirm Settings dialog box, specify the Channel Specification parameter and select Data Transmission Service (Pay-As-You-Go) Service Terms.
Click Buy and Start. The data integration task runs based on the specified scheduled time.
 Note
NoteThe data integration task automatically stops at the end of the scheduled time. To stop the task before the end time of the schedule, click Stop data integration task.
Result
If a task is completed before the end of the current scheduled time, the task status changes to Completed. DTS waits for the next scheduled time and performs full data migration again.
