Data Security Center (DSC) provides the static data masking feature. You can use the feature to mask sensitive data in TXT, CSV, XLSX, and XLS files in source Object Storage Service (OSS) buckets within your account and save masked files to destination OSS buckets within the account for secure data sharing.
Overview
Examples of masked data
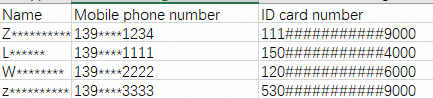
Raw data | Masked data | ||||
Name | Mobile phone number | ID card number | Name | Mobile phone number | ID card number |
Zhang Sansan | 13900001234 | 111222190002309000 | Z*********** | 139****1234 | 111###########9000 |
Li Sisi | 13900001111 | 150802202207214000 | L***** | 139****1111 | 150###########4000 |
Wang Wuwu | 13900002222 | 120105195001066000 | W******** | 139****2222 | 120###########6000 |
To mask data, perform the following steps:
Create OSS buckets and upload a file: Create a source OSS bucket and a destination OSS bucket and upload a table file that contains sensitive data to the source OSS bucket.
Connect objects in OSS buckets to DSC: Authorize DSC to access OSS buckets to ensure that DSC can read data from and write data to OSS buckets.
Create a data masking task: Create a data masking task. You must configure masking algorithms and rules for sensitive fields in the source OSS bucket and specify the destination OSS bucket to store the masked file.
Start the data masking task: Start the data masking task to mask sensitive data in the table file in the source OSS bucket and save the masked file to the destination OSS bucket.

Prerequisites
DSC is purchased and authorized to access cloud services. To purchase DSC, go to the DSC buy page. To perform authorization, go to the Workbench page.
You must purchase DSC Enterprise Edition that supports the data masking feature. In this example, OSS Data Management is enabled to mask data in OSS buckets. The minimum specification for OSS Protection Capacity is selected. You can disable Database Management and all features in the Value-added Module section.
OSS is activated. To activate OSS, go to the OSS buy page.
Step 1: Create OSS buckets and upload a file
1.1 Create a source OSS bucket and a destination OSS bucket
On the Buckets page of the OSS console, click Create Bucket.
In the Create Bucket panel, configure the parameters as shown in the following figure and use the default settings for other parameters. Then, click Create. The OSS bucket is used as the source OSS bucket.
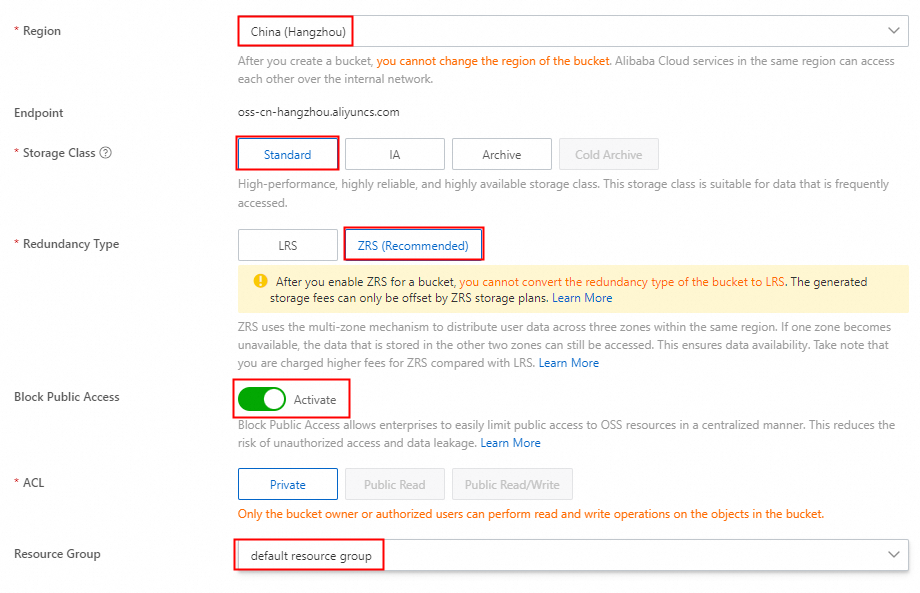
Repeat the preceding steps to create another OSS bucket.
1.2 Upload a table file to the source OSS bucket
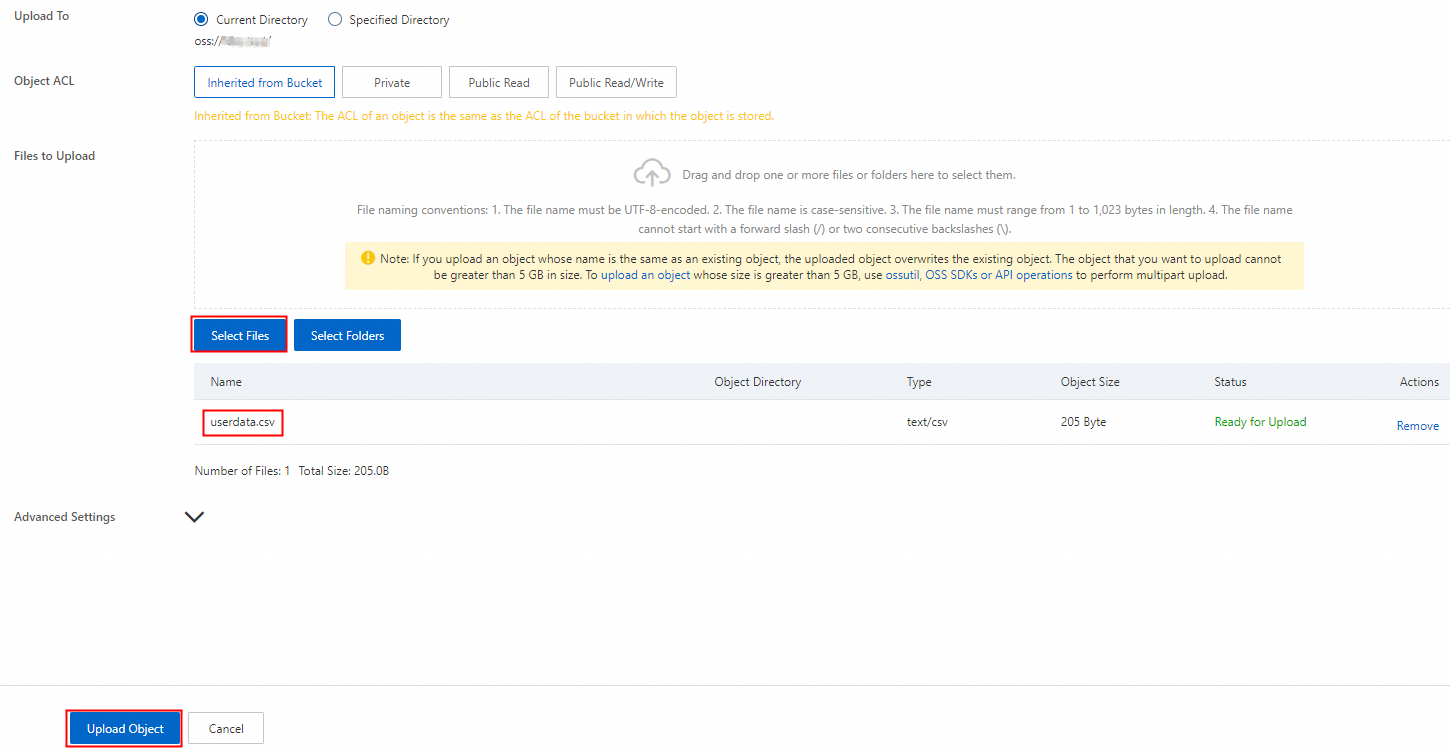
On the Buckets page of the OSS console, click the name of the source OSS bucket.
On the Objects page, click Upload Object.
Click Select Files, select the required file from your computer, and then click Upload Object. Wait until the file is uploaded. In this example, the userdata.csv file that contains sensitive information, such as names, mobile phone numbers, and ID card numbers, is uploaded.
Step 2: Connect objects in OSS buckets to DSC
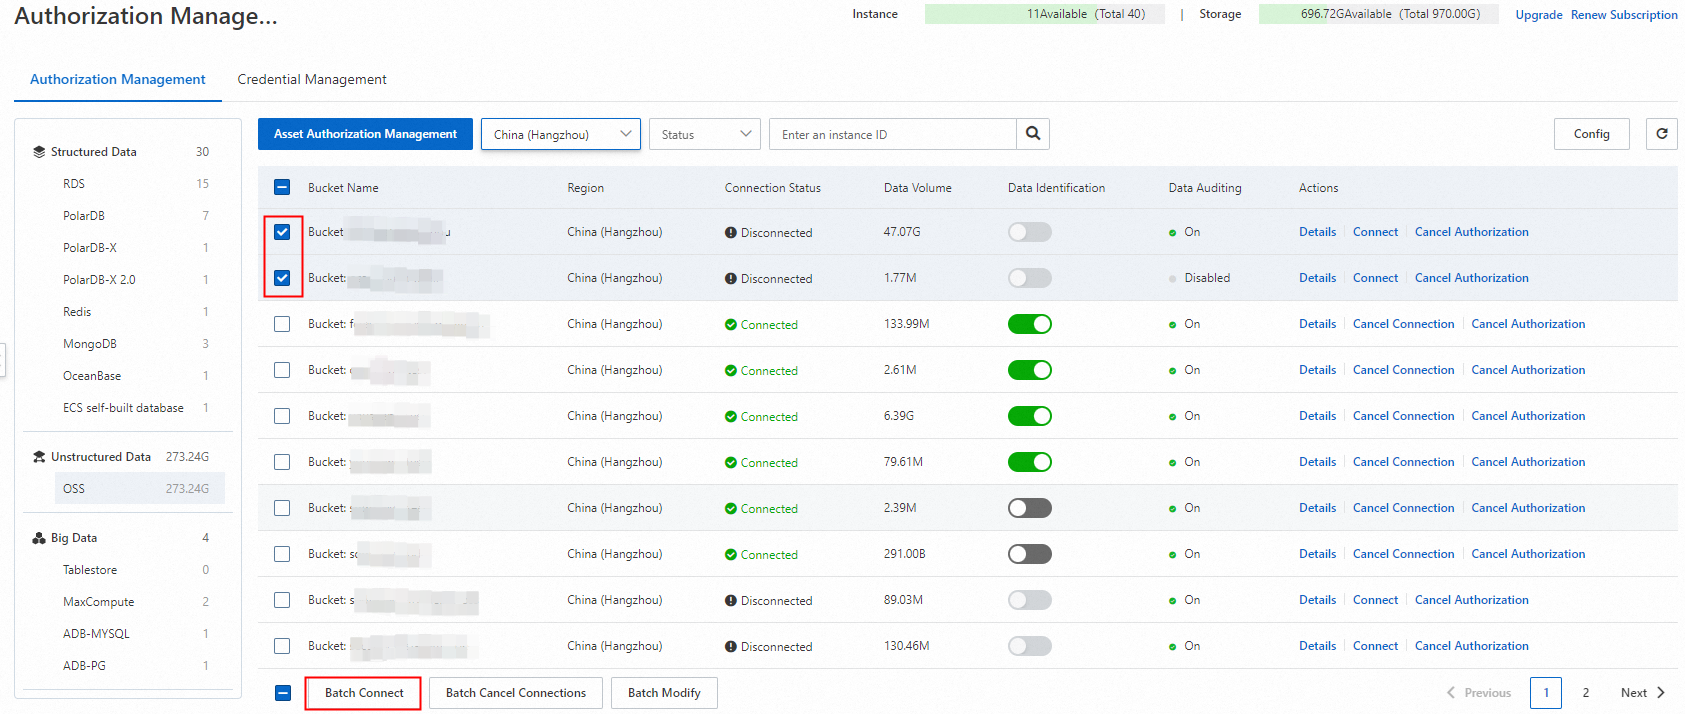
On the Authorization Management page of DSC, click Asset Authorization Management.
In the Asset Authorization Management panel, click OSS in the Unstructured Data section and click Asset synchronization.
After assets are synchronized, select the source and destination OSS buckets and click Batch Authorize.
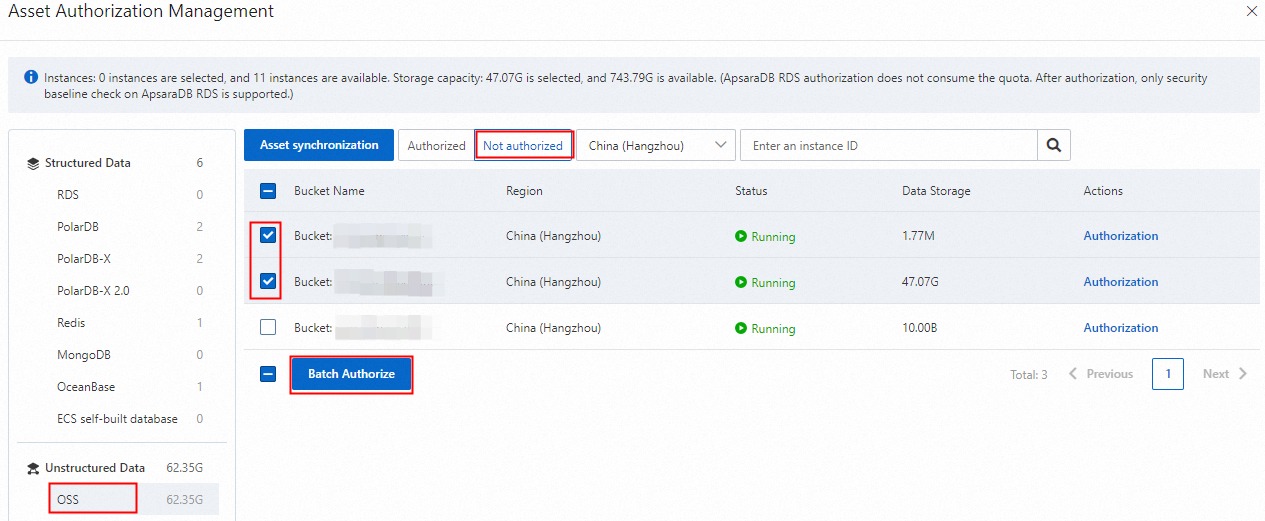
After batch authorization is complete, select the source and destination OSS buckets on the Asset Authorization Management page, and click Batch Connect.
In the Batch Connect dialog box, click OK. You do not need to select Immediately scan database assets and identify data.
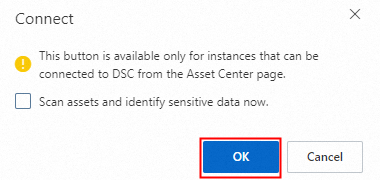
Wait until the Connection Status of the OSS buckets changes to Connected.
Step 3: Create a data masking task
On the Data Desensitization page in the DSC console, click Add Desensitization Task. Follow the on-screen instructions to create a data masking task.
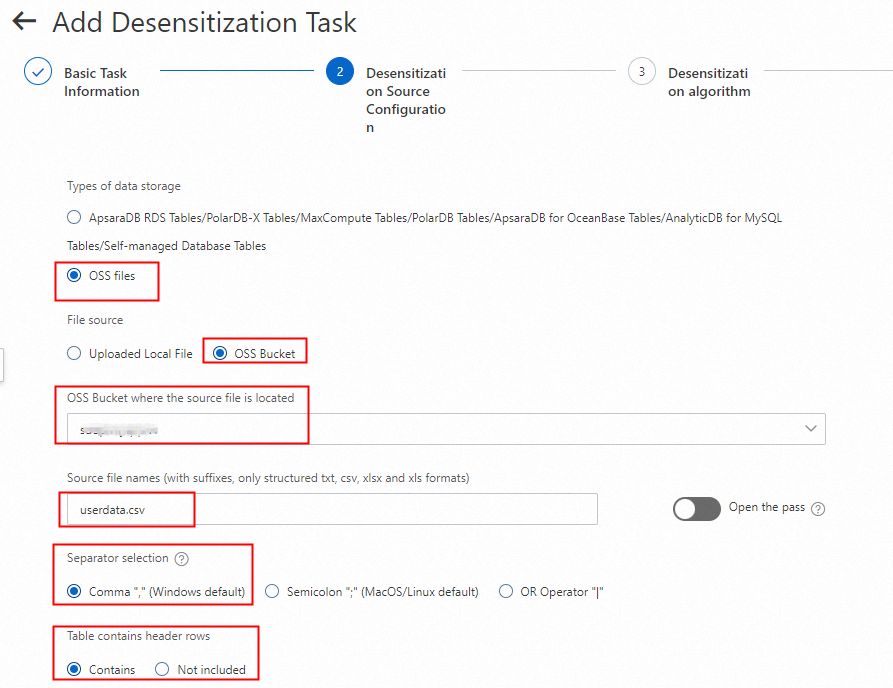
3.1 Configure the source file
In the Basic Task Information step, enter the task name. In the Desensitization Source Configuration step, set the masking source to the object named userdata.csv in the source OSS bucket. For objects of the csv type, select Comma "," (Windows default) for the Separator selection parameter. In this example, Contains is selected for the Table contains header rows parameter.
3.2 Configure masking rules
In the Desensitization algorithm step, the fields in the header row in the userdata.csv file are automatically matched. In this example, the names, mobile phone numbers, and ID card numbers are redacted.
Turn on Desensitization for each field and select Masking.
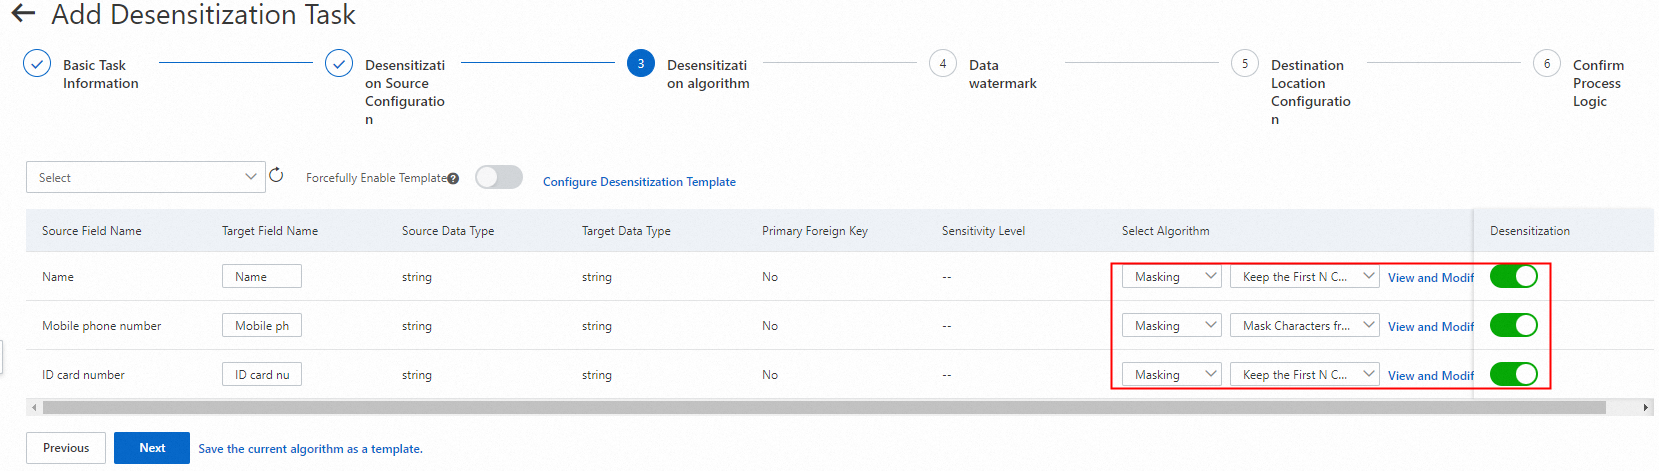
Click View and Modify Parameter next to Masking, configure algorithm rules, and then click Save. In this example, the following masking rules are configured:
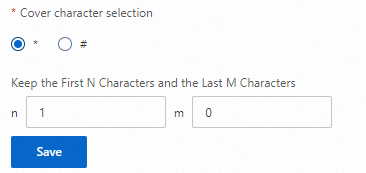
Name: Retain the first character and redact other characters with asterisks (
*).Mobile phone number: Redact the fourth to the seventh characters with asterisks (
*).ID card number: Retain the first three and last four characters and redact other characters with number signs (
#).
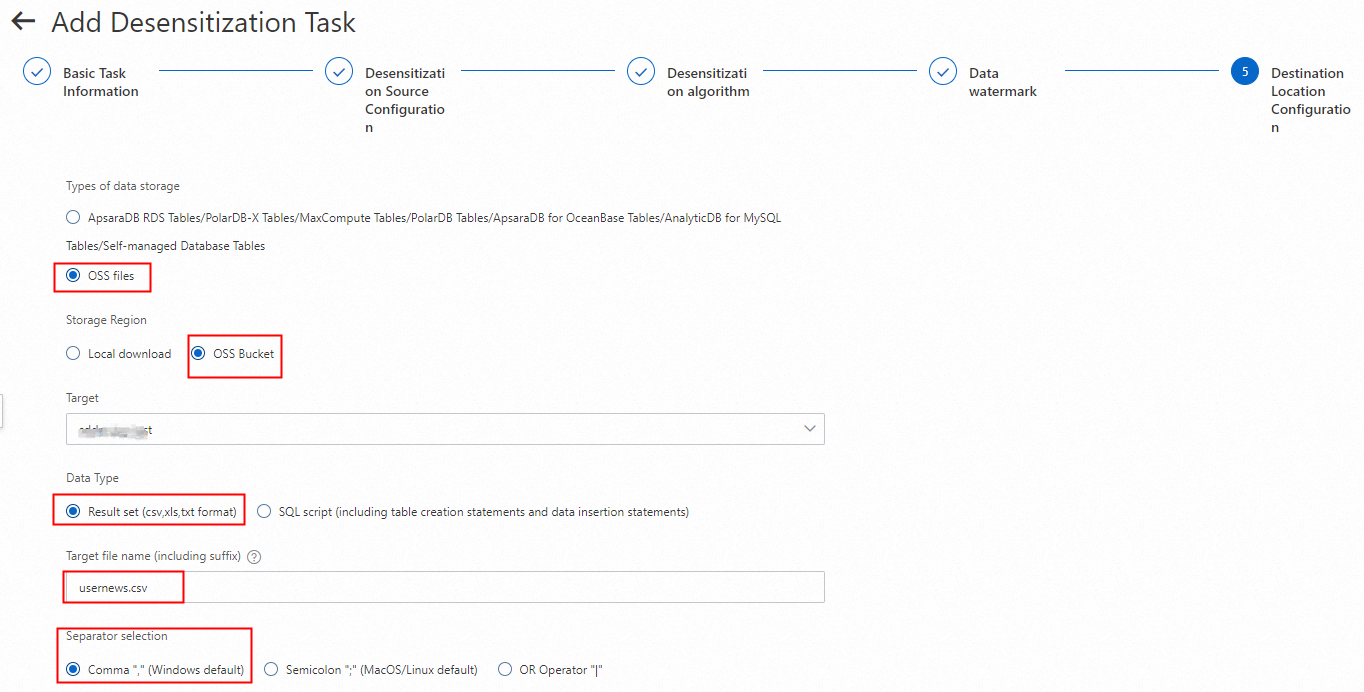
3.3 Specify the storage location of masked files
You cannot add watermarks to OSS data sources. You can configure the destination bucket to store masked files. In this example, Result set (csv,xls,txt format) is selected for the Data Type parameter. You can specify a custom file name. The file type must be csv, xls, or txt.
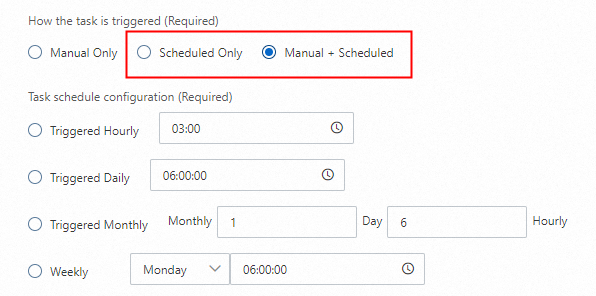
3.4 Configure the triggering method of the data masking task
You need to configure only the How the task is triggered (Required) parameter for OSS file masking tasks. You do not need to configure other parameters.
Set the How the task is triggered (Required) parameter to Manual Only.

Click Submit.
Step 4: Start the data masking task
4.1 Run the data masking task
On the Static Desensitization tab, click Task Configurations. Then, find the created data masking task and click Start in the Actions column to run the data masking task.

On the Static Desensitization tab, click Status. Wait until the progress of the data masking task reaches 100% and the status becomes Successful.

4.2 Query the masking results
Go to the Buckets page in the OSS console, click the name of the destination bucket, and then find the masked file in the file list. The file name is in the
<Destination file name>_<Time when the data masking task is run>.<File type>format. Example:usernews_20240808150643.csv.20240808150643indicates that the task was run at 15:06:43 on August 8, 2024. You can click Download to download the file.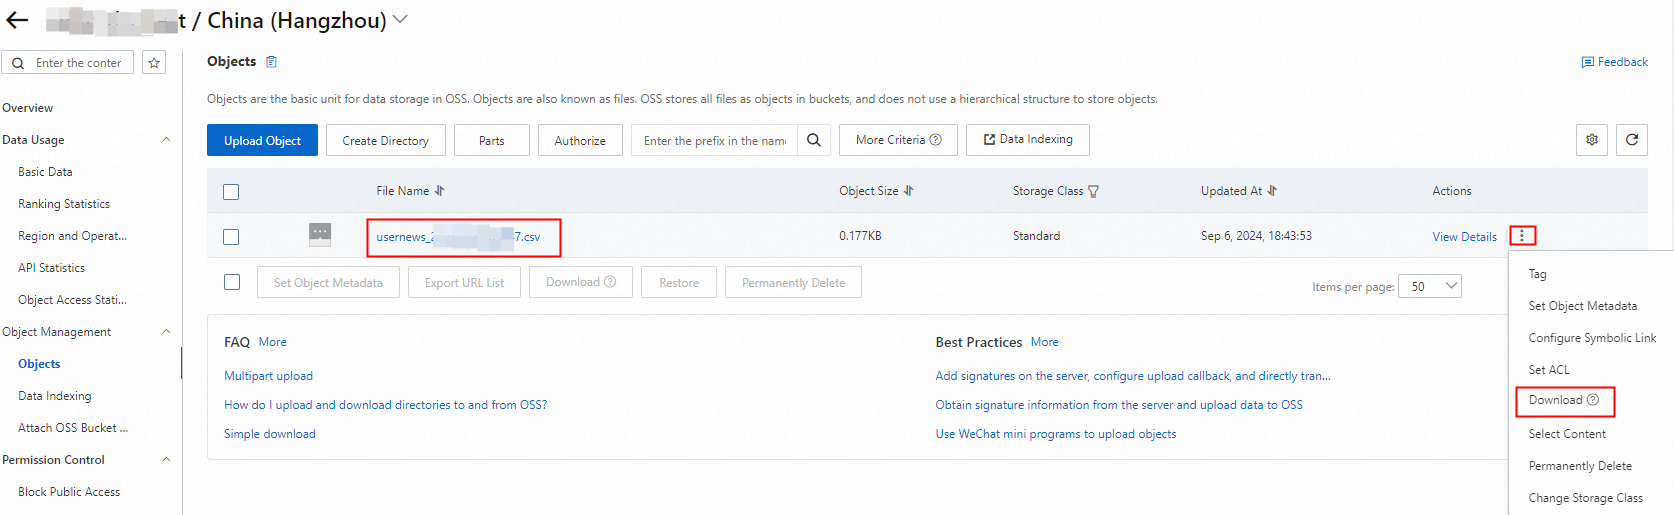
Download and open the file. Names, mobile phone numbers, and ID card numbers in the file are masked.
Summary
You can mask raw data in OSS buckets and store the masked data in destination OSS buckets for sharing. In this case, even if shared data is leaked, sensitive data remains unexposed. This reduces the risk of data abuse and privacy violations. Masked data can be used in scenarios such as data analysis, model training, and business report sharing without compromising personal privacy.
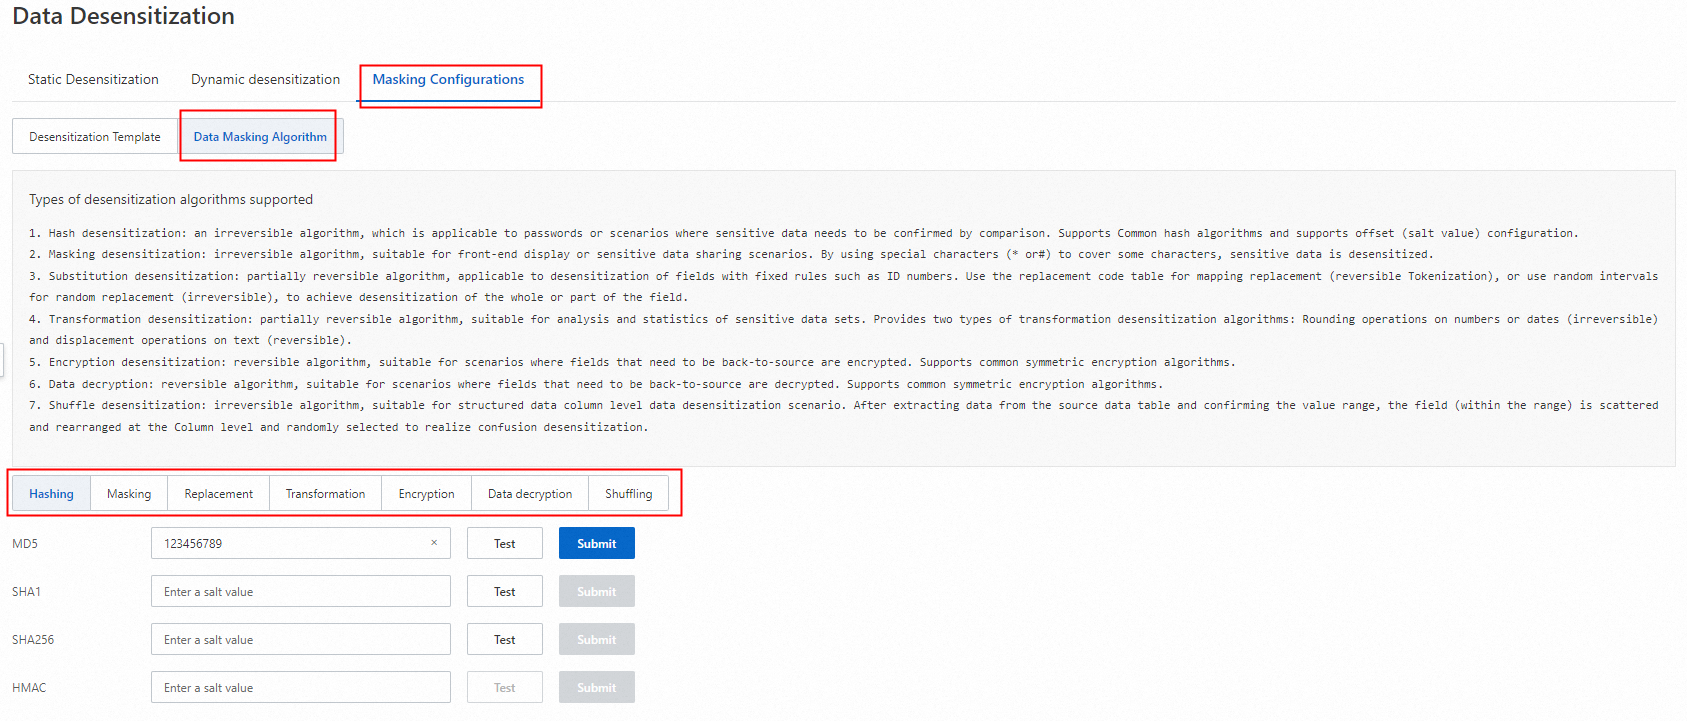
Flexible selection of masking algorithms
Data masking is implemented based on masking algorithms and masking rules. DSC supports the following masking algorithms: hashing, redaction, substitution, rounding, encryption, decryption, and shuffling. You can select masking algorithms for different business scenarios based on your business requirements.
Efficient masking rule configuration
DSC provides masking templates. You can add data masking algorithms that are frequently used in the same scenario to a data masking template and use the template to configure a static data masking rule in an efficient manner.
For more information, see Configure data masking templates and algorithms.
Scheduled data masking tasks
Data masking tasks can be run on an hourly, daily, monthly, or weekly basis to ensure that the updated data is masked at the earliest opportunity.