DataWorks provides built-in process checks, such as code reviews before task deployment and built-in checks for governance items in the Data Governance center. DataWorks also supports custom check logic that you can integrate to manage DataWorks processes. This topic uses an example of checking for the MAX_PT function in code during commit and deployment to demonstrate how to use an extension to prohibit the use of a specific function in a workspace.
Scenario description
This best practice provides an example of checking for the MAX_PT function in code that is committed and published. The check process is as follows:
No. | Core process | Core feature |
1 | Send file commit and publish messages from a workspace to EventBridge through OpenEvent. EventBridge then filters the messages and sends them to your service. | When you enable message subscription, specify the event types as file commit and publish (dataworks:FileChange:CommitFile and dataworks:FileChange:DeployFile) in the event rule. For more information, see Best practices: Prohibit the use of the MAX_PT function (Advanced). |
2 | A local or online service receives the messages. Configure the extension to achieve the following results:
|
For more information, see Best practices: Prohibit the use of the MAX_PT function (Advanced). |
Prerequisites
EventBridge is activated. For more information, see Billing.
DataWorks is activated. For more information, see Purchasing guide.
A workspace is created in DataWorks. For more information, see Create a workspace.
Procedure
Step 1: Configure a custom event bus
Log on to the EventBridge console. In the navigation pane on the left, click Event Buses to open the event bus creation page.
Click Quickly Create to Create Custom Event Bus.
In the Event Bus section, configure Name and click Next Step to go to the event source configuration.
Click Skip to skip the configuration of Event Source, Event Rule, and Event Target.

In the navigation pane on the left, click Event Buses to go to the Event Buses page. Find the event bus that you created and click its name to go to the overview page.
In the navigation pane on the left, click Event Rules. Then, click Create Rule.
In this best practice, the custom EventBridge bus is configured to receive file commit and file publish event messages from DataWorks. The core parameter configurations are as follows.
Configure Basic Info: Specify a name for the custom rule.
Configure Event Pattern
Event Source Type, select Custom Event Source.
Event Source: You do not need to configure this parameter.
Pattern Content: Enter the content in JSON format as follows.
{ "source": [ "acs.dataworks" ], "type": [ "dataworks:FileChange:CommitFile", "dataworks:FileChange:DeployFile" ] }source: The product name identifier of the event. Set this to acs.dataworks.
type: The event type identifier for the product. Set this to dataworks:FileChange:CommitFile and dataworks:FileChange:DeployFile.
Event Pattern Debugging: Add or modify the values for source and type, and then test the event. If the test is successful, click Next.

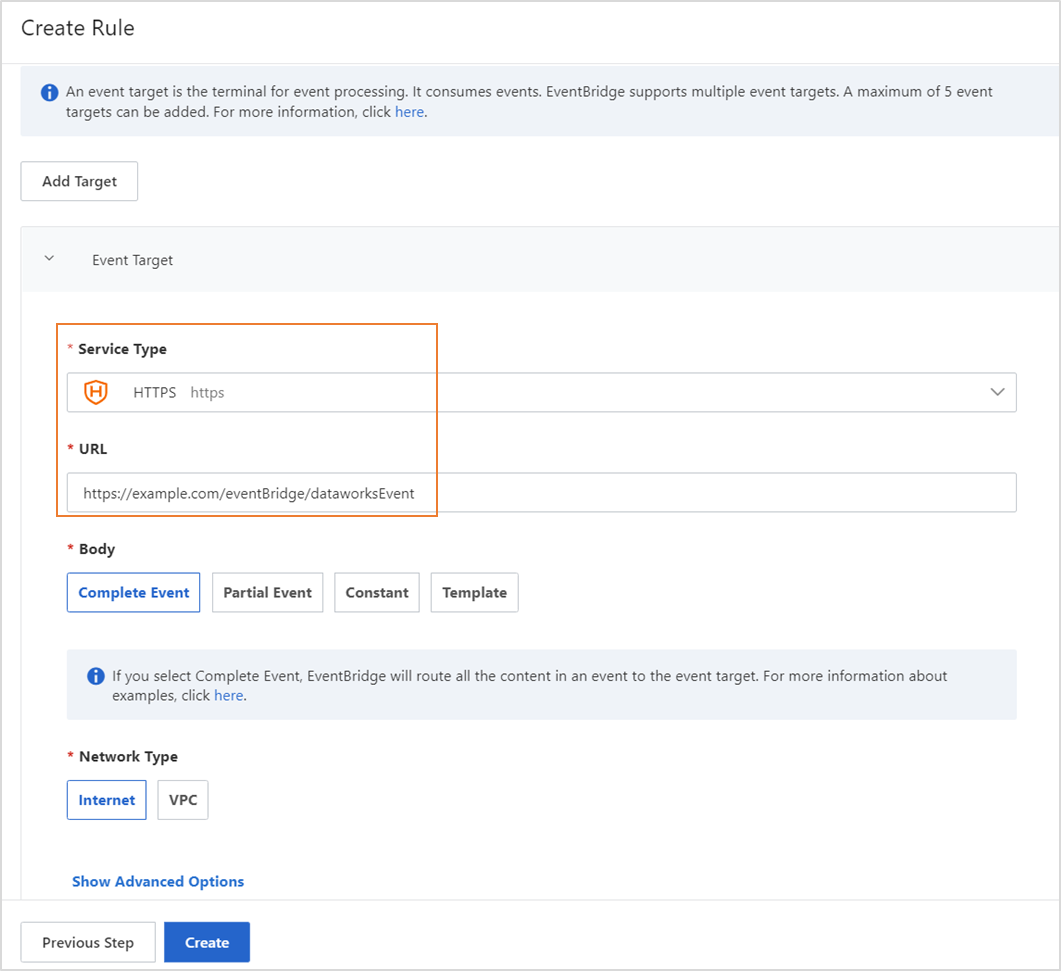
Configure Targets.
Service Type: Select HTTPS or HTTP. For more information, see Manage event rules.
URL: Enter the URL to receive messages pushed from the custom bus. For example,
https://server_address:port_number/extensions/consumer.Body: Select Complete event.
Network Type: Select Internet.
Step 2: Configure an event distribution channel
Go to the Developer Backend tab.
Log on to the DataWorks console. In the top navigation bar, select the desired region. In the left-side navigation pane, choose . On the page that appears, click Go to Open Platform. The Developer Backend tab appears.
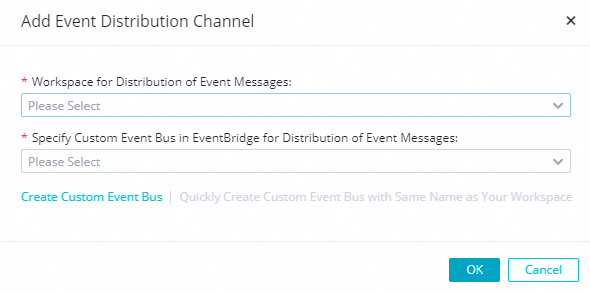
On the Developer Backend page, click OpenEvent in the left navigation pane. On the page that appears, click Add Event Distribution Channel and configure the parameters in the dialog box.
Workspace for Distribution of Event Messages: Select the workspace that you created.
Specify Custom Event Bus in EventBridge for Distribution of Event Messages: Select the event bus that you created in Step 1.
After you save the event distribution channel, find the channel and click Enable in the Actions column.
Step 3: Register and configure an extension (Extension)
Go to the Developer Backend tab.
Log on to the DataWorks console. In the top navigation bar, select the desired region. In the left-side navigation pane, choose . On the page that appears, click Go to Open Platform. The Developer Backend tab appears.
On the Developer Backend page, click Extensions in the left navigation pane. Then, click Register Extension and configure the parameters in the dialog box.
Deployment method: Select Deploy Based on Self-managed Service.
Register extension
Extension Name: Enter a custom name.
Processed Extension Points, select Pre-event for Node Commit and Pre-event for Node Deployment.
Workspace for Testing: Specifies a workspace where you can test the extension after it is created but before it is submitted.
Extension Parameter Configuration
You can use this parameter to control the scope of the extension. In the specified workspace:
When a node is committed (Pre-event for Node Commit), the commit process is not blocked because the extension check is not triggered.
When a node is published, the Pre-event for Node Deployment event triggers an extension check. If the check conditions are not met, the publish process is blocked.
Configure the parameter as
extension.project.commit-file.disabled=YourProjectId. Replace YourProjectId with the ID of the workspace where you want to disable the extension for the specified event.Options for Extension: Specifies the response method, such as Alert or Disable, to use when the check conditions are not met.
{
  "type":"object",
  "properties":{
    "checkStatus":{
      "type":"number",
      "title":"Check method for MAX-PT function",
      "x-decorator":"FormItem",
      "x-component":"Radio.Group",
      "x-decorator-props":{
        "tooltip":"Description file"
      },
      "x-component-props":{
        "dataSource":[
          {
            "value":"WARN",
            "label":"Alert"
          },
          {
            "value":"FAIL",
            "label":"Disable"
          }
        ],
        "mode":"multiple"
      }
    }
  }
}
After completing the configuration, click OK to save the registered extension.
In the Actions column for the extension, click Submit to begin the review process.
NoteThe extension is reviewed by the DataWorks platform. The review usually takes three business days. Please wait patiently.
To test the extension you created, you must configure a Workspace for Testing.
After the extension is approved, click Publish in the Actions column to publish it.
Click the Manage Extensions button to go to the page. Select the extension you created, enable it in the Enable column, and click Settings to configure the control level for the MAX_PT function in the workspace.

Develop and configure the extension
EventBridge receives JSON-formatted events sent from DataWorks through an HTTP request, parses the messages, and pushes them to the destination service program. After processing the events, the program returns the results to DataWorks.
Sample code
This sample code calls the UpdateIDEEventResult API to send the result as a callback. It uses the messageId parameter in the API to retrieve the detailed event information and then performs a logical check to determine if the restricted function is included. The check result is returned to DataWorks using UpdateIDEEventResult. For more information, see Develop an extension.
Environment: Java 8 and the Maven build tool.
package com.aliyun.dataworks.demo;

import com.alibaba.fastjson.JSON;
import com.alibaba.fastjson.JSONObject;
import com.aliyun.dataworks.config.Constants;
import com.aliyun.dataworks.config.EventCheckEnum;
import com.aliyun.dataworks.config.ExtensionParamProperties;
import com.aliyun.dataworks.services.DataWorksOpenApiClient;
import com.aliyun.dataworks_public20200518.Client;
import com.aliyun.dataworks_public20200518.models.*;
import org.springframework.beans.factory.annotation.Autowired;
import org.springframework.web.bind.annotation.PostMapping;
import org.springframework.web.bind.annotation.RequestBody;
import org.springframework.web.bind.annotation.RequestMapping;
import org.springframework.web.bind.annotation.RestController;

/**
 * @author dataworks demo
 */
@RestController
@RequestMapping("/extensions")
public class ExtensionsController {

  @Autowired(required = false)
  private DataWorksOpenApiClient dataWorksOpenApiClient;

  @Autowired
  private ExtensionParamProperties extensionParamProperties;

  /**
   * Receive messages pushed from EventBridge.
   *
   * @param jsonParam
   */
  @PostMapping("/consumer")
  public void consumerEventBridge(@RequestBody String jsonParam) {
    JSONObject jsonObj = JSON.parseObject(jsonParam);
    String eventCode = jsonObj.getString(Constants.EVENT_CODE_FILED);
    if (Constants.COMMIT_FILE_EVENT_CODE.equals(eventCode) || Constants.DEPLOY_FILE_EVENT_CODE.equals(eventCode)) {
      // Initialize the client.
      Client client = dataWorksOpenApiClient.createClient();
      try {
        // Information about the parameters for the current event.
        String messageId = jsonObj.getString("id");
        JSONObject data = jsonObj.getObject("data", JSONObject.class);
        Long projectId = data.getLong("projectId");

        // Initialize the event callback.
        UpdateIDEEventResultRequest updateIDEEventResultRequest = new UpdateIDEEventResultRequest();
        updateIDEEventResultRequest.setMessageId(messageId);
        updateIDEEventResultRequest.setExtensionCode(extensionParamProperties.getExtensionCode());

        // Query the data snapshot of the extension point when the extension point event is triggered.
        GetIDEEventDetailRequest getIDEEventDetailRequest = new GetIDEEventDetailRequest();
        getIDEEventDetailRequest.setMessageId(messageId);
        getIDEEventDetailRequest.setProjectId(projectId);
        GetIDEEventDetailResponse getIDEEventDetailResponse = client.getIDEEventDetail(getIDEEventDetailRequest);
        String content = getIDEEventDetailResponse.getBody().getEventDetail().getCommittedFile().getContent();

        // Check whether the code contains the restricted function.
        if (content.contains(Constants.CHECK_CODE)) {
          // Obtain the configuration of the extension options in the project.
          GetOptionValueForProjectRequest getOptionValueForProjectRequest = new GetOptionValueForProjectRequest();
          getOptionValueForProjectRequest.setProjectId(String.valueOf(projectId));
          getOptionValueForProjectRequest.setExtensionCode(extensionParamProperties.getExtensionCode());
                  GetOptionValueForProjectResponse getOptionValueForProjectResponse = client.getOptionValueForProject(getOptionValueForProjectRequest);
                  JSONObject jsonObject = JSON.parseObject(getOptionValueForProjectResponse.getBody().getOptionValue());
                  // Note: You must fill in the format based on the actual settings in DataWorks.
                  String checkStatus = jsonObject.getString("checkStatus");
                  updateIDEEventResultRequest.setCheckResult(checkStatus);
                  updateIDEEventResultRequest.setCheckResultTip("The code contains a restricted function.");
              } else {// Successful callback.
                  updateIDEEventResultRequest.setCheckResult(EventCheckEnum.OK.getCode());
                  updateIDEEventResultRequest.setCheckResultTip(EventCheckEnum.OK.getName());
              }
              // Callback to DataWorks.
              UpdateIDEEventResultResponse response = client.updateIDEEventResult(updateIDEEventResultRequest);
              // The unique identifier of the request, used for subsequent troubleshooting.
              System.out.println("response:" + response.getBody().getRequestId());
          } catch (Exception e) {
              // Error description message.
              System.out.println("ErrMsg:" + e.getMessage());
          }
      } else {
          System.out.println("Failed to filter other events. Check the configuration steps.");
      }
  }
}
Sample project deployment
Prepare the environment and project
Dependencies: Java 8 or later, Maven build tool.
Project download link: extensions-demo-maxpt.zip (219 KB).
Deployment method
Local deployment: Package the project into a JAR file. On a local server where Java 8 and the Maven tool are deployed, run the
java -jar yourapp.jarcommand to start the service program.Cloud platform deployment: Package the project into a JAR file and upload it to the runtime environment, such as a Docker container or an Elastic Compute Service (ECS) instance, for deployment.
NoteThe deployed service must be accessible from EventBridge over the public network.
After you download the project, go to the root directory of the project and run the packaging command to package the project into a JAR file.
mvn clean package -Dmaven.test.skip=true spring-boot:repackageRun the JAR file:
java -jar target/extensions-demo-maxpt-1.0.jarThe project starts successfully, as shown in the following figure.
 Enter
Enter http://localhost:8080/indexin a browser. If"hello world!"is returned, the application is deployed successfully. After the network is connected, you can subscribe to messages from EventBridge.
Result verification
After you deploy the code and connect the network to EventBridge, you can verify the results in the workspace where the extension is enabled.
Verification steps
On the Data Development page, create a node. In the node, edit the code to include the prohibited
MAX_PTfunction, then save and commit it.Click the Publish button. On the Create Deployment Package page, publish the node. This action triggers the extension check.
NoteThe extension is configured to ignore file commit events in the specified workspace. Therefore, the extension check is not triggered when you commit a node that contains the
MAX_PTfunction. The check is triggered when you publish the node that contains theMAX_PTfunction.