The DataWorks Open Platform provides OpenAPI, OpenEvent, and Extensions features. You can use these features to implement custom controls and responses for specific flows. This topic uses a task deployment lockdown scenario as an example to show you how to configure the Open Platform for events, such as submitting a node for deployment on the Data Development page.
For an introduction to the Open Platform features and concepts used in this best practice, see OpenEvent overview and Extensions overview.
Scenario description
Subscription configuration
When you configure a subscription, you can use an event rule to specify the event type for file submission or deployment.
For a workspace in standard mode, use dataworks:FileChange:CommitFile.
For a workspace in basic mode, use dataworks:FileChange:DeployFile.
Procedure
Step 1: Configure a custom event bus
For detailed steps on how to enable and configure message subscription, see Enable message subscription. The following section describes the core configuration flow and important notes for this best practice.
Log on to the EventBridge console. In the navigation pane on the left, click Event Buses to go to the event bus creation page
If EventBridge is not activated, please enable the service and complete the authorization.
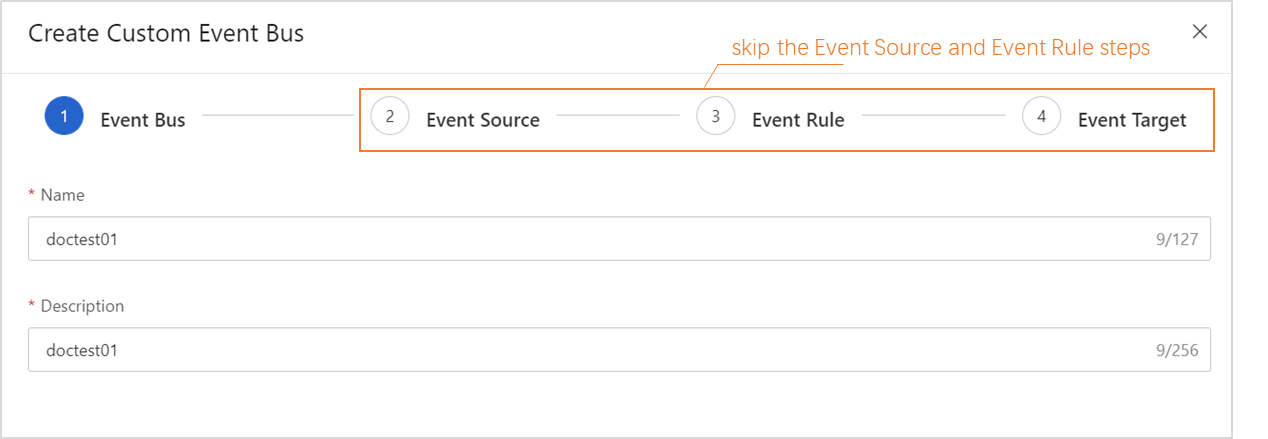
Click Quickly Create to Create Custom Event Bus.
In the Event Bus section, configure Name and click Next Step to go to the event source configuration.
Click Skip to skip the configuration of Event Source, Event Rule, and Event Target.
In the navigation pane on the left, click Event Buses. Find the event bus that you created and click its name to go to the overview page.
In the navigation pane on the left, click Event Rules. On the Event Rules page, click Create Rule to create a new event rule.
In this best practice, the custom EventBridge bus is configured to receive DataWorks file submission and file deployment event messages. The following section describes the demo configuration and core parameters.
Configure Basic Info: Enter a custom rule name.
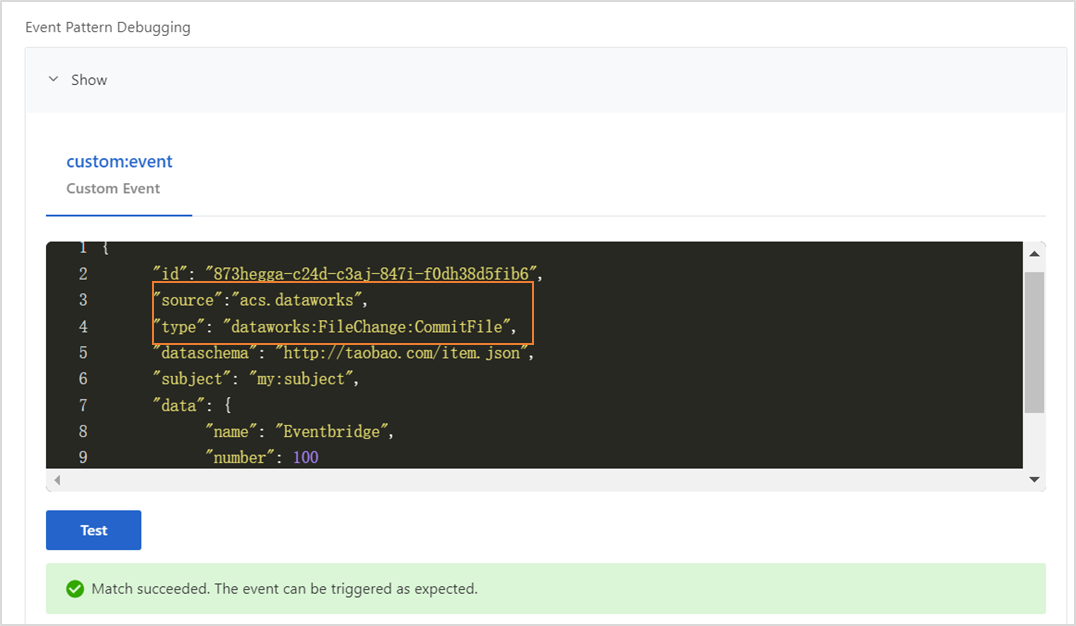
Configure Event Pattern
Event Source Type: Select Custom Event Source.
Event Source: Leave this parameter empty.
Pattern Content: Write the content in JSON format as follows. This example uses a workspace in standard mode.
NoteFor a workspace in basic mode, set this parameter to dataworks:FileChange:DeployFile.
{ "source": [ "acs.dataworks" ], "type": [ "dataworks:FileChange:CommitFile" ] }source: Defines the product name identifier for the event, which is acs.dataworks.
type: Defines the event type identifier for the product. Set this parameter to dataworks:FileChange:CommitFile.
Event Pattern Debugging: Modify the values for source and type, and then test the event. If the test is successful, click Next.
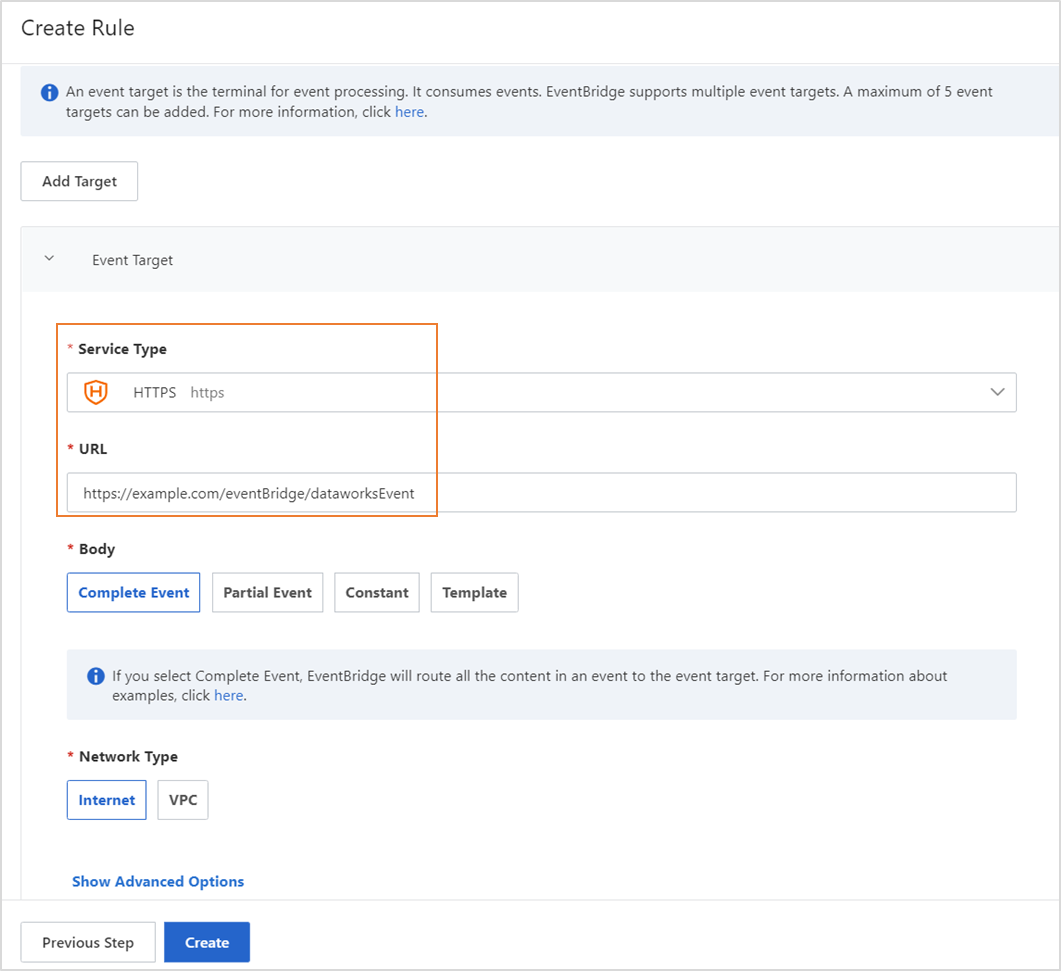
Configure Targets
Service Type: Select HTTPS or HTTP. For more information about service types, see Manage event rules.
URL: Enter the URL to receive messages that are pushed from the custom bus, for example,
https://server_address:port_number/extensions/consumer.NoteEnter the server URL of the deployed extension.
Body: Select Complete Event.
Network Type: Select Internet.
Step 2: Configure an event distribution channel
Go to the Developer Backend tab.
Log on to the DataWorks console. In the top navigation bar, select the desired region. In the left-side navigation pane, choose . On the page that appears, click Go to Open Platform. The Developer Backend tab appears.
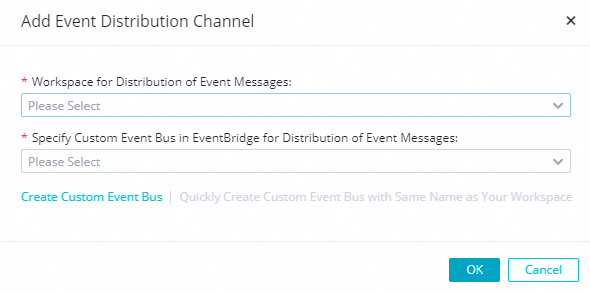
On the Developer Backend page, click OpenEvent in the left navigation pane. On the page that appears, click Add Event Distribution Channel and configure the parameters in the dialog box.
Workspace for Distribution of Event Messages: Select the workspace that you created.
Specify Custom Event Bus in EventBridge for Distribution of Event Messages: Select the event bus that you created in Step 1.
After you save the event distribution channel, find the channel and click Enable in the Actions column.
Step 3: Register and configure an extension
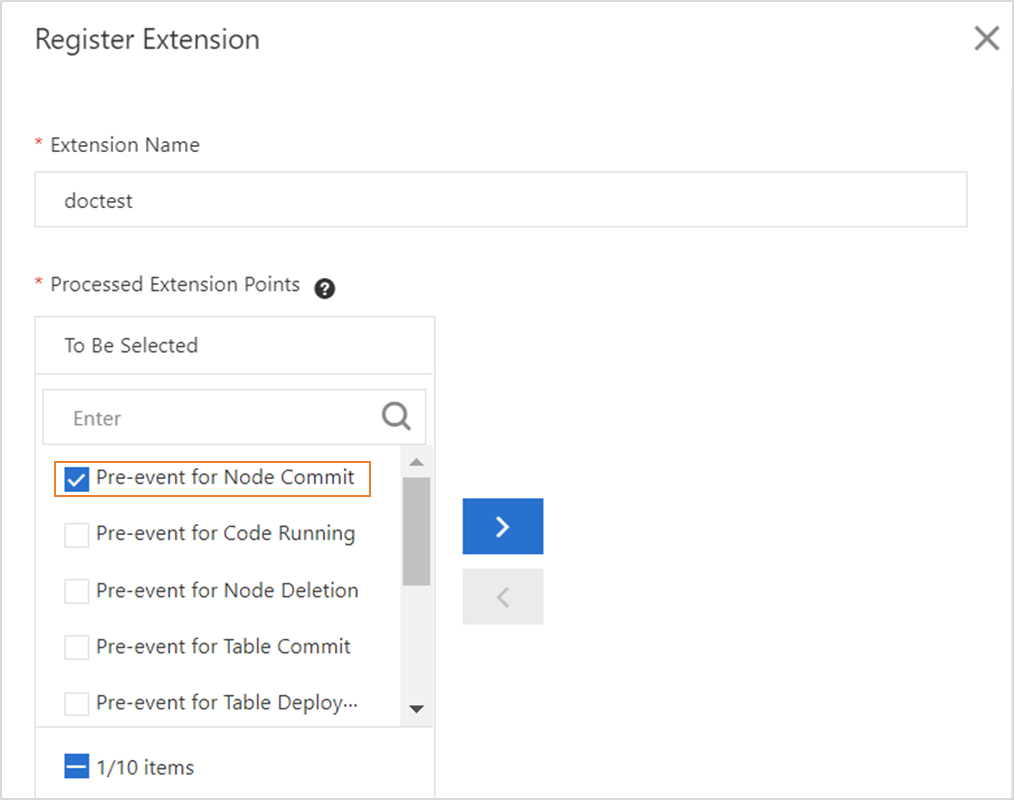
On the Developer Backend page, click Extensions in the left navigation pane. Then, click Register Extension and configure the parameters in the dialog box.
Deployment Method: Select Deploy with Self-managed Service.
Register the extension.
Extension Name: Enter a custom name.
Processed Extension Points: Select Pre-event for Node Commit and Pre-event for Node Deployment.
Workspace for Testing: After the configuration is complete, you can test the extension in this workspace after the extension is created but before it is submitted.
Configure other parameters as prompted on the UI.
After completing the configuration, click OK to save the registered extension.
In the Actions column for the extension, click Submit to begin the review process.
NoteThe extension is reviewed by the DataWorks platform. The review usually takes three business days. Please wait patiently.
To test the extension you created, you must configure a Workspace for Testing.
After the extension is approved, click Publish in the Actions column to publish it.
Click Manage Extensions to go to the page. Select the extension that you created and enable it in the Enable column.
Develop and configure the extension
Sample code
This code uses the message that is pushed from EventBridge to the service to call the service. The code compares the current date with the configured holiday and lockdown dates to determine whether it is a lockdown day. The result is sent back to DataWorks through a callback using the UpdateIDEEventResult OpenAPI operation.
Environment: Java 8 and the Maven build tool.
package com.aliyun.dataworks.demo;

import com.alibaba.fastjson.JSON;
import com.alibaba.fastjson.JSONObject;
import com.aliyun.dataworks.config.Constants;
import com.aliyun.dataworks.config.EventCheckEnum;
import com.aliyun.dataworks.config.ExtensionParamProperties;
import com.aliyun.dataworks.services.DataWorksOpenApiClient;
import com.aliyun.dataworks_public20200518.Client;
import com.aliyun.dataworks_public20200518.models.UpdateIDEEventResultRequest;
import com.aliyun.dataworks_public20200518.models.UpdateIDEEventResultResponse;
import org.springframework.beans.factory.annotation.Autowired;
import org.springframework.web.bind.annotation.PostMapping;
import org.springframework.web.bind.annotation.RequestBody;
import org.springframework.web.bind.annotation.RequestMapping;
import org.springframework.web.bind.annotation.RestController;

import java.text.SimpleDateFormat;
import java.util.Arrays;
import java.util.List;

/**
 * @author dataworks demo
 */
@RestController
@RequestMapping("/extensions")
public class ExtensionsController {

  @Autowired(required = false)
  private DataWorksOpenApiClient dataWorksOpenApiClient;

  @Autowired
  private ExtensionParamProperties extensionParamProperties;

  /**
   * Receive messages pushed from EventBridge
   *
   * @param jsonParam
   */
  @PostMapping("/consumer")
  public void consumerEventBridge(@RequestBody String jsonParam) {
    JSONObject jsonObj = JSON.parseObject(jsonParam);
    String eventCode = jsonObj.getString(Constants.EVENT_CODE_FILED);
    if (Constants.COMMIT_FILE_EVENT_CODE.equals(eventCode)) {
      // Initialize the client
      Client client = dataWorksOpenApiClient.createClient();
      // Get the current time
      SimpleDateFormat sdf = new SimpleDateFormat(Constants.YYYY_MM_DD);
      String now = sdf.format(System.currentTimeMillis());
      // Get the holidays and lockdown dates for 2022
      List<String> holidayList = Arrays.asList(extensionParamProperties.getHolidayList().split(","));
      // Check if the current date is a lockdown day
      boolean isExists = holidayList.stream().anyMatch(day -> day.equals(now));
      // Callback method
      UpdateIDEEventResultRequest updateIDEEventResultRequest = new UpdateIDEEventResultRequest();
      updateIDEEventResultRequest.setMessageId(jsonObj.getString("id"));
      updateIDEEventResultRequest.setExtensionCode(extensionParamProperties.getExtensionCode());
      // If it is a lockdown day, the check fails
      if (isExists) {
        updateIDEEventResultRequest.setCheckResult(EventCheckEnum.FAIL.getCode());
        updateIDEEventResultRequest.setCheckResultTip("File submission is not allowed on a lockdown day.");
      } else {
        // If it is not a lockdown day, the check passes
        updateIDEEventResultRequest.setCheckResult(EventCheckEnum.OK.getCode());
        updateIDEEventResultRequest.setCheckResultTip(EventCheckEnum.OK.getName());
      }
      try {
        // Send the callback to DataWorks
        UpdateIDEEventResultResponse response = client.updateIDEEventResult(updateIDEEventResultRequest);
              // The unique ID of the request, used for troubleshooting.
              System.out.println("response:" + response.getBody().getRequestId());
          } catch (Exception e) {
              System.out.println("consumerEventBridge error:" + e.getMessage());
              throw new RuntimeException(e);
          }
      } else {
          System.out.println("Failed to filter other events. Check the configuration steps.");
      }
  }
}
Sample project deployment
Prepare the environment and project
Required environment: Java 8 or later and the Maven build tool.
Project download link: extension-demo-deploycontroller.zip (30 KB).
Deployment method
Local deployment: Package the project into a JAR file. Run the service program on a local server or a Windows machine that has Java 8 and Maven installed by running the
java -jar yourapp.jarcommand.Cloud platform deployment: Package the project into a JAR file. Upload the file to a runtime environment, such as a Docker container or an Elastic Compute Service (ECS) instance, for deployment.
After you download the project, go to the root directory of the project and run the packaging command to package the project into a JAR file.
mvn clean package -Dmaven.test.skip=true spring-boot:repackageRun the JAR file:
java -jar target/extension-demo-deploycontroller-1.0.jar
The project starts successfully, as shown in the following figure.  Enter
Enter http://localhost:8080/index in a browser. If "hello world!" is returned, the application is deployed successfully. After you establish the network connection, you can subscribe to messages from EventBridge.
Verify the results
After you deploy the code and establish the network connection to EventBridge, you can perform verification in the workspace where the extension is enabled.