This topic describes how to synchronize full data and incremental data from an AnalyticDB for MySQL V3.0 database to Hologres in offline mode.
Limits
In this example, only exclusive resource groups for Data Integration are supported.
Prerequisites
The data sources that you want to use as the source and destination are configured.
In this example, an AnalyticDB for MySQL V3.0 data source is used as the source, and a Hologres data source is used as the destination. You must add the AnalyticDB for MySQL V3.0 data source and the Hologres data source to the current workspace on the Data Sources page in Management Center in the DataWorks console. For information about the synchronization capabilities that are supported by the two types of data sources, see AnalyticDB for MySQL V3.0 data source and Hologres data source.
An exclusive resource group for Data Integration is purchased and associated with the current DataWorks workspace. Network connections between the resource group and data sources are established.
In this example, only exclusive resource groups for Data Integration are supported. You must purchase and configure an exclusive resource group for Data Integration, and establish network connections between the resource group and the AnalyticDB for MySQL V3.0 data source and Hologres data source. For information about how to purchase and configure an exclusive resource group for Data Integration, see Create and use an exclusive resource group for Data Integration.
Create and configure a synchronization task
Log on to the DataWorks console and go to the Data Integration page. In the left-side navigation pane of the Data Integration page, click Synchronization Task. On the Synchronization Task page, select the desired source type and destination type and click Create Synchronization Task.
In the Basic Settings section and Network and Resource Configuration section, configure basic information for the synchronization task.
Source And Destination: Select AnalyticDB for MySQL (V3.0) as the source type and Hologres as the destination type.
New Node Name: Specify a name for the synchronization task based on your business requirements.
Synchronization Method: Select Offline synchronization of the entire database.
Synchronization Mode:
If you want to perform one-time or periodic synchronization of full data, select Full initialization for this parameter.
If you want to perform one-time or periodic synchronization of incremental data, select Incremental synchronization for this parameter.
If you want to perform one-time synchronization of full data and periodic synchronization of incremental data, select Full initialization and Incremental synchronization for this parameter.
Network and Resource Configuration: In this section, select the AnalyticDB for MySQL V3.0 data source, Hologres data source, and exclusive resource group for Data Integration that you prepared, and click Test Connectivity to test the network connectivity between the resource group and data sources.
Configure information that is specific to the synchronization task.
In this example, a synchronization task used to synchronize data from an AnalyticDB for MySQL V3.0 data source to a Hologres data source is configured based on two common scenarios. You can configure a synchronization task based on your business requirements. For more information, see the Scenario 1: Configure a synchronization task to periodically synchronize full data and Scenario 2: Configure a synchronization task to synchronize full data at a time and periodically synchronize incremental data sections in this topic.
Scenario 1: Configure a synchronization task to periodically synchronize full data
If you select Structural migration and Full initialization for the Synchronization Mode parameter, you must make the following configurations for the synchronization task.

Select the tables from which you want to read data.
In the Select Data Sources and Tables for Data Synchronization section, select the tables from which you want to read data from the Source Table list and click the rightward arrow to move the selected tables to the Selected Tables list. You can use a regular expression to search for the desired table by name.
Configure the mode of full synchronization.
In the Configurations for Full and Incremental Synchronization section, select Periodical Synchronization for the Full Synchronization parameter. Then, click Configure Scheduling Parameters for Periodical Scheduling to configure scheduling parameters for periodic scheduling. For information about scheduling parameters, see Supported formats of scheduling parameters.

Refresh mappings between tables in the source and tables in the destination.
In the Mapping Rules for Destination Tables section, find a source table and click Refresh in the Actions column. Then, the system displays a schema name in the Dst Schema Name column of the source table.
If a table is newly created in the destination, you can click the
 icon in the Destination Table Name column to modify the schema of the table. For example, you can add fields to the table or specify a field as a primary key for the table.
 If a table already exists in the destination, you can only view the table.
Select all source tables and click Batch Refresh Mapping Results to refresh mappings between the source tables and destination tables.
Configure the setting for clearing all data in a destination table before data synchronization.
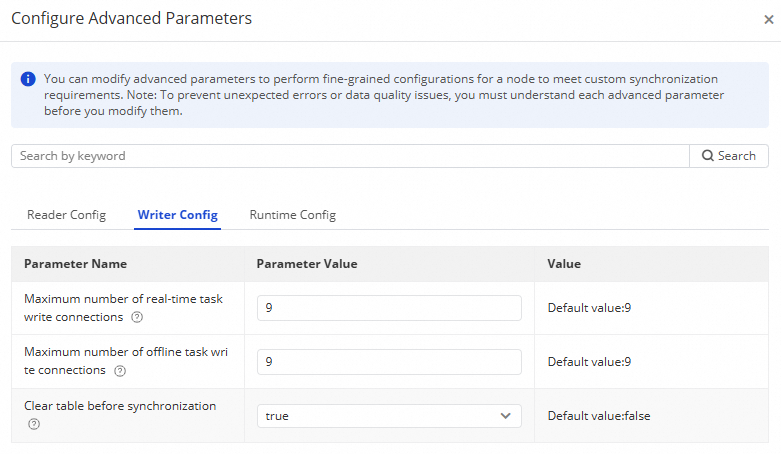
Clearing all data in a destination table before full synchronization can ensure that the data synchronized to the destination table is the same as the data in the mapped source table. In the upper-right corner of the configuration page, click Configure Advanced Parameters. In the Configure Advanced Parameters panel, click the Writer Config tab. On the Writer Config tab, set the Clear table before synchronization parameter to true. Then, click OK.
Configure the settings for periodic scheduling at the table level.
You can configure scheduling parameters for periodic scheduling at the table level. You can modify the configurations for a single table-mapping record or for multiple table-mapping records at a time based on your business requirements. You can configure parameters such as Scheduling Cycle and Resource Group for Scheduling. For more information about the scheduling parameters for periodic scheduling, see Overview.

After the preceding configuration is complete, click Complete.
For information about other parameters that you can configure, see the Configure other advanced settings in this topic.
Scenario 2: Configure a synchronization task to synchronize full data at a time and periodically synchronize incremental data
If you select Structural migration, Full initialization, and Incremental synchronization for the Synchronization Mode parameter, you must make the following configurations for the synchronization task.

Select the tables from which you want to read data.
In the Select Data Sources and Tables for Data Synchronization section, select the tables from which you want to read data from the Source Table list and click the rightward arrow to move the selected tables to the Selected Tables list. You can use a regular expression to search for the desired table by name.
Configure the modes of full synchronization and incremental synchronization.
One-time Synchronization is automatically selected for the Full Synchronization parameter, and Periodical Synchronization is automatically selected for the Method of Incremental Synchronization parameter. The two values cannot be changed. You can click Configure Scheduling Parameters for Periodical Scheduling to configure the scheduling parameters for implementing incremental synchronization. The configured scheduling parameters can be used for various purposes. For example, you can use the scheduling parameters in a filter condition, and assign the scheduling parameters to additional fields as values in a destination table. For more information about scheduling parameters, see Supported formats of scheduling parameters.

Refresh mappings between tables in the source and tables in the destination.
In the Mapping Rules for Destination Tables section, find a source table and click Refresh in the Actions column. Then, the system displays a schema name in the Dst Schema Name column of the source table.
If a table is newly created in the destination, you can click the
 icon in the Destination Table Name column to modify the schema of the table. For example, you can add fields to the table or specify a field as a primary key for the table.
 If a table already exists in the destination, you can only view the table.
Select all source tables and click Batch Refresh Mapping Results to refresh mappings between the source tables and destination tables.
Configure the condition for incremental synchronization at the table level.
You can configure the condition for incremental synchronization at the table level. You can modify the configuration for a single table-mapping record or for multiple table-mapping records at a time based on your business requirements. You can configure the Condition for Incremental Synchronization parameter to specify a WHERE clause to filter data in the source. When you configure the parameter, you do not need to include the WHERE keyword in the clause. If you configure the scheduling parameters for implementing periodic synchronization of incremental data, you can use the system parameter variables.
For example, you can configure a WHERE clause to enable the synchronization task to synchronize incremental data that is generated during the time range from 00:00 on the previous day to 00:00 on the current day.
STR_TO_DATE('${bizdate}', '%Y%m%d') <= columnName AND columnName < DATE_ADD(STR_TO_DATE('${bizdate}', '%Y%m%d'), interval 1 day)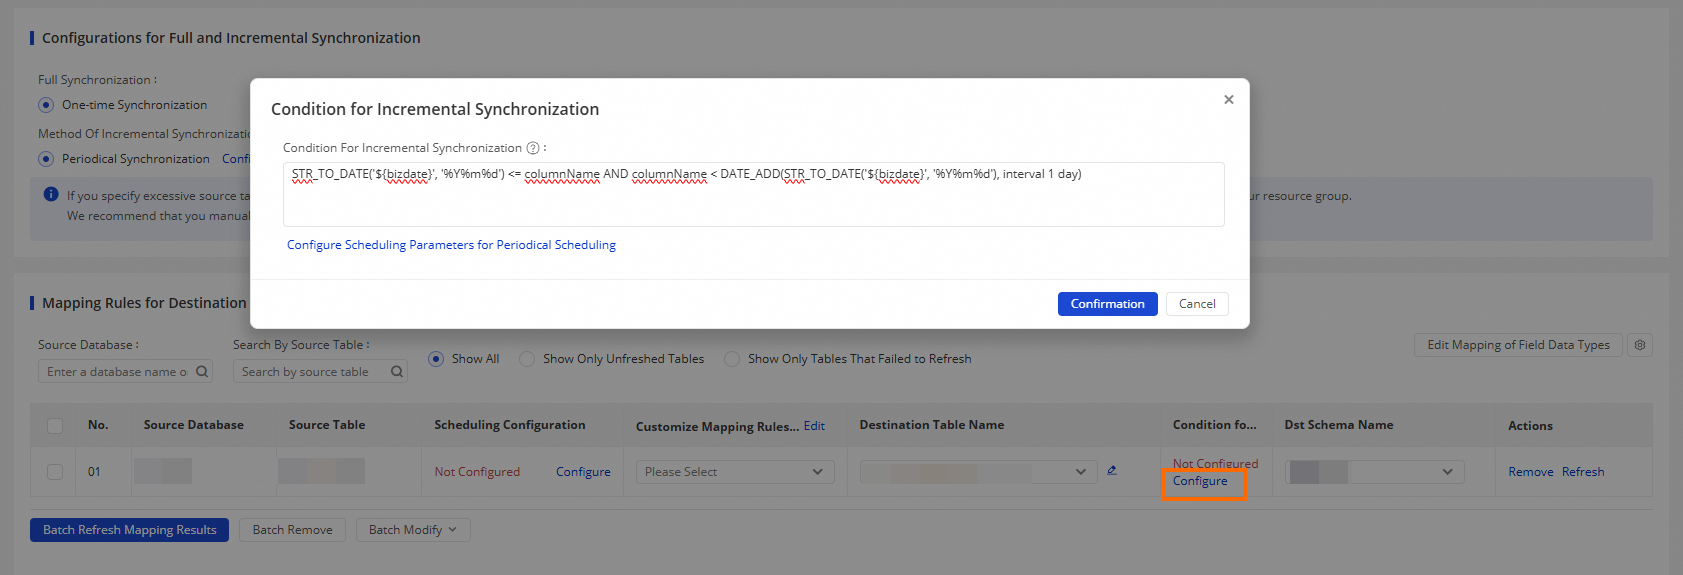
Configure the settings for periodic scheduling at the table level.
You can configure the scheduling parameters for periodic scheduling at the table level. You can modify the configurations for a single table-mapping record or for multiple table-mapping records at a time based on your business requirements. You can configure parameters such as Scheduling Cycle and Resource Group for Scheduling. For more information about the scheduling parameters for periodic scheduling, see Overview.

After the preceding configuration is complete, click Complete.
For information about other parameters that you can configure, see the Configure other advanced settings in this topic.
Configure other advanced settings
Configure a custom name for a destination table
You can concatenate built-in variables and specified strings into a destination table name. You can edit built-in variables. For example, you can replace built-in variables with strings.

Configure the modes of full synchronization and incremental synchronization
If you select Full initialization and Incremental synchronization for the Synchronization Mode parameter when you configure basic information for the synchronization task, One-time Synchronization is automatically selected for the Full Synchronization parameter and Periodical Synchronization is automatically selected for the Method Of Incremental Synchronization parameter. The two values cannot be changed.

If you select Full initialization for the Synchronization Mode parameter when you configure basic information for the synchronization task, you can select One-time Synchronization or Periodical Synchronization for the Full Synchronization parameter.

If you select Incremental synchronization for the Synchronization Mode parameter when you configure basic information for the synchronization task, you can select One-time Synchronization or Periodical Synchronization for the Method Of Incremental Synchronization parameter.

Modify data type mappings between fields in the source and fields in the destination
If the data type mappings that are automatically established do not meet your business requirements, you can click Edit Mapping of Field Data Types to modify data type mappings between fields in the source and fields in the destination, and click Apply and Refresh Mapping.

Assign scheduling parameters to additional fields as values
You can assign scheduling parameters to additional fields as values.
In the Mapping Rules for Destination Tables section, find a destination table whose schema you want to modify and click the
 icon in the Destination Table Name column to modify the schema of the destination table.
 In the dialog box that appears, click Add Field in the Field section to add fields. After the fields are added, click Apply and Refresh Mapping.
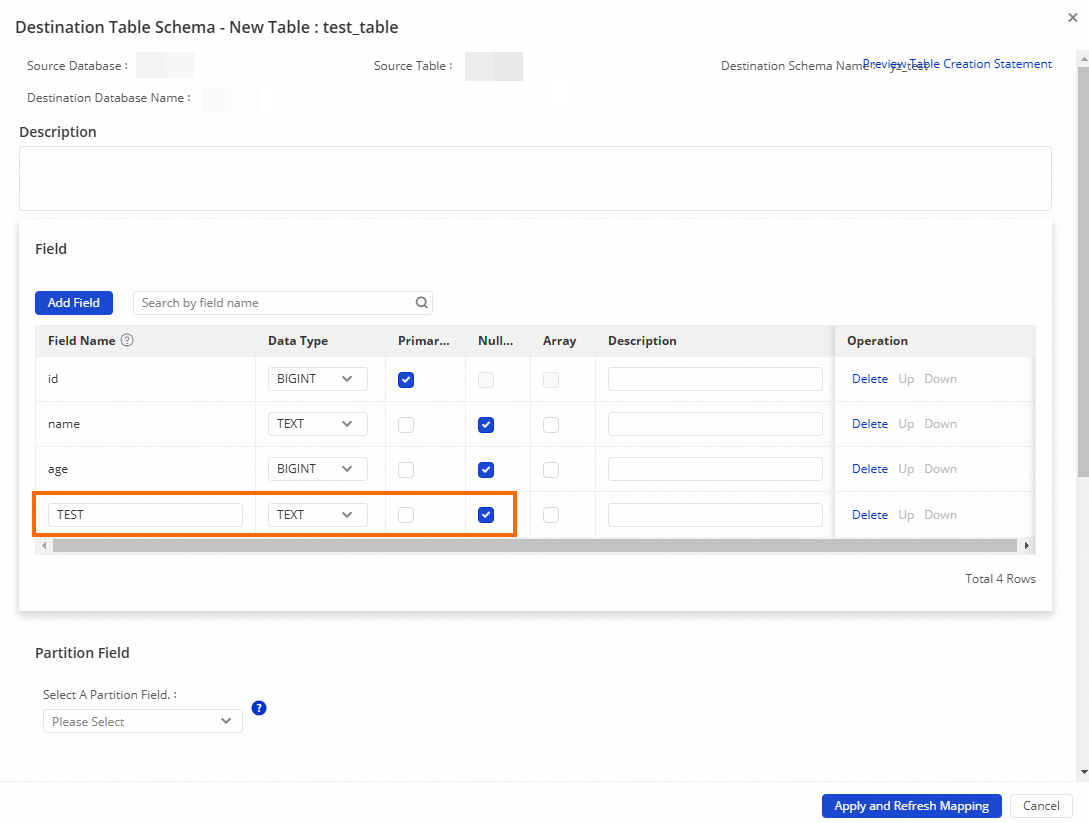
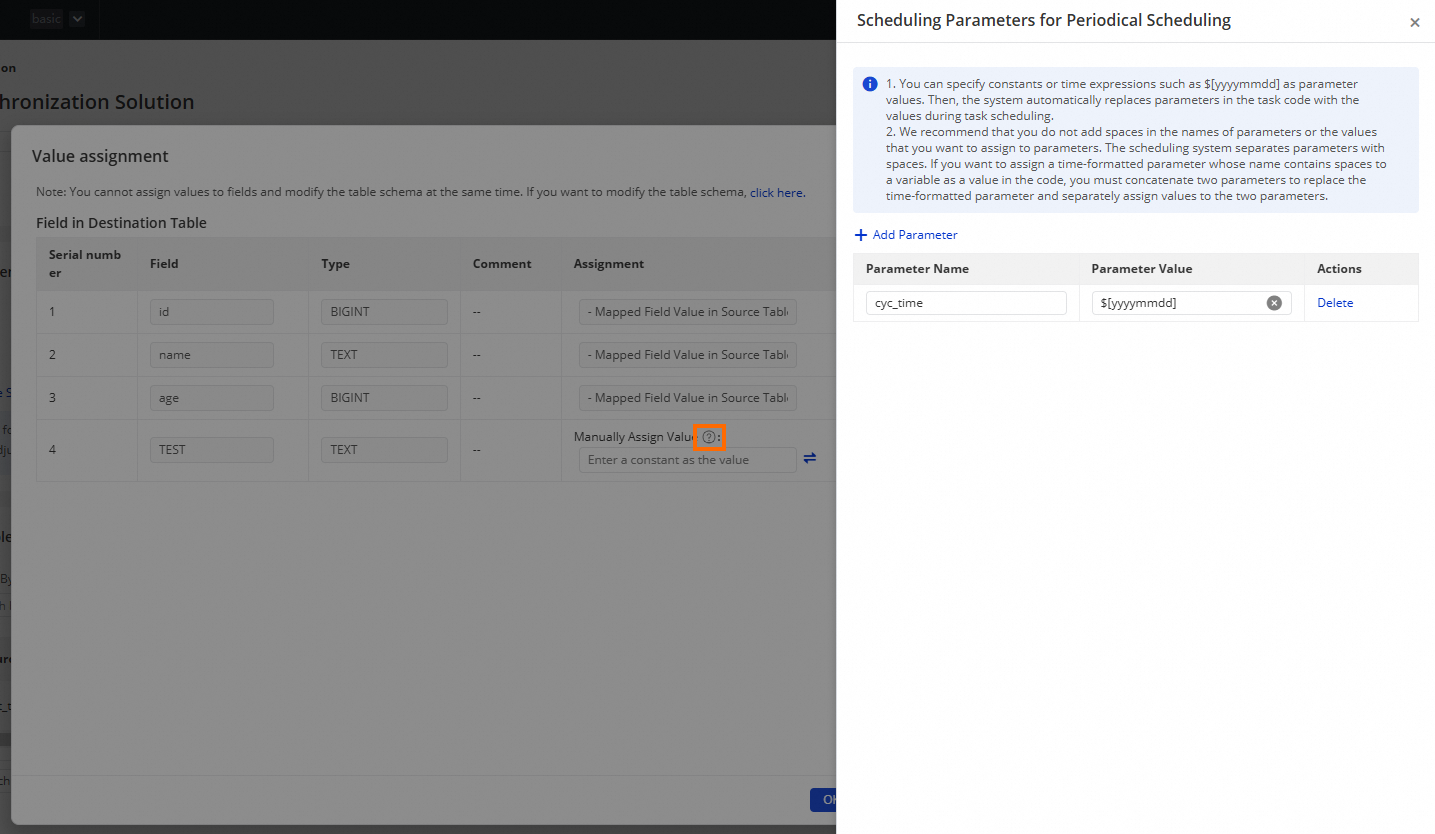
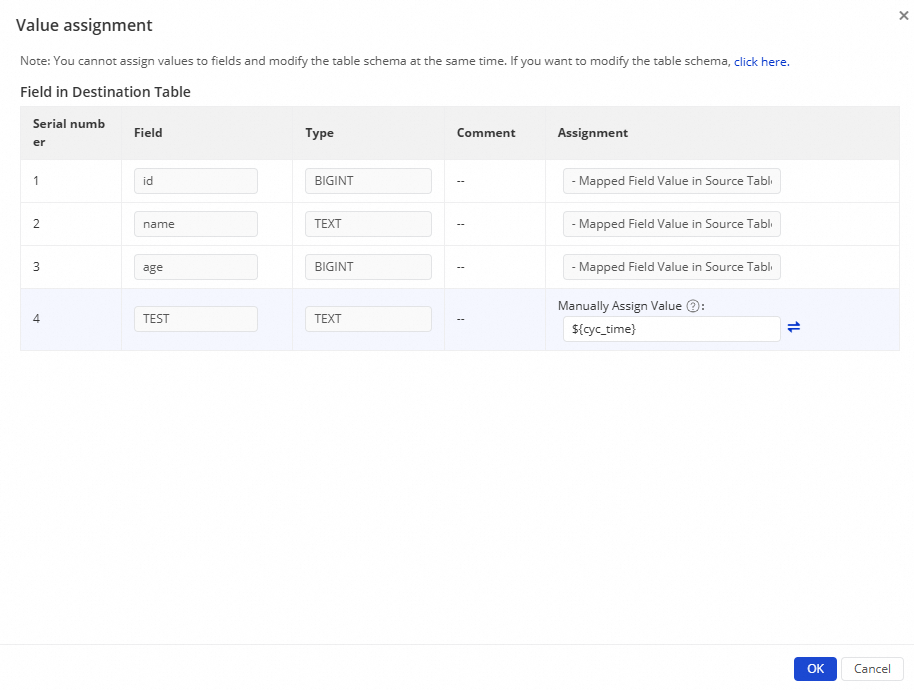
In the Mapping Rules for Destination Tables section, select the destination table, click Batch Modify, and then select Value assignment. In the Value assignment dialog box, you can assign scheduling parameters to the additional fields as values. When you assign a scheduling parameter to an additional field, you can move the pointer over the quotation mark (?) next to Manually Assign Value and click Edit Scheduling Parameter in the infotip that is displayed to quickly open the Scheduling Parameters for Periodical Scheduling panel. In this example, cyc_time is assigned to an additional field as the value.

In the Value assignment dialog box, enter ${cyc_time} in the Manually Assign Value field in the Assignment column of the additional field and click OK.
Configure advanced parameters
You can use one of the following methods to configure advanced parameters:
In the upper-right corner of the configuration page, click Configure Advanced Parameters. In the Configure Advanced Parameters panel, configure fine-grained settings for the reader, writer, and channel control. For example, you can configure the maximum numbers of connections that are allowed for the source and destination, and throttling-related parameters for the batch synchronization subtask.
You can configure advanced parameters to control the action of a synchronization task. The advanced parameters that you configure for a synchronization task are global settings, which take effect for each table involved in the synchronization task.
In the Mapping Rules for Destination Tables section, you can separately configure advanced parameters for each destination table based on your business requirements. The advanced parameters that you configure in the section take precedence over the advanced parameters that you configure in the Configure Advanced Parameters panel.

Perform O&M operations on the synchronization task
Start the synchronization task
After the configuration of the synchronization task is complete, you are navigated to the Tasks section of the Synchronization Task page. You can find the synchronization task and click Start in the Actions column to start the synchronization task.

View the details of the synchronization task
You can click the name of the synchronization task in the Name/ID column or click the blank area next to each stage displayed in the Execution Overview column to go to the running details page of the synchronization task. The running details page displays the following information about the synchronization task:
Basic information: You can view the basic information of the synchronization task, such as the data sources, the resource group used to run the synchronization task, and the synchronization task type.
Running details: You can view the details of the synchronization steps after the synchronization task is subdivided.
If you select Full initialization for the Synchronization Mode parameter when you configure the synchronization task, the Schema Migration and Full Data Synchronization sections are displayed.
If you select Incremental synchronization for the Synchronization Mode parameter when you configure the synchronization task, the Schema Migration and Incremental Sync sections are displayed.
If you select Full initialization and Incremental synchronization for the Synchronization Mode parameter when you configure the synchronization task, the Schema Migration, Full Synchronization, and Incremental Sync sections are displayed.
Details: You can view the steps that are performed during schema migration, full synchronization, and incremental synchronization.

The Schema Migration tab displays information such as whether the destination table is a newly created table or an existing table. For a newly created table, the DDL statement that is used to create the table is displayed.
The Full Synchronization tab displays information about the tables involved in batch synchronization, the synchronization progress, and the number of data records that are written to the destination.
The Incremental Sync tab displays information about metrics related to the latest instance of the auto triggered subtask generated by the synchronization task.
Rerun the synchronization task
Directly rerun the synchronization task: Find the synchronization task in the Tasks section, click More in the Actions column, and then select Rerun.

Effect: The one-time subtask is rerun and the properties of the periodic subtask are updated.
Add tables to or remove tables from the synchronization task and then rerun the synchronization task: Find the synchronization task in the Tasks section, add tables to or remove tables from the synchronization task, and then click Complete. In this case, Apply Updates is displayed in the Actions column of the synchronization task in the Tasks section. Click Apply Updates to rerun the modified synchronization task for the modifications to take effect.
Effect: If you add tables to the synchronization task, only data in the added tables is synchronized. Data in the original tables in the synchronization task is not re-synchronized.
Change the name of a destination table and then rerun the synchronization task: Find the synchronization task, change the name of a destination table or change the destination table to which you want to write data, and then click Complete. In this case, Apply Updates is displayed in the Actions column of the synchronization task in the Tasks section. Click Apply Updates to rerun the modified synchronization task for the modifications to take effect.
Effect: Data is re-synchronized to the destination table on which a change is made. Data is not re-synchronized to destination tables on which no change is made.
Data development scenarios
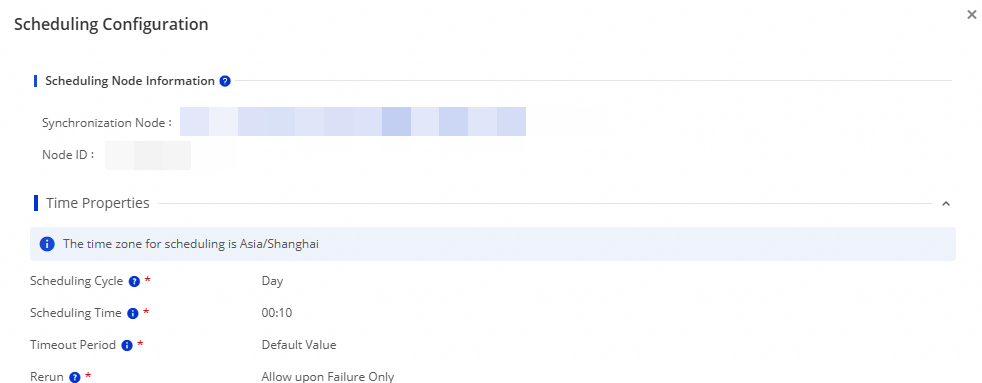
You can refer to Scheduling dependency configuration guide to configure scheduling dependencies for the auto triggered subtask generated by the synchronization task to meet data development requirements. You can view information about the auto triggered subtask in the Scheduling Configuration section.

