Operational Data Store (ODS) tables are used to receive and process raw data that needs to be stored in a data warehouse. The schema of an ODS table is the same as the schema of the source table in the data system. ODS tables are data preparation areas of a data warehouse. The name of an ODS table must start with ods. This topic describes how to create an ODS table.
Prerequisites
The ODS layer is created. You can create ODS tables only at the ODS layer. For information about how to create the ODS layer, see Create a data layer.
A data domain is created. The data domain is used to determine the perspective of business data stored in an ODS table. For information about how to create a data domain, see Data domain.
Step 1: Create an ODS table
Go to the Data Modeling page.
Log on to the DataWorks console. In the left-side navigation pane, choose . On the page that appears, select the desired workspace from the drop-down list and click Go to Data Modeling.
In the top navigation bar of the Data Modeling page, click Dimensional Modeling. On the Dimensional Modeling page, move the pointer over the
 icon and select Create ODS Table.
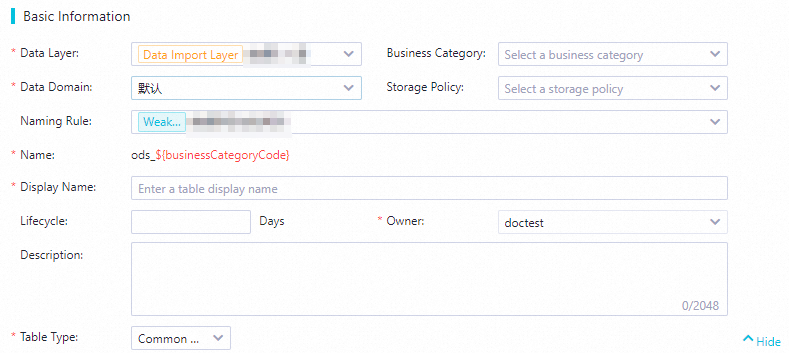
 In the Basic Information section of the configuration tab that appears, configure basic information for the ODS table.
You can configure the parameters that are described in the following table based on your business requirements.
Parameter
Description
Data Layer
You can set the value only to Data Import Layer.
Business Category
The business category to which the ODS table belongs. The business category is used to determine the category of business data stored in the ODS table and can help you manage business data in an efficient manner.
Data Domain
The data domain to which the ODS table belongs. The data domain is used to define the fine-grained business type of data stored in the ODS table. A data domain corresponds to a macro analysis field, such as the procurement or supply chain field.
Storage Policy
The policy based on which you want to store data in the ODS table. The policy defines the storage period of data in the ODS table and the maximum volume of data in the ODS table.
Naming Rule
The checker that is used to check whether the name of the ODS table conforms to the configured naming conventions. After you select a checker, you must configure a name for the ODS table based on the naming conventions defined in the checker.
NoteFor information about how to configure a checker, see Configure and use a checker at a data layer.
Name
The name of the ODS table. If you configure the Naming Rule parameter, the name that you specify must conform to the naming conventions defined in the checker specified by the Naming Rule parameter.
Display Name
The display name of the ODS table.
Lifecycle
The lifecycle of the ODS table. Unit: day. The maximum value of this parameter is 36000.
Owner
The owner of the ODS table. The default owner is the creator of the ODS table.
Table Type
The type of the ODS table. Set the value to Common ODS Table.
After the parameters are configured, click Save in the upper part of the configuration tab. The ODS table is created.
The created ODS table is used as a model in Dimensional Modeling. You can view and manage the ODS table in the data domain or business category displayed in the left-side navigation tree of the Dimensional Modeling page. After the ODS table is created, you must add fields to the ODS table and configure attributes and associations for fields.
Step 2: Add fields to the ODS table
After you configure the basic information for the ODS table, you must add fields to the ODS table. You can add fields to the ODS table in shortcut mode or script mode.
Shortcut Mode
The shortcut mode allows you to import all or specific fields from a physical table or view that exists in a compute engine instance to the ODS table.
You can import fields only from physical tables or views that are created in MaxCompute, Hologres, and E-MapReduce (EMR) compute engine instances.
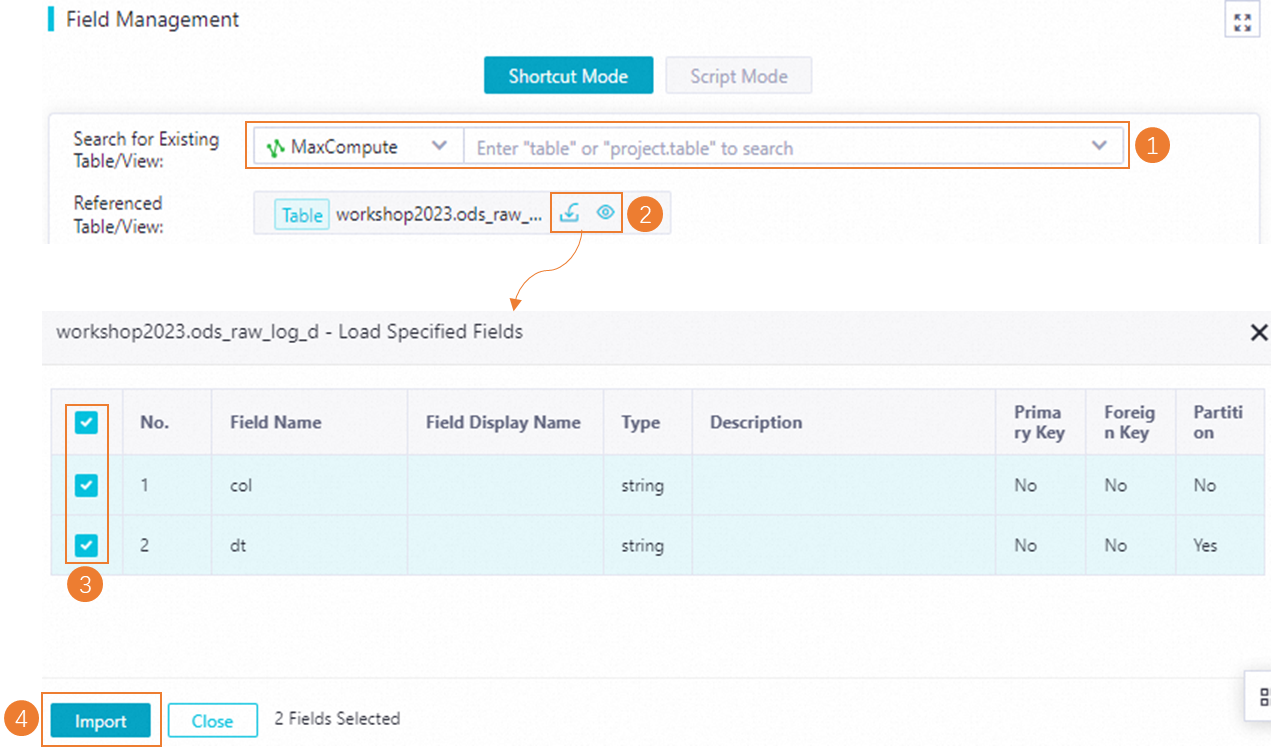
Search for the physical table or view from which you want to import fields.
Select the desired compute engine type and the desired physical table or view from the drop-down lists for Search For Existing Table/View.
NoteWhen you search for the desired physical table or view, keyword-based fuzzy match is supported. After you enter a keyword, all physical tables or views whose names contain the keyword are displayed.
You can search for only tables in the production environment. You cannot search for tables in the development environment.
Import fields.
Import all or specific fields from the selected physical table or view to the ODS table:
 : imports all fields.
  : imports specific fields.
If you choose to import specific fields from the selected physical table or view, you can select the desired fields from all fields that are displayed and import the selected fields to the ODS table.
NoteIf one of the fields that are imported has no display name, you can fill the description of the field as the display name of the field as prompted.
Script Mode
The script mode allows you to edit code to manage the fields in the table. After you click Script Mode, the statement that is used to create the table is displayed in the code editor in the Script Mode dialog box. You can modify the statement based on your business requirements.
Fast modeling language (FML) is an SQL-like language that is used to design data tables for dimensional modeling. For more information, see Use FML statements to configure and manage data tables.
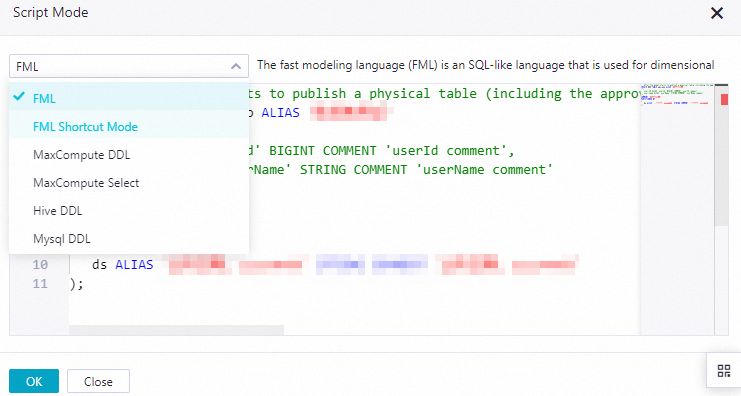
DataWorks provides different statement types that are designed for different compute engine types. You can select a statement type based on your business requirements and modify information of the table by using this type of statement.
FML is suitable for scenarios in which you want to quickly create fields. Fields of the following data types are supported: STRING, BIGINT, DATETIME, BOOLEAN, DOUBLE, and DECIMAL.
MaxCompute Select is suitable for scenarios in which you want to quickly initialize information of fields.
Step 3: Configure attributes and associations for fields in the ODS table
After fields are added to the ODS table, you can configure items such as Associated Field Standard and Redundant Field for the fields.
Configure the attributes that you want the system to display for fields.
By default, the following basic attributes are displayed for fields: Field Name, Type, Field Display Name, Description, Primary Key, and Not Empty. You can click Field Display Settings in the upper-right corner of the list of fields that are added and select the attributes that you want the system to display. You can also modify the values of the attributes based on your business requirements. You can modify the value of an attribute only if the attribute is displayed.
Configure Associated Field Standard and Associated Lookup Table for fields in the table.
You can associate field standards and lookup tables with the added fields to standardize the values and value range of the fields.
Associated Field Standard: allows you to manage the fields that have the same meaning but different names in a centralized manner. A field standard can be used to define the value range and measurement unit for the fields.
Associated Lookup Table: allows you to define the values and value range of fields that use a field standard.
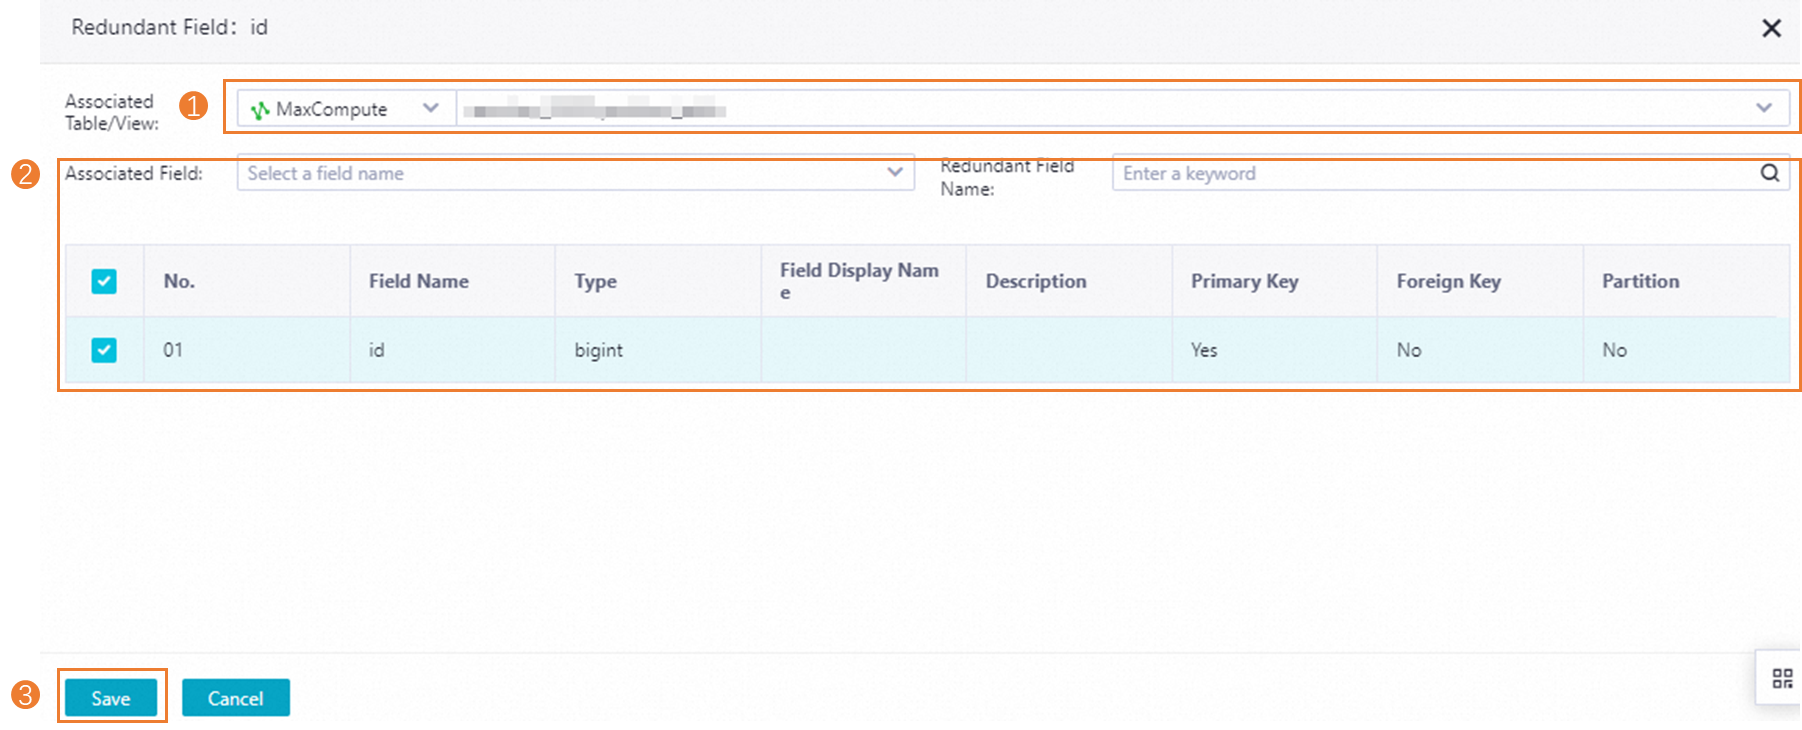
Configure Redundant Field for fields in the table.
In most cases, if a field is used by multiple tables and the field is frequently queried but seldomly updated, you can associate the field with fields in another table as a redundant field. You can find the field that you want to configure as a redundant field and click Redundant Field in the Actions column. In the dialog box that appears, you can select one or more fields that you want to associate with the field and click Save.
Then, click Save in the upper part of the configuration tab of the ODS table.
What to do next
After the preceding configuration is complete, you must publish the table to the required compute engine instance for subsequent data development and data analysis. For more information, see Publish and materialize a table.