To manage a Cloud Storage Gateway (CSG) file gateway from your local data center, download the gateway image, install it on a virtual machine (VM), configure the network, and activate the gateway through the CSG console.
Prerequisites
Before you begin, make sure that you have:
An Alibaba Cloud account with completed real-name verification. For more information, see Create an Alibaba Cloud account
CSG activated in the CSG console. If CSG is not activated, follow the on-screen instructions to activate it
An AccessKey pair for a RAM user. Get your AccessKey pair from the Profile page
We recommend that you log on to the CSG console as a RAM user instead of your Alibaba Cloud account. For more information, see Use RAM to implement account-based access control.
Supported hypervisors and VM requirements
CSG can be deployed on VMware vSphere, Hyper-V, and KVM hypervisors. Download the corresponding gateway image from the CSG console during gateway creation.
| Hypervisor | Installation method | Image format |
|---|---|---|
| VMware vSphere | Import an OVA file | .ova |
| KVM | Use Virt-Manager to import a qcow2 file | .qcow2 |
| Hyper-V | Import a VHD file | .vhd |
To deploy gateway images (version 1.0.30 or later) in OVA format, use the vCenter Web Client in vCenter 6.0 or later. Images downloaded from the CSG console cannot be imported into Elastic Compute Service (ECS).
The VM must meet the following minimum specifications:
| Resource | Minimum requirement |
|---|---|
| vCPUs | 4 |
| Memory | 8 GB |
| Disk space | 100 GB (for the VM image and system data) |
| Cache disk | 40 GB per disk. Use thick provisioning for better I/O performance. |
Step 1: Download the image
Log on to the CSG console. In the left-side navigation pane, click Gateways. On the Gateways page, click Create.
On the Gateway Information tab, configure the following parameters and click Next.
Parameter Description Name Enter a name for the gateway. The name must be 1 to 60 characters long and start with a letter or Chinese character. It can contain letters, Chinese characters, digits, underscores (_), hyphens (-), and periods (.). Location Select On-premises. Region Select a region for the file gateway. Type Select File Gateway. Description Optional. Enter a description for the gateway. The description can be up to 255 characters long. On the Billing Information tab, configure the following parameters and click Next.
Parameter Description Billing Method Select Pay-as-you-go or Subscription. For more information, see Billable items. If you select Subscription, complete the payment on the purchase page after the gateway is created. For more information, see Purchase a CSG instance. Expiration Policy This parameter appears only when Billing Method is set to Subscription. Select Switch to Pay-as-you-go or Release. On the Image Download tab, download the image for your hypervisor to your local machine.
Step 2: Install the image
Deploy the downloaded image on your hypervisor. For detailed instructions, see Deploy a CSG gateway in an on-premises data center.
Step 3: Configure the network
After installing the gateway image, configure the network settings through the gateway command-line interface (CLI).
Start the gateway VM and open the Linux console terminal.
Log in with the default credentials.
Username:
rootPassword:
Alibaba#sgw#1030
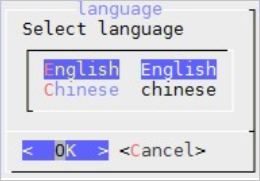
Select a language. Select English. Some VM versions do not fully support Chinese character display.
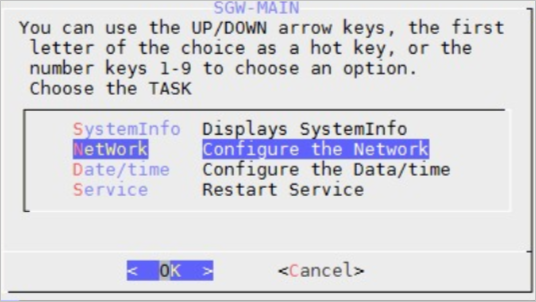
Select Configure the Network.
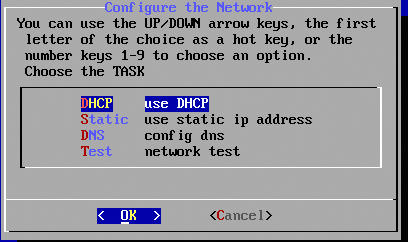
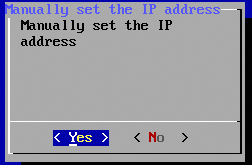
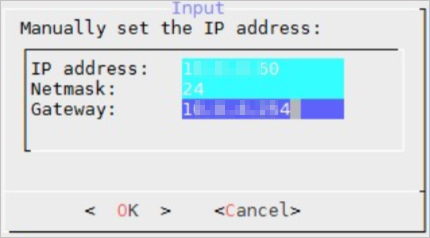
Select use static ip address and enter the IP address, subnet mask, and gateway. The subnet mask must be a CIDR prefix length (an integer from 1 to 32). For example, for a subnet mask of 255.255.255.0, enter 24.
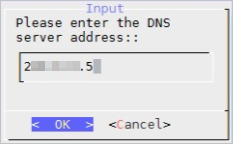
Select config dns and enter the DNS server address.
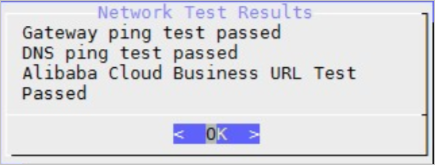
Select network test to verify connectivity. A successful test produces output similar to the following:
Select Configure the Date/time to configure the NTP server. By default, the Alibaba Cloud NTP server (
ntp.aliyun.com) provides automatic time synchronization. Alternatively, selectLocalTimefor manual configuration. Make sure that any manually configured time is accurate and synchronized with a reliable source.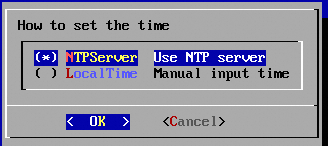
Step 4: Activate the gateway
Log on to the CSG console.
Find the target file gateway on the Gateways page and click Certificate Download. Save the certificate to your local machine.
The certificate is valid for 24 hours. Download and use it before it expires.
Open a browser and go to
https://<IP address of the file gateway>to access the on-premises console.On the Cloud Storage Gateway Register page, fill in the following fields and click Submit.
Field Description Upload Certificate Click Upload Certificate and select the certificate you downloaded. Access Key ID Enter the Access Key ID of the RAM user. Get the AccessKey pair from the Profile page. Access Key Secret Enter the Access Key Secret of the RAM user. Username Set the username for the on-premises console. Password Set the password for the on-premises console. Confirm Password Enter the password again. After the gateway is activated, log on to the on-premises console with the credentials you just created.
Manage gateway settings
After deployment, the following operations are available on the Gateways page:
| Operation | Description |
|---|---|
| Delete a gateway | Find the gateway and click Delete. Only pay-as-you-go gateways can be deleted. |
| Rename a gateway | Find the gateway, click More > Edit, and enter a new name. |
| Reset password | For on-premises gateways, find the gateway and click More > Reset Password to reset the on-premises console password. |