You can use Cloud Backup to back up files in a CPFS file system and restore them when needed. Before backing up files, install a Cloud Backup client on each backup node of the CPFS file system. You can add multiple Cloud Backup clients to a client group to improve backup and restoration performance.
Prerequisites
To back up a large-scale file system, you must perform the following operations:
Prepare one or more physical machines, virtual machines, or ECS instances as backup nodes. You must ensure network connectivity between the backup nodes and your file system (CPFS file system, CPFS for Lingjun file system, or other large-scale file system).
Before you back up a CPFS file system, make sure that a CPFS-NFS client is installed on each ECS instance.
Before you back up a CPFS for Lingjun file system, contact the CPFS team to confirm that all ECS instances used as backup nodes can be mounted with CPFS.
Usage notes
To achieve optimal backup performance, we recommend that you run a Cloud Backup client on a host with the following configurations: 64-bit CPU with two or more cores and more than 8 GB available memory.
The volume of data that can be backed up depends on the available memory. For a host with 4 GB available memory, a maximum of one million files, up to 8 TB in total, can be backed up. If you want to back up tens of millions of files, we recommend that you prepare 16 GB available memory.
The installation package of a Cloud Backup client (64-bit) does not support the ARM64 architecture.
Before you install or uninstall a Cloud Backup client, check the client installation path first:
If a CPFS directory is mounted to the installation path, unmount the CPFS directory. This prevents files from being accidentally deleted.
If other important directories and files exist in the installation path, move them to another path. This prevents these directories and files from being accidentally deleted.
Before you use Cloud Backup, we recommend that you read the topics about the limits on Cloud Backup, the default backup speed, and the features available in each region. For more information, see Limits, Backup and recovery speeds, Features, and Features available in each region.
Download and activate a Cloud Backup client for Windows
Log on to the Cloud Backup console.
In the navigation pane on the left, choose Backup > CPFS Backup.
In the top navigation bar, select the region in which the file system is deployed.
NoteThe CPFS backup feature is available only in some regions and will be available in more regions in the future. You can log on to the Cloud Backup console to view the regions in which the CPFS backup feature is available.
On the CPFS Backup page, click Add Client.
Download the Cloud Backup client for Windows.
You can download the installation package of the Cloud Backup client for Windows (64bit). Record the activation code. The activation code is used to install and activate the Cloud Backup client.
Install and activate the Cloud Backup client for Windows.
Double-click the installation package of the Cloud Backup client and select the language that you want to use.
Select the path in which you want to install the Cloud Backup client, and click Next.
Select Local Client Connecting To Alibaba Cloud, and click Next.
For more information, see How do I select a component and account when I install a Cloud Backup client?.
Configure the logon identity.
Files in a CPFS file system are shared over a network. To back up or archive files in a CPFS file system, select This User as the logon identity. The user must meet the following requirements:
The user has the permissions of the local administrator.
The user has the permissions to log on as a service.
To configure the logon user, perform the following steps:
Open the Control Panel. In the window that appears, click Administrative Tools.
Open Local Security Policy and choose .
Turn on Log On As A Service. In the dialog box that appears, add a user.
The user has the permissions to access files that are shared over a network.
For more information, see How do I select a component and account when I install a Cloud Backup client?.
If you want to use a proxy server, enter the IP address of the proxy server. Click Next.
Enter the activation code that you recorded in the Activation Token field. Then, click Next.
Click Install.
After the client is installed, you can view and select the client when you add a data source.
Download and activate a Cloud Backup client for Linux
Log on to the Cloud Backup console.
In the navigation pane on the left, choose Backup > CPFS Backup.
In the top navigation bar, select the region in which the file system is deployed.
NoteThe CPFS backup feature is available only in some regions and will be available in more regions in the future. You can log on to the Cloud Backup console to view the regions in which the CPFS backup feature is available.
On the CPFS Backup page, click Add Client.
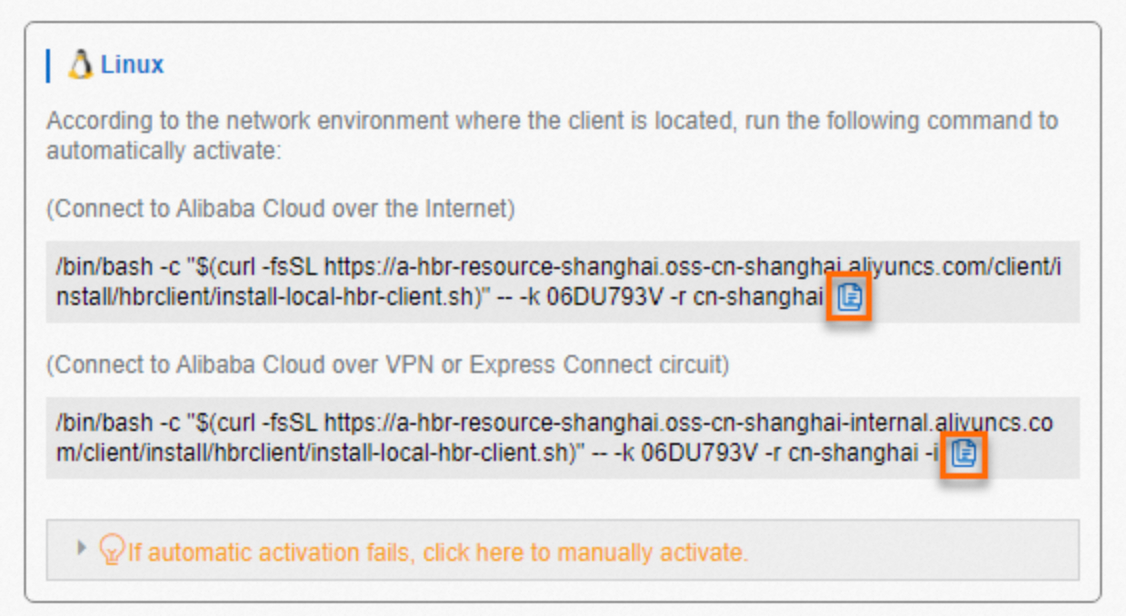
Automatically activate the Cloud Backup client for Linux.
Copy one of the commands based on your network. Then, paste and run the command on the Cloud Backup client for Linux to activate the client.
Related operations
After you install a Cloud Backup client, you can click ┇ in the Actions column on the Data Source List tab to perform the following operations.
Operation | Description |
Delete | Delete a data source. Warning If a data source is associated with a backup plan or contains backup data, you cannot delete the data source. After a data source is deleted, it cannot be recovered. Proceed with caution. |
Edit Backup Client Group |
|