This topic describes how to migrate data from a self-managed ClickHouse cluster to an ApsaraDB for ClickHouse Enterprise Edition cluster using the console or manual migration.
Prerequisites
Self-managed cluster: You have created a database account and password. The account must have read permissions on databases and tables and permission to execute SYSTEM commands. To migrate external tables that contain account passwords, the account must also have the
displaySecretsInShowAndSelectpermission.Destination cluster: You have created a database account and password with full permissions.
Network connectivity
If the self-managed cluster and the destination cluster are in the same VPC, add the IP addresses of all nodes in the destination cluster and the IPv4 CIDR block of its vSwitch to the whitelist of the self-managed cluster.
For information about how to configure a whitelist in ApsaraDB for ClickHouse, see Configure a whitelist.
For information about how to configure a whitelist in your self-managed cluster, see the documentation of your product.
You can run the
SELECT * FROM system.clusters WHERE internal_replication = 1;command to view the IP addresses of all nodes in the ApsaraDB for ClickHouse cluster.
If the self-managed cluster and the destination cluster are in different VPCs, or if the self-managed cluster is hosted in an on-premises data center or another cloud provider, resolve network connectivity issues first. For more information, see How do I establish network connectivity between the destination cluster and the data source?.
NoteIn this case, IP mapping may be required to avoid CIDR block conflicts between different VPCs. If you perform IP mapping, add the mapped IP addresses to the whitelists of both clusters.
Migration validation
Before you start migrating data, create a staging environment to validate business compatibility, performance, and whether the migration can complete successfully. After successful validation, proceed with the migration in the production environment. This step is critical because it helps you identify and resolve potential issues early, ensuring a smooth migration and avoiding unnecessary impact on your production environment.
Create a migration task to migrate data.
Perform performance bottleneck analysis to determine whether the migration can complete.
You can validate compatibility in one of the following ways:
Manual validation. For more information, see Compatibility analysis and resolution.
Console-based validation. For more information, see (Optional) Check SQL compatibility.
Select a solution
Migration solution | Advantages | Disadvantages | Scenarios |
Console-based migration | Provides a visual interface and does not require manual metadata migration. | Supports only full and incremental migration of entire clusters. You cannot migrate specific databases, tables, or historical data subsets. | Full cluster migration. |
Manual migration | Gives you full control over which databases and tables to migrate. | Requires complex operations and manual metadata migration. |
|
Procedure
Console-based migration
Notes
During migration
Merge operations are paused for tables being migrated in the destination cluster, but not in the self-managed cluster.
NoteIf the migration takes too long, metadata accumulates excessively in the destination cluster. We recommend that migration tasks run for no more than five days. Tasks that exceed this duration are automatically canceled.
The destination cluster must use the default cluster. If your self-managed cluster uses a different name, the cluster definition in distributed tables is automatically converted to default.
Supported migration content
Some table engines are converted during migration. For details about engine conversions after migration, see the following tables.
Database schema: The following table lists supported database engines and their conversion rules.
Engine name
Engine conversion description
Atomic
Replaced with Replicated database
Replicated
No change
Ordinary
Replaced with Replicated database
Table schema: The following table lists the table engines that support migration.
Engine name
Engine conversion description
MaterializedView
No change
View
GenerateRandom
Buffer
URL
Null
Merge
SharedMergeTree
SharedVersionedCollapsingMergeTree
SharedSummingMergeTree
SharedReplacingMergeTree
SharedAggregatingMergeTree
SharedCollapsingMergeTree
SharedGraphiteMergeTree
MergeTree
It will be replaced with SharedMergeTree
ReplicatedMergeTree
VersionedCollapsingMergeTree
It will be replaced with SharedVersionedCollapsingMergeTree
ReplicatedVersionedCollapsingMergeTree
SummingMergeTree
It will be replaced with SharedSummingMergeTree
ReplicatedSummingMergeTree
ReplacingMergeTree
It will be replaced with SharedReplacingMergeTree
ReplicatedReplacingMergeTree
AggregatingMergeTree
It will be replaced with SharedAggregatingMergeTree
ReplicatedAggregatingMergeTree
ReplicatedCollapsingMergeTree
It will be replaced with SharedCollapsingMergeTree
CollapsingMergeTree
GraphiteMergeTree
It will be replaced with SharedGraphiteMergeTree
ReplicatedGraphiteMergeTree
Data: Incrementally migrates data from MergeTree-family tables.
The database and table schemas listed above can be migrated normally. For other schemas, handle them manually based on warnings or error messages during migration.
If your data does not meet the preceding conditions, choose manual migration.
Cluster impact
Self-managed cluster
CPU and memory usage increase while reading data from the self-managed cluster.
DDL operations are not allowed.
Destination cluster
CPU and memory usage increase while writing data to the destination cluster.
DDL operations are not allowed on tables being migrated. Tables not involved in migration are unaffected.
Merge operations are paused for tables being migrated. Tables not involved in migration continue merging.
After migration ends, the cluster performs frequent merge operations for some time, increasing I/O usage and potentially increasing latency for business requests. We recommend that you calculate the merge duration after migration and plan accordingly to mitigate potential latency impacts.
Step 1: Check the self-managed cluster and enable system tables
Before data migration, modify the config.xml file based on whether system.part_log and system.query_log are enabled in the self-managed cluster to support incremental migration.
If system.part_log and system.query_log are not enabled
If you have not enabled system.part_log and system.query_log, add the following configurations to the config.xml file.
system.part_log
<part_log>
    <database>system</database>
    <table>part_log</table>
    <partition_by>event_date</partition_by>
    <order_by>event_time</order_by>
    <ttl>event_date + INTERVAL 15 DAY DELETE</ttl>
    <flush_interval_milliseconds>7500</flush_interval_milliseconds>
</part_log>
system.query_log
<query_log>
    <database>system</database>
    <table>query_log</table>
    <partition_by>event_date</partition_by>
    <order_by>event_time</order_by>
    <ttl>event_date + INTERVAL 15 DAY DELETE</ttl>
    <flush_interval_milliseconds>7500</flush_interval_milliseconds>
</query_log>
Enabled system.part_log and system.query_log
Compare the configurations of
system.part_logandsystem.query_login the config.xml file with the following content. If there are any inconsistencies, modify the configurations to match. Otherwise, the migration may fail or proceed slowly.system.part_log
<part_log>
    <database>system</database>
    <table>part_log</table>
    <partition_by>event_date</partition_by>
    <order_by>event_time</order_by>
    <ttl>event_date + INTERVAL 15 DAY DELETE</ttl>
    <flush_interval_milliseconds>7500</flush_interval_milliseconds>
</part_log>
system.query_log
<query_log>
    <database>system</database>
    <table>query_log</table>
    <partition_by>event_date</partition_by>
    <order_by>event_time</order_by>
    <ttl>event_date + INTERVAL 15 DAY DELETE</ttl>
    <flush_interval_milliseconds>7500</flush_interval_milliseconds>
</query_log>
After you modify the configuration, run the
drop table system.part_loganddrop table system.query_logstatements. Thesystem.part_logandsystem.query_logtables are automatically recreated when you insert data into a business table.
Step 2: Configure the destination cluster to match the self-managed cluster version
To ensure the destination cluster behaves as similarly as possible to the self-managed cluster, connect to the destination cluster and set the compatibility parameter to match the version of the self-managed cluster.
Setting compatibility to a lower version disables some new features, such as ParallelReplica.
Example:
SELECT currentProfiles(); // Get the profile used by the user
SELECT
    profile_name,
    setting_name,
    value
FROM system.settings_profile_elements
WHERE (setting_name = 'compatibility') AND (profile_name = 'xxxx'); // Query the compatibility setting
ALTER PROFILE XXXX SETTINGS compatibility = '23.8'; // Modify the profile
Step 3: Create a migration task
Log on to the ApsaraDB for ClickHouse console. On the Clusters page, select Enterprise Edition Clusters and click the ID of the destination cluster.
In the navigation pane on the left, choose .
Click Create Migration Task.
Select source and destination instances.
Configuration item
Description
Example
Task Name
The task name can contain only letters and digits. Names are case-insensitive and must be unique.
MigrationTask1229
Source Cluster Name
Run
SELECT * FROM system.clusters;to get the cluster name of the self-managed instance.default
VPC IP Address
The IP address and port of each shard in the cluster, separated by commas. Format:
IP:PORT,IP:PORT,....Run the following SQL statement to get the IP addresses and ports of the self-managed cluster:
SELECT shard_num, replica_num, host_address as ip, port FROM system.clusters WHERE cluster = '<cluster_name>' and replica_num = 1;Parameters:
cluster_name: The name of the destination cluster.
replica_num=1 selects the first replica. You can also select other replicas or manually pick one replica per shard.
ImportantDo not use the VPC domain name or SLB address of ClickHouse.
If IP and port mapping is applied for Alibaba Cloud, configure the mapped IP and port based on network connectivity.
192.168.0.5:9000,192.168.0.6:9000
Database Account
The database account of the self-managed cluster.
test
Database Password
The password of the database account for the self-managed cluster.
test******
Source Instance Kernel Version
Click Get Version.
22.8.5.29
Based on the source instance version, perform the corresponding operation:
If the source instance version is 22.10 or later, click Next.
If the source instance version is earlier than 22.10, enter the Destination Instance Information as prompted and click Next.
If version retrieval fails, check for errors such as incorrect source instance information or network connectivity issues. Fix the issues and click Get Version again.
NoteDue to parameter incompatibilities between older community editions and Enterprise Edition, if the source instance version is earlier than 22.10, you must use push-based synchronization from source to destination. In this case, you must map the destination IP to the self-managed network. If the self-managed network and the Enterprise Edition instance are in the same VPC or connected via VPC peering, you can use the original IP addresses directly.
Check connectivity and configuration.
Click Start Check.
During the check, click the
 icon in the upper-right corner to view real-time progress.
After the check completes, proceed based on the results.
Select a result level and check item, then click the
button to view details. Results are interpreted as follows:Success: If all checks pass, click Next to continue.
Warning: These are non-blocking issues. Confirm whether they affect your business or migration. You can ignore the warning or fix the issue and click Start Check again to recheck.
Error: These are blocking issues. Fix the error and click Start Check again to recheck.
For error messages and solutions, see FAQ.
Check database and table schemas.
Click Start Check.
During the check, click the
icon in the upper-right corner to view real-time progress.After the check completes, proceed based on the results.
For result interpretation, see Step 5.
Migrate database and table schemas.
Click Start Migration.
During migration, click the
icon in the upper-right corner to view real-time progress.Once the inspection is complete, you can proceed with the next steps based on the inspection results.
For result interpretation, see Step 5.
(Optional) Check SQL compatibility.
SQL compatibility checking replays SQL statements from the self-managed instance on the destination instance to verify syntax compatibility across kernel versions. Decide whether to perform this step based on your needs.
To skip, click Skip.
To perform the check, select a request replay time and click Start Check. After a successful check, click Next. For failed checks, see Step 5 for resolution.
ImportantThis check validates syntax compatibility only and does not require data. To test with data, migrate partial data in the next step first.
False positives may occur due to client version mismatches with the destination instance. Validate SQL statements manually if needed.
Start synchronization.
Click Start Sync.
During synchronization, click the
icon in the upper-right corner to view real-time progress.When the process reaches Migrate Data, switch to the Migrate Data tab and click the
button to view Migration Progress and estimated remaining time.ImportantMonitor the Migration Progress closely. Based on the estimated remaining time, stop writes to the self-managed cluster and handle Kafka and RabbitMQ engine tables.
When Migration Progress reaches 100% and you confirm the source instance has stopped writes, click Stop to end the migration and proceed.
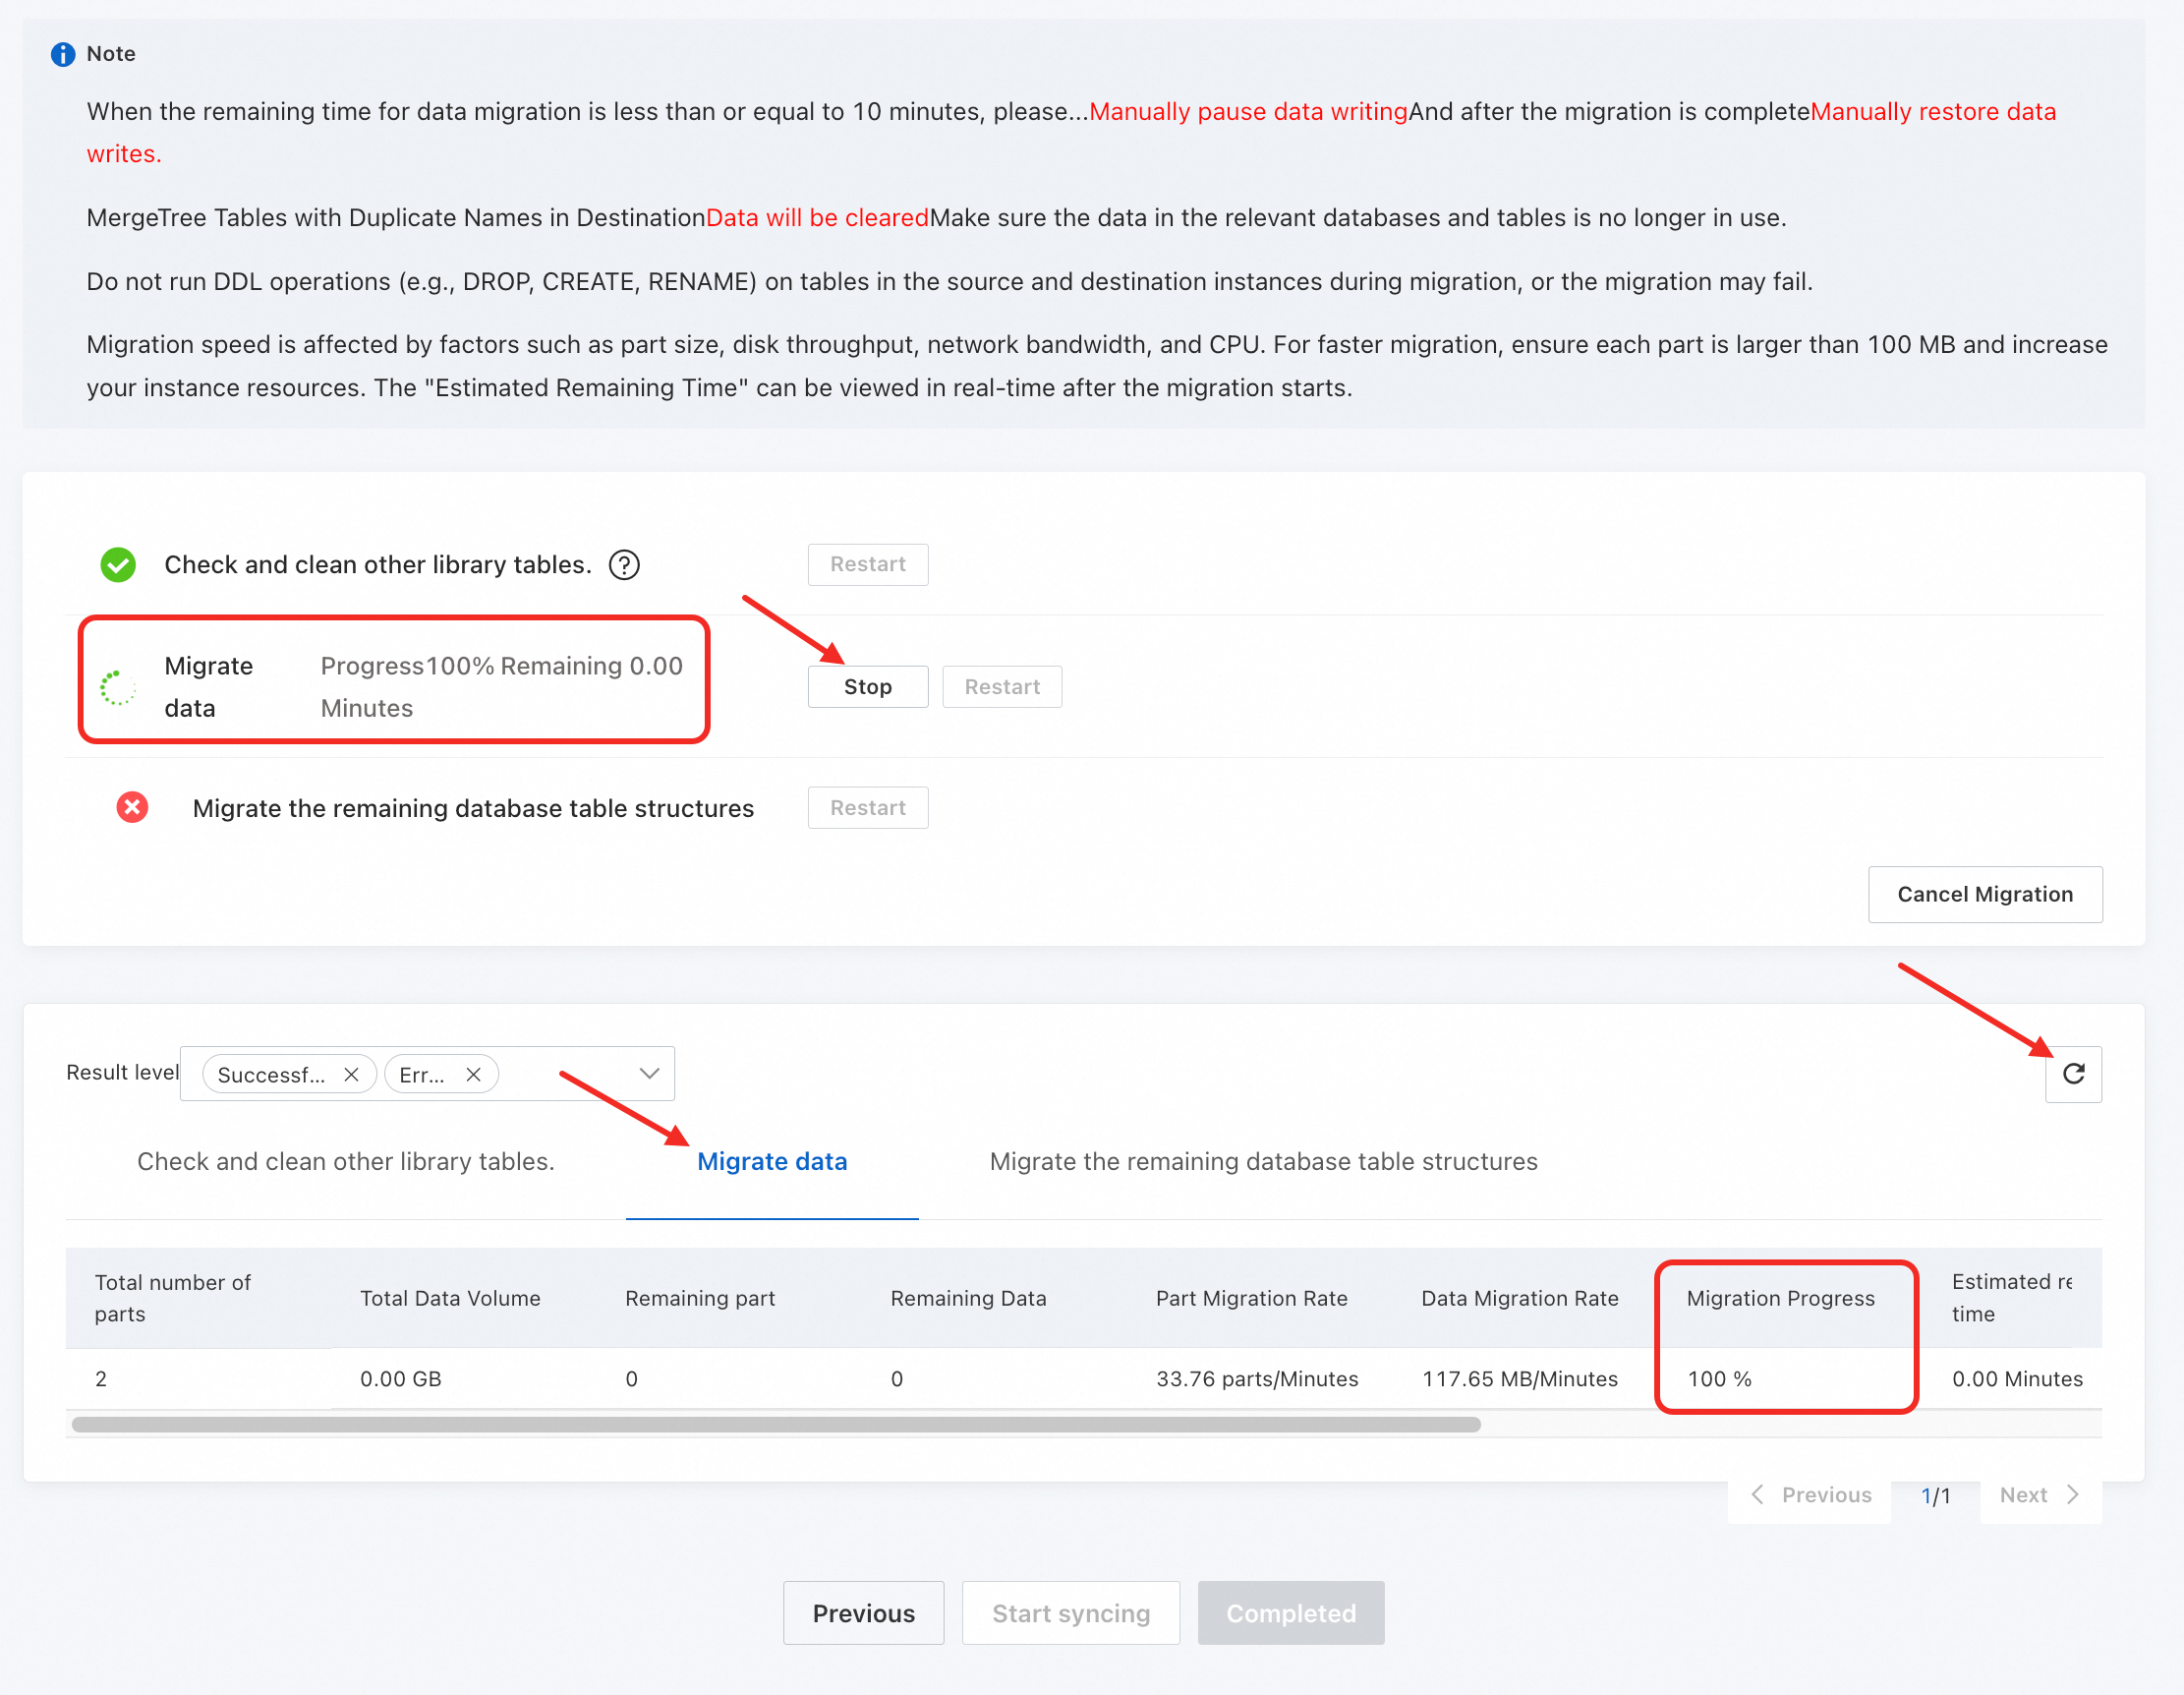
After synchronization completes, click Completed.
ImportantAfter the "Start synchronization" step completes, the migration task is locked and cannot be modified. Use the Previous, Next, or Refresh buttons to view step results.
Step 4: Migrate business data for non-MergeTree tables
During migration, non-MergeTree tables support only schema migration (such as MySQL tables) or no migration at all (such as Log tables). After migration, some tables in the destination cluster may have schemas but no data. Complete data migration manually as follows:
Log on to the self-managed cluster and run the following statement to identify non-MergeTree tables requiring data migration:
SELECT
    `database` AS database_name,
    `name` AS table_name,
    `engine`
FROM `system`.`tables`
WHERE (`engine` NOT LIKE '%MergeTree%') AND (`engine` != 'Distributed') AND (`engine` != 'MaterializedView') AND (`engine` NOT IN ('Kafka', 'RabbitMQ')) AND (`database` NOT IN ('system', 'INFORMATION_SCHEMA', 'information_schema')) AND (`database` NOT IN (
    SELECT `name`
    FROM `system`.`databases`
    WHERE `engine` IN ('MySQL', 'MaterializedMySQL', 'MaterializeMySQL', 'Lazy', 'PostgreSQL', 'MaterializedPostgreSQL', 'SQLite')
))
Log on to the destination cluster and use the remote function to migrate data.
Manual migration
Migrate data from a self-managed ClickHouse cluster to ApsaraDB for ClickHouse Enterprise Edition

In ApsaraDB for ClickHouse Enterprise Edition, regardless of whether your source table is sharded or replicated, simply create the corresponding destination table (omit the Engine parameter because the system automatically uses the SharedMergeTree table engine). The ApsaraDB for ClickHouse Enterprise Edition cluster handles vertical and horizontal scaling automatically. You do not need to manage replication or sharding implementation.
Overview
The procedure for migrating data from a self-managed ClickHouse cluster to an ApsaraDB for ClickHouse Enterprise Edition cluster is as follows.
Add a read-only user to the source cluster.
Copy the source table schema to the destination cluster.
If the source cluster supports external network access, pull data from the source cluster to the destination cluster. If not, push data from the source cluster to the destination cluster.
(Optional) You can delete the IP address of the source cluster from the destination cluster.
Remove the read-only user from the source cluster.
Procedure
Perform the following operations on the source cluster (the source table contains data):
Add a read-only user for table db.table.
CREATE USER exporter
IDENTIFIED WITH SHA256_PASSWORD BY 'password-here'
SETTINGS readonly = 1;
GRANT SELECT ON db.table TO exporter;Copy the source table schema.
SELECT create_table_query
FROM system.tables
WHERE database = 'db' and table = 'table'
Perform the following operations on the destination cluster.
Create a database.
CREATE DATABASE dbCreate the destination table using the
CREATE TABLEstatement from the source table.NoteWhen running the
CREATE TABLEstatement, change ENGINE to SharedMergeTree but do not include any parameters because the ApsaraDB for ClickHouse Enterprise Edition cluster always replicates tables and provides correct parameters. Retain theORDER BY,PRIMARY KEY,PARTITION BY,SAMPLE BY,TTL, andSETTINGSclauses to ensure the table is created correctly in the destination ApsaraDB for ClickHouse Enterprise Edition cluster.CREATE TABLE db.table ...Use the
Remotefunction to pull or push data.NoteIf the source ClickHouse server is not accessible from external networks, push data instead of pulling it because the
Remotefunction works for both SELECT and INSERT operations.In the destination cluster, use the
Remotefunction to pull data from the source table in the source cluster.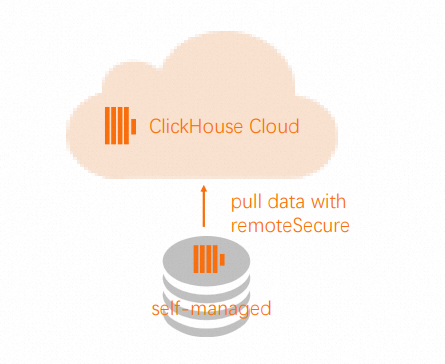
INSERT INTO db.table SELECT * FROM
remote('source-hostname:9000', db, table, 'exporter', 'password-here')
In the source cluster, use the
Remotefunction to push data to the destination cluster.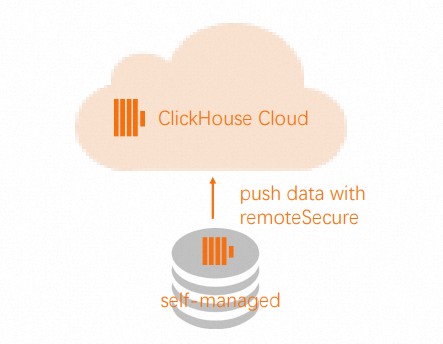 Note
NoteTo allow the
Remotefunction to connect to your ApsaraDB for ClickHouse Enterprise Edition cluster, add the source cluster IP address to the destination cluster whitelist. For more information, see Configure a whitelist.INSERT INTO FUNCTION remote('target-hostname:9000', 'db.table', 'default', 'PASS') SELECT * FROM db.table
FAQ
Error messages and solutions during connectivity and configuration checks
Error message | Meaning | Solution |
| Network connection to the self-managed cluster timed out. | Troubleshoot network issues based on the error message. |
| The cluster configured during migration task creation does not exist in the self-managed cluster. | Query the self-managed cluster for available clusters using SQL and update the migration task configuration. |
| One or more of the following system tables are missing in the self-managed cluster: | Create the missing system tables in the self-managed cluster. |
| The time zones of the self-managed and destination clusters do not match. | Modify the time zone to match. |
| The compatibility setting of the destination cluster does not match the version of the self-managed cluster. | Adjust the compatibility setting of the destination cluster to match the self-managed cluster version. Important Setting compatibility to a lower version disables some new features, such as ParallelReplica. |
Error messages and solutions during schema checks
Error message | Meaning | Solution |
| Database tables are inconsistent across nodes in the self-managed cluster. | Check and resolve inconsistencies across nodes in the self-managed cluster. |
| Table passwords are hidden. | Set display_secrets_in_show_and_select=1 and restart. Note: This requires the account to have the displaySecretsInShowAndSelect permission. |
| The database engine in the self-managed cluster does not support migration. | Consider switching to a destination-supported database engine. |
| The database engine in the self-managed cluster does not support migration. | The system automatically replaces it with a Replicated database to bypass migration exceptions. |
| The database engine in the self-managed cluster does not support migration. | Use DTS (Data Transmission Service) for synchronization or create a same-name database to bypass migration exceptions. |
| The database engine in the self-managed cluster does not support migration. | It is automatically ignored during migration. |
| ApsaraDB for ClickHouse Enterprise Edition does not recommend using distributed tables. | Delete the distributed table in the self-managed cluster and query the underlying MergeTree table directly after migration. |
| External engines are referenced. Access issues may occur, but are not guaranteed. | Confirm whether the referenced IP addresses are accessible from the destination instance. If not, establish network connectivity and add the IPs to the whitelist. |
| For some engines, only the table schema is migrated; data migration is not supported. | Migrate data manually using the remote function or other methods. |
| Data migration is not supported for some engines. | Create a same-name MergeTree table in the destination cluster and migrate data manually. |
| Data migration is not supported for some engines. | See Step 4 in the procedure. |
| During schema checks, the corresponding table in the destination instance must be empty. | Delete data from the corresponding table in the destination instance. |
| Only user-defined functions ( | Create the corresponding function manually in the destination instance. |
Other
For other issues during migration and their solutions, see FAQ.