You can install applications on an application server and publish the applications by using the RemoteApp service. Before you perform O&M operations on applications by using a bastion host, you must deploy an application server. This topic describes how to deploy a server that runs Windows Server 2019 as an application server.
Windows Server deployment
The RemoteApp service is not supported on Windows Server 2000 and 2003. We recommend that you use Windows Server 2016, Windows Server 2019, or Windows Server 2022.
The server that runs Windows Server can be a physical machine or a virtual machine.
Application O&M depends on Remote Desktop Services (RDS). The default free trial period of RDS is 120 days. If you want to continue using RDS after the trial period ends, you must activate a license server.
WarningYou can use RDS during the free trial period. After the trial period ends, the application O&M feature becomes unavailable. If you want to use RDS for a long term, you must purchase Client Access Licenses (CALs) on the official Microsoft website and activate a license server on the published application server.
The following types of RDS CALs can be used:
Per device CALs: You can purchase RDS CALs based on the maximum number of concurrent O&M connections for application O&M. Each O&M connection requires a CAL. This CAL type is suitable for scenarios in which the number of personnel in concurrent application O&M is less than the total number of O&M personnel. This CAL type is recommended.
Per user CALs: You can purchase RDS CALs based on the number of O&M personnel who need to perform application O&M. Each personnel requires a CAL. This CAL type is suitable for scenarios in which the number of personnel in concurrent application O&M is the same as the total number of O&M personnel.
Recommended configurations for the application server
Item | 1 to 10 concurrent connections | 11 to 20 concurrent connections | 21 to 50 concurrent connections | 51 to 100 concurrent connections | More than 100 concurrent connections |
CPU | 4 cores | 4 cores | 8 cores | 8 cores | 16 cores |
Memory | 8 GB | 16 GB | 16 GB | 32 GB | 64 GB |
System disk | 200 GB | 200 GB | 300 GB | 300 GB | 500 GB |
RemoteApp overview
RemoteApp is a service introduced by Microsoft in its OSs starting Windows Server 2008. RemoteApp allows users to access remote desktops and programs. RemoteApp allows you to access desktops and applications on remote computers without the need to install an OS or an application on your on-premises machine. To use Bastionhost to perform O&M operations on applications, you need to log on to the application server and start the client on the server. In this scenario, RemoteApp is required.
Step 1: Create an Active Directory (AD) domain
Log on to the server that runs Windows Server 2019.
If you use an Elastic Compute Service (ECS) instance, you can connect to the ECS instance by using multiple methods. For more information about the methods, see Connect to an instance.
Click the
 icon and select Server Manager. In the left-side navigation pane, click Dashboard. On the page that appears, click Add roles and features.
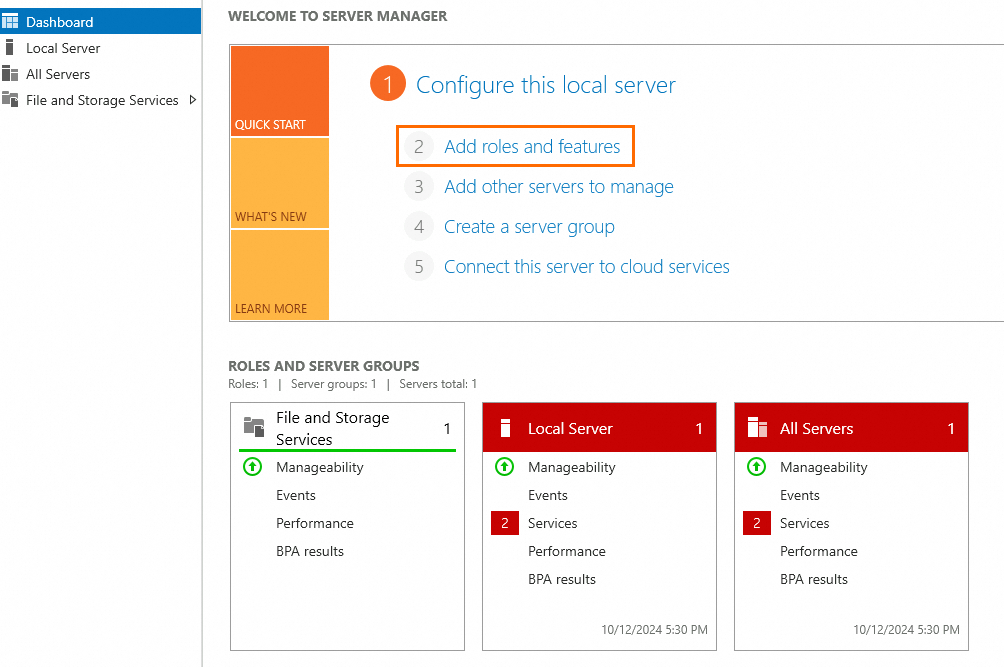
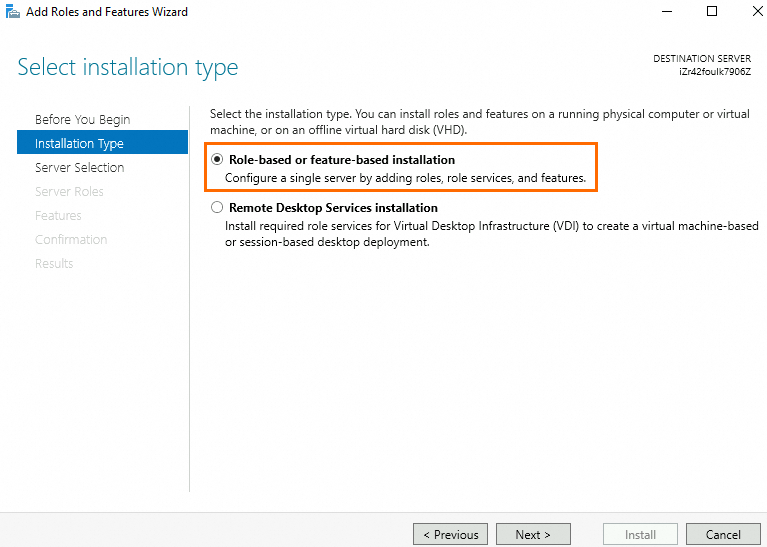
Configure the parameters by following the instructions on the wizard. Use the default values unless in special scenarios.
Installation Type: Select Role-based or feature-based installation.
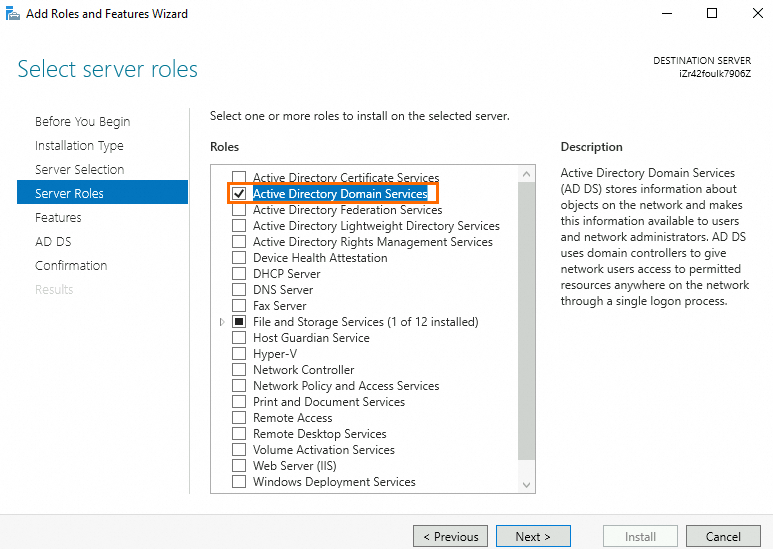
Server Roles: Select Active Directory Domain Services.
Features: Selected .NET Framework 3.5 Features and .NET Framework 4.7 Features.
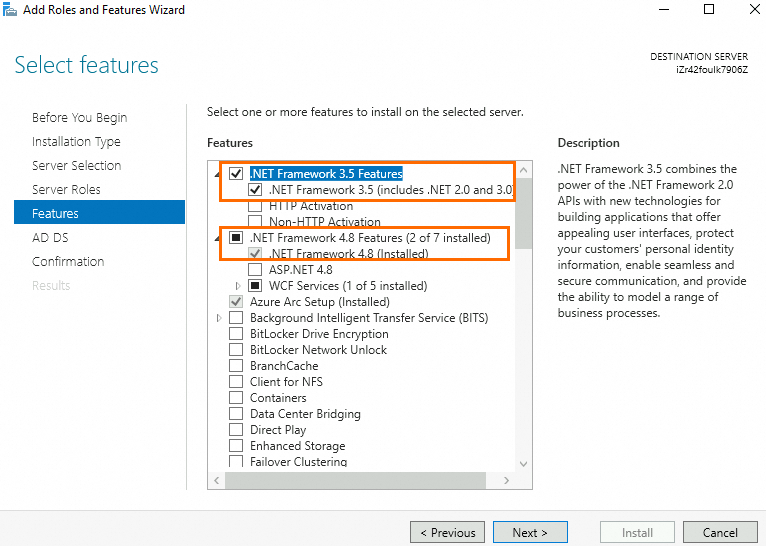
Restart the server after the roles and features are installed.
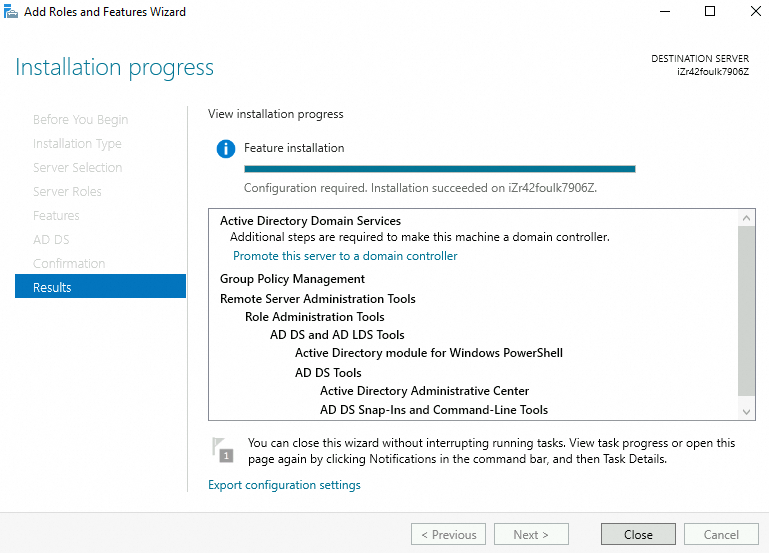
Step 2: Promote the server to a domain controller
On the Dashboard page, click Promote this server to a domain controller.
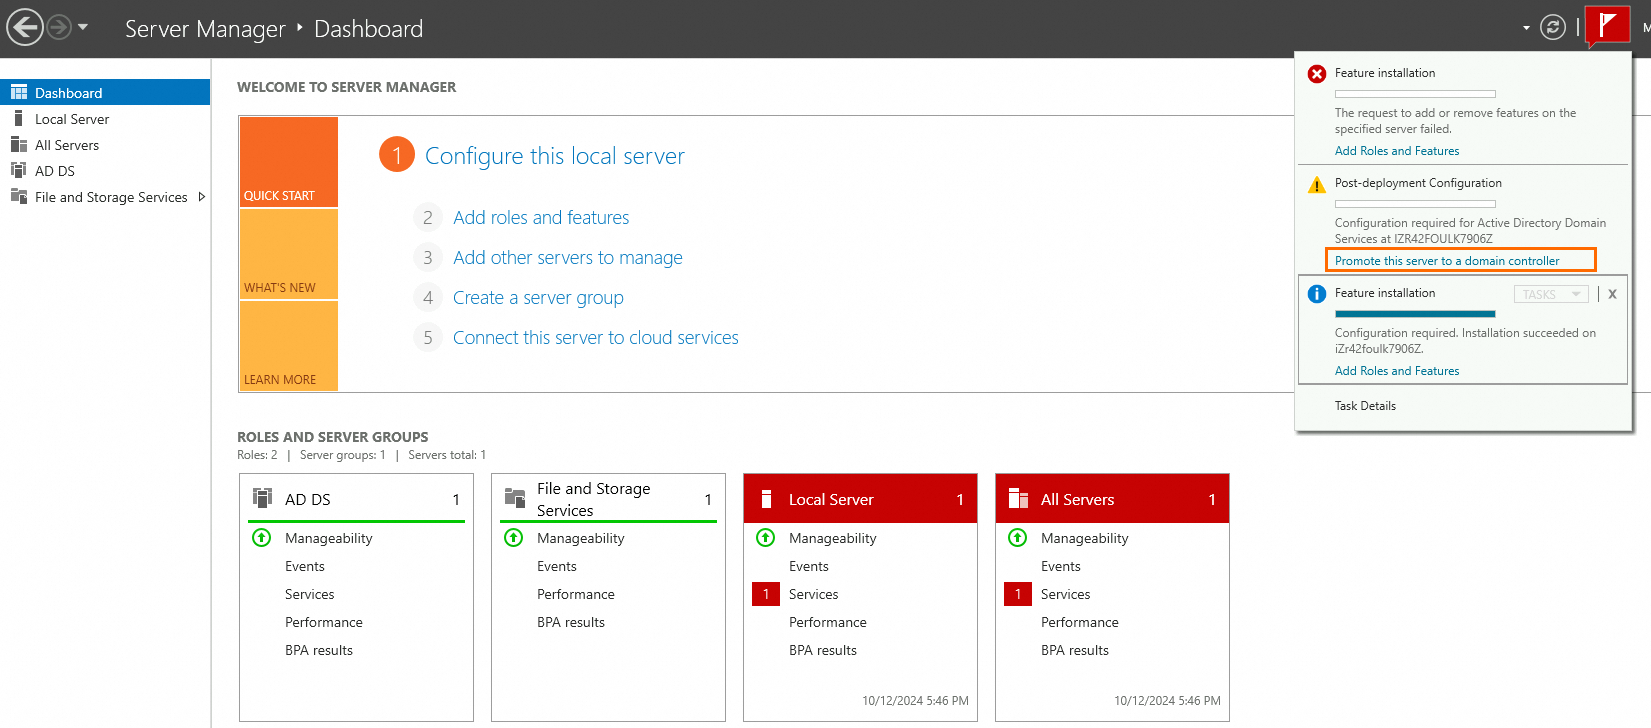
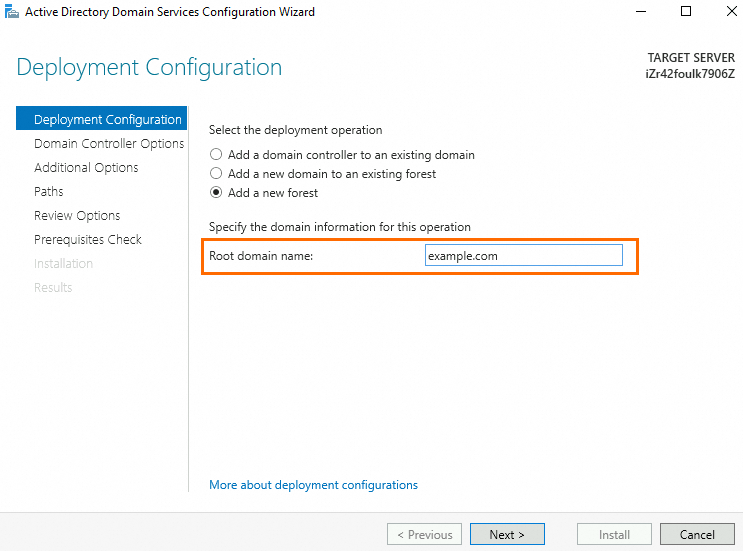
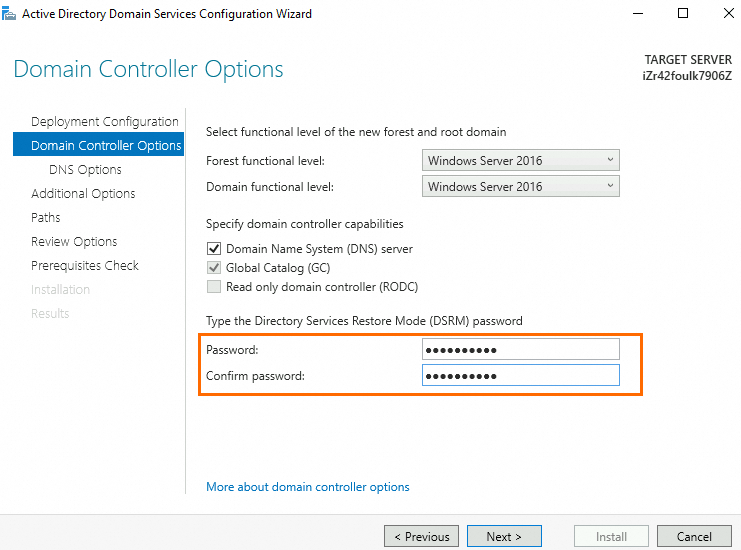
Configure the parameters by following the instructions on the wizard. Use the default values unless in special scenarios.
Deployment Configuration: You can specify a custom root domain name, such as example.com.
Domain Controller Options: Enter a Directory Service Restore Mode (DSRM) password. The password must contain letters, digits, and special characters.
DNS Options: Ignore the prompt and click Next.
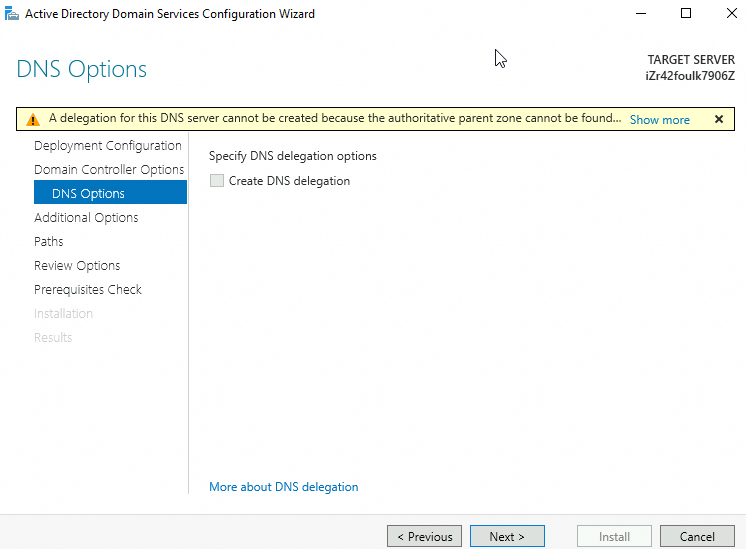
Restart the server after the server is promoted to a domain controller. Check whether the server is in the domain after the restart.
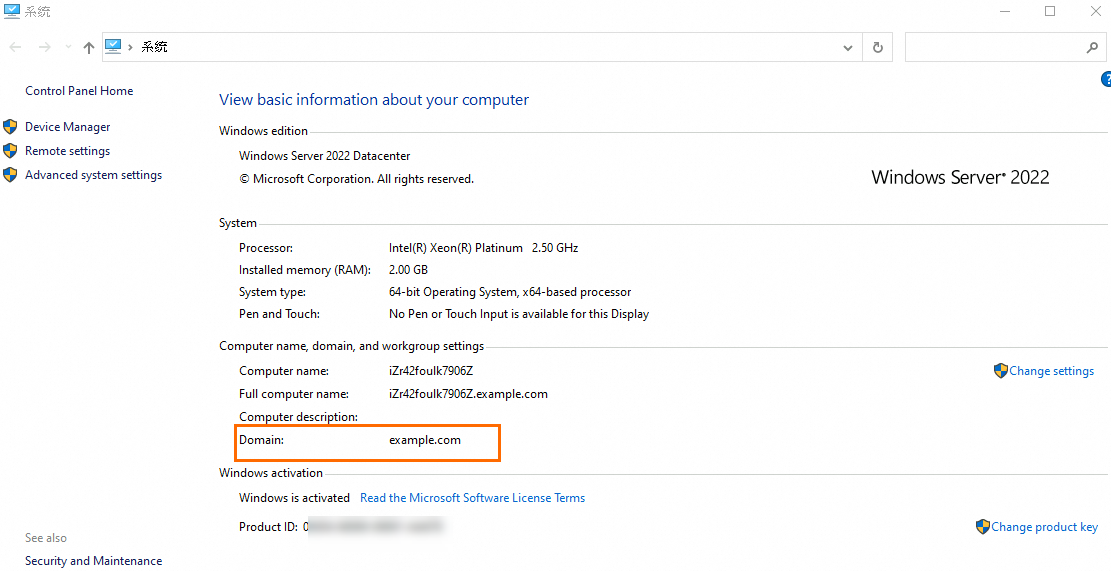
Step 3: Install Remote Desktop Services
Log on to the server by using a domain account or the administrator account.
If the domain name is example.com, the domain account is example. The password is the same as that of the administrator account.
Click the
 icon and select Server Manager. In the left-side navigation pane, click Dashboard. On the page that appears, click Add roles and features.
Configure the parameters by following the instructions on the wizard. Use the default values unless in special scenarios.
Server Roles: Select Remote Desktop Services.
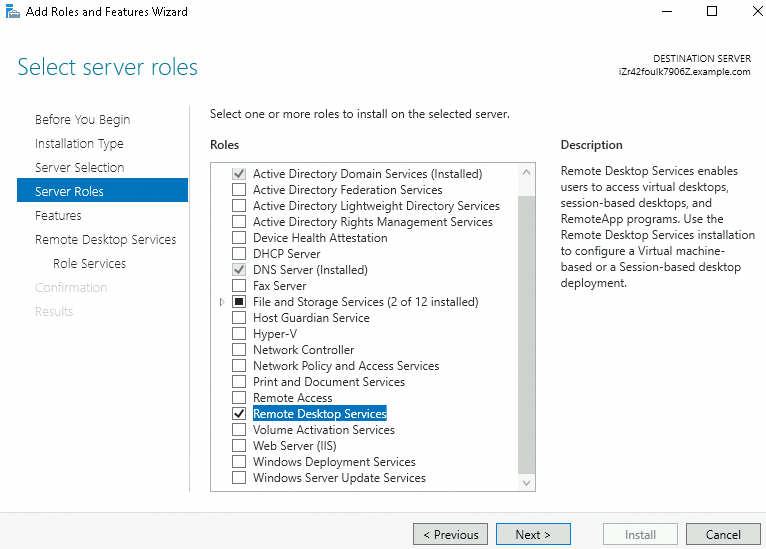
Role Services: Select Remote Desktop Session Host and Remote Desktop Licensing.

Confirmation: Select Restart the destination server automatically if required.
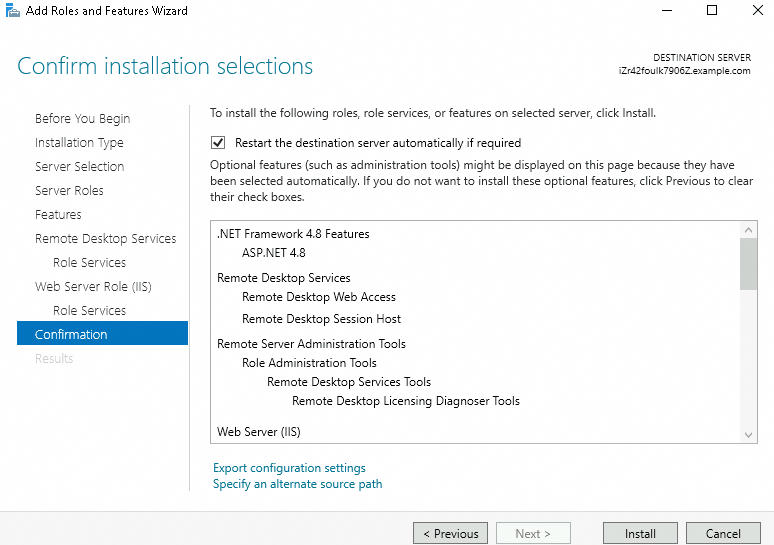
Step 4: Install RemoteApp
Log on to the server by using a domain account or the administrator account.
If the domain name is example.com, the domain account is example. The password is the same as that of the administrator account.
Click the
 icon and select Server Manager. In the left-side navigation pane, click Dashboard. On the page that appears, click Add roles and features.
Configure the parameters by following the instructions on the wizard. Use the default values unless in special scenarios.
Installation: Select Remote Desktop Services installation.
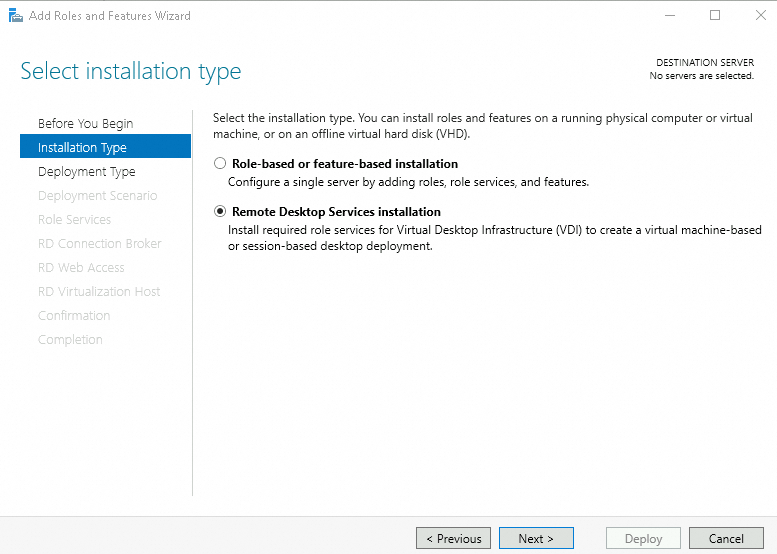
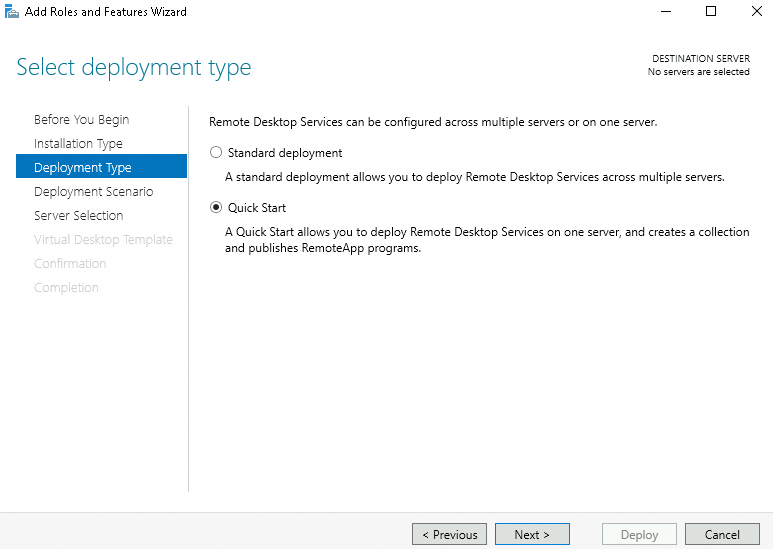
Deployment Type: Select Quick Start.
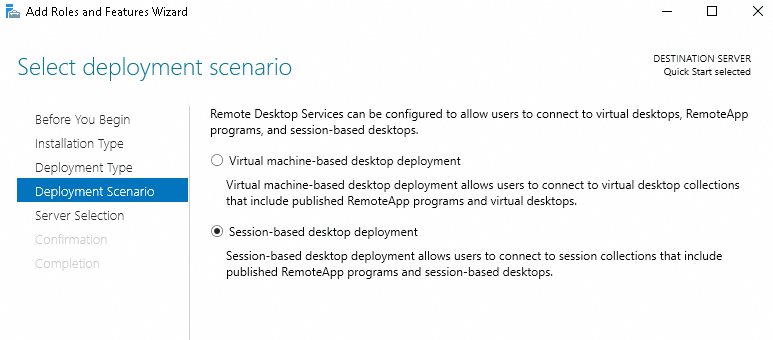
Deployment Scenario: Select Session-based desktop deployment.
Server Selection: Select the server on which you want to install RemoteApp and click Next.
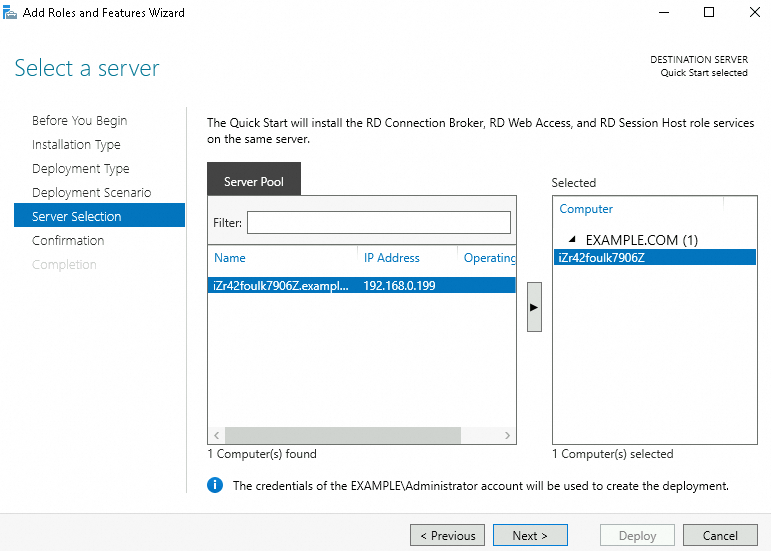
If a compatibility error occurs, run the Enable-PSRemoting command in Windows PowerShell as the administrator. After the command is complete, return to the Server Selection step and click Next.

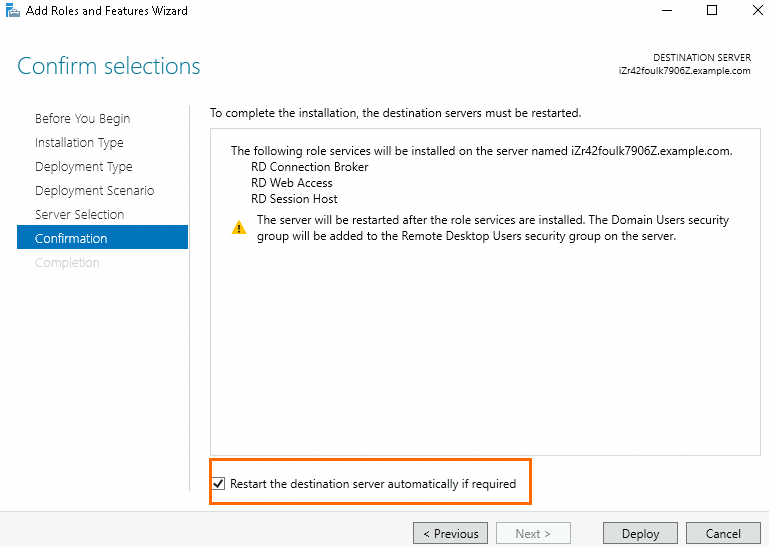
Confirmation: Select Restart the destination server automatically if required.
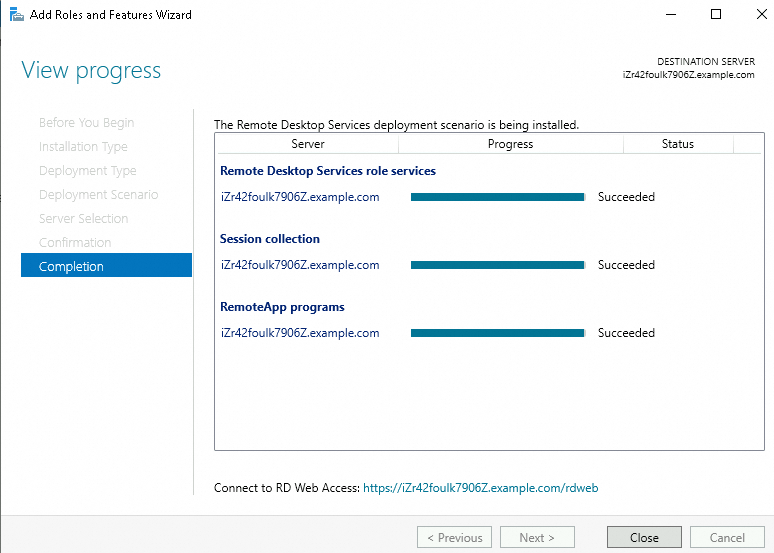
The following figure shows that RemoteApp is installed.
Step 5: Adjust the application server policy
Adjust the local group policy
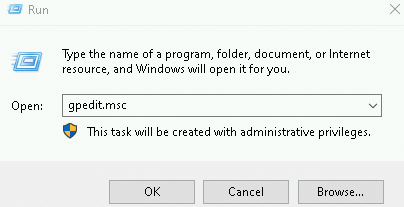
Open the Run dialog box and enter gpedit.msc.
On the page, configure a remote desktop session host connection and a session time.
Connection settings
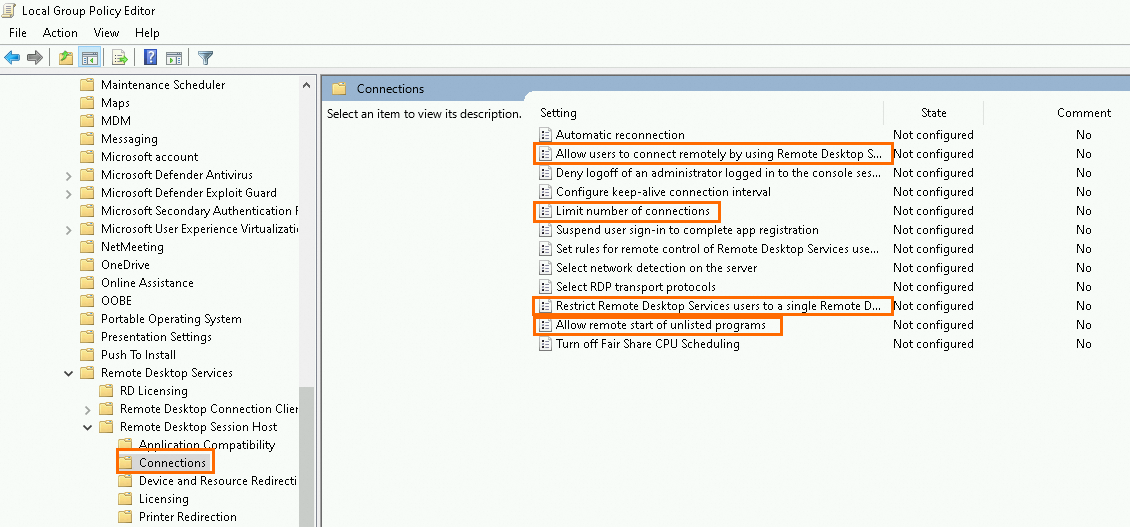
Allow users to connect remotely by using Remote Desktop Services: Select Enabled.
Limit number of connections: Select Enabled and set the RD Maximum Connections allowed parameter to 999999.
Restrict Remote Desktop Services users to a single Remote Desktop Services session: Select Disabled.
Allow remote start of unlisted programs: Select Enabled.
Session time settings
Set time limit for disconnected sessions: Select Enabled and set the End a disconnected session parameter to 1 minute.
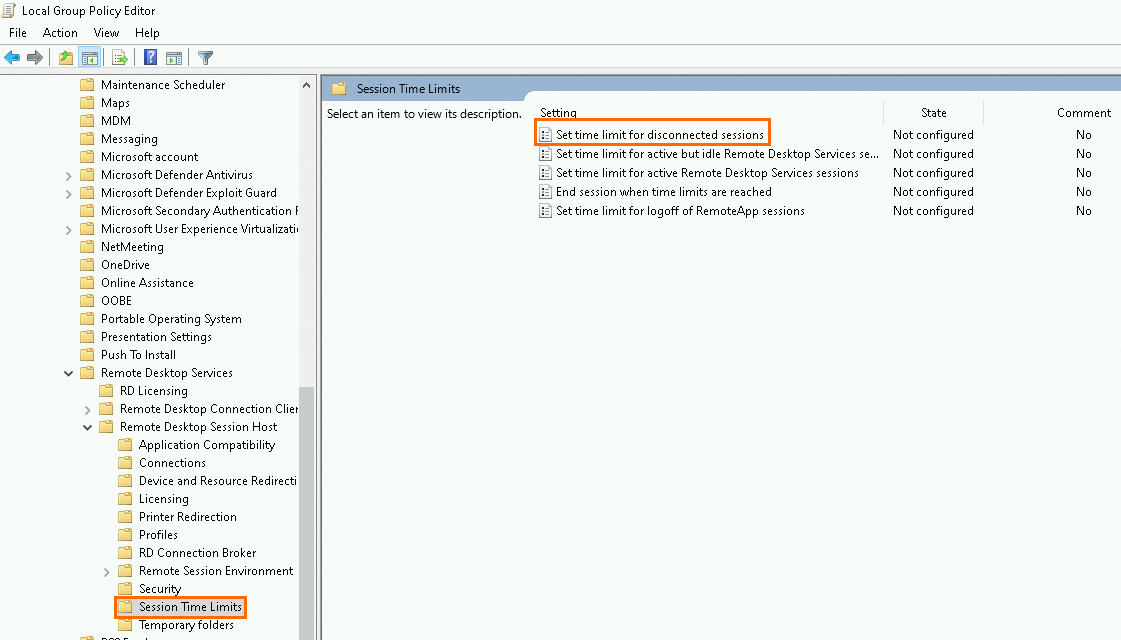
Block the IE address bar
Open the Run dialog box and enter gpedit.msc.

On the page, set the Enforce full-screen mode parameter to Enabled.
After you complete the configurations, open Internet Explorer (IE) to test whether the configurations take effect. If the address is not displayed in the address bar, the configurations are effective.
Disable the Windows firewall
On the page, turn off the firewall.
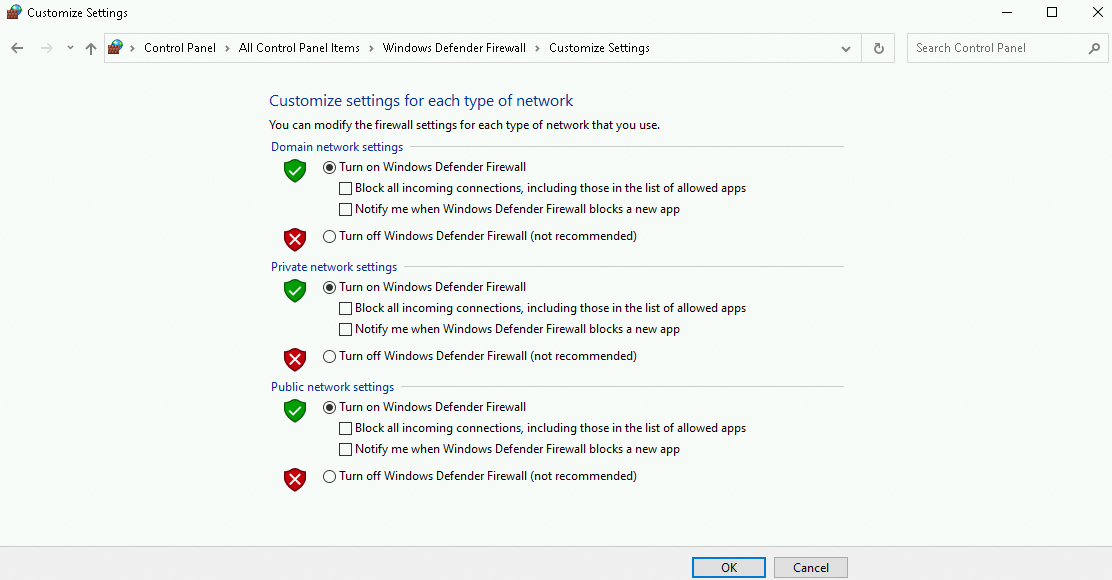
Disable IE enhanced security
Click the
 icon and click Server Manager.
 In the left-side navigation pane, click Local Server. On the page that appears, turn off IE Enhanced Security.

Configure the resource directory licensing mode
Click the
 icon and select Server Manager. In the left-side navigation pane, choose Remote Desktop Services > Overview. On the page that appears, double-click RD Licensing.
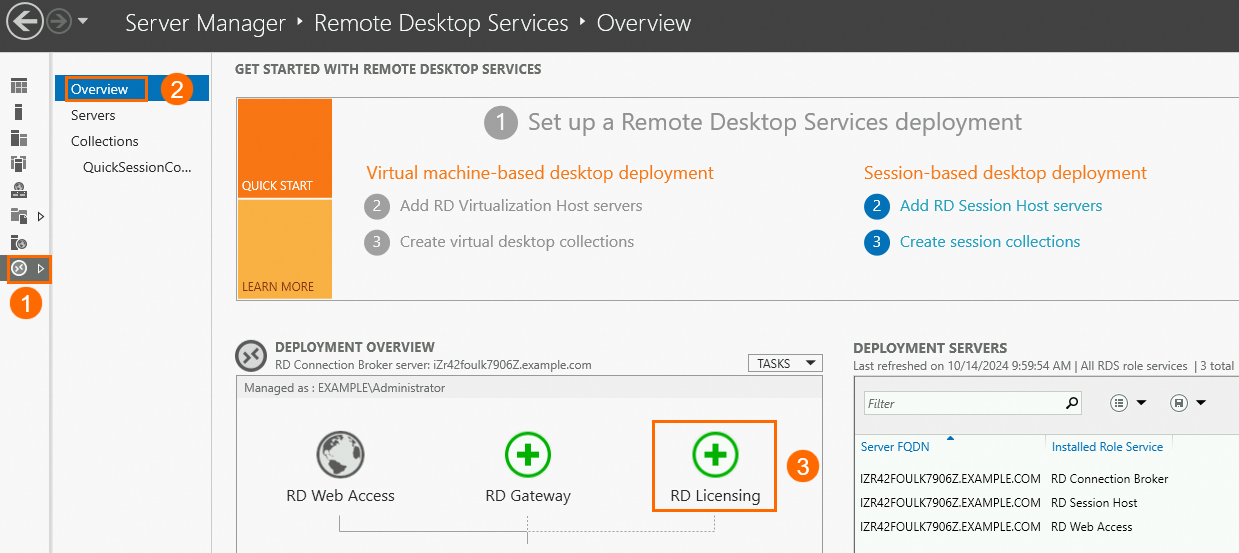
Select the license server and click Next. Complete the subsequent configurations based on the instructions.
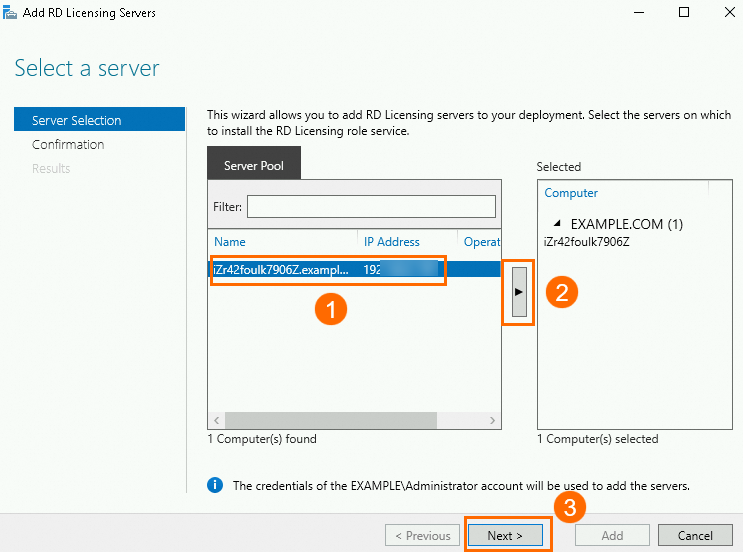
Return to the Remote Desktop Services page and choose .
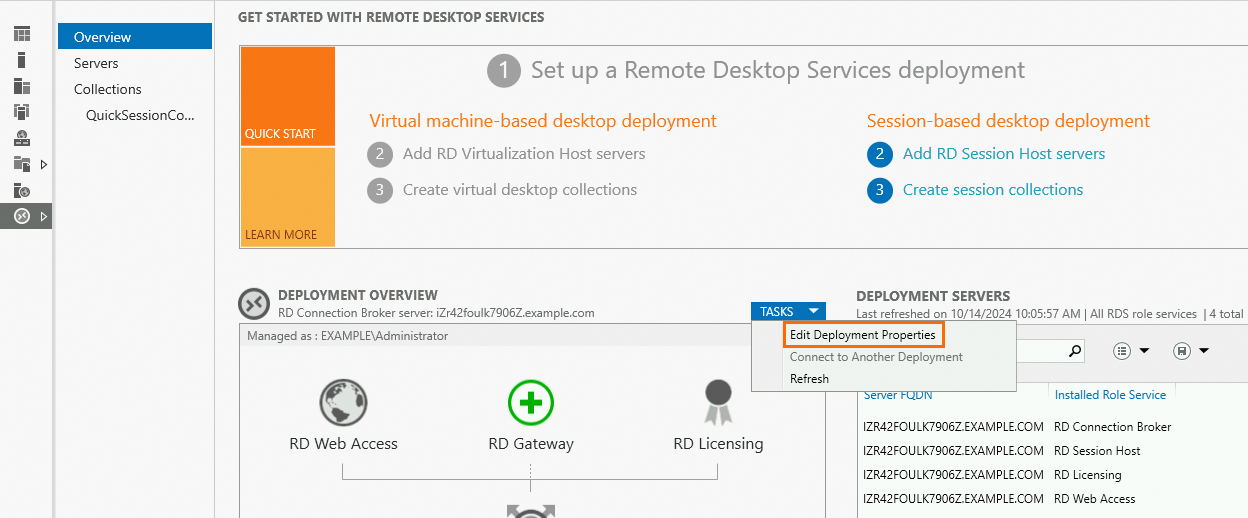
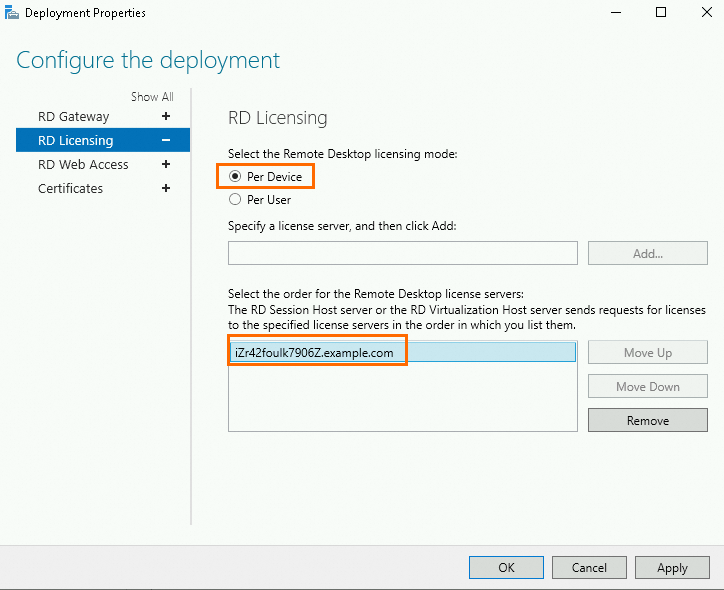
Set the resource directory licensing mode to Per Device, select a remote desktop license server, and then click Apply.
Start the remote desktop
On the page, click Allow remote access.
On the Remote tab, select Allow connections to this computer, clear Allow connections only from computers running Remote Desktop with Network Level Authentication (recommended), and then click OK.