Answers to common questions about Browser Monitoring billing, including how to stop billing, control daily spending, and configure alerts for resource plans.
How do I stop billing?
If you no longer need Browser Monitoring, stop billing by stopping or deleting your application sites.
| Approach | Impact | Reversible |
|---|---|---|
| Stop all applications | Pauses monitoring for every site | Yes |
| Stop a single application | Pauses monitoring for one site | Yes |
| Delete a site | Permanently removes the site | No |
Stop all applications
In the ARMS console, choose in the left navigation pane.
On the Site List page, choose in the upper-right corner.
In the Start/Stop All Applications dialog box, select an option and click OK.
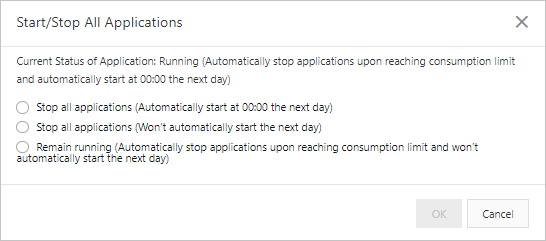
Option
Behavior
Stop all applications (Automatically start at 00:00 the next day)
ARMS immediately stops monitoring all applications. Monitoring automatically resumes at 00:00 the next day.
Stop all applications (Won't automatically start the next day)
ARMS immediately stops monitoring all applications and does not automatically resume.
Remain running (Automatically stop applications upon reaching consumption limit and won't automatically start the next day)
ARMS continues monitoring until your spending reaches the daily limit, then stops all applications without automatic resumption. You must set a spending limit before you select this option.
Stop a single application
In the ARMS console, choose in the left navigation pane.
On the Site List page, find the target application site and choose .
In the Start/Stop Settings dialog box, select an option and click OK.
Option
Behavior
Stop the current application (Automatically resumes at 00:00 the next day)
ARMS immediately stops monitoring the application. Monitoring automatically resumes at 00:00 the next day.
Stop the current application (Does not automatically resume the next day)
ARMS immediately stops monitoring the application and does not automatically resume.
Keep running (Automatically stops when the limit is reached and automatically resumes the next day)
ARMS continues monitoring until your spending reaches the daily limit, then stops the application. Monitoring automatically resumes the next day. You must set a spending limit before you select this option.
Keep running (Automatically stops when the limit is reached and does not automatically resume the next day)
ARMS continues monitoring until your spending reaches the daily limit, then stops the application without automatic resumption. You must set a spending limit before you select this option.
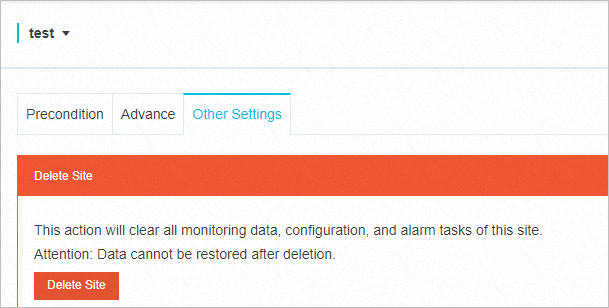
Delete a site
Deleting a site is irreversible. To re-enable Browser Monitoring, perform the integration again. For more information, see Browser Monitoring integration overview.
In the ARMS console, choose in the left navigation pane.
On the Site List page, find the target application site, choose , and then click the Other Settings tab.
On the Other Settings tab, click Delete Site. In the Confirm Operation dialog box, click OK.
ARMS immediately stops monitoring the application.
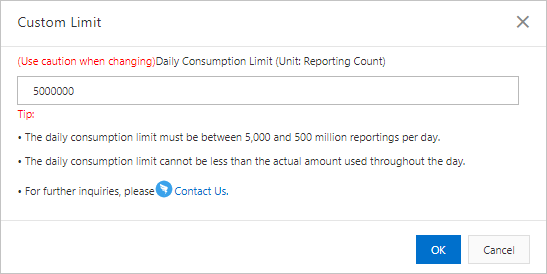
How do I set a spending limit?
Set a daily spending limit to cap costs and prevent unexpected charges. When spending reaches the daily limit, ARMS stops monitoring and billing. Both automatically resume at 00:00 the next day.
In the ARMS console, choose in the left navigation pane.
On the Site List page, choose in the upper-right corner.
In the Custom Limit dialog box, set your daily spending limit and click OK.
How do I set alerts for resource plans?
Set alerts for resource plan quotas
After you set an alert for a resource plan quota, you will receive a notification by text message or email when the remaining quota of the resource plan reaches the specified level.
Log on to Expenses and Costs. In the navigation pane on the left, click Resource Instance Management.
Set Resource Dimension to Resource Plan and then click Balance Alert Settings.
In the dialog box that appears, turn on the alert switch, set the remaining quota percentage, and click OK.
For example, if you set the remaining quota percentage to 20%, Alibaba Cloud sends you an alert notification when the remaining quota of the resource plan is 20% of the total quota for the current month.
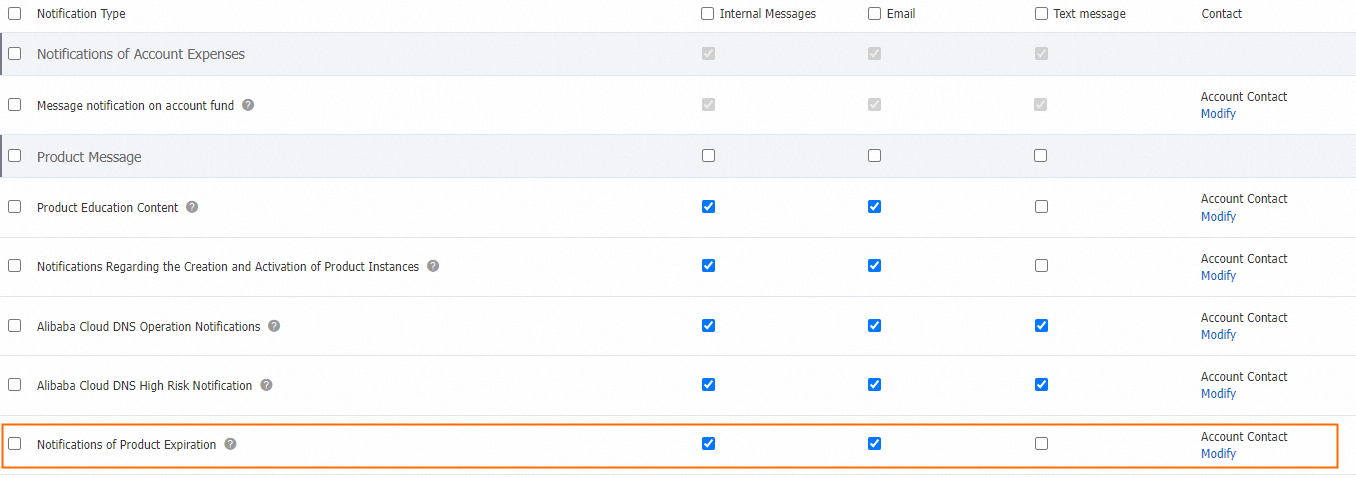
Set notifications for resource plan expiration
Log on to the Alibaba Cloud Management Console.
In the top navigation bar, click the
 icon.
icon.In the navigation pane on the left, choose .
On the Basic Receiving Management page, select Product Expiration Notification.
When a resource plan is about to expire, Alibaba Cloud sends a notification to the contacts of the current account by default. You can also click Modify to add contacts.