This topic describes how to renew and maintain ApsaraMQ for MQTT instances and upgrade or downgrade the configurations of instances.
Renew an instance
A notification is sent to the mobile phone number that is bound to your account seven days before a ApsaraMQ for MQTT instance expires. When you receive the notification, renew the instance. If an instance is not renewed upon expiration, the instance is retained for seven days and then automatically released.
Log on to the ApsaraMQ for MQTT console. In the top navigation bar, select a region from the Region drop-down list, such as China (Hangzhou).
In the left-side navigation pane, click Instances.
On the Instances page, find the instance to be renewed, and then click Renew.
On the Renew page, select the renewal cycle as needed, and complete the payment.
Enable auto-renewal (Recommended)
We recommend that you enable auto-renewal for instances in the Message Queue for MQTT console to prevent service disruption that is caused by expired instances.
Log on to the ApsaraMQ for MQTT console. In the top navigation bar, choose .
On the Renewal page, click AliwareMQ for IoT.
Click the Manual tab. Find the instance for which you want to enable auto-renewal in the instance list. Then, click Enable Auto Renewal in the Actions column.
In the Enable Auto Renewal dialog box, set Auto Renewal Cycle as needed, and click Auto Renew.
Upgrade or downgrade the configuration of an instance
You can upgrade or downgrade the configuration of an instance to meet your business needs without service disruption.
Upgrades on Basic Edition instances immediately take effect. Upgrades on Platinum Edition instances may require help from a technical support engineer of ApsaraMQ for MQTT. This may increase the amount of time required for the upgrade to take effect. During this period, your instance is not affected and can continue to provide services.
Instance downgrades immediately take effect. Refunds are not given for instance downgrades. Therefore, we recommend that you downgrade the configuration of an instance at the end of the billing cycle of the instance.
You cannot upgrade or downgrade the service edition of an instance. For example, you cannot upgrade an instance from Basic Edition to Platinum Edition or downgrade an instance from Platinum Edition to Basic Edition.
Log on to the ApsaraMQ for MQTT console. In the top navigation bar, select the region where your instance is deployed.
In the left-side navigation pane, click Instances.
On the Instances page, click the instance for which you want to upgrade or downgrade the configuration, and then click Upgrade or Downgrade.
On the Upgrade or Downgrade page, select instance specifications as needed, and complete the payment.
Maintain an instance
You can view instance statistics, including the messaging transactions per second (TPS), the number of subscriptions, and the number of connected clients when the instance is running. You can also configure alerts for the instance to monitor its usage in real time.
View instance statistics
Log on to the ApsaraMQ for MQTT console. In the top navigation bar, select the region where your instance is deployed.
In the left-side navigation pane, click Instances.
On the Instances page, find the instance you want to view. Click the Statistics tab.
On the Statistics tab, specify a time range. Then click Search.
NoteThe maximum time span is two days.
Configure alerts for an instance
ApsaraMQ for MQTT allows you to view the messaging TPS, the number of subscriptions, and the number of connected clients for each instance. Message Queue for MQTT can also send messages to your mobile phone number when these metrics exceed the specified alert thresholds so that you can upgrade your instance configuration at the earliest opportunity.
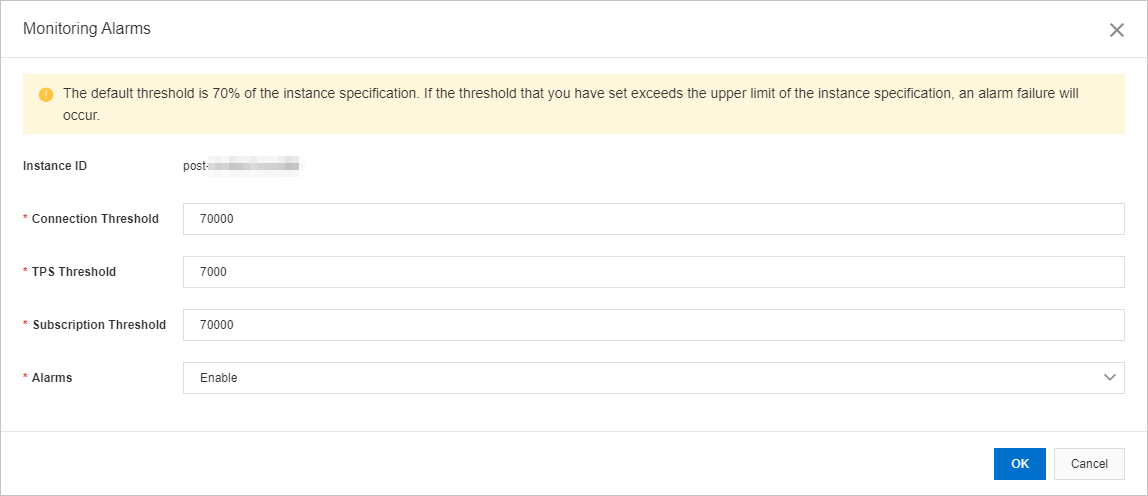
By default, the alert thresholds are set to 70% of the maximum values of metrics supported by the instance specification. You can also customize alert thresholds and enable or disable alerts.
Log on to the ApsaraMQ for MQTT console. In the top navigation bar, select the region where your instance is deployed.
In the left-side navigation pane, click Instances.
On the Instances page, find the instance for which you want to configure an alert, and then click Monitor.
In the Monitoring Alarms dialog box, enter an alert threshold. Select Enable from the Alarms drop-down list, and click OK.