This topic describes how to create an Object Storage Service (OSS) sink connector to synchronize data from a topic in ApsaraMQ for Kafka to an object in OSS.
Prerequisites
For information about the prerequisites, see Prerequisites.
Usage notes
An OSS sink connector routes data to OSS based on the time when events are processed instead of the time when events are generated. If you configure subdirectories by time when you create an OSS sink connector, data that is generated at a time boundary may be delivered to the next subdirectory.
Dirty data processing: If you use the JSONPath syntax to configure the custom path or object content when you create an OSS sink connector, the connector routes data that does not meet the JSONPath syntax to a directory named invalidRuleData/ in the bucket based on the batch policy that you configure. If the invalidRuleData/ directory is displayed in a bucket, check whether the JSONPath syntax is correct and make sure that all messages are consumed by the consumer.
Latency that ranges from seconds to minutes may exist in a routing.
If the bodies of messages in the source ApsaraMQ for Kafka topic need to be extracted based on the JSONPath syntax used for the custom path or object content, you must encode or decode the message bodies into the JSON format in the source ApsaraMQ for Kafka topic.
An OSS sink connector writes data from the upstream application to OSS by appending the data to an existing object in real time. Therefore, in a path with no subdirectories, data is being written to the latest visible object. In this case, exercise caution when you consume messages.
Billing rules
OSS sink connectors run on Alibaba Cloud Function Compute. When data in an OSS sink connector is processed and transmitted, you are charged for Function Compute resources that are consumed. For more information, see Billing overview.
Step 1: Create OSS resources
Create a bucket in the OSS console. For more information, see Create buckets.
In this topic, a bucket named oss-sink-connector-bucket is created.
Step 2: Create and start an OSS sink connector
Log on to the ApsaraMQ for Kafka console. In the Resource Distribution section of the Overview page, select the region where the ApsaraMQ for Kafka instance that you want to manage resides.
In the left-side navigation pane, choose .
On the Tasks page, click Create Task.
Task Creation
In the Source step, set the Data Provider parameter to ApsaraMQ for Kafka and follow the on-screen instructions to configure other parameters. Then, click Next Step. The following table describes the parameters.
Parameter
Description
Example
Region
The region where the ApsaraMQ for Kafka instance resides.
China (Beijing)
ApsaraMQ for Kafka Instance
The ApsaraMQ for Kafka instance in which the messages that you want to route are produced.
alikafka_post-cn-jte3****
Topic
The topic on the ApsaraMQ for Kafka instance in which the messages that you want to route are produced.
topic
Group ID
The ID of the group on the ApsaraMQ for Kafka instance in which the messages that you want to route are produced.
Quickly Create: Create a new group.
Use Existing Group: Select a created group.
GID_http_1
Consumer Offset
The offset from which messages are consumed.
Latest Offset
Network Configuration
The type of the network over which you want to route messages.
Basic Network
VPC
The ID of the virtual private cloud (VPC) in which the ApsaraMQ for Kafka instance is deployed. This parameter is required only if you set the Network Configuration parameter to Self-managed Internet.
vpc-bp17fapfdj0dwzjkd****
vSwitch
The ID of the vSwitch with which the ApsaraMQ for Kafka instance is associated. This parameter is required only if you set the Network Configuration parameter to Self-managed Internet.
vsw-bp1gbjhj53hdjdkg****
Security Group
The security group to which the ApsaraMQ for Kafka instance belongs. This parameter is required only if you set the Network Configuration parameter to Self-managed Internet.
alikafka_pre-cn-7mz2****
Messages
The maximum number of messages that can be sent in each function invocation. Requests are sent only when the number of messages in the backlog reaches the specified value. Valid values: 1 to 10000.
100
Interval (Unit: Seconds)
The time interval at which the function is invoked. The system sends the aggregated messages to Function Compute at the specified time interval. Valid values: 0 to 15. Unit: seconds. The value 0 specifies that messages are sent immediately after aggregation.
3
In the Filtering step, define a data pattern in the Pattern Content code editor to filter requests. For more information, see Event patterns.
In the Transformation step, specify a data cleansing method to implement data processing capabilities such as splitting, mapping, enrichment, and dynamic routing. For more information, see Data cleansing.
In the Sink step, set the Service Type parameter to OSS and follow the on-screen instructions to configure other parameters. Then, click Save. The following table describes the parameters.
Parameter
Description
Example
OSS Bucket
The OSS bucket that you created.
ImportantMake sure that the specified bucket is manually created and is not deleted when the connector runs.
When you create the bucket, set the Storage Class parameter to Standard or IA. Archive buckets are not supported by ApsaraMQ for Kafka sink connectors.
After you create an OSS sink connector, a system file path .tmp/ is generated in the level-1 directory of the OSS bucket. Do not delete or use OSS objects in the path.
oss-sink-connector-bucket
Storage Path
The object to which the routed messages are stored. The key of an OSS object consists of a path and a name. For example, if the ObjectKey parameter is set to
a/b/c/a.txt, the path of the object isa/b/c/and the name of the object isa.txt. You can specify a custom value for the path of an object. The name of the object is generated by the connector based on the following format:{A UNIX timestamp in milliseconds }_{An 8-bit random string}. Example: 1705576353794_elJmxu3v.If you set this parameter to a forward slash (/), no subdirectory is available in the bucket. Data is stored in the level-1 directory of the bucket.
Time variables {yyyy}, {MM}, {dd}, and {HH} can be used in the value of this parameter. These variables specify year, month, day, and hour, respectively, and are case-sensitive.
The JSONPath syntax can be used in the value of this parameter. Examples: {$.data.topic} and {$.data.partition}. The JSONPath variables must meet the requirements of standard JSONPath expressions. To prevent data write exceptions, we recommend that the values extracted by using JSONPath be of the int or string type, contain characters that are encoded in UTF-8, and do not contain spaces, two consecutive periods(.), emojis, forward slashes (/), or backslashes (\).
Constants can be used to in the value of this parameter.
NoteSubdirectories allow you to properly group data. This helps prevent issues caused by a large number of small objects in a single subdirectory.
The throughput of an OSS sink connector is positively correlated with the number of subdirectories. If no subdirectories or a small number of subdirectories are configured, the throughput of the connector is low. This may cause message accumulation in the upstream application. A large number of subdirectories can cause issues such as scattered data, increased number of writes, and excessive parts. We recommend that you configure subdirectories based on the following suggestions:
Source ApsaraMQ for Kafka topic: You can configure subdirectories by time and partition. This way, you can increase the number of partitions on the ApsaraMQ for Kafka instance to increase the throughput of the connector. Example: prefix/{yyyy}/{MM}/{dd}/{HH}/{$.data.partition}/.
Business group: You can configure subdirectories by using a specific business field of the data. The throughput of the connector is determined by the number of business field values. Example: prefixV2/{$.data.body.field}/.
We recommend that you configure different constant prefixes for different OSS sink connectors. This prevents multiple connectors from writing data to the same directory.
alikafka_post-cn-9dhsaassdd****/guide-oss-sink-topic/YYYY/MM/dd/HH
Time Zone
The time zone. Default value: UTC +8:00. This setting takes effect only if you configure subdirectories by time.
UTC+8:00
Batch Aggregation Object Size
The size of the objects to be aggregated. Valid values: 1 to 1024. Unit: MB.
NoteAn OSS sink connector writes data to the same OSS object in batches. The data size of each batch is greater than 0 MB and equal to or less than 16 MB. Therefore, the size of the OSS object may be slightly greater than the configured value. The excess size is up to 16 MB.
In heavy-traffic scenarios, we recommend that you set the Batch Aggregation Object Size parameter to a value larger than 100 MB and the Batch Aggregation Time Window parameter to a value larger than 1 hour. Examples for the Batch Aggregation Object Size parameter: 128 MB and 512 MB. Examples for the Batch Aggregation Time Window parameter: 60 minutes and 120 minutes.
5
Batch Aggregation Time Window
The time window for aggregation. Valid values: 1 to 1440. Unit: minutes.
1
File Compression
No Compression Required: generates objects with no suffixes.
GZIP: generates objects with the .gz suffix.
Snappy: generates objects with the .snappy suffix.
Zstd: generates objects with the .zstd suffix.
If objects are to be compressed, the OSS sink connector writes data in batches based on the data size before compression. As a result, the object size displayed in OSS is smaller than the batch size. After the object is decompressed, the object size is close to the batch size.
No Compression Required
File Content
Complete Data: The connector uses the CloudEvents specification to package the original messages. If you select this value, the routed data to OSS includes the metadata in the CloudEvents specification. The following sample code provides an example. In the sample code, the data field specifies the data and other fields specify the metadata in the CloudEvents specification.
{
  "specversion": "1.0",
  "id": "8e215af8-ca18-4249-8645-f96c1026****",
  "source": "acs:alikafka",
  "type": "alikafka:Topic:Message",
  "subject": "acs:alikafka:alikafka_pre-cn-i7m2msb9****:topic:****",
  "datacontenttype": "application/json; charset=utf-8",
  "time": "2022-06-23T02:49:51.589Z",
  "aliyunaccountid": "182572506381****",
  "data": {
    "topic": "****",
    "partition": 7,
    "offset": 25,
    "timestamp": 1655952591589,
    "headers": {
      "headers": [],
      "isReadOnly": false
    },
    "key": "keytest",
    "value": "hello kafka msg"
  }
}
Data Extraction: data extracted by using JSONPath is routed to OSS. For example, if you configure the $.data expression, only the value of the data field is routed to OSS.
If you do not require additional fields in the CloudEvents specification, we recommend that you select Partial Event and configure the $.data expression to route the original messages to OSS. This helps reduce costs and improve transmission efficiency.
Data Extraction
$.data
Task Property
Configure the retry policy that you want to use when events fail to be pushed and the method that you want to use to handle faults. For more information, see Retry policies and dead-letter queues.
Go back to the Tasks page, find the OSS sink connector that you created, and then click Enable in the Actions column.
In the Note message, click OK.
The connector requires 30 to 60 seconds to be enabled. You can view the progress in the Status column on the Tasks page.
Step 3: Test the OSS sink connector
On the Tasks page, find the OSS sink connector that you created and click the source topic in the Event Source column.
- On the Topic Details page, click Send Message.
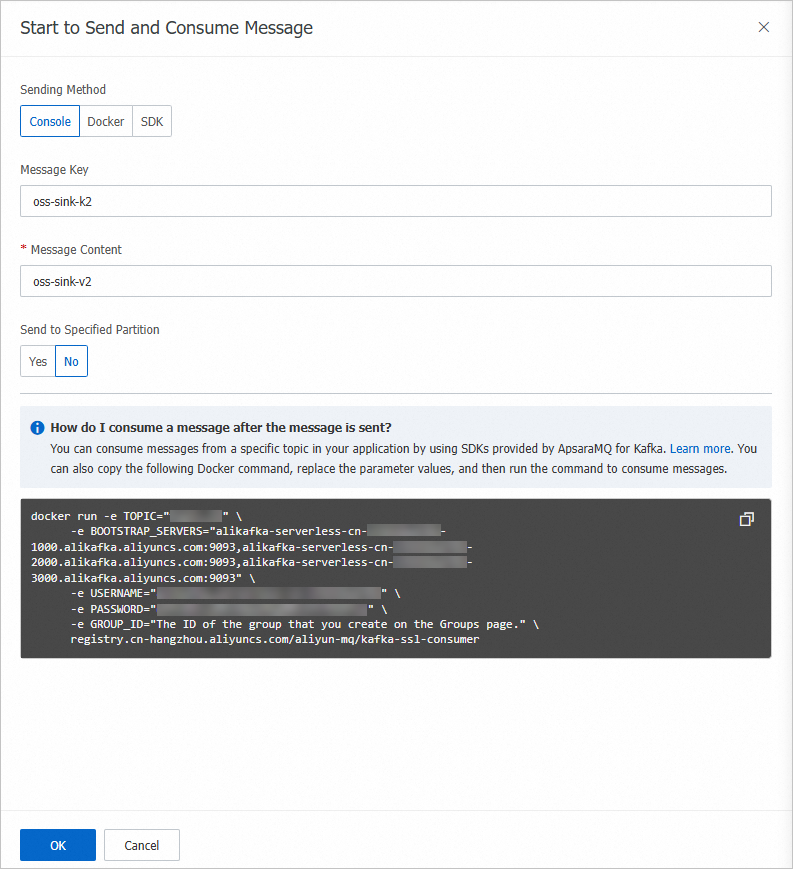
In the Start to Send and Consume Message panel, configure the parameters based on the following figure and click OK.

On the Tasks page, find the OSS sink connector that you created and click the destination bucket in the Event Target column.
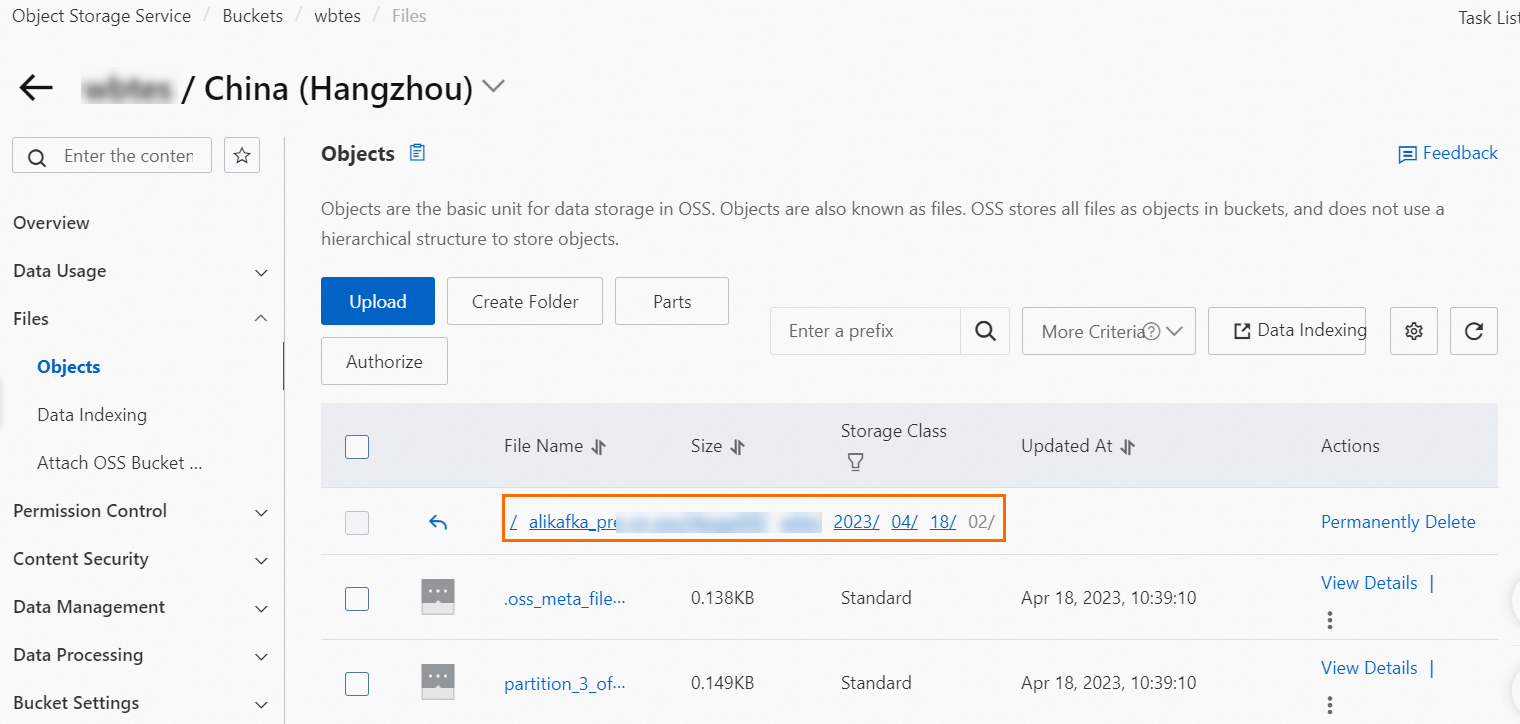
In the left-side navigation pane of the page that appears, choose .
/tmp directory: the system file path on which the connector depends. Do not delete or use the OSS objects in this path.
Data file directory: Subdirectories are generated in this directory based on the path that you configured for the connector. Data objects are uploaded to the deepest directory.

Find the object that you want to manage and choose in the Actions column.
Open the downloaded object to view the details of the messages.

The preceding figure provides an example of message details. Multiple messages are separated with line feeds.