This topic describes how to create an AnalyticDB sink connector to synchronize data from a source topic in an ApsaraMQ for Kafka instance to a table in AnalyticDB.
Prerequisites
For information about the prerequisites, see Prerequisites.
Step 1: Create AnalyticDB resources
Create AnalyticDB for MySQL or AnalyticDB for PostgreSQL resources.
If you want to export data to an AnalyticDB for MySQL table, you must create a cluster, a database account, and a database, and connect to the cluster in the AnalyticDB for MySQL console. For more information, see Create a cluster, Create a database account, Connect to an AnalyticDB for MySQL cluster, and Create a database.
If you want to export data to an AnalyticDB for PostgreSQL table, you must create an instance and a database account, and connect to the database in the AnalyticDB for PostgreSQL console. For more information, see Create an instance, Create and manage a database account, and Client connection.
In this topic, an AnalyticDB for MySQL database named adb_sink_database and a data table named adb_sink_table are created.
Step 2: Create and start an AnalyticDB sink connector
Log on to the ApsaraMQ for Kafka console. In the Resource Distribution section of the Overview page, select the region where the ApsaraMQ for Kafka instance that you want to manage resides.
In the left-side navigation pane, choose .
On the Tasks page, click Create Task.
Task Creation
In the Source step, set the Data Provider parameter to ApsaraMQ for Kafka and follow the on-screen instructions to configure other parameters. Then, click Next Step. The following table describes the parameters.
Parameter
Description
Example
Region
The region where the ApsaraMQ for Kafka instance resides.
China (Beijing)
ApsaraMQ for Kafka Instance
The ApsaraMQ for Kafka instance in which the messages that you want to route are produced.
MQ_INST_115964845466****_ByBeUp3p
Topic
The topic on the ApsaraMQ for Kafka instance in which the messages that you want to route are produced.
topic
Group ID
The name of the consumer group on the ApsaraMQ for Kafka instance. You must use a separate consumer group to create the message routing source. Do not use a consumer group that is in use. Otherwise, existing messages may fail to be sent and received.
GID_http_1
Consumer Offset
The offset from which messages are consumed.
Latest Offset
Network Configuration
The type of the network over which you want to route messages.
Basic Network
VPC
The ID of the virtual private cloud (VPC) in which the ApsaraMQ for Kafka instance is deployed. This parameter is required only if you set the Network Configuration parameter to Self-managed Internet.
vpc-bp17fapfdj0dwzjkd****
vSwitch
The ID of the vSwitch with which the ApsaraMQ for Kafka instance is associated. This parameter is required only if you set the Network Configuration parameter to Self-managed Internet.
vsw-bp1gbjhj53hdjdkg****
Security Group
The security group to which the ApsaraMQ for Kafka instance belongs. This parameter is required only if you set the Network Configuration parameter to Self-managed Internet.
alikafka_pre-cn-7mz2****
Messages
The maximum number of messages that can be sent in each function invocation. Requests are sent only when the number of messages in the backlog reaches the specified value. Valid values: 1 to 10000.
100
Interval (Unit: Seconds)
The time interval at which the function is invoked. The system sends the aggregated messages to Function Compute at the specified time interval. Valid values: 0 to 15. Unit: seconds. The value 0 specifies that messages are sent immediately after aggregation.
3
In the Filtering step, define a data pattern in the Pattern Content code editor to filter requests. For more information, see Event patterns.
In the Transformation step, specify a data cleansing method to implement data processing capabilities such as splitting, mapping, enrichment, and dynamic routing. For more information, see Data cleansing.
In the Sink step, set the Service Type parameter to AnalyticDB and follow the on-screen instructions to configure other parameters. Then, click Save. The following table describes the parameters.
Parameter
Description
Example
Instance Type
The type of the instance that you created. In this example, AnalyticDB for MySQL is selected. Valid values:
AnalyticDB for MySQL
AnalyticDB for PostgreSQL
AnalyticDB for MySQL
AnalyticDB Instance ID
The ID of the AnalyticDB for MySQL instance that you created.
gp-bp10uo5n536wd****
Database Name
The name of the database that you created.
adb_sink_database
Table Name
The name of the table that you created.
adb_sink_table
Data Mapping
The format of the data that is forwarded from ApsaraMQ for Kafka to AnalyticDB. You can specify the value extraction rule in the database table by using JSONPath rules. If you set the Data Format parameter to Json in the Source step, the format of data forwarded from ApsaraMQ for Kafka is as shown in the following code:
{
    "data": {
        "topic": "demo-topic",
        "partition": 0,
        "offset": 2,
        "timestamp": 1739756629123,
        "headers": {
            "headers": [],
            "isReadOnly": false
        },
        "key":"adb-sink-k1",
        "value": {
            "userid":"xiaoming",
            "source":"shanghai"
        }
    },
    "id": "7702ca16-f944-4b08-***-***-0-2",
    "source": "acs:alikafka",
    "specversion": "1.0",
    "type": "alikafka:Topic:Message",
    "datacontenttype": "application/json; charset=utf-8",
    "time": "2025-02-17T01:43:49.123Z",
    "subject": "acs:alikafka:alikafka_serverless-cn-lf6418u6701:topic:demo-topic",
    "aliyunaccountid": "1******6789"
}
Specify the JSONPath rule based on the column name of the table. For example, if the column name of the table is userid, specify
$.data.value.useridas the value extraction rule.Database Username
The username used to access the database account.
user
Database Password
The password used to access the database account.
******
Network Settings
VPC: Messages in ApsaraMQ for Kafka are delivered to AnalyticDB in a virtual private cloud (VPC).
Internet: Messages in ApsaraMQ for Kafka are delivered to AnalyticDB over the Internet.
VPC
VPC
The ID of the VPC. This parameter is required only if you set the Network Settings parameter to VPC.
vpc-bp17fapfdj0dwzjkd****
vSwitch
The ID of the vSwitch. This parameter is required only if you set the Network Settings parameter to VPC.
ImportantAfter you select a vSwitch, you must add the CIDR block to which the vSwitch belongs to the IP address whitelist of the AnalyticDB for MySQL instance. For more information, see IP address whitelists.
vsw-bp1gbjhj53hdjdkg****
Security Group
The ID of the security group. This parameter is required only if you set the Network Settings parameter to VPC.
test_group
Go back to the Tasks page, find the OSS sink connector that you created, and then click Enable in the Actions column.
In the Note message, click OK.
The connector requires 30 to 60 seconds to be enabled. You can view the progress in the Status column on the Tasks page.
Step 3: Test the AnalyticDB sink connector
On the Tasks page, find the AnalyticDB sink connector that you created and click the name of the source topic in the Event Source column.
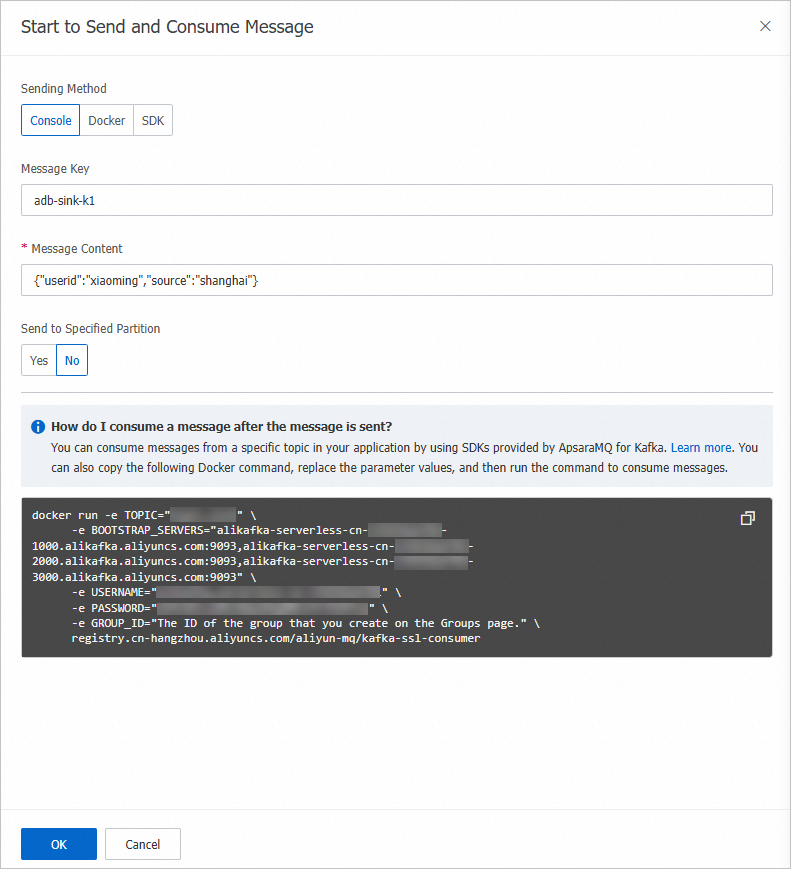
- On the Topic Details page, click Send Message.
In the Start to Send and Consume Message panel, configure the parameters based on the following figure and click OK.
NoteIn this example, the message content is a JSON string that contains all columns of the created data table. The system writes the values of the fields that have the same names as the columns in the data table to the corresponding columns.
On the Tasks page, find the AnalyticDB sink connector that you created and click the name of the destination instance in the Event Target column.
In the upper-right corner of the Basic Information page, click Log on to Database.
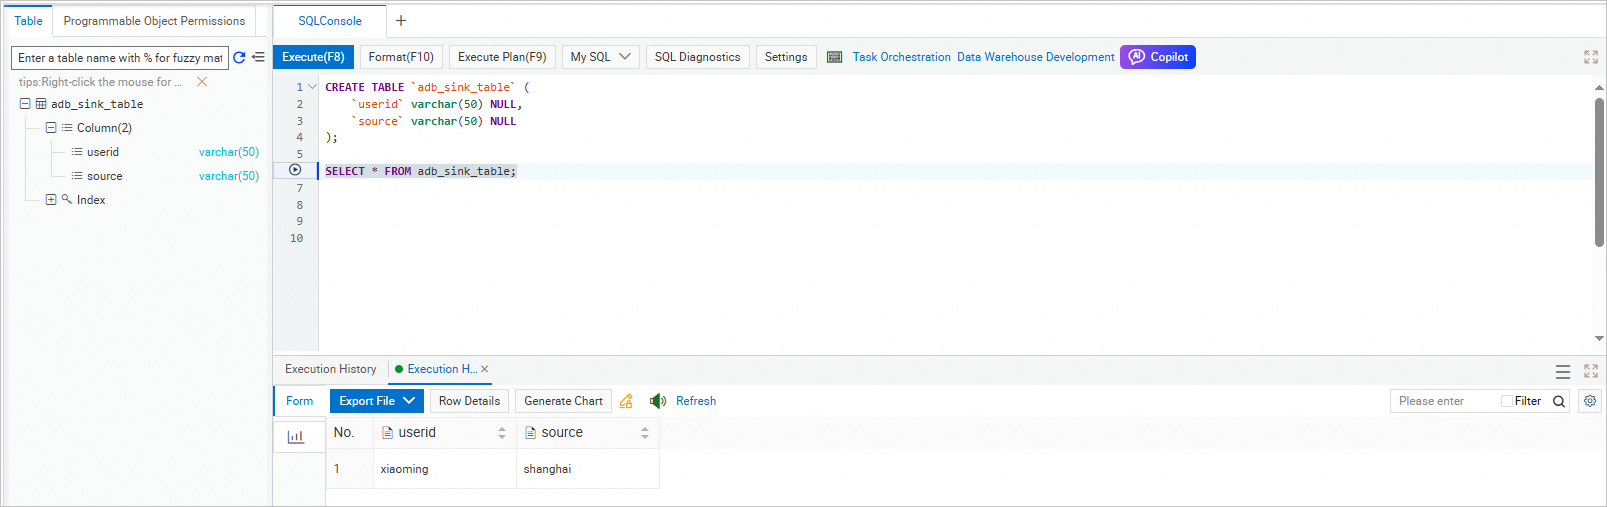
In the Data Management (DMS) console, execute the following statement to query all data in the table:
SELECT * FROM adb_sink_table;The following figure shows the query result.