Filebeat supports Apache Kafka as an input type, allowing you to consume messages directly from an ApsaraMQ for Kafka instance in a Virtual Private Cloud (VPC). This tutorial covers endpoint retrieval, topic and consumer group setup, Filebeat configuration, and message consumption verification.
Before you begin
Before you begin, make sure that you have:
An ApsaraMQ for Kafka instance deployed in a VPC. This tutorial uses a non-serverless instance. See Deploy a VPC-connected instance
Filebeat installed on a server in the same VPC. See Download Filebeat
JDK 8 installed. See Download JDK 8
Step 1: Get the VPC endpoint
Filebeat connects to an ApsaraMQ for Kafka instance through the instance's VPC endpoint.
Log on to the ApsaraMQ for Kafka console.
In the Resource Distribution section of the Overview page, select the region where your instance resides.
On the Instances page, click the instance name.
On the Instance Details page, find the Endpoint Information section and note the VPC endpoint. If you plan to use SASL authentication, also note the Username and Password values in the Configuration Information section.
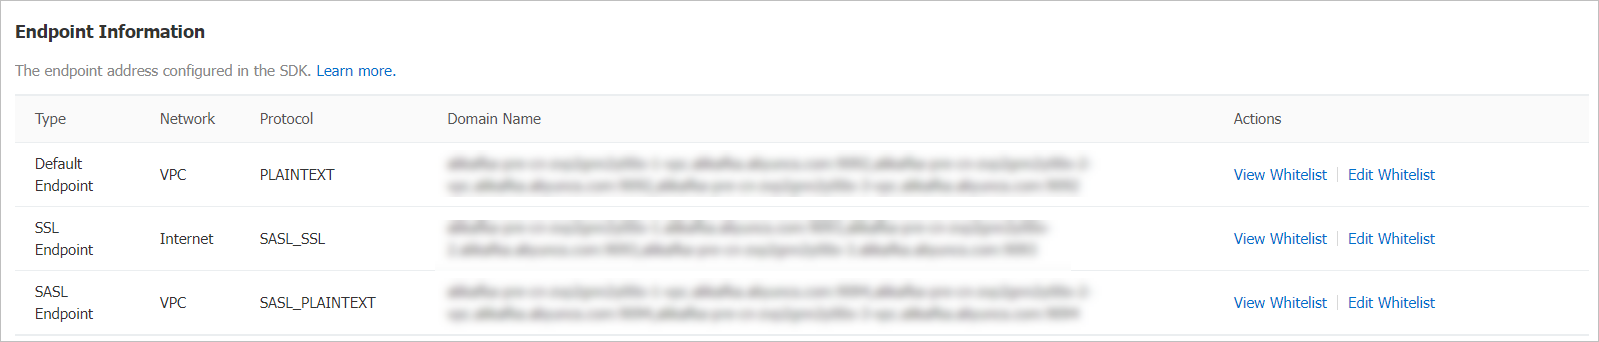
ApsaraMQ for Kafka supports multiple endpoint types. For differences between them, see Comparison among endpoints.
Step 2: Create a topic
Create a topic to hold the messages that Filebeat will consume.
In the ApsaraMQ for Kafka console, open your instance and click Topics in the left-side navigation pane.
Click Create Topic.
In the Create Topic panel, configure the following parameters and click OK.
| Parameter | Description | Example |
|---|---|---|
| Name | The topic name. | demo |
| Description | A brief description of the topic. | demo test |
| Partitions | The number of partitions. | 12 |
| Storage Engine | The storage engine type. Cloud Storage uses Alibaba Cloud disks with three-replica distributed storage for low latency and high durability. Local Storage uses the in-sync replicas (ISR) algorithm of open-source Apache Kafka. If you use a Standard (High Write) instance, only Cloud Storage is available. This parameter is configurable only for non-serverless Professional Edition instances. For other instance types, Cloud Storage is selected by default. | Cloud Storage |
| Message Type | Normal Message: messages with the same key go to the same partition in send order, but order may not be preserved during a broker failure. Auto-selected when you choose Cloud Storage. Partitionally Ordered Message: same-key ordering is preserved even during broker failures, though some partitions become temporarily unavailable. Auto-selected when you choose Local Storage. | Normal Message |
| Log Cleanup Policy | Available only for Local Storage on Professional Edition instances. Delete (default): retains messages until max retention, then deletes the oldest when storage exceeds 85%. Compact: keeps only the latest value for each key, used by components like Kafka Connect and Confluent Schema Registry. You can use log-compacted topics only in specific cloud-native components, such as Kafka Connect and Confluent Schema Registry. For more information, see aliware-kafka-demos. | Compact |
| Tag | Tags to attach to the topic. | demo |
Create the topic in the same region as your Elastic Compute Service (ECS) instance. Topics cannot be used across regions.
Step 3: Send test messages
Send messages to the topic to verify that Filebeat can consume them.
In the ApsaraMQ for Kafka console, open your instance and click Topics in the left-side navigation pane.
Click the topic name, then click Send Message in the upper-right corner of the Topic Details page.
In the Start to Send and Consume Message panel, choose a sending method:
Console: Enter a Message Key (for example,
demo) and Message Content (for example,{"key": "test"}). Optionally, enable Send to Specified Partition and enter a Partition ID. For information about how to query partition IDs, see View partition status.Docker: Run the Docker commands displayed in the panel to produce and consume test messages.
SDK: Select a programming language and access method, then follow the on-screen instructions.
Step 4: Create a consumer group
Create a consumer group that Filebeat uses to track its consumer offset.
In the ApsaraMQ for Kafka console, open your instance and click Groups in the left-side navigation pane.
Click Create Group.
Enter a Group ID and Description, optionally attach tags, and click OK.
Step 5: Configure and run Filebeat
On the server where Filebeat is installed, go to the Filebeat installation directory.
Create a configuration file named
input.yml:
filebeat.inputs:
- type: kafka
  hosts:
    - <broker-1-vpc-endpoint>:9092
    - <broker-2-vpc-endpoint>:9092
    - <broker-3-vpc-endpoint>:9092
  topics: ["<your-topic>"]
  group_id: "<your-group-id>"

output.console:
  pretty: true
Replace the following placeholders with your actual values:
| Placeholder | Description | Example |
|---|---|---|
<broker-N-vpc-endpoint> | Broker addresses from the VPC endpoint in Step 1 | alikafka-pre-cn-zv\*\*\*\*-1-vpc.alikafka.aliyuncs.com |
<your-topic> | The topic name created in Step 2 | filebeat_test |
<your-group-id> | The Group ID created in Step 4 | filebeat_group |
For the full list of parameters, see Kafka input plugin in the Filebeat documentation.
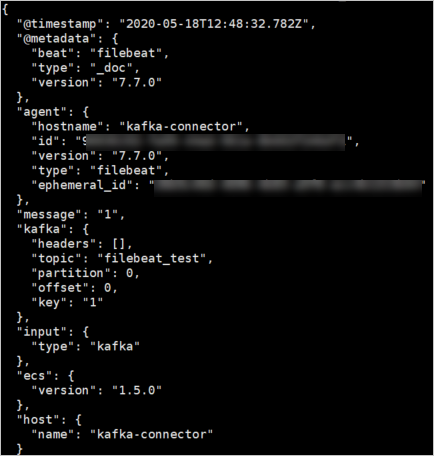
Run Filebeat with the configuration file:
./filebeat -c ./input.ymlConsumed messages appear in the console in JSON format:
What's next
To write consumed messages to Elasticsearch instead of the console, configure the
output.elasticsearchsection ininput.yml. See Elasticsearch output.To monitor consumer group lag, see View consumer group status.